- Как задать или изменить приоритет процесса в Linux?
- Что такое приоритет процесса?
- Как узнать приоритет процесса?
- С помощью команды top (все запущенные процессы)
- С помощью команды ps (конкретный процесс(ы) по его имени)
- С помощью команды ps (конкретный процесс по его PID)
- Задание приоритета при запуске процесса
- Изменение приоритета у существующего процесса
- Linux commands: How to manipulate process priority
- Great Linux resources
- Process priority and relativity
- Priority report
- Manipulating existing niceness
- One last thing
Как задать или изменить приоритет процесса в Linux?

В некоторых ситуациях может возникнуть необходимость запускать скрипт/программу не со стандартным приоритетом, а с более высоким или низким, либо повысить или понизить приоритет у запущенного ранее процесса. В данной статье мы рассмотрим несколько способов, как можно это с делать.
Что такое приоритет процесса?
Приоритет процесса определяет, как часто именно этот процесс, по сравнению с другими запущенными процессами, стоящими в очереди на выполнение, будет исполняться процессором. В ОС Linux значение приоритета процесса варьируется в диапазоне значений от -20 до 19 (т.е. получается 40 возможных значений: -20, -19, -18 . 0, 1, 2 . 19) и называется niceness (сокращенно NI). Чем меньше это значение, тем выше приоритет будет у такого процесса. Например, если у нас есть один процесс, работающий с приоритетом 10, а другой процесс работающий с приоритетом 15, то в первую очередь будет выполняться процесс приоритетом 10, а уже после него, тот, где приоритет 15. А в ситуации, когда есть 2 процесса и у одного из них приоритет будет равен -20, а у другого равен 10, то в первую очередь процессор будет обрабатывать тот процесс, у которого приоритет равен -20, а уже после тот, у которого приоритет равен 10.
Как узнать приоритет процесса?
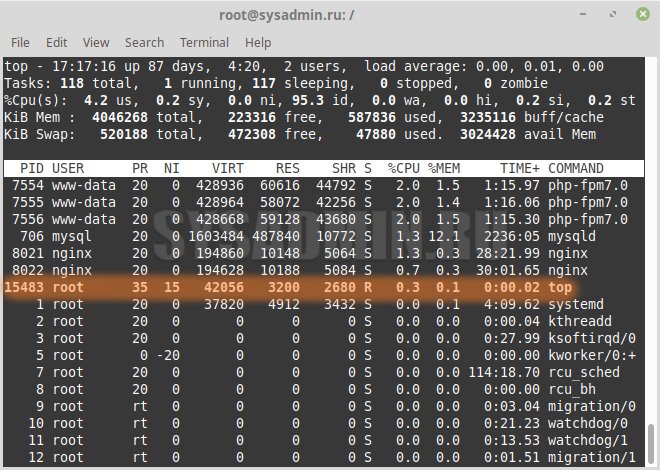
С помощью команды top (все запущенные процессы)

Посмотреть приоритет процесса можно с помощью команды top
С помощью команды ps (конкретный процесс(ы) по его имени)
ps -o pid,comm,nice -C mysqld PID COMMAND NI 706 mysqld 0С помощью команды ps (конкретный процесс по его PID)
ps -o pid,comm,nice 706 PID COMMAND NI 706 mysqld 0Задание приоритета при запуске процесса
Для того, чтобы задать приоритет при старте нового процесса, необходимо воспользоваться командой nice
nice -n [значение приоритета] [команда]
Запустить утилиту top с приоритетом 15:
Изменение приоритета у существующего процесса
Для того, чтобы изменить приоритет у существующего процесса (т.е. такого процесса, который ранее был уже запущен), необходимо воспользоваться командой renice
renice [значение приоритета] -p [id процесса]
При понижении приоритета у процесса, который является вашим (т.е. запущен под той же учетной записью, под которой вы работаете в системе) — права суперпользователя не требуются, НО при повышении приоритета у процесса, требуется запускать команду renice с правами суперпользователя, т.е. с помощью sudo renice.
В противном случае, вы будете получать ошибку примерно такого содержания:
sudo renice 0 -p 15483 15483 (process ID) old priority 15, new priority 0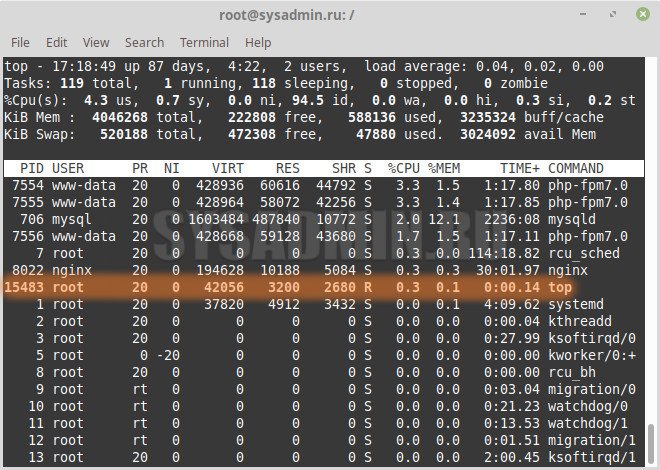
Мы изменили приоритет у существующего процесса (команда top из предыдущего примера) с 15 на 0.
Linux commands: How to manipulate process priority

Managing processes in Linux is a fundamental concept that every good system administrator should be familiar with. A majority of the work you do with these processes consists of basic, repetitive tasks such as starting and stopping processes, searching for them, killing them, etc.
Great Linux resources
In some less frequent cases, you may need to re-order your processes due to system resource allocation. When these situations arise, many of us will take to our favorite search engine to figure out the most efficient way to do this. Now that the search algorithm has brought you here to Enable Sysadmin, let’s serve up the answers you are looking for.
I will break down how priority is determined and then show you how to manipulate those values below.
Process priority and relativity
Linux systems routinely run more processes than there are processing units in the computer. Because of this, the process scheduler will quickly jump between processes on a single core, thus creating the illusion that we are running multiple, simultaneous processes.
In reality, each process is assigned a process scheduling policy. Within this policy, there is a 40 point scale used to measure the nice levels of a process. The nice level is a unit of measure that describes the relative priority of the process. When discussing niceness levels, note that the scale is -20 (highest priority) to 19 (lowest priority), and that a process inherits its nice level from the parent (most often 0).
Now, if a process has a lower niceness level (sub-zero), then it will be less likely to give up its CPU usage (not very nice, is it?). On the flip side, a process with a high niceness value (exceeding zero) will be more likely to give up CPU usage.
An easy way to remember this is if someone (or a process) is really nice, they are more inclined to share with others. If they are not very nice, they tend to be more protective over what belongs to them (CPU resources, in this case).
Also, if there is no shortage of resources, even processes with high niceness levels will use all available CPU time. The only time a process will yield its resources is when there is a bandwidth shortage.
Priority report
Now that we have all of the context surrounding process priority, let’s look at some of the ways to view this information at the terminal.
The quickest, most basic way to view niceness information is to use the top command. It displays this information by default in the fourth column (left to right) and therefore doesn’t require any additional options or flags.
The other and slightly more involved method is to use the ps command with a generous helping of formatting options. The following command will display processes with their process IDs, name, niceness level, and scheduling class (sorted descending):
[tcarrigan@localhost ~]$ ps axo pid,comm,nice,cls --sort=-niceManipulating existing niceness
We now know how to view an existing process’s niceness, but what if that nice level doesn’t suit our needs? How can we change those values to get the most out of our system? Well, if you have a particular process that is eating up resources that you need elsewhere, you can lower the nice level of that specific process. To do this, we will use the renice command.
Note: only the root user may reduce a niceness level (increase priority). Unprivileged users may increase nice levels but cannot decrease them without root permissions.
Take a look at this sleep 500 process. It has a PID of 23990 and a default nice level of 0.
[tcarrigan@localhost ~]$ ps -o pid,comm,nice 23990 PID COMMAND NI 23990 sleep 0If I wanted to make that process less of a priority, I would use the following renice command:
To make the process more important (lowering the nice level), you would use the same command syntax as a privileged user.
One last thing
Okay, before we wrap up, there is one more trick I wanted to include here. If you are going to start a process that usually has a default nice level that is undesirable, you can actually set that parameter as you spawn the process. We will use the sleep command again. However, this time, we will create it with the nice command (which defaults the process to nice level 10).
You can set a specific nice level by using the same command with the following syntax:
[tcarrigan@localhost ~]$ nice -n 19 sleep 500 &The above command sets the background sleep 500 to a nice level of 19.
These commands were a ton of fun to learn and show off. In the future, when I run into issues with system resources or hungry processes, I can modify the resources allocated to them.