- Установка и настройка выделенного сервера Valheim на Ubuntu 20.04
- Настройка портов
- Подготовка операционной системы
- Настройка часового пояса
- Установка обновлений
- Установка Valheim Server
- Настройка сервера Valheim
- Настройка запуска сервера
- Бэкапирование
- Уведомления о действиях на сервере
- Команды сервера
- Полезные ссылки
- Valheim Dedicated Server
- Automated Setup [ ]
- Docker [ ]
- Automated Installation via AMP [ ]
- Manual Setup [ ]
- Step 1: Download the Server files [ ]
- Windows [ ]
- Linux [ ]
- Step 2: Setting up a Valheim Dedicated Server [ ]
- Windows [ ]
- Linux [ ]
- Step 3: Port Forwarding / Remote Access [ ]
- Location of World Save Data [ ]
- Location of Server Log Files [ ]
- Linux [ ]
- Valheim выделенный сервер linux
Установка и настройка выделенного сервера Valheim на Ubuntu 20.04
Простейшая инструкция по установке игрового сервера Valheim на Ubuntu 20.04 + полезная информация по теме.
Настройка портов
Должны быть открыты порты по UDP:
При использовании UFW (Uncomplicated Firewall) делаем так:
sudo ufw allow 2456/udp sudo ufw allow 2457/udp sudo ufw allow 2458/udp sudo ufw allow 27060/udp Подготовка операционной системы
Некоторые шаги для общей настройки сервера.
Настройка часового пояса
Первым делом проверяем текущую дату и время, а также часовой пояс на сервере.
При необходимости меняем часовой пояс, чтобы он больше подходил для клиентов сервера.
sudo timedatectl set-timezone Europe/Moscow Список всех доступных часовых поясов смотрим здесь так.
timedatectl list-timezones Установка обновлений
Тут все стандартно. Проверяем наличие обновлений пакетов и устанавливаем обновления.
sudo apt update sudo apt upgrade Установка Valheim Server
Для установки воспользуемся проектом LinuxGSM. Сначала нам нужно установить все необходимые компоненты.
sudo dpkg --add-architecture i386; sudo apt update; sudo apt install curl wget file tar bzip2 gzip unzip bsdmainutils python util-linux ca-certificates binutils bc jq tmux netcat lib32gcc1 lib32stdc++6 steamcmd sudo apt remove --purge nodejs npm curl -sL https://deb.nodesource.com/setup_12.x | sudo -E bash - sudo apt update && sudo apt install -y nodejs npm install gamedig -g sudo npm install gamedig -g sudo npm update -g sudo npm list -g gamedig Переходим в каталог пользователя, от которого будет работать сервер, и создаем каталог для файлов приложения.
cd /home/ mkdir linuxgsm cd linuxgsm После этого запускаем непосредственно установку сервера Valheim.
wget -O linuxgsm.sh https://linuxgsm.sh && chmod +x linuxgsm.sh && bash linuxgsm.sh vhserver ./vhserver install Настройка сервера Valheim
Переходим в каталог с файлами конфигурации сервера.
cd ~/lgsm/config-lgsm/vhserver ls Делаем бэкап текущего файла конфигурации и заменяем конфигурацию стандартной.
mv common.cfg common.cfg.old cp _default.cfg common.cfg Далее открываем файл конфигурации в любимом редакторе и меняем его под себя.
Настройки, которые нужно поменять в первую очередь:
- servername — имя сервера.
- serverpassword — пароль для входа на сервер.
- port — порт сервера. По умолчанию 2456.
- gameworld — имя игрового мира. По умолчанию совпадает с именем сервера.
- public — поставить 1, если сервер должен быть виден сообществу.
И некоторые необязательные настройки:
- stats — позволить собирать статистику использования проекту LinuxGSM.
- updateonstart — обновление сервера при старте. Рекомендую включить.
- Alert settings — настройка уведомлений о событиях сервера, в т.ч. в Телеграм. Смотрите официальную документацию по каждому каналу доставки сообщений.
Также обратить внимание на настройки бэкапирования. Подробная информация в официальной документации.
Настройка запуска сервера
Для автоматического запуска игрового сервера воспользуемся возможностями systemd.
sudo mcedit /etc/systemd/system/vhserver.service Файл должен иметь примерно такое содержимое (поправьте пути к файлам искриптам).
[Unit] Description=LinuxGSM Valheim Server After=network-online.target Wants=network-online.target [Service] Type=forking User= WorkingDirectory=/home//linuxgsm RemainAfterExit=yes ExecStart=/home//linuxgsm/vhserver start ExecStop=/home//linuxgsm/vhserver stop Restart=no [Install] WantedBy=multi-user.target Замените нужным значением, т.е. именем пользователя, от которого будет работать игровой сервер.
После этого обновляем настройки systemd и включаем службу.
sudo systemctl daemon-reload sudo systemctl enable vhserver.service Теперь сервер запускается автоматически!
Бэкапирование
Для выполнения бэкапа сервера достаточно выполнить команду.
/home/user/linuxgsm/vhserver backup Сервер будет остановлен и все файлы будут сохранены в архив по адресу “/home/
Есть нюанс! По умолчанию файлы игрокового мира находятся вне каталога сервера Valheim. Если сам сервер мы установили в “/home/user/linuxgsm”, то файлы игрового мира находятся в “/home/user/.config/unity3d/IronGate/Valheim/worlds”.
Рекомендую остановить сервер, переместить каталог “/home/user/.config/unity3d” в “/home/user/linuxgsm/unity3d”, а в файле “/home/user/linuxgsm/lgsm/config-lgsm/vhserver/common.cfg” изменить параметр “savedir” на новое значение.
После запустить сервер. Тогда бэкап игрового сервера будет включать и файлы игрового мира.
Уведомления о действиях на сервере
Можно настроить уведомления в Telegram-канал о действиях на сервере:
- Вход/выход пользователя на сервер
- Респаун игроков
- Смерть игроков
- Событие общего сна на сервере, когда ночное время пропускается.
- Случайные события.
- Запуск сервера
- Остановка сервера
Для этого воспользуйтесь проектом valheim-notify от Whiskey24.
Команды сервера
Только администраторы сервера могут запускать эти команды.
| Command | Args | Description |
|---|---|---|
| help | Список всех доступных команд | |
| kick | name/ip/userID | Отключить пользователя |
| ban | name/ip/userID | Забанить пользователя |
| unban | /ip/userID | Отменить бан пользователя |
| banned | Список забаненых пользователей | |
| ping | Проверить пинг сервера для диагностики задержек | |
| info | Системная информация |
Полезные ссылки
- Building a Dedicated Valheim Server on Ubuntu Server 20.04 — самая подробная инструкция по настройке выделенного сервера Valheim.
- Valheim server commands list — список команд сервера.
- Valheim Dedicated Server Setup on Ubuntu 20.04.1 LTS — еще одна краткая инструкция по настройке выделенного сервера Valheim.
Copyright © Permitin Yuriy 2022
Valheim Dedicated Server
Note: Server performance depends on your initial setup, distro/os selection and whether you use mods. Modded Valheim Servers will require better hardware. The recommended settings will cover most instances.
Automated Setup [ ]
Docker [ ]
If your server is running Docker, you can find community images on Docker Hub. At the time there is no offical docker image for Valheim dedicated server available.
- Auto update
- Auto backup
- ValheimPlus support
- BepInEx support
- Event hooks
- Extensive logging
- Auto update
- Auto backup
- ValheimPlus support
- BepInEx support
- Event hooks
Automated Installation via AMP [ ]
AMP is a popular game server management panel you can run on your own PC/server that supports Valheim and makes it easier to get the server going from its web interface. You can run it on both Windows and Linux. See the Video Tutorial on YouTube. AMP is commercial software, starting at approximately $10 USD as a one-time cost for up to 5 game server instances and free lifetime updates.
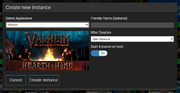
Once you have AMP itself up and running (Tutorial and Guide), click «Create Instance» and then select «Valheim» from the list of games. Once you’ve done that, select «Create Instance».
After that, double click the new Valheim instance to manage it and select «Update» from the status screen. This will download the Valheim server and required files.
Once the download is complete you can hit Start and after a few moments the server will start up. Once the startup has completed you can connect as normal.
Manual Setup [ ]
Step 1: Download the Server files [ ]
Windows [ ]
- Create a folder where you wish to install your Valheim dedicated server
- Download SteamCMD into that folder
- Create a batch file named InstallUpdate.bat
- Place the following code in this batch file:
@echo off steamcmd.exe +force_install_dir "C:\Your\Valheim\Folder" +login anonymous +app_update 896660 -beta none validate +quit
Linux [ ]
- Create a folder where you wish to install your Valheim dedicated server
- Install SteamCMD
- Create a Valheim install and validate script named InstallUpdate.sh
- Place the following code in this script (make sure you edit the path)
#!/bin/sh steamcmd +@sSteamCmdForcePlatformType linux +force_install_dir /path/to/server +login anonymous +app_update 896660 -beta none validate +quit
sudo chmod +x /path/to/script
Step 2: Setting up a Valheim Dedicated Server [ ]
Windows [ ]
- Create a batch file named StartServer.bat in your Valheim server folder from Step 1
- Place the following code in this batch file:
@echo off set SteamAppId=892970 echo "Starting server PRESS CTRL-C to exit" valheim_server.exe -nographics -batchmode -name "YourWorldName" -port 2456 -world "YourWorldFilename" -password "YourPassword" -public 1
Linux [ ]
- Create a script named valheim.sh in your Valheim install directory
- Place the following code in this script
#!/bin/sh export templdpath=$LD_LIBRARY_PATH export LD_LIBRARY_PATH=./linux64:$LD_LIBRARY_PATH export SteamAppID=892970 echo "Starting server PRESS CTRL-C to exit" ./valheim_server.x86_64 -name "" -port 2456 -nographics -batchmode -world "" -password " -public 1 export LD_LIBRARY_PATH=$templdpath
Step 3: Port Forwarding / Remote Access [ ]
Add an incoming rule to your Windows Firewall to allow UDP port (game port) 2456 , (Steam query port) 2457 .
You may additionally need to add a forwarding rule to your network router. You can use PortForward.com to read how to do this.
Location of World Save Data [ ]
To locate your save folder, navigate to this folder:
For linux, navigate to this directory:
- Dedicated.db (your map data)
- Dedicated.fwl (your identifier which includes your worldname and seed)
Location of Server Log Files [ ]
Linux [ ]
Connection logs are located under /home/your-username/.steam/logs
1. Connection logs for the valheim server are named connection_log_2456.txt 2456 is the port number your server is listening on ( 2456 is the default value)
Server logs require you to edit the valheim.sh -file (or whatever name you called your script to start the server) in order to be saved.
2. Open your valheim.sh -file in any text editor 3. On the line starting with ./valheim_server.x86_64 , append the following:
>> /tmp/valheim_log.txt /dev/null & Your file should now look something like this:
#!/bin/sh export templdpath=$LD_LIBRARY_PATH export LD_LIBRARY_PATH=./linux64:$LD_LIBRARY_PATH export SteamAppID=892970 echo "Starting server PRESS CTRL-C to exit" ./valheim_server.x86_64 -name "" -port 2456 -world "" -password " -public 1 >> /tmp/valheim_log.txt /dev/null & export LD_LIBRARY_PATH=$templdpath
- >> /tmp/valheim_log.txt tells the linux kernel to pipe anything received on stdout to this text file instead.
- < /dev/null & is used to instantly send EOF(End of File) to the program, so that it doesn't wait for input
- /dev/null , the null device, is a special file that discards all data written to it, but reports that the write operation succeeded, and provides no data to any process that reads from it, yielding EOF immediately.
- & is a special type of command separator used to background the preceding process. ref
Valheim выделенный сервер linux
Single installation script for setting up Valheim on a dedicated Linux server with steamcmd.
Tested on: AWS, Azure and DigitalOcean
OS — Ubuntu 18.06 LTS 64bit and Ubuntu 20.04 LTS
Recommended server settings: CPU: 4 (2 will work but meh) RAM: 8GB+ Harddrive: 250GB+
4
1
2
1
1
3
2
2
1
1
Never run any script on a production server, unless you know what you are doing.
Supports French, German, Spanish and English currently, more to come!Run as root(if brave enough) or sudo current user
How to update your Valheim Server
Added new Menu system for folks if you want to use that and not the script listed below.
- sudo apt install -y git net-tools
- cd /opt
- git clone https://github.com/Nimdy/Dedicated_Valheim_Server_Script.git
- cd Dedicated_Valheim_Server_Script
- sudo chmod +x njordmenu.sh
Launch the Njord Menu - sudo ./njordmenu.sh
7. Confirm you want to continue with the Valheim Install
8. Accept Default Action on Resolv Update. (Advanced users do what you wish)
9. Enter a Password for the newly created NONROOT local Steam account (This is not your Steam account, just a local account to run the Valheim Server)
10. Enter what you wish your Public Valheim Server display will be called
11. Enter your local world name. This is the name your map data files will be called and what your World is called for those who play in it.
12. Enter the password required to connect to your server. This is required.
13. Your information is now saved for you later. A lot of people seem to forget this, so we added a little reminder. Keep this safe.
14. That’s it for the install! Now you need to setup your firewall rules.
15. Now configure your firewalls to allow the game to connect. Click the wiki link listed below.
Allow ports 2456,2457,2458 (TCP/UDP) on your server. This might take you a while, if you never done it before. Don’t worry, members in my discord and myself can help troubleshoot later
**(DO NOT OVER LOOK THIS STEP)**


