- Saved searches
- Use saved searches to filter your results more quickly
- Pa1kumar1997/Wifijammer-Deauther
- Name already in use
- Sign In Required
- Launching GitHub Desktop
- Launching GitHub Desktop
- Launching Xcode
- Launching Visual Studio Code
- Latest commit
- Git stats
- Files
- README.md
- WiFi jammer с модулем ESP8266: прошивка и инструкция
- Модули
- Установка
- Первый вариант загрузки прошивки
- Второй вариант загрузки прошивки
Saved searches
Use saved searches to filter your results more quickly
You signed in with another tab or window. Reload to refresh your session. You signed out in another tab or window. Reload to refresh your session. You switched accounts on another tab or window. Reload to refresh your session.
Wifi Jammer code to Flash esp8266 Deauther
Pa1kumar1997/Wifijammer-Deauther
This commit does not belong to any branch on this repository, and may belong to a fork outside of the repository.
Name already in use
A tag already exists with the provided branch name. Many Git commands accept both tag and branch names, so creating this branch may cause unexpected behavior. Are you sure you want to create this branch?
Sign In Required
Please sign in to use Codespaces.
Launching GitHub Desktop
If nothing happens, download GitHub Desktop and try again.
Launching GitHub Desktop
If nothing happens, download GitHub Desktop and try again.
Launching Xcode
If nothing happens, download Xcode and try again.
Launching Visual Studio Code
Your codespace will open once ready.
There was a problem preparing your codespace, please try again.
Latest commit
Git stats
Files
Failed to load latest commit information.
README.md
Deauthentication attack and other exploits using an ESP8266!

Support me and my projects by purchasing one of the official deauther boards.
Or become my patron on patreon.com/spacehuhn.
What it is and how it works
This software allows you to perform a deauth attack with an ESP8266 against selected networks.
The ESP8266 is a cheap and easy to use Wi-Fi SoC (System-on-a-Chip), programmable with the Arduino IDE.
With this software flashed onto it, you can select a target network and start different attacks.
The deauth attack will, if the connection is vulnerable, disconnect the devices from the network. Because the attack is running constantly, the devices will be disconnected again and again. Depending on the network, that can either block a connection or slow it down.
The difference between deauthing and jamming: WiFi Jammers vs Deauthers | What’s The Difference?
Other attacks also have been implemented, such as beacon and probe request flooding.
The deauth attack works by exploiting an old and known vulnerability in the 802.11 Wi-Fi protocol.
Because these deauthentication frames, usually used to close a Wi-Fi connection safely, are unencrypted, it’s very easy to spoof them. You only need the mac address of the access point, which you can sniff easily.
If you don’t want to attack all connected devices, you can also scan for connections and attack them specifically.
How to protect yourself against it
With 802.11w-2009 the Wi-Fi protocol became encrypted management (and deauthentication) frames. This makes spoofing these packets way harder and the attack, in this form, ineffective. So make sure your router is up to date and has management frame protection enabled. Your client device (e.g your phone, notebook etc.) needs to support that too. Both ends of the connection need to use it!
The problem with that is, most routers use unencrypted managment frames by default, don’t provide any option to change that and don’t provide any information about this issue.
I tested several networks and couldn’t find one that wasn’t vulnerable!
I made a Deauth Detector using the same ESP8266 to indicate high amounts of deauth frames. It can’t protect you, but it can help you figure out if and when an attack is going on.
This project is a proof of concept for testing and educational purposes.
Neither the ESP8266, nor its SDK was meant or build for such purposes.
Bugs can occur!
Use it only against your own networks and devices!
I don’t take any responsibility for what you do with this program.
Please check the legal regulations in your country before using it.
It is not a frequency jammer as claimed falsely by many people. Its attack, how it works and how to protect against it is described above. It uses valid Wi-Fi frames described in the official 802.11 standard and doesn’t block or disrupt any frequencies.
My intention with this project is to draw more attention on this issue.
This attack shows how vulnerable the 802.11 Wi-Fi standard is and that it has to be fixed.
A solution is already there, why don’t we use it?
Please don’t refer to this project as «jammer», that totally undermines the real purpose of this project!
You can flash this software yourself onto any ESP8266, but if you would like to support me, you can get one of these cool boards that are made especially for this project and come with everything preinstalled!
You have 2 choices here. Uploading the .bin files is easier, but not as good for debugging.
YOU ONLY NEED TO DO ONE OF THE INSTALLATION METHODS!
0 Download the current release from releases
Always use the 1mb version, unless you’re sure that your ESP8266 only has 512kb flash memory.
Note: the 512kb version won’t have the full mac vendors list.
1 Upload using the ESP8266 flash tool of your choice:
— nodemcu-flasher [Windows only]
— esptool-gui [Windows, MacOS]
— esptool [Windows, MacOS, Linux]
Make sure your settings are correct for your board. Most boards come with 4mb flash and sometimes you have to hold the flash button down while plugging it in and hold it until the flashing process started.
Also make sure you select the right com-port, the right upload size (mostly 4mb) and the correct .bin file.
If it’s not working, you can try using the Arduino as descriped below.
Compiling the source with Arduino
0 Download the source code of this project.
1 Install Arduino and open it.
2 Go to File > Preferences
3 Add http://arduino.esp8266.com/stable/package_esp8266com_index.json to the Additional Boards Manager URLs. (source: https://github.com/esp8266/Arduino)
4 Go to Tools > Board > Boards Manager
5 Type in esp8266
6 Select version 2.0.0 and click on Install (must be version 2.0.0!)

7 Go to File > Preferences
8 Open the folder path under More preferences can be edited directly in the file

9 Go to packages > esp8266 > hardware > esp8266 > 2.0.0 > tools > sdk > include
10 Open user_interface.h with a text editor
11 Scroll down and before #endif add following lines:
typedef void (*freedom_outside_cb_t)(uint8 status); int wifi_register_send_pkt_freedom_cb(freedom_outside_cb_t cb); void wifi_unregister_send_pkt_freedom_cb(void); int wifi_send_pkt_freedom(uint8 *buf, int len, bool sys_seq); 
don’t forget to save!
12 Go to the SDK_fix folder of this project
13 Copy ESP8266Wi-Fi.cpp and ESP8266Wi-Fi.h
14 Paste these files here packages > esp8266 > hardware > esp8266 > 2.0.0 > libraries > ESP8266WiFi > src
15 Open esp8266_deauther > esp8266_deauther.ino in Arduino
16 Select your ESP8266 board at Tools > Board and the right port at Tools > Port
If no port shows up you may have to reinstall the drivers.
17 Depending on your board you may have to adjust the Tools > Board > Flash Frequency and the Tools > Board > Flash Size . I use a 160MHz flash frequency and a 4M (3M SPIFFS) flash size.
Note: If you use a 512kb version of the ESP8266, you will need to comment out a part of the mac vendor list in data.h. Otherwise it will use too much memory to fit on 512kb.
Your ESP8266 Deauther is now ready!

I included 2 extra .bin files for the display version on the release page.
One for the 0.96″ SSD1306 OLED and one for the 1.3″ SH1106 OLED.
| Display | ESP8266 |
|---|---|
| SDA | 5 (D1) |
| SCL | 4 (D2) |
| GND | GND |
| VCC | VCC (3.3V) |
The buttons have to be between following pins and GND:
| Button | ESP8266 |
|---|---|
| up | 12 (D6) |
| down | 13 (D7) |
| select | 14 (D5) |
If you use Arduino, you have will need to install this library: https://github.com/squix78/esp8266-oled-ssd1306.
Then you only need to uncomment //#define USE_DISPLAY in the beginning of the sketch.
Below that, you can customize the settings:
//create display(Adr, SDA-pin, SCL-pin) SSD1306 display(0x3c, 5, 4); //GPIO 5 = D1, GPIO 4 = D2 //SH1106 display(0x3c, 5, 4); //button pins #define upBtn 12 //GPIO 12 = D6 #define downBtn 13 //GPIO 13 = D7 #define selectBtn 14 //GPIO 14 = D5 #define displayBtn 0 //GPIO 0 = FLASH BUTTON First start your ESP8266 by plugging it in and giving it power.
Scan for Wi-Fi networks and connect to pwned . The password is deauther .
Once connected, you can open up your browser and go to 192.168.4.1 .

You can now scan for networks.
Note: While scanning the ESP8266 will shut down its access point, so you may have to go to your settings and reconnect to the Wi-Fi network manually!

. and start different attacks.
For more information please read the FAQ.
This software is licensed under the MIT License. See the license file for details.
Sources and additional links


packet injection with ESP8266:
WiFi jammer с модулем ESP8266: прошивка и инструкция
![]()
Сегодня мы поговорим о глушилке Wi-Fi сигнала WiFi jammer. Для начала давайте расскажу, что такое вай-фай джаммер — это устройство, которая способна заглушить WiFi сеть в небольшом диапазоне. При этом все устройство, которые ранее могли быть подключены к роутеру не могут с ним работать, пока «атакер» функционирует и работает.
Сами глушилки в своём понимании не новы. Они смогут заглушить нормальное функционирования беспроводной сети, а также в идеале глушит сотовую связь и даже некоторые дополнительные частоты и стандарты. Подобные устройства профессионального типа продаются в разных магазинах, но и стоят они не меньше 30 000 рублей. Сегодня мы поговорим о том, как можно сделать более бюджетную модель.
ВНИМАНИЕ! Портал WiFi-Гид не призывает пользоваться подобными устройствами. Статья была написана только для повышения информационной безопасности. Применение подобного устройства может караться законом. Особенно эта касается использования глушилки в частных компаниях. Смотрим статью 273 Уголовного кодекса Российской Федерации.
Модули
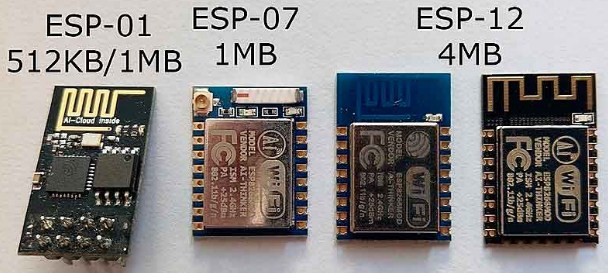
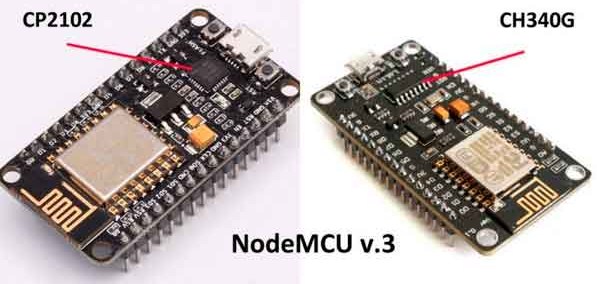
На рынке можно встретить Джаммер платы на платформе NodeMCU. Сам модуль имеет название – ESP8266. Он работает на частоте 2.4 ГГц. Именно ею чаще всего используют в роутерах. Есть два вида модуля:
Данные платы используются для установки их в любые устройства для удалённого управления. Но кто-то придумал использовать их как глушилку сигнала. На самом деле без разницы какую плату выбрать – все они примерно одинаковые и работают по одному и тому же алгоритму. В качестве примера мы будем использовать Dstike от китайцев. Но также вы можете посмотреть и другие устройства от этой же фирмы:
- Deauther OLED V3.5 – имеет дополнительный экран, с помощью которого можно управлять процедурой.
- Deauther Power Bank.
- Deauther Wristband – имеет вид часов с экраном.
Установка
Мы будем использовать прошивку Deauther 2.0. Её можно скачать по ссылке тут . Самое главное выберите версию именно для вашего модуля и платы. Нас интересует файл с расширением «.bin».
Первый вариант загрузки прошивки
- Скачиваем и запускаем программу для загрузки бин файла – ЗДЕСЬ .
- И так, нам нужны драйвера для наших плат. Выбираем исходя из названия чипа. Так как у меня китайский вариант – скачиваю CH340:
- CP2102 .
- CH340 .

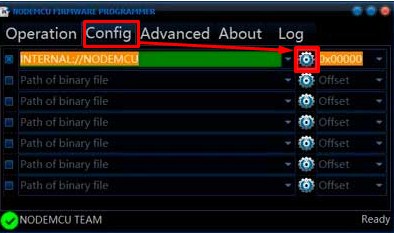
- Теперь переходим во вторую вкладку и нажимаем по «шестерёночке». Теперь просто выбираем тот файлик с «бин» расширением, который мы скачали с сайта «GitHub».
- Идём в первую вкладку и нажимаем «Flash».
- Ждём пока прошивочка загрузится.
Второй вариант загрузки прошивки
- Устанавливаем драйвера – ссылке есть в прошлой главе.
- Второй вариант подразумевает использования программки «Arduino IDE». Скачивать программу лучше с официального сайта.

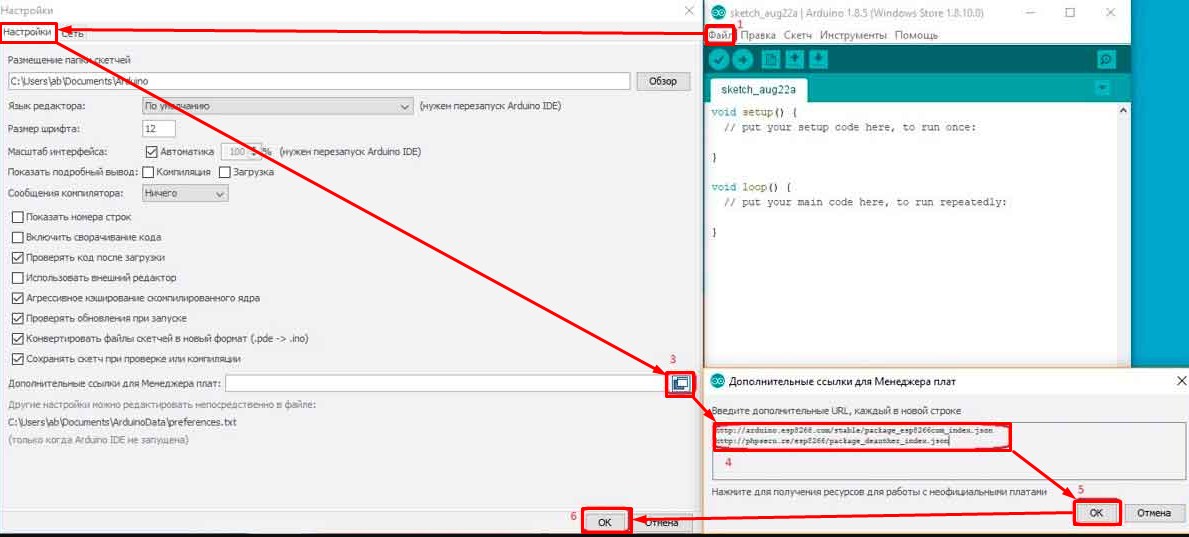
- Открываем программу «Файл»-«Настройки»-«Дополнительные ссылки для Менеджера плат»- Добавляем две ссылки:
- http://arduino.esp8266.com/stable/package_esp8266com_index.json
- http://phpsecu.re/esp8266/package_deauther_index.json


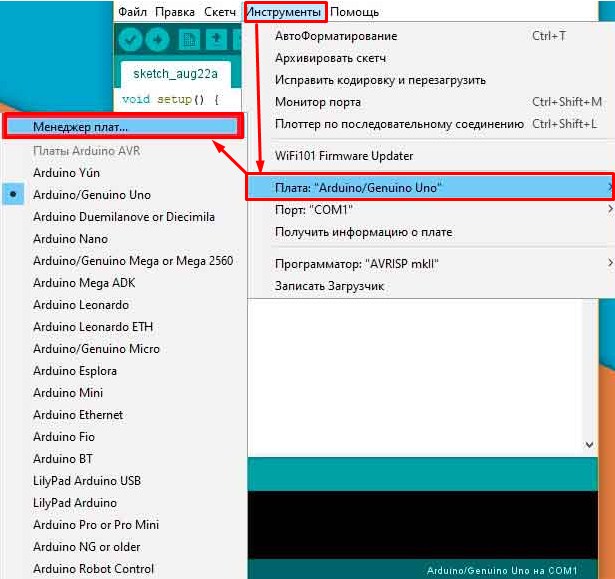
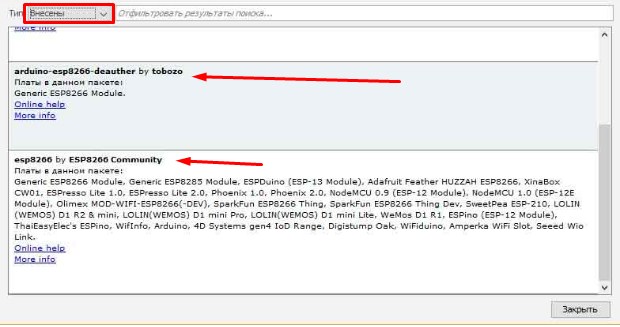
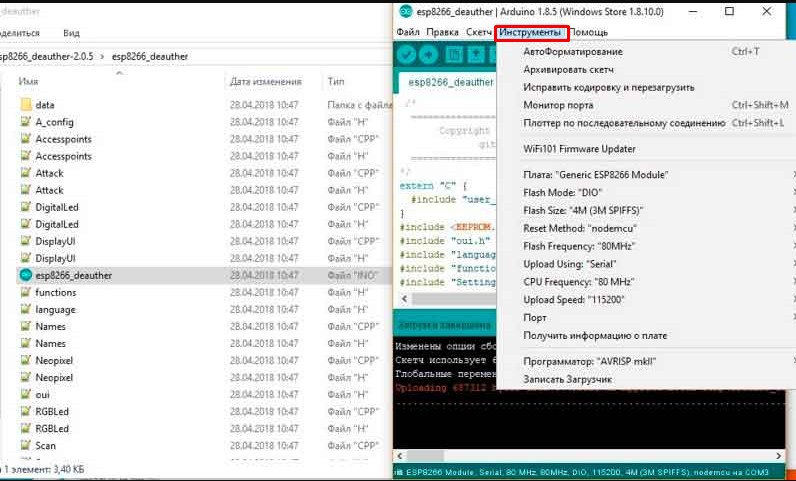
- Открываем папку библиотек, скаченную ранее. В программке открываем вкладку «Инструменты» – в разделе, где находится все платы нажимаем на необходимую, ту которую и хотим прошить.
- Также нужно будет указать размер памяти, всё зависит от выбора ESP – смотрим на «скриншот» ниже.


- Теперь заходим в меню. Оно интуитивно понятное, также для каждого раздела меню есть свои пояснения от автора прошивки. Как вы видите, можно производить атаки как на отдельные сети, так и не все подряд. Можно установить таймаут, для автоматического отключения атаки.