- How To Connect To Wi-Fi networks using CMD ( Command Prompt )
- How to connect to wifi using cmd with netsh wlan commands-
- 1# View various wireless network profiles saved on your PC
- 2# View WiFi adapter driver information
- 3# View wireless adapter settings
- 4# Recover your WiFi password from any of the WiFi connection profiles saved on your PC
- 5# Connecting to a WiFi network using command prompt
- 6# Stop your PC connecting automatically to a wireless network out of range
- 7# Delete wireless network profile stored on your PC
- 8# Export and import wireless network profiles
- 9# Generate a complete report of the wireless adapters on your PC/laptop
- Как быстро раздать wifi с ноутбука — 3 простых команды
How To Connect To Wi-Fi networks using CMD ( Command Prompt )
Nowadays internet connectivity is everything. For the Internet, we have Wi-Fi connections that we manage and use through the network settings on Windows 7/8.1/10 computers.
You can also connect, manage, and delete your WiFi networks using the command prompt.
In fact, the command prompt offers many more features than the standard network connection settings in Windows 10.
To do this we only require a CMD(Command Prompt) with Administrator privileges and will have to use netsh wlan commands.
How to connect to wifi using cmd with netsh wlan commands-
Before we dive into the guide. You’ll need to open the Command Prompt with administrator rights to perform most of the commands. To do this, use the Windows key + X keyboard shortcut, and select Command Prompt (Admin).
Or search cmd and right click run as administrator
1# View various wireless network profiles saved on your PC
Command > Netsh WLAN show profiles
Every time you connect to a wireless access point, the operating system creates a “wireless network profile”, and it’s stored on your computer, you can view all these profiles using the following command line on the Command Prompt Netsh WLAN show profiles.
Alternatively, you can use the “interface” parameter to show the list of profiles for a particular wireless adapter:
Netsh WLAN show profiles interface=”your WiFi interface name”
2# View WiFi adapter driver information
Command > Netsh WLAN show drivers
When you need to get driver information about your computer’s wireless adapter, you can use the the above command. The result will show the exact drivers being used, the WiFi radios on your PC/laptop alongwith driver version number.
You can further use this command to check your WiFi capabilities. Type in the following command
C:\Netsh WLAN show wirelesscapabilities
The results will show you exactly what your WiFi connection is capable of including WiFi Direct service capabilities.
3# View wireless adapter settings
Command > Netsh WLAN show interfaces
You can see the details of your WiFi interfaces using above command. The results will show you description of the interface, SSID, BSSID, Cipher, authentication type, channel, average receive and transmit rate and radio type.
If you have multiple WiFi connections saved on your PC, the “Show interfaces” command will display the information for all the wireless adapters on your computer. If you only need to see the information for one adapter, you can use the following command:
Netsh WLAN show interface name=”your wifi connection name”
4# Recover your WiFi password from any of the WiFi connection profiles saved on your PC
Command > Netsh WLAN show profile name=”your WiFi connection name” key=clear
If you lost and cannot remember your network security key to connect another device to a particular Wi-Fi access point, you can use the above command to view your WiFi password. You can also use this command to see the data limits if you have set them.
5# Connecting to a WiFi network using command prompt
Command > netsh wlan set hostednetwork mode=allow ssid=”your WiFi connection name” key=”your WiFi connection password”
You can use the above command to sign into your WiFi network. The above command is particularly useful if your WiFi settings in Windows 10 is not visible/cannot be connected due to some reasons. The additional commands are C:\netsh wlan start hostednet and C:\netsh wlan stop hostednetwork These two commands will start and stop your WiFi hotspot connection.
6# Stop your PC connecting automatically to a wireless network out of range
Command > Netsh WLAN set profileparameter name=”your WiFi connection name” connectionmode=manual
Normally, you would have configured your Windows 10 PC to connect to different WiFi networks automatically. While this is the best way to connect, sometimes notice that your laptop connects automatically to a WiFi connection that has zero or poor connectivity instead of an available full network WiFi connection. In such a case you can use the above command to prevent your computer from connecting to different networks automatically. If you want to move again to the automatic mode use the following command C:\Netsh WLAN set profileparameter name=” your WiFi connection name” connectionmode=auto
7# Delete wireless network profile stored on your PC
Command > Netsh WLAN delete profile name=”the WiFi connection you want to delete”
When you no longer need to connect to a particular wireless network, the access point is no longer available, or you need to reset the network profile settings, you can also use Netsh WLAN to delete any profile stored on your computer using the above command. If you can’t remember the name of the network profile, you can use the C:\Netsh WLAN show profiles command to list all the available profiles and select the one you want to delete.
8# Export and import wireless network profiles
Command > Netsh WLAN export profile key=clear folder=”the folder you want to save this report”
Sometimes you need to export and import wireless profiles. The above command exports all your wireless network profiles available on your PC. If you want to export a specific WiFi connection profile to a specific location, use this command > C:\Netsh WLAN export profile name=”your WiFi connection name” key=clear folder=”the folder you want to save this report”
9# Generate a complete report of the wireless adapters on your PC/laptop
Command > Netsh WLAN show WLANreport
Trouble shooting WiFi connection problems is very difficult as Internet has lots of conflicting tutorials and troubleshooting guide. Also you should know the exact problem you are facing while connecting to WiFi.
Using the above command will generate a full detailed WiFi networks report to the following location > C:\ProgramData\Microsoft\Windows\WLANReport\ WLAN-report-latest.html.
Once the WLAN report has been created, copy and paste the path into your web browser’s address bar to open the report.
You can use this report to troubleshoot the problems, ask help on tech forums. The WLAN reports contain a graph with details of the connectivity status, including information, such as when the connection started, when it got disconnected, errors, and more.
The report also summarizes network adapters information configured on your system, session success/failures, disconnect reasons, and a lot more. It’s a very detailed report that can help you to ping point many Wi-Fi connectivity issues.
So this was how to connect to wifi using cmd (command prompt) with netsh wlan commands
Как быстро раздать wifi с ноутбука — 3 простых команды
Периодически я сталкиваюсь с ситуациями, когда необходимо быстро настроить раздачу интернета через WiFi со своего ноутбука и под рукой нет специальной программы. Вот и сейчас мой роутер приказал долго жить и оставил дом без интернета. А не так давно телефон друга отказался подключаться к моему роутеру и мы быстро организовали дополнительный wifi-сигнал с моего ноута, что спасло ситуацию.
И помогают мне в этом 3 команды:
netsh wlan set hostednetwork mode=allow
netsh wlan set hostednetwork mode=allow ssid=FastWifi key=12345678 keyUsage=persistent
netsh wlan start hostednetwork
Под катом я детально расскажу как и что нужно делать и покажу на примере настройки Windows 7.
Надо сказать, что гайд, который я описываю — не слишком уникален. В сети можно найти подобное руководство, но я думаю, что грамотно оформленный и актуальный на сегодняшний день гайд на гиктаймсе будет очень удобен для чтения и применения.
Шаг 1:
Для начала нам нужно отключить интернет у себя на ноутбуке.
Шаг 2:
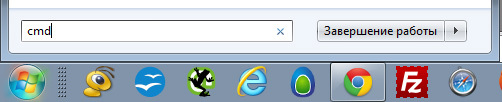
Теперь находим командную строку. Для этого откройте меню “Пуск” и введите запрос в поисковой строчке — cmd
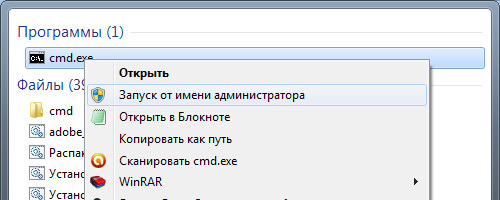
Теперь запускаем её от имени администратора, кликнув на появившуюся иконку правой кнопкой мыши.
Шаг 3:
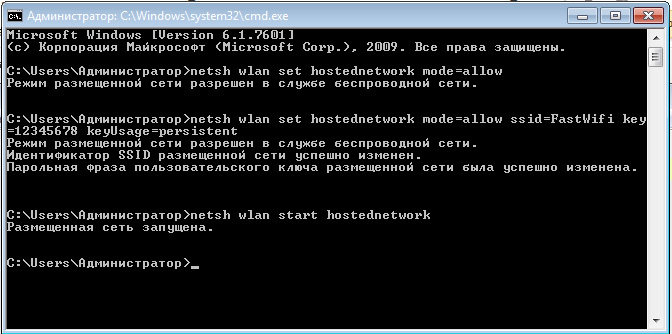
Вводим первую команду: netsh wlan set hostednetwork mode=allow

В командной строке не работает стандартное СTRL+C/СTRL+V, но скопировав строчку её можно вставить нажав на правую кнопку мыши в cmd и выбрав пункт “вставить”
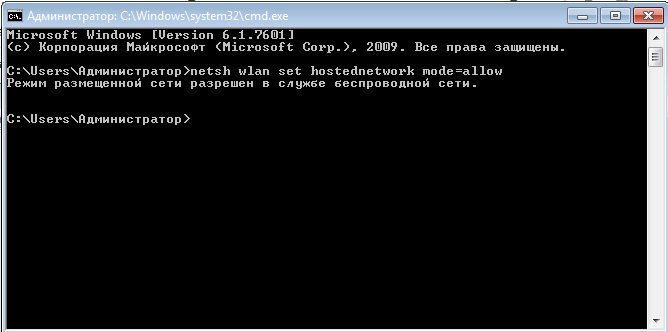
Если всё хорошо, то мы получили такую картинку:
Шаг 4:
Вводим данные своей создаваемой сети, её название и пароль, с помощью команды:
netsh wlan set hostednetwork mode=allow ssid=FastWifi key=12345678 keyUsage=persistent
Где “FastWifi” — это название сети, а “12345678” — пароль от неё.

Вот что получаем:
Шаг 5:
И наконец вводим команду, которая запустит нашу точку доступа:
netsh wlan start hostednetwork

Видим:
Шаг 6:
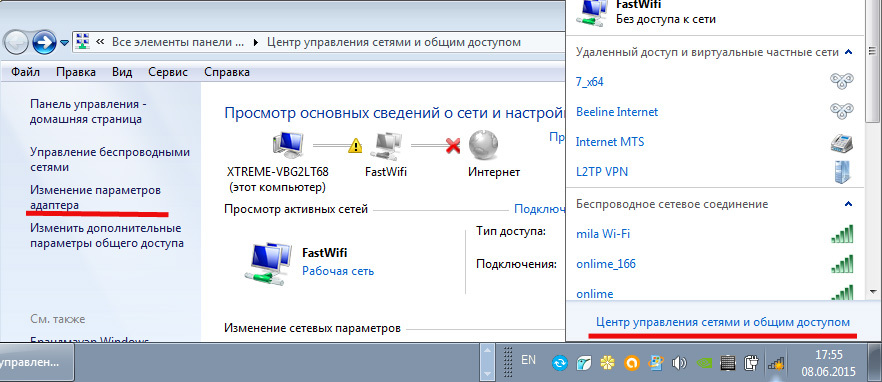
Теперь надо передать права от нашего текущего интернета — нашему новому “роутеру”. Для этого идём в “Центр управления сетями и общим доступом”, там идём по ссылке “Изменить параметры адаптера”.
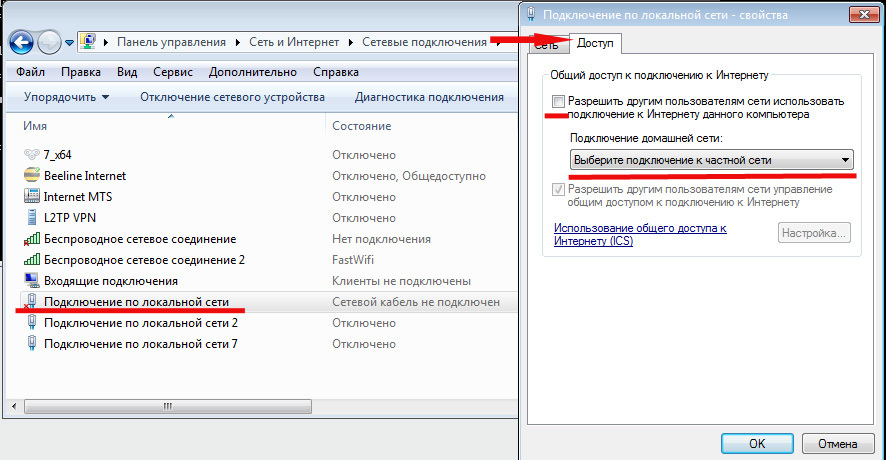
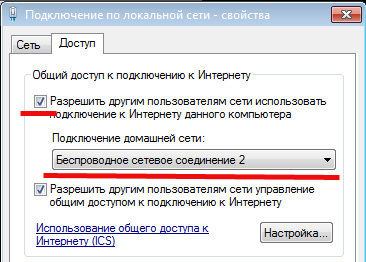
Находим значок своего интернета, кликаем правой кнопкой на него, выбираем “Свойства”. Далее выбираем вкладку “Доступ”, галкой отмечаем пункт “Разрешить другим пользователям сети использовать подключение к Интернету данного компьютера” и в списке “Подключение к домашней сети” выбираем наше новое соединение, которое мы только что создали.
Шаг 7:
Включаем интернет и наслаждаемся результатом


Если хотите дать полные права доступа, а не только доступ к интернету через браузер, то во вкладке “Доступы” нажмите “Настройка” и отметься галочками все необходимые пункты.
Итого:
В конечном итоге вам нужно помнить только 3 команды:
— netsh wlan set hostednetwork mode=allow
— netsh wlan set hostednetwork mode=allow ssid=FastWifi key=12345678 keyUsage=persistent
— netsh wlan start hostednetwork
И вы сможете настраивать интернет за 5 минут, а на настроенном компьютере вам понадобится только 2 команды:
— netsh wlan start hostednetwork — для запуска точки доступа
— netsh wlan stop hostednetwork — для остановки точки доступа
p.s. Стоит отметить, что метод этот всё-таки временный, так как при перезагрузке ноутбука сеть выключается и её вновь надо запускать через командную строку, так что рекомендую посмотреть качественные беспроводные маршрутизаторы, чтобы подобных проблем дома у вас не возникало.