- Install VirtualBox Guest Additions in CentOS, RHEL & Fedora
- How to Install VirtualBox Guest Additions in CentOS
- Install Guest Additions via a GUI
- Install Guest Additions via a Terminal
- Setting up VirtualBox Guest Additions
- For recent guest OSs
- Ubuntu or similar
- Getting VBoxGuestAdditions.iso
- Making VBoxGuestAdditions.iso visible to the guest
- Executing install script for Guest Additions on older Linux guests
- References
- Install VirtualBox Guest Additions on Ubuntu 20.04
- Install VirtualBox Guest Additions on Ubuntu 20.04
- Insert Guest Additions ISO File Manually
- Install Guest Additions Manually from Terminal
- Installing Guest Additions ISO from Ubuntu Repositories
- Related Tutorials
- SUPPORT US VIA A VIRTUAL CUP OF COFFEE
Install VirtualBox Guest Additions in CentOS, RHEL & Fedora
VirtualBox Guest Additions are software (typically device drivers and other special system applications) that enable seamless integration between the host and guest systems. They help you make the best out of your guest operating system for better performance and usability.
Some of the features offered by Guest Additions include mouse pointer integration, Drag’n’Drop functionality, shared clipboard, shared folders, enhanced video support, time sync, generic host/guest communication pathways, seamless windows and more.
Guest Additions are designed to be installed in a virtual machine, once a guest operating system has been installed.
In this article, we will explain how to install VirtualBox Guest Additions on CentOS and RHEL based distributions such Fedora and Scientific Linux.
How to Install VirtualBox Guest Additions in CentOS
1. First start by enabling the EPEL repository on your CentOS/RHEL guest operating system to install some required packages needed for the installation process as shown.
# yum -y install epel-release
2. Next, update each package on your guest system including the kernel to the latest version that is both available and resolvable, as shown. Once the upgrade process is done, reboot your system to complete the upgrade process and start using the new kernel.
# yum -y update [On RHEL/CentOS] # dnf -y upgrade [On Fedora 22+]
3. Once update process completes, install all kernel headers, developer tools and other related packages that are required for installing the guest additions from source as shown.
---------- On RHEL/CentOS ---------- # yum install make gcc kernel-headers kernel-devel perl dkms bzip2 ---------- On Fedora 22+ ---------- # dnf install make gcc kernel-headers kernel-devel perl dkms bzip2
4. Next, set the KERN_DIR environment variable to kernel source code directory (/usr/src/kernels/$(uname -r)) and export it at the same time as shown.
# export KERN_DIR=/usr/src/kernels/$(uname -r)
5. Now, you can mount the Guest Additions ISO and run the installer in two ways:
Install Guest Additions via a GUI
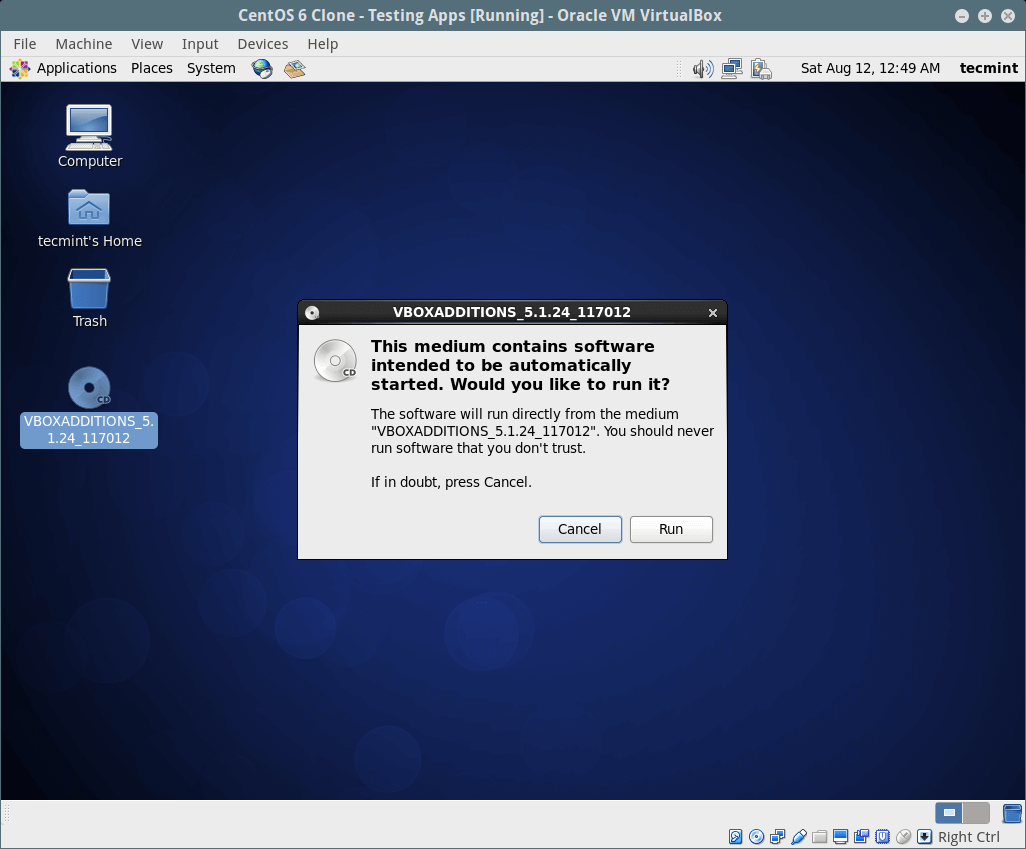
If you have a desktop environment installed, use this option, from the Virtual machine menu bar, go to Devices => click on Insert Guest Additions CD image to mount the Guest Additions ISO file in your guest OS.
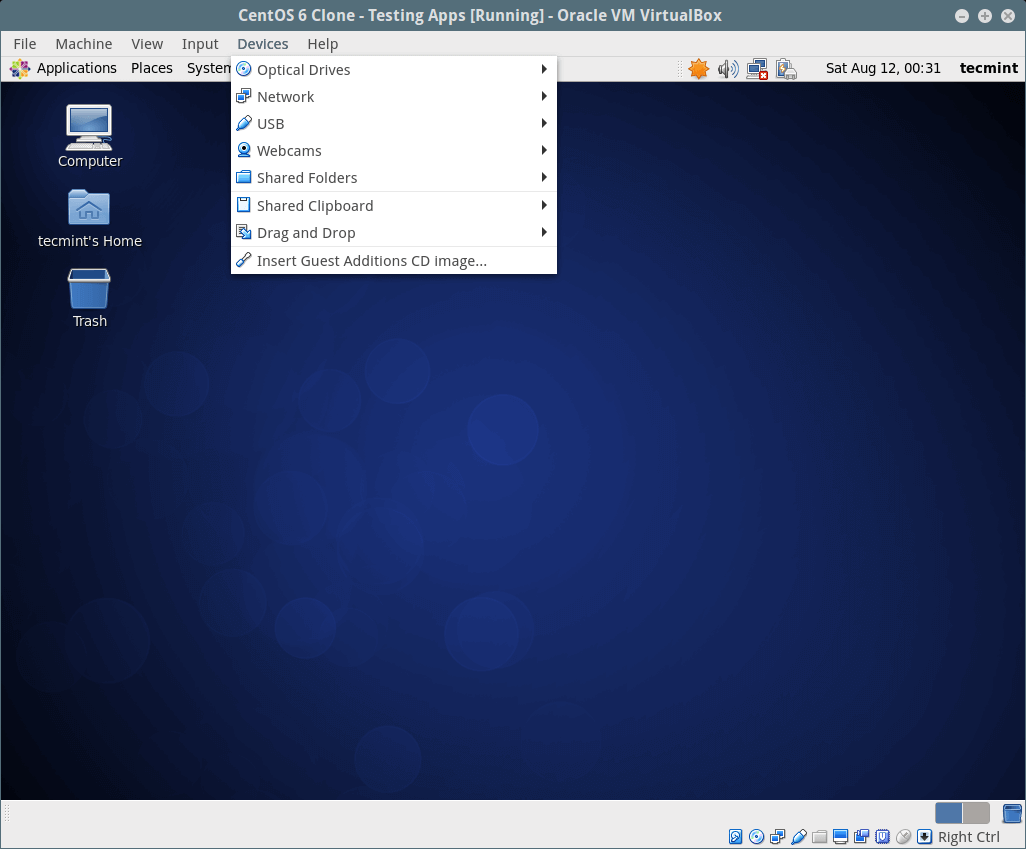
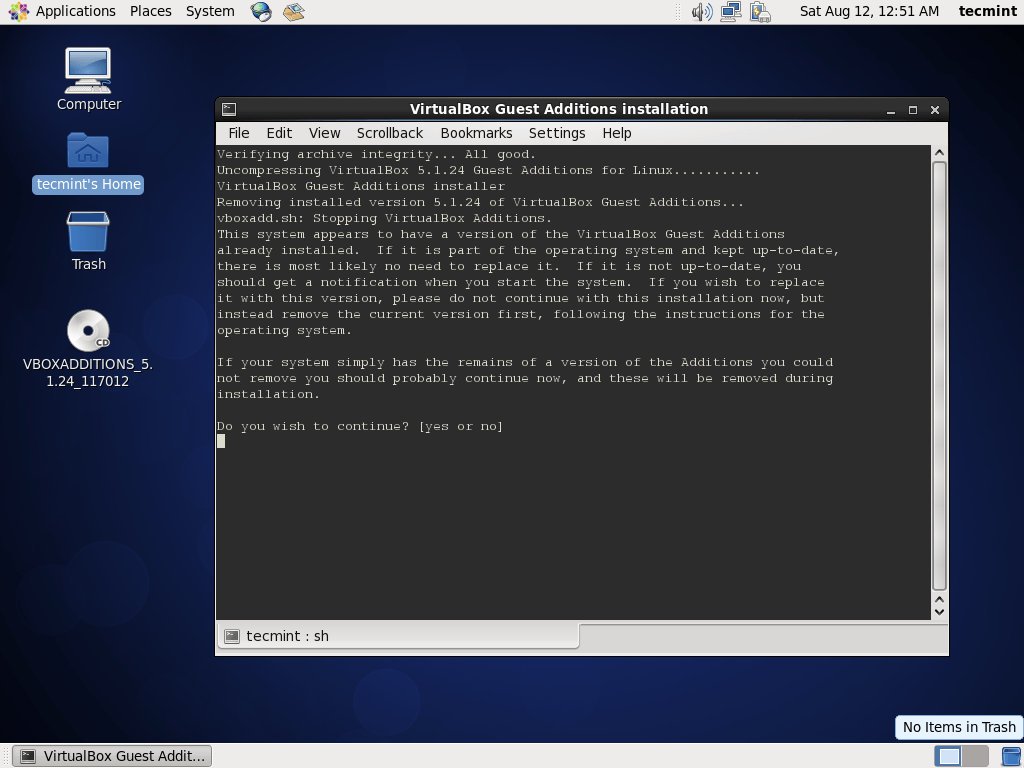
A dialog window will open up, asking you to Run the installer, click on the Run to execute it. This will in turn open a terminal which shows the installation details (follow the on-screen instructions).
Install Guest Additions via a Terminal
Login into terminal and run the following commands to mount the Guest Additions ISO file, move into the directory where the guest additions ISO has been mounted, inside there you will find VirtualBosx guest addition installers for various platform, run the one for Linux, as follows.
# mount -r /dev/cdrom /media # cd /media/ # ./VBoxLinuxAdditions.run
6. Once the installation is complete, power off your guest system to perform certain settings as explained below.
Note: If you don’t have a desktop environment installed, you can install Gnome 3 desktop or skip the next section. You should be good to go.
7. Now you need to enable the shared clipboard and drag’n’drop functionality for your guest operating system. From the CentOS, RHEL and Fedora guest machine settings, go to General => Advanced and enable these two options from there, click on the drop down options to select an option.
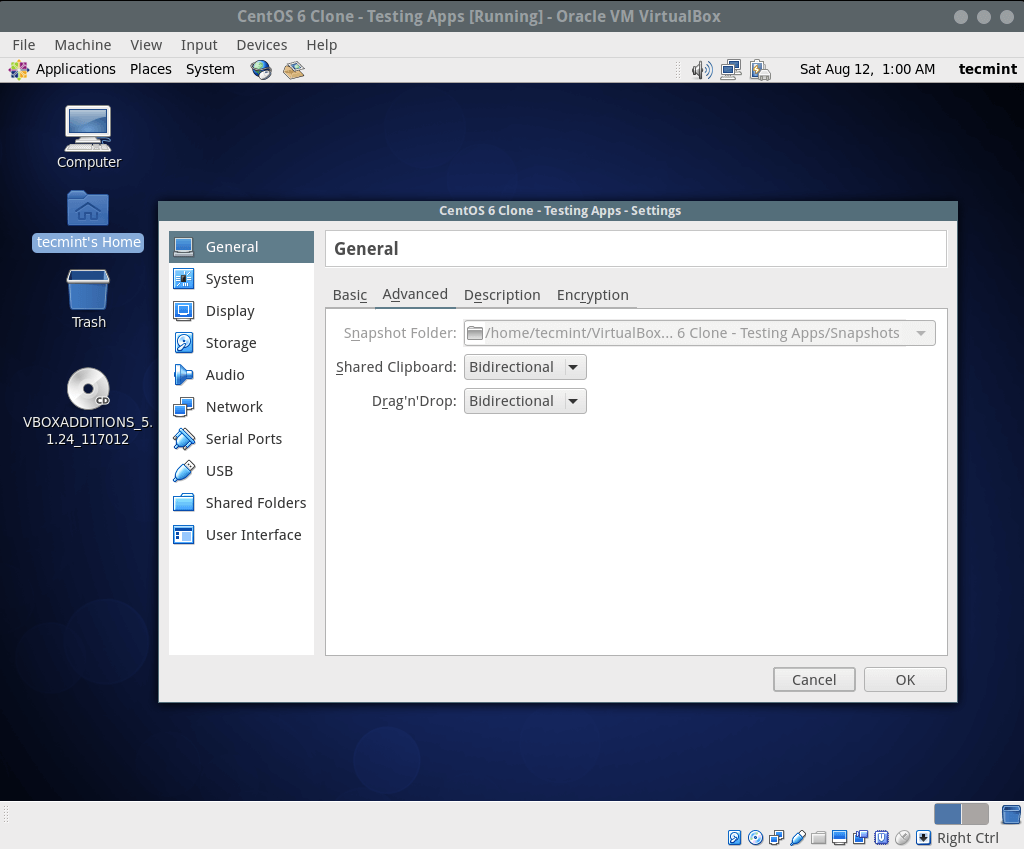
Once you are done, click on OK to save the settings and boot your guest OS and confirm that the changes you have just made are working as expected.
That’s it! VirtualBox Guest Additions make your life simple while using guest operating systems by enabling seamless integration between the host and guest systems. If you face any problems during installation, use the feedback form below to ask any questions.
Setting up VirtualBox Guest Additions
Guest Additions are distributed on their own CD image (.iso file) named VBoxGuestAdditions.iso. How you get that file to the guest can depend on the OS of the guest — see below.
After installing Guest Additions, on some, older guests you might need to restart the guest.
For recent guest OSs
In the guest virtual machine, choose Devices -> Install Guest Additions from the menubar of VirtualBox.
VirtualBox will look for the needed file. Failing to find it, it may give you an opportunity to download the file from the internet.
If all that fails, follow one of the steps below.
Ubuntu or similar
Getting VBoxGuestAdditions.iso
- Download a VirtualBox package from https://www.virtualbox.org/wiki/Downloads (you might have installed this package when you installed VirtualBox). The package should include the VBoxGuestAdditions.iso file.
- Open http://download.virtualbox.org/virtualbox/ and enter the subdirectory for the latest version of VirtualBox. It should contain the corresponding VBoxGuestAdditions_X.Y.Z.iso file.
- Install a package through the usual channels for your distribution. For example, you might use:
sudo apt-get install virtualbox-guest-additions-iso
Some, recent versions of VirtualBox will now be able to find the file on the host when you choose Device -> Install Guest Additions on the VirtualBox running a guest. Continue with instructions for setting up file sharing.
For other, older versions of guest OS’s and VirtualBox, the .iso file is on the host, but the guest needs to see it (and file sharing is not yet enabled.) Follow the next two steps for mounting the .iso file and executing the scripts in the .iso file.
Making VBoxGuestAdditions.iso visible to the guest
Just as you mounted a .iso CD image for your guest OS when installing it on the guest, now mount VBoxGuestAdditions.iso as a CD on the guest. For example, in the VirtualBox window, choose the Storage section under Details, and so forth.
Note that recent versions of VirtualBox have changed the method of mounting .iso files.
Executing install script for Guest Additions on older Linux guests
Make sure you have the image, for example VBoxGuestAdditions.iso or VBOXADDITIONS, mounted as CDROM.
If you are running a Linux guest, open a terminal and type:
in for instance Ubuntu Lucid, the CD image should mount at /media/ so that would be
sudo sh ./VBoxLinuxAdditions.run
If you would like to uninstall the Guest Additions, run:
sudo sh ./VBoxLinuxAdditions.run uninstall
References
VirtualBox/GuestAdditions (последним исправлял пользователь 78-0-208-105 2012-10-20 16:28:08)
The material on this wiki is available under a free license, see Copyright / License for details
You can contribute to this wiki, see Wiki Guide for details
Install VirtualBox Guest Additions on Ubuntu 20.04

If you have installed Ubuntu 20.04 on VirtualBox, you realize that it is not in fullscreen. In this guide, you will learn how to install VirtualBox guest additions on Ubuntu 20.04. Apart from enabling the virtual machine to have a full screen view, guest additions offers many other features;
- Mouse pointer integration
- Shared folders for easy sharing of files between the host and the guest
- Ensures better and accelerated video performance.
- Seamless windows integration
- Generic host/guest communication channels that enables you to control and manage guest execution.
- Provides Host-Guest time synchronization.
- Shared clipboard between host and guest vm.
- Automated logins.
You can read more about these features on the VirtualBox User Manual.
Install VirtualBox Guest Additions on Ubuntu 20.04
Insert Guest Additions ISO File Manually
To manually insert the VirtualBox Guest Additions ISO file on your Ubuntu 20.04 VM, navigate to Menu bar on your VM and click Devices > Insert Guest Additions CD image. Note that before you can insert the ISO file, you need to have at least one empty IDE controller.
However, before you can proceed with Guest Addition installation, you first need to install required build tools, the Linux kernel headers and the support modules, if not already installed.
Run the command below to verify if these requirements have already been installed.
sudo dpkg -l | grep -E "dkms|linux-headers-$(uname -r)|build-essential"ii build-essential 12.8ubuntu1 amd64 Informational list of build-essential packages ii linux-headers-5.3.0-18-generic 5.3.0-18.19 amd64 Linux kernel headers for version 5.3.0 on 64 bit x86 SMPThe ii means that the package is installed. As you can see from the output, dkms is not installed. If none if these packages is installed, you can simply use the APT package manager to install them.
sudo apt update -y sudo apt upgradesudo apt install dkms linux-headers-$(uname -r) build-essentialOnce that is done, proceed to insert the Guest Additions ISO from the Menu bar > Devices.
This will launch a dialog box which prompts you to run or cancel the Guest Additions installer.

Click Run to launch the installation of Guest additions on Ubuntu 20.04. You will be prompted to enter your password to authenticate the installation.
Upon successful authentication, the Guest Addition installation will now run.
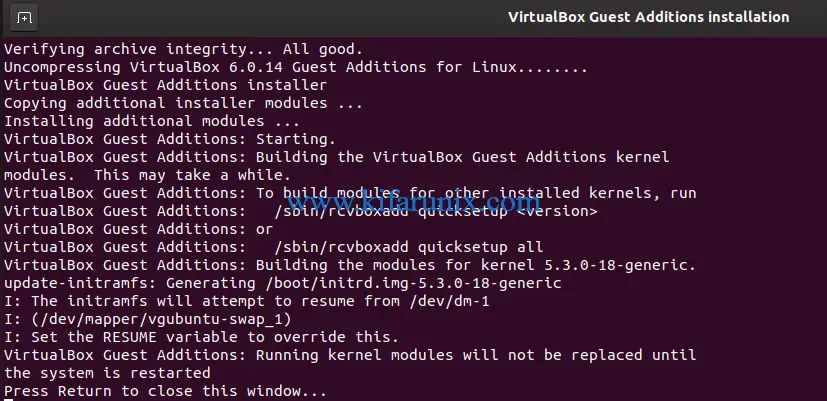
Once the Guest Additions are installed, the screen automatically resizes itself. Press Enter to close the installation screen.
You can as well restart your virtual machine to reload the Kernel modules.
Install Guest Additions Manually from Terminal
You can also install the Guest Additions from the terminal. When the Guest Addition ISO file is inserted, it is mounted on /media/$USER/VBox_GAs_6.0.x . Where x is the build version of VirtualBox.
Therefore press cancel when the installer dialog box opens up.
Then navigate to the mount point of the guest additions and run the command below;
cd /media/$USER/VBox_GAs_6.0.14 sudo ./VBoxLinuxAdditions.runsudo /media/$USER/VBox_GAs_6.0.14/VBoxLinuxAdditions.runInstalling Guest Additions ISO from Ubuntu Repositories
It is also possible to install the Guest Additions ISO file from Ubuntu repos. Guest Additions ISO file is provided by the virtualbox-guest-additions-iso package.
sudo apt-cache policy virtualbox-guest-additions-isoIf it is available, simply run the command below to install it.
sudo apt install virtualbox-guest-additions-isoWhen installed, the VirtualBox Guest Additions ISO is now available as /usr/share/virtualbox/VBoxGuestAdditions.iso .
To install it, you need to mount it.
sudo mount -o loop /usr/share/virtualbox/VBoxGuestAdditions.iso /media/Next, run the installation.
sudo /media/VBoxLinuxAdditions.runOnce the installation is done, restart your system to reload kernel modules.
You should now be on full screen and can be able to enable shared clipboard, shared folders, drag and drop…
If upon system reboot the screen doesn’t auto-resize automatically, be sure to toggle (off/on, so to say) View -> Auto-resize Guest Display on the VM menu bar to set right VM resolution.
That is all on our guide on how to install VirtualBox Guest Additions on Ubuntu 20.04.
Related Tutorials
SUPPORT US VIA A VIRTUAL CUP OF COFFEE
We’re passionate about sharing our knowledge and experiences with you through our blog. If you appreciate our efforts, consider buying us a virtual coffee. Your support keeps us motivated and enables us to continually improve, ensuring that we can provide you with the best content possible. Thank you for being a coffee-fueled champion of our work!