- Установка дополнений гостевой ОС Ubuntu
- Шаг 1. Установка необходимого ПО
- Шаг 2. Подключение образа
- Шаг 2. Запустите установщик
- Шаг 3. Перезагрузка системы
- Шаг 4. Готово
- Install the VirtualBox guest additions in Ubuntu 22.04
- Background
- What do you need
- Update your Ubuntu operating system
- Install the dependencies for building kernel modules
- Insert the VirtualBox guest additions CD image
- Install the VirtualBox guest additions in Ubuntu
- Checking the VirtualBox guest additions
- Enable the bi-directional clipboard
- Enable shared folders
- Wrap up
Установка дополнений гостевой ОС Ubuntu
Иногда нужно работать в нескольких операционных системах одновременно. В таких случаях на помощь приходят технологии виртуализации и, в частности, программа VirtualBox. Если вы ещё не знаете, как установить Ubuntu, вам может быть интересна статья об установке Ubuntu.
Установка нужной системы в виртуальную машину не решает все проблемы. По умолчанию, нет никакой интеграции между хостом и гостевой машиной: мы не можем передавать файлы, изменять расширение экрана и использовать сложные графические программы. Но есть решение — установка дополнений гостевой ОС.
Дополнения гостевой ОС VirtualBox позволяют:
- Использовать общую папку для обмена файлами между системами;
- Использовать общий буфер обмена;
- На лету изменять расширение экрана;
- Интегрировать окна программ гостевой ОС с реальным рабочим столом;
- Оптимизировать производительность системы;
В этой инструкции мы рассмотрим, как установить дополнения гостевой ОС в Ubuntu. Здесь нет ничего сложного — просто следуйте описанным ниже шагам:
Шаг 1. Установка необходимого ПО
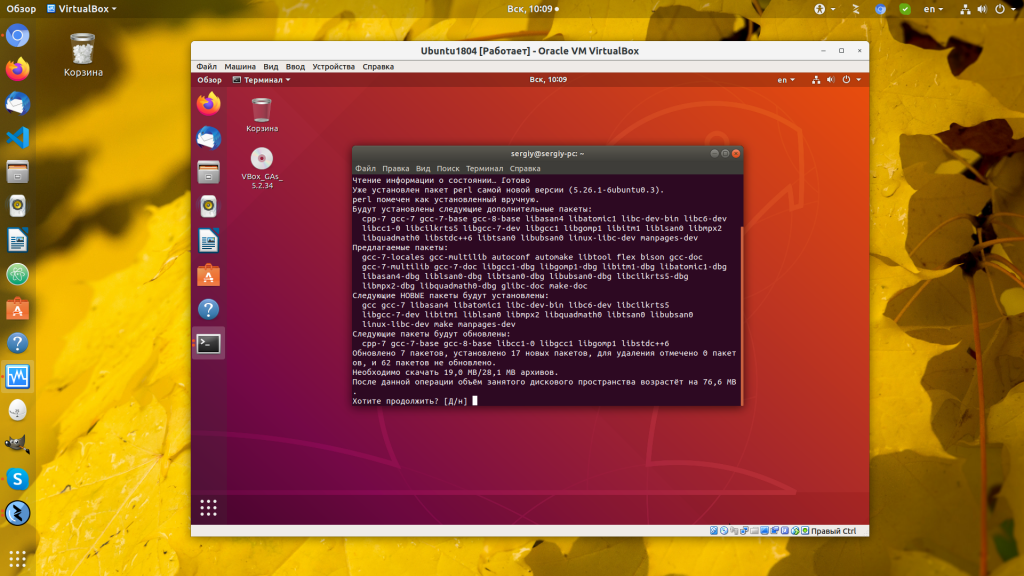
Чтобы установка дополнений гостевой ОС прошла успешно, необходимо нсталлировать инструменты, которые используются для сборки модулей ядра Linux. Для этого выполните в терминале:
sudo apt install gcc make perl
В будущем список этих зависимостей может меняться, но вы всегда можете их узнать, запустив установщик и посмотрев, какие ошибки он выводит.
Шаг 2. Подключение образа
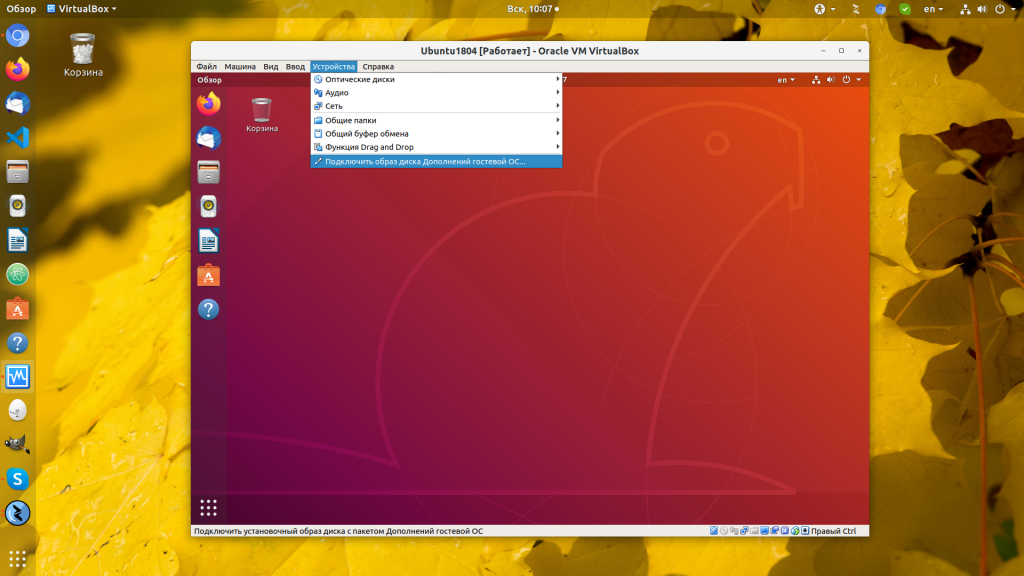
Сначала откройте меню Устройства работающей виртуальной машины и выберите в нём последний пункт — Подключить образ диска дополнений гостевой ОС:
Шаг 2. Запустите установщик
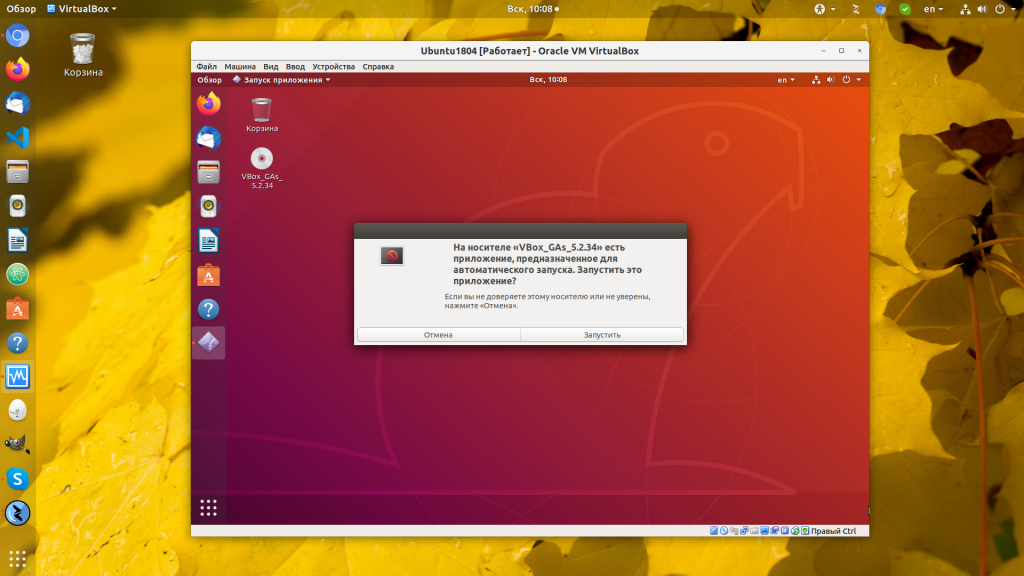
Через несколько секунд после подключения на экране появится вот такое сообщение, нажмите Запустить:
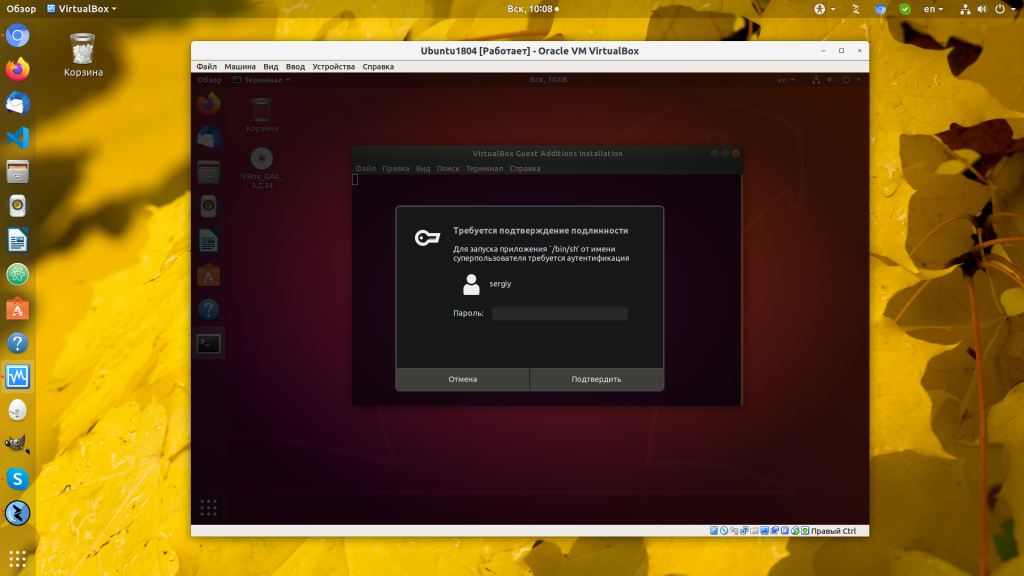
Система спросит ваш пароль, так как установка программы — это действие от суперпользователя:
Шаг 3. Перезагрузка системы
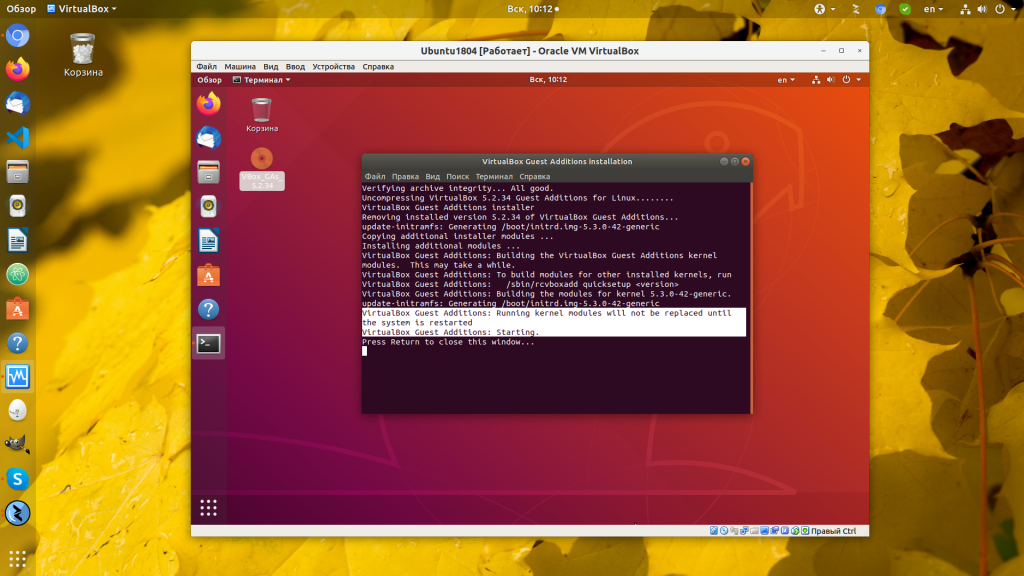
Когда установщик завершит работу, останется перезагрузить виртуальную машину. Убедитесь, что установка прошла без ошибок:
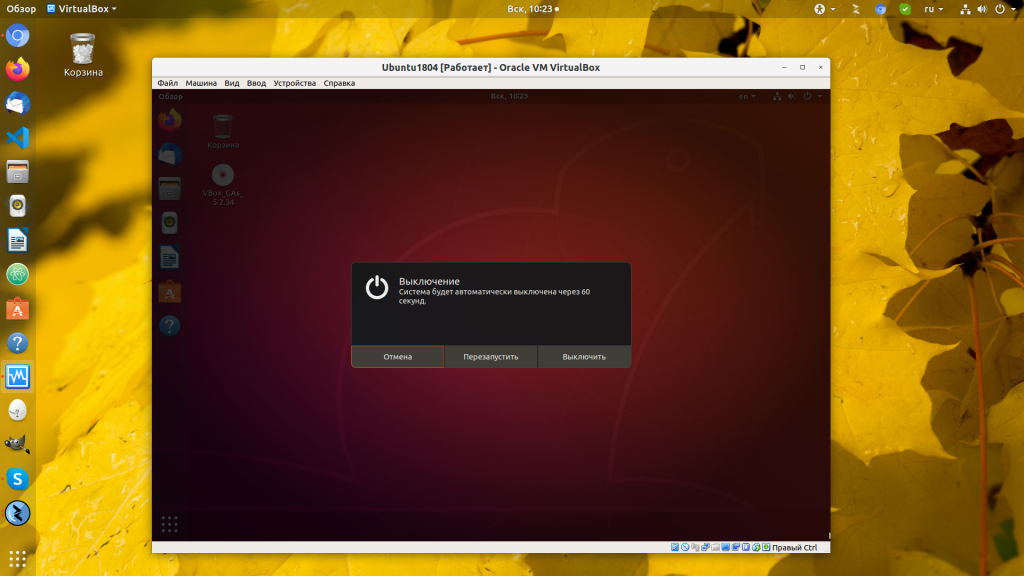
Нажмите стрелку в верхнем правом углу экрана, затем значок выключения, а потом Перезагрузить, чтобы перезапустить компьютер:
Шаг 4. Готово
Готово. Установка дополнений гостевой ос VirtualBox Ubuntu прошла успешно, теперь вы можете использовать все преимущества работы в гостевой ОС. Если остались вопросы, с радостью отвечу в комментариях.
Обнаружили ошибку в тексте? Сообщите мне об этом. Выделите текст с ошибкой и нажмите Ctrl+Enter.
Install the VirtualBox guest additions in Ubuntu 22.04
Bummed that you can’t change the screen resolution in your freshly installed Ubuntu virtual machine? An easy fix exists for this: You just need to install the VirtualBox guest additions in your Ubuntu 22.04 VirtualBox virtual machine. Besides automatically adjusting the screen resolution, you also get support for a bi-directional clipboard and shared folders. This article explains how to install the VirtualBox guest additions in an Ubuntu 22.04 virtual machine.
Background
In you ever installed Ubuntu in a VirtualBox virtual machine, you probably noticed that you can’t change the screen resolution. For example after resizing the virtual machine window or going into full-screen mode. The reason for this is that the Ubuntu 22.04 installer does not install the so called VirtualBox guest additions.
The VirtualBox guest additions consist of a set of drivers and kernel modules for the operating system, when installed as a VirtualBox virtual machine. They offer quality of life type improvements for working with your virtual machine:
- Improved display driver that automatically adjusts the screen resolution, when resizing the window of the virtual machine.
- Bi-directional clipboard for copy-pasting text between the host and the guest operating system.
- Shared folders for exchanging files between the host and the guest operating system.
Because of these added benefits, I highly recommend installing the VirtualBox guest additions right after you finished installing Ubuntu in a VirtualBox virtual machine. This tutorial walks you through the steps of how to install the VirtualBox guest additions in an Ubuntu virtual machine.
What do you need
In this article, I’ll explain step-by-step how to install the VirtualBox guest additions for an Ubuntu virtual machine. This assumes that you already installed Ubuntu as a virtual machine in VirtualBox. The presented instructions work for any type of Ubuntu flavor or derivative, for example Xubuntu, Linux Mint and Pop!_OS.
At the time of this writing, Ubuntu 22.04 is the latest long term support (LTS) release. In preparation for this article, I created a VirtualBox virtual machine based on Xubuntu 22.04. The XFCE desktop environment feels nice and snappy, especially on a resource constrained virtual machine.
Update your Ubuntu operating system
Before installing anything on your Ubuntu system, you should always update the operating system first. Why? Because package dependencies might have changed since your last update. This could lead to potential installation issues when installing new software.
To update the currently installed packages on your Ubuntu system, start the virtual machine and run the following two commands from the terminal:
Install the dependencies for building kernel modules
The VirtualBox guest additions for Linux consist of a bunch of Linux kernel modules. When installing the VirtualBox guest additions, these kernel modules are automatically built, specifically for the kernel version currently running in Ubuntu. Building kernel modules requires certain software packages. Therefore we need to first install these, prior to installing the VirtualBox guest additions in Ubuntu.
With your Ubuntu virtual machine running, open the terminal and run the following commands. This installs the required software packages for building kernel modules:
Insert the VirtualBox guest additions CD image
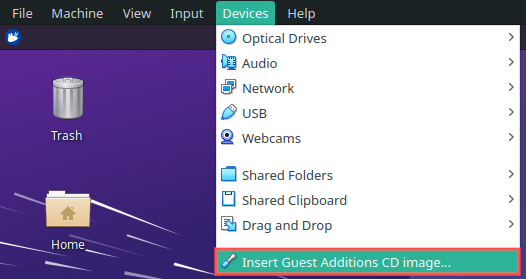
The guest additions CD image holds the installer for the VirtualBox guest additions. This CD image ships with VirtualBox. So there is no need to separately download this CD image. As a first step in installing the VirtualBox guest additions, you need to insert the guest additions CD image into the virtual CD drive of your Ubuntu virtual machine. As shown in the screenshot, you achieve this by selecting Devices → Insert Guest Additions CD Image from the menu of your Ubuntu virtual machine:
Give Ubuntu a few seconds time to automatically mount the CD image. Once mounted, Ubuntu opens up the file manager, showing you the CD contents.
Install the VirtualBox guest additions in Ubuntu
After Ubuntu mounted the guest additions CD, open up your terminal program. Then change to the directory where Ubuntu mounted the CD image of the VirtualBox guest additions. If you don’t remember the mount point, you can find out by running command:
- lsblk | grep «rom»
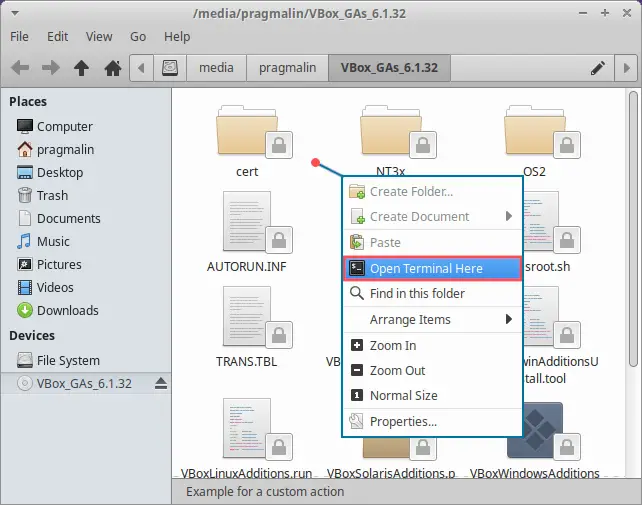
Alternatively and in my opinion easier: Simply right-click on the white space in the file manager, which popped up after Ubuntu mounted the CD. Then select Open Terminal Here from the context menu:
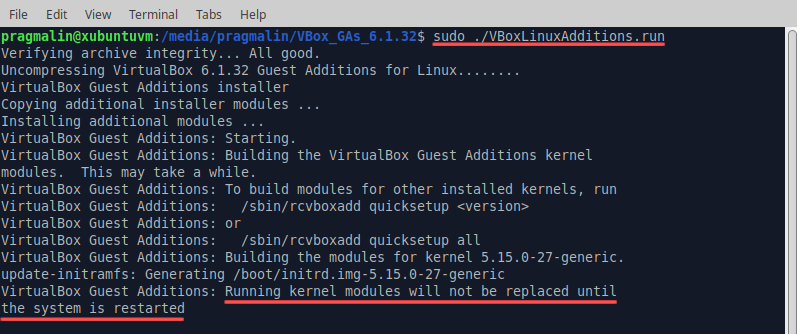
When you opened the terminal in the directory of the VirtualBox guest additions CD, start the VirtualBox guest additions installer, by running command:
Follow the installation progress on the terminal screen. Once done, you just need to restart your Ubuntu virtual machine, to activate the newly built and installed kernel modules.
Checking the VirtualBox guest additions
How do you know if the installation for the VirtualBox guest additions was successful for your Ubuntu virtual machine? It installed an improved display driver that allows automatic screen resolution adjustment. To test this, you simply resize the windows of your Ubuntu virtual machine. Then check if the screen resolution properly changed.
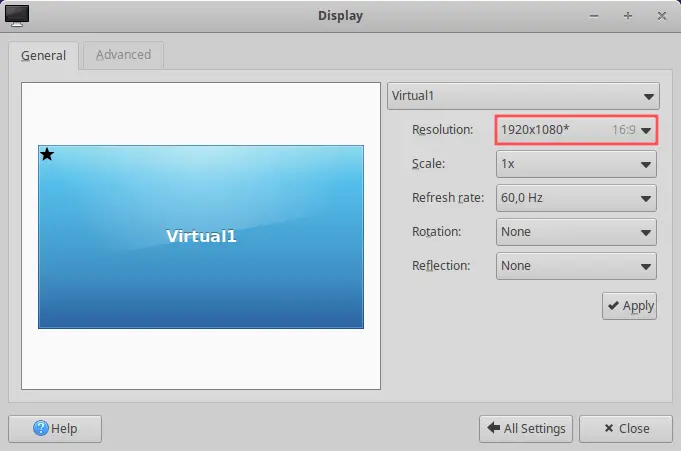
In my case, I switched the Ubuntu virtual machine window to full screen and checked the screen resolution in the Display section of the XFCE Settings application:
The screen resolution of 1920 x 1080 resembles what I expect for my monitor. In conclusion, this verifies that the VirtualBox guest additions were successfully installed on my Ubuntu virtual machine.
Enable the bi-directional clipboard
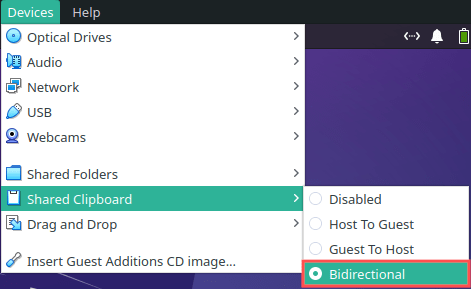
In addition to an improved display driver, the VirtualBox guest additions offer a bi-directional clipboard. This allows you to copy-paste text between the host operating system and your Ubuntu virtual machine. You just need to enable this feature. From the menu of your Ubuntu virtual machine, select Devices → Shared Clipboard → Bidirectional:
From now on both your host operating system and your guest operating system can access text on the clipboard.
Enable shared folders
A feature I use myself quite often, is the VirtualBox shared folders. With the help of the VirtualBox shared folders, you can select a directory on your host operating system. Your Ubuntu virtual machine then automatically mounts this directory. Effectively, this means that you can exchange files between your host operating system and your Ubuntu virtual machine, through this selected directory.
Getting shared folders to work, is a bit trickier. For these reason, I dedicated an entire article towards the topic of how to mount a shared folder in VirtualBox. In this section, I’ll summarize how to setup a shared folder.
The first thing to do is add your user to the group vboxsf . Otherwise you user does not have permissions to access the shared folder. Inside your Ubuntu virtual machine, open a terminal and run this command:
Next reboot your Ubuntu virtual machine, to activate these user and group changes.
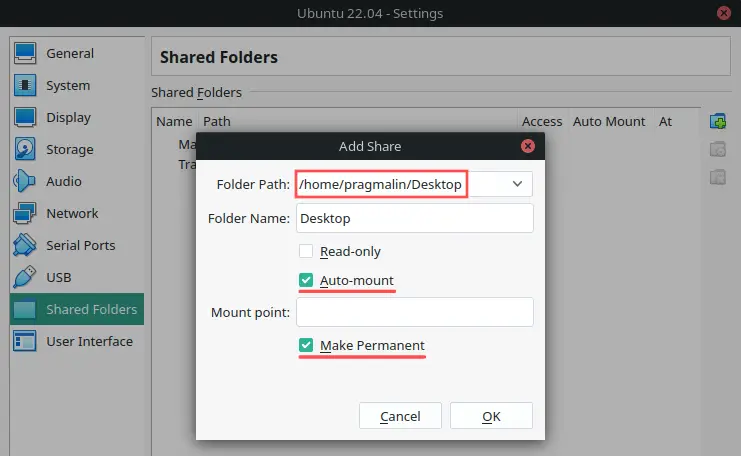
Once the reboot completed, open the shared folders settings by selecting Devices → Shared Folders → Shared Folders Settings from the Ubuntu virtual machine menu. Continue by adding a shared folder on this settings dialog and make sure to enable the Auto-mount option. Enable Make Permanent if you want the shared folder to persist with each reboot. I typically select my user’s Desktop folder as the directory to share:
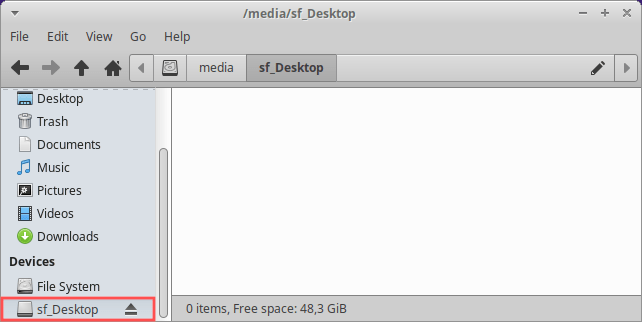
If you now open the file manager on your Ubuntu virtual machine, you’ll notice that you can immediately access the shared folder. Its name is sf_ . In my case sf_Desktop :
Wrap up
The VirtualBox guest additions make working with your Ubuntu virtual machine more pleasant. Its most prominent features are:
- An improved display driver that supports automatic screen resolution changes.
- A bi-directional clipboard for copy-pasting text between the host and the guest operating system.
- One or more shared folders to exchange files between the host and guest operating system.
Your Ubuntu virtual machine does not offer the VirtualBox guest additions by default. Therefore, it is recommended to install the VirtualBox guest additions, after you completed a fresh installation of Ubuntu in your virtual machine.
This article showed you step-by-step how to install the VirtualBox guest additions in an Ubuntu virtual machine. As whip-cream on top, you also learned how to enable the bi-directional clipboard and setup shared folders.
You can find more Ubuntu and VirtualBox related articles here:
