- 5 simple steps to create shared folder Oracle VirtualBox
- Lab Environment
- 1. Install VBoxGuestAddition
- 1.1 Load Guest Additions ISO Image
- 1.2 Mount Guest Additions Image on the server
- 1.3 Verify the content of the Image
- 1.4 Install pre-requisite rpms
- 1.5 Install VBox Guest Addition
- 2. Configure Virtual Box to create shared folder
- 3. Access Shared Folder (as root and non-root user)
- What’s Next
- Conclusion
- Настройка общих папок в VirtualBox
- Общие папки в VirtualBox
- Шаг 1: Создание общей папки на хост-машине
- Шаг 2: Настройка VirtualBox
- Шаг 3: Установка гостевых дополнений
5 simple steps to create shared folder Oracle VirtualBox
How to create shared folder using Oracle VirtualBox with Linux Operating System? Can I share a folder from Windows host to Linux OS inside Oracle Virtual Box? How to access shared folder as normal user (non root) from Oracle VBox inside Linux? How to transfer files between Oracle VirtualBox and Windows Host? How to map network drive from Windows to Linux VM using Oracle VBox?
In this tutorial I will share step by step instructions to configure shared folder feature from Oracle VirtualBox. Normally i use samba server to configure a share between Linux and Windows but lately I came to know about this feature from VirtualBox and thought to give it a try. The configuration is easy so even a non-techie can easily setup a shared folder which is I believe many people choose for this option instead of samba share. You can use this option to transfer files between Windows and Linux and vice versa
Lab Environment
I am using Oracle VirtualBox 6.1 which is installed on Windows 10 host. It is possible the steps may vary in future with a different version of VirtualBox. I will use RHEL/CentOS 8 as my Linux OS to access the shared folder as normal and root user.
1. Install VBoxGuestAddition
This is a mandatory pre-requisite if you wish to configure a shared folder with VirtualBox. The good thing is that you don’t have to download any additional software to setup VBoxGuestAddition .
1.1 Load Guest Additions ISO Image
Just power on your VM and on the console look out for Devices from the top menu. In the drop down menu click on Insert Guest Additions CD Image..
To verify if the Image is mounted successfully, click on Machine from the top menu and from the drop down click on Settings. This will open a new window, select Storage from the left menu and check if VBoxAdditions.iso is mounted
1.2 Mount Guest Additions Image on the server
Next mount this ISO on some mount point. Currently my server has two ISOs which are mounted
[root@server ~]# lsscsi [0:0:0:0] cd/dvd VBOX CD-ROM 1.0 /dev/sr0 [1:0:0:0] cd/dvd VBOX CD-ROM 1.0 /dev/sr1 [2:0:0:0] disk ATA VBOX HARDDISK 1.0 /dev/sda [3:0:0:0] disk ATA VBOX HARDDISK 1.0 /dev/sdb I know sr1 contains the virtual box addition image so I will mount it on /mnt
[root@server ~]# mount /dev/sr1 /mnt mount: /mnt: WARNING: device write-protected, mounted read-only.
1.3 Verify the content of the Image
Check the content of the ISO.
1.4 Install pre-requisite rpms
Before we install the Guest Addition software, there are certain pre-requisite which must be covered or else the installation will fail with errors like » VirtualBox Guest Additions: Kernel Headers Not Found For Target Kernel «
[root@server ~]# yum -y install gcc make perl bzip2 kernel-headers-$(uname -r) kernel-devel-$(uname -r) elfutils-libelf-devel xorg-x11-drivers xorg-x11-util
This will install the list of compilers and modules required to install the Virtual Box addition software.
1.5 Install VBox Guest Addition
Since we are on a Linux platform we will use VBoxLinuxAdditions.run to install VirtualBox Guest Addition modules. if you are on a windows platform you can use VBoxWindowsAdditions.exe
As you see the scripts are already having executable permission so just go ahead and execute the script as root user. The execution may take some time depending upon your VM resources
[root@server ~]# /mnt/VBoxLinuxAdditions.run Verifying archive integrity. All good. Uncompressing VirtualBox 6.1.12 Guest Additions for Linux. VirtualBox Guest Additions installer Copying additional installer modules . Installing additional modules . VirtualBox Guest Additions: Starting. VirtualBox Guest Additions: Building the VirtualBox Guest Additions kernel modules. This may take a while. VirtualBox Guest Additions: To build modules for other installed kernels, run VirtualBox Guest Additions: /sbin/rcvboxadd quicksetup VirtualBox Guest Additions: or VirtualBox Guest Additions: /sbin/rcvboxadd quicksetup all VirtualBox Guest Additions: Building the modules for kernel 4.18.0-193.14.2.el8_2.x86_64. VirtualBox Guest Additions: Running kernel modules will not be replaced until the system is restarted
Next restart the server to activate the changes
2. Configure Virtual Box to create shared folder
We are all set at the Linux client so next all we need is to setup shared folder on the Windows Host and Oracle Virtual Box.
Open the console of your VM, in the footer menu look out for the folder icon as I have shown in the screenshot.
Right click on this icon and click on Shared Folders Settings. Next click on the Add icon
In the next window Browse for the directory which you wish to share on the Windows Host on your Linux client. Select Auto-Mount to mount the directory automatically after every reboot.
Click OK to save the configuration
3. Access Shared Folder (as root and non-root user)
By default the shared folder will be allowed to be mounted as root user only. So to access the shared folder on the Linux client, execute the command using below syntax:
For example to mount our shared folder
Here shared is my folder name from Windows Host while /share is the mount point on the Linux client. Now check if the share is mounted successfully.
# df -h /share/ Filesystem Size Used Avail Use% Mounted on shared 235G 117G 118G 50% /share Since we have used Auto-Mount, this share will be automatically mounted after reboot so no configuration required in /etc/fstab .
Check the permission of this /share
# ls -ld /share/ drwxrwx--- 1 root vboxsf 4096 Aug 30 09:52 /share/
The permission is 750 with user owner as root and group owner as vboxsf . So only root user and all users part of vboxsf will be allowed to access this shared folder. Any other users are by default not allowed to access this folder.
To allow a normal user to perform read/write operation in this shared folder, you must make him/her part of vboxsf group.
# usermod -aG vboxsf admin # id admin uid=1004(admin) gid=1004(admin) groups=1004(admin),982(vboxsf) Here I have added user admin to vboxsf group so now he can also access this folder without using sudo privilege.
Now you can go ahead and start using your shared folder from Windows Host.
What’s Next
We used Auto-Mount feature to mount the shared folder automatically on the Linux client but I will tell you when and why you should avoid using Auto-Mount in my next article.
Conclusion
In this tutorial we configured shared folder using Oracle Virtual Box Guest Addition. The shared folder is created between the Windows Host and our Linux client. This is actually a good feature but somehow I feel samba as a better option although for few users it can be tricky to configure while configuring «shared folder» is comparatively easy.
Didn’t find what you were looking for? Perform a quick search across GoLinuxCloud
If my articles on GoLinuxCloud has helped you, kindly consider buying me a coffee as a token of appreciation.

For any other feedbacks or questions you can either use the comments section or contact me form.
Thank You for your support!!
Настройка общих папок в VirtualBox
Для более комфортного управления виртуальной ОС, запущенной в VirtualBox, существует возможность создания общих папок. Они одинаково доступны из хостовой и гостевой систем и предназначены для удобного обмена данными между ними.
Общие папки в VirtualBox
Через общие папки пользователь может просматривать и использовать локально хранящиеся файлы не только на хост-машине, но и в гостевой ОС. Эта возможность упрощает взаимодействие операционных систем и избавляет от необходимости подключать флешки, переносить документы в облачные сервисы хранения и прочие способы хранения данных.
Шаг 1: Создание общей папки на хост-машине
Общие папки, с которыми в дальнейшем могут работать обе машины, должны располагаться в основной ОС. Они создаются точно таким же способом, как и обычные папки в вашей Windows или Linux. Кроме того, в качестве общей папки можно выбирать любую существующую.
Шаг 2: Настройка VirtualBox
Созданные или выбранные папки необходимо сделать доступными для обеих операционных систем через настройку VirtualBox.
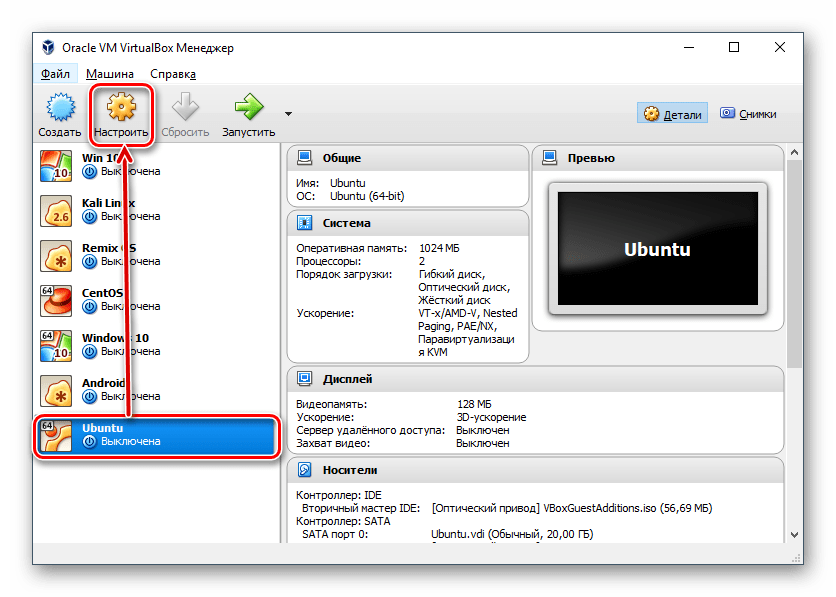
- Откройте VB Менеджер, выделите виртуальную машину и нажмите «Настроить».
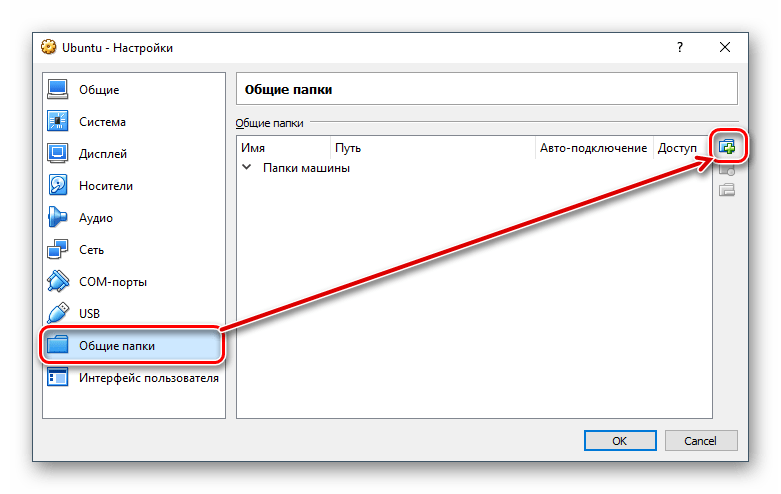
- Перейдите в раздел «Общие папки» и нажмите на иконку с плюсом, что находится справа.
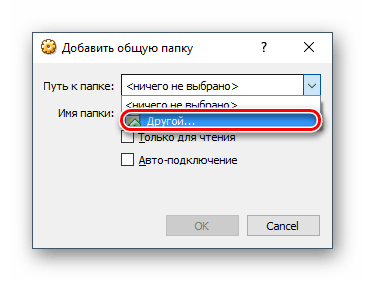
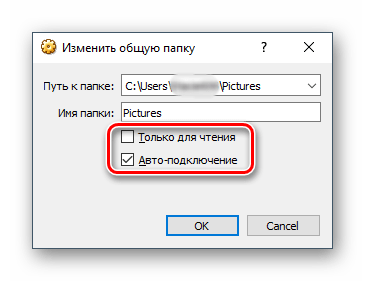
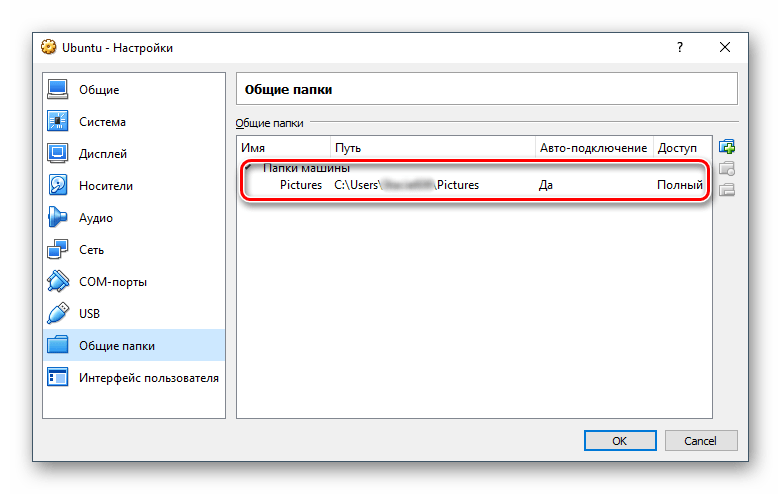
Когда этот этап будет выполнен, потребуется воспользоваться дополнительным ПО, предназначенным для тонкой настройки ВиртуалБокс.
Шаг 3: Установка гостевых дополнений
Гостевые дополнения VirtualBox — это фирменный набор расширенных функций для более гибкой работы с виртуальными операционными системами.
Перед установкой не забудьте обновить VirtualBox до последней версии во избежание проблем с совместимостью программы и дополнений.
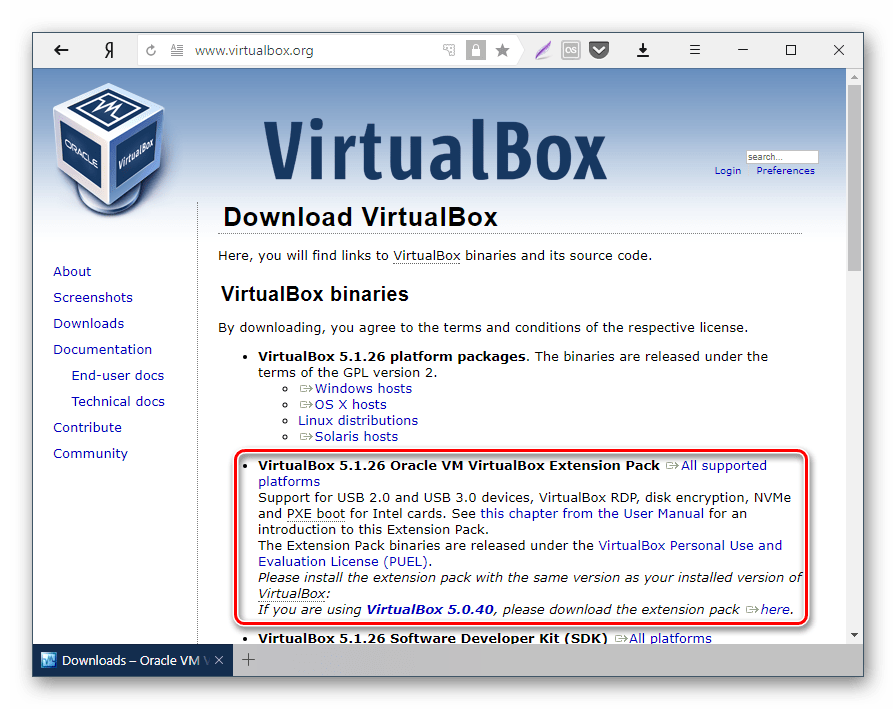
Перейдите по этой ссылке на страницу загрузок официального сайта ВиртуалБокс.
Нажмите на ссылку «All supported platforms» и скачайте файл.
На Windows и Linux он устанавливается по-разному, поэтому далее мы рассмотрим оба варианта.
- Установка VM VirtualBox Extension Pack в Windows
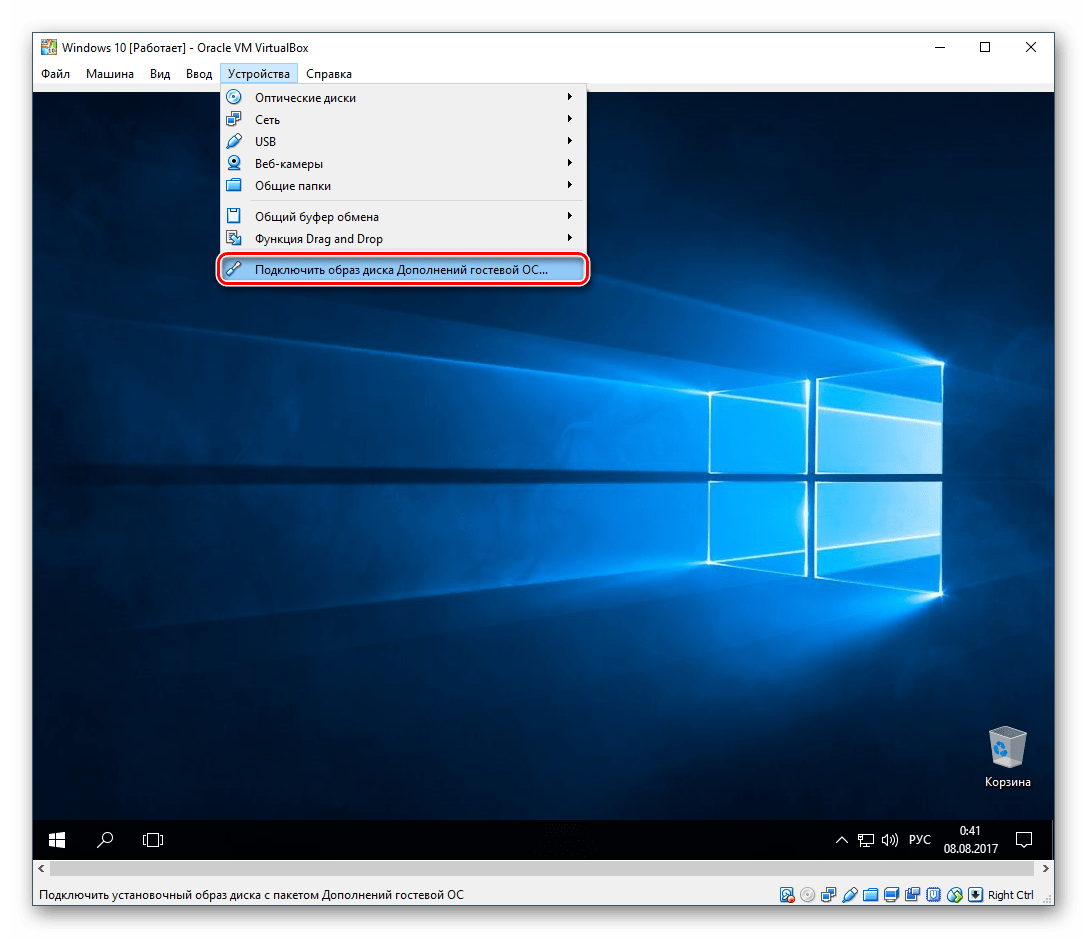
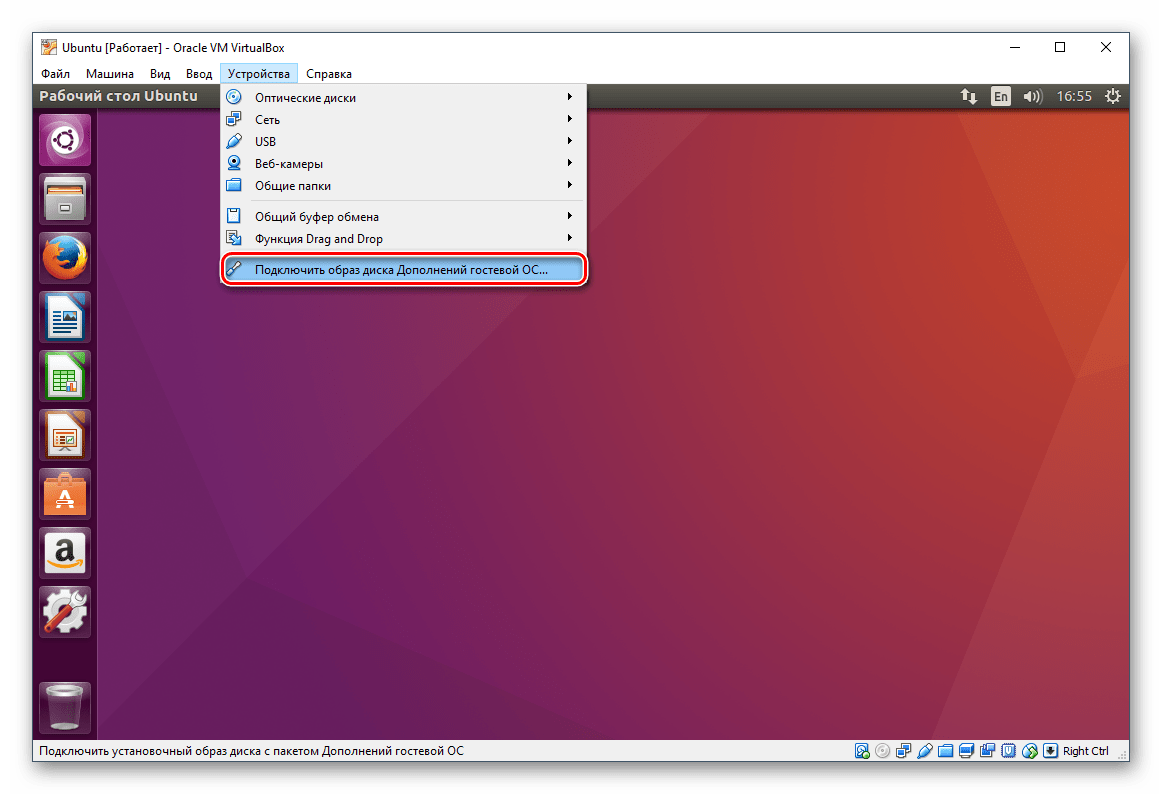
- На панели меню VirtualBox выберите «Устройства» >«Подключить образ диска Дополнений гостевой ОС…».
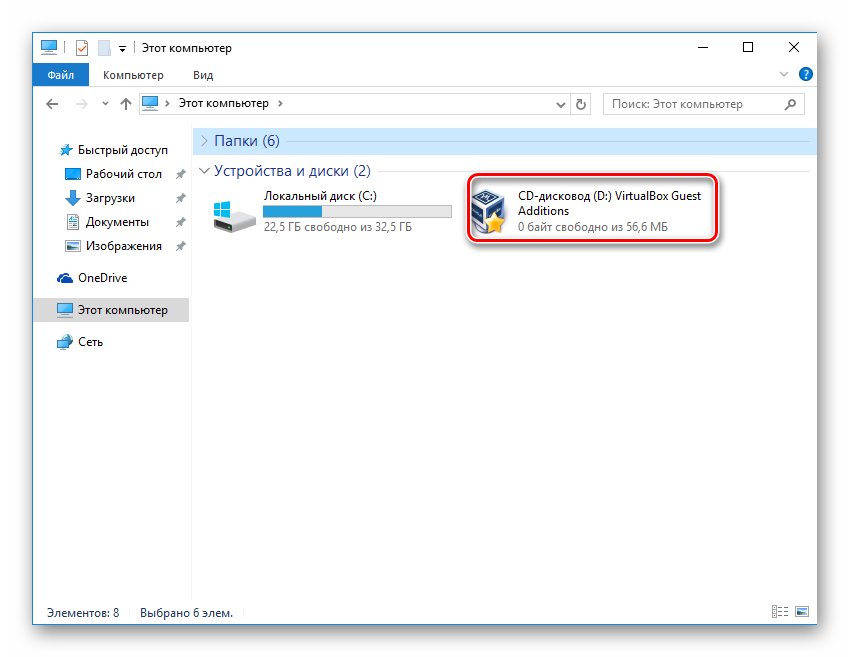
- В Проводнике появится эмулированный диск с установщиком гостевых дополнений.
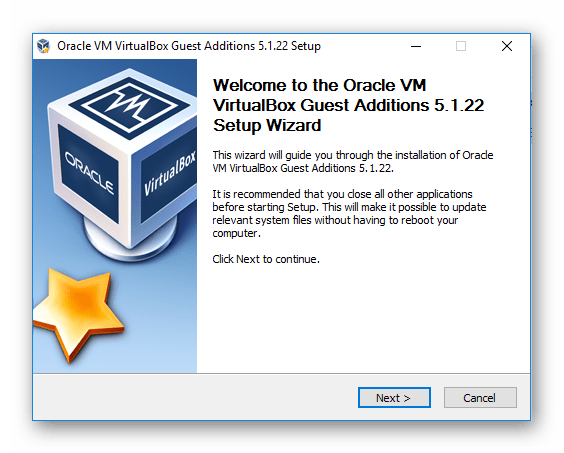
- Щелкните по диску два раза левой кнопкой мыши, чтобы запустить инсталлятор.
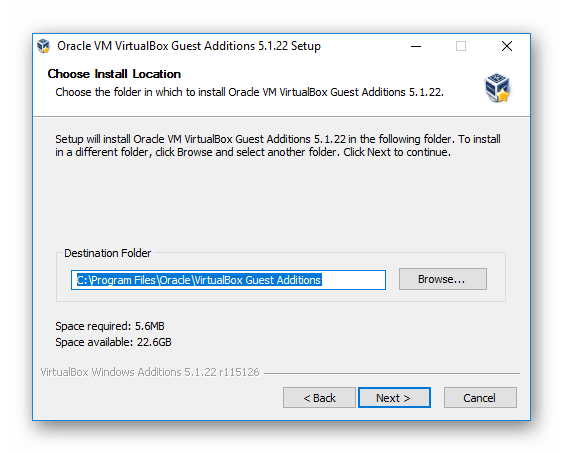
- Выберите папку в виртуальной ОС, куда будут установлены дополнения. Рекомендуется не менять путь.
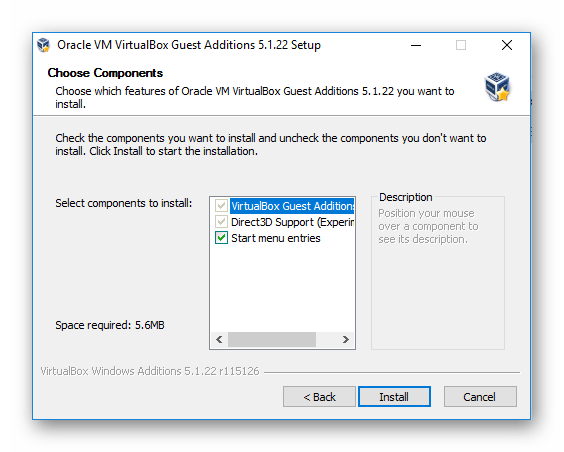
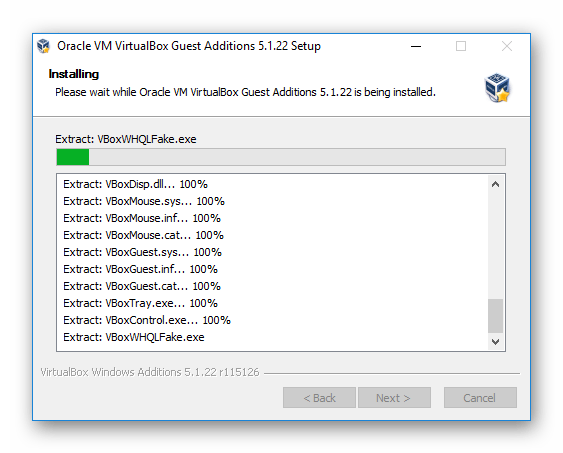
- Отобразятся компоненты для установки. Нажмите «Install».
- Начнется установка.
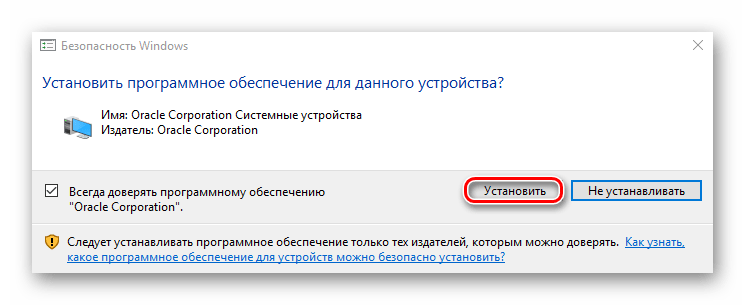
- На вопрос: «Установить программное обеспечение для данного устройства?» выберите «Установить».
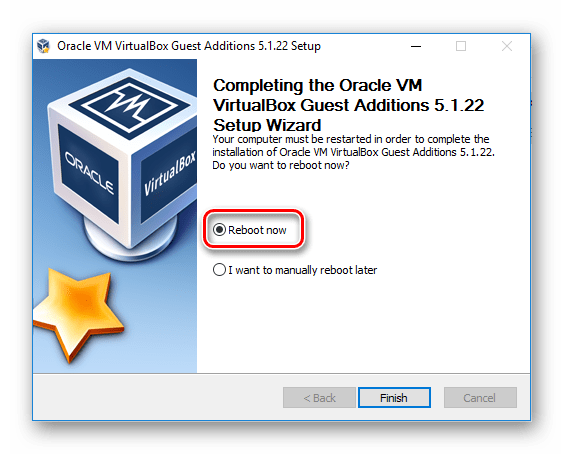
- По завершении вам будет предложена перезагрузка. Согласитесь, нажав «Finish».
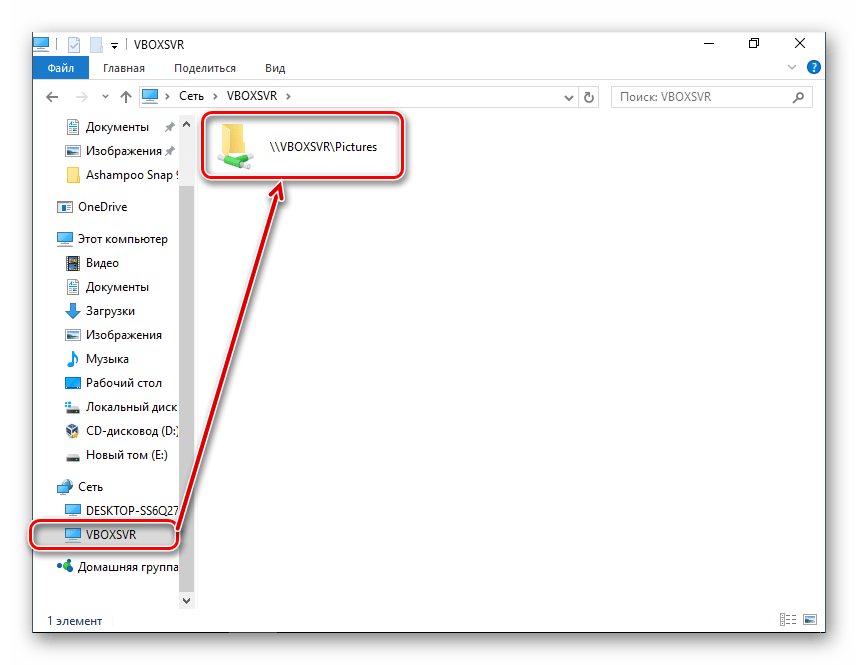
- После перезагрузки зайдите в Проводник, и в разделе «Сеть» вы сможете найти ту самую общую папку.
- В некоторых случаях сетевое обнаружение может быть отключено, и при нажатии на «Сеть» появляется такое сообщение об ошибке:
Нажмите «Ок».
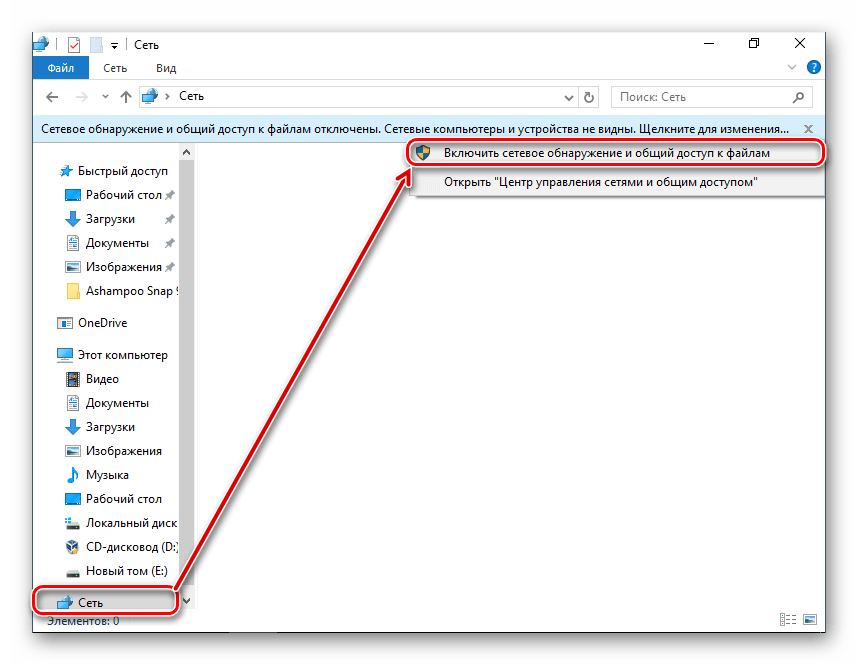
- Откроется папка, в которой будет оповещение о том, что сетевые параметры недоступны. Щелкните по этому уведомлению и в меню выберите пункт «Включить сетевое обнаружение и общий доступ к файлам».
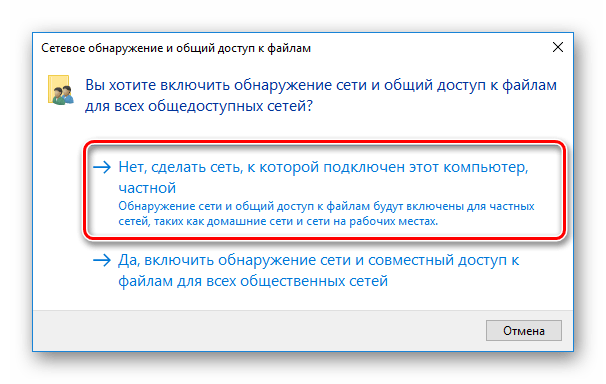
- В окне с вопросом о включении обнаружения сети выберите первый вариант: «Нет, сделать сеть, к которой подключен этот компьютер, частной».
- Теперь, щелкнув по «Сеть» в левой части окна еще раз, вы увидите общую папку, которая называется «VBOXSVR».
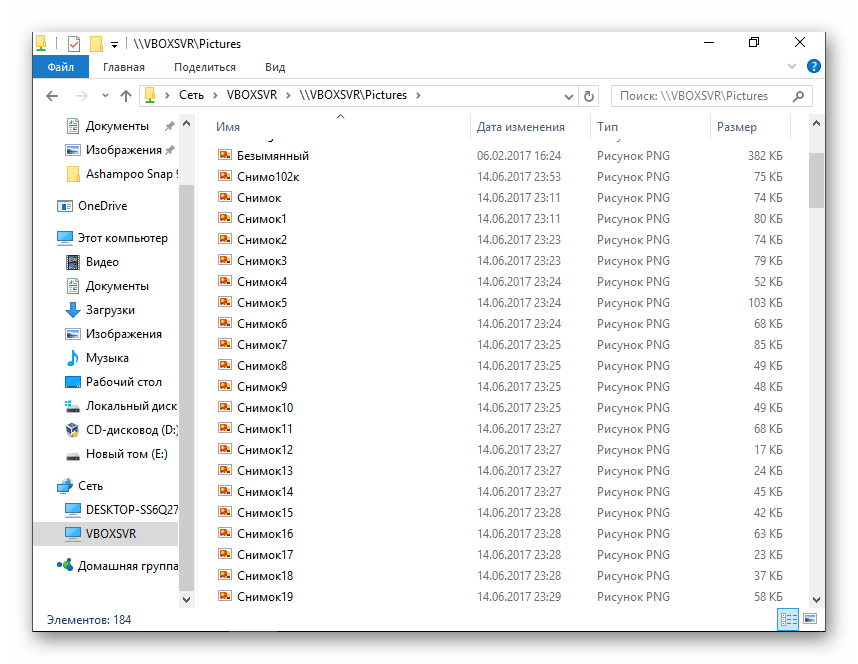
- Внутри нее будут отображаться хранящиеся файлы той папки, которую вы расшарили.
- Установка VM VirtualBox Extension Pack в Linux
Установка дополнений в ОС на Linux будет показана на примере самого распространенного дистрибутива — Ubuntu.
- Запустите виртуальную систему и на панели меню VirtualBox выберите «Устройства» >«Подключить образ диска Дополнений гостевой ОС…».
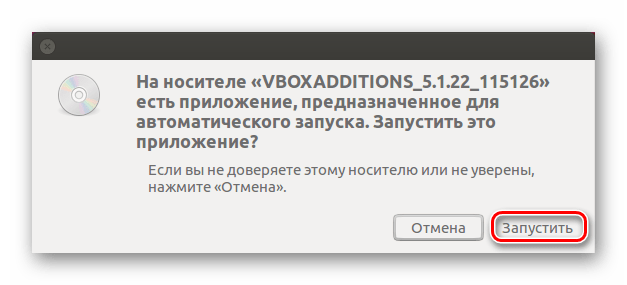
- Откроется диалоговое окно, запрашивающее запуск исполняемого файла на диске. Нажмите на кнопку «Запустить».
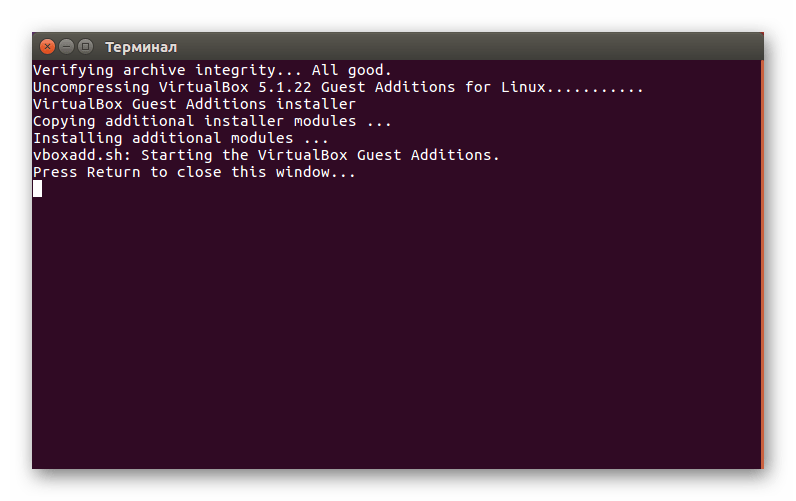
- Процесс установки будет отображен в «Терминале», который затем можно будет закрыть.
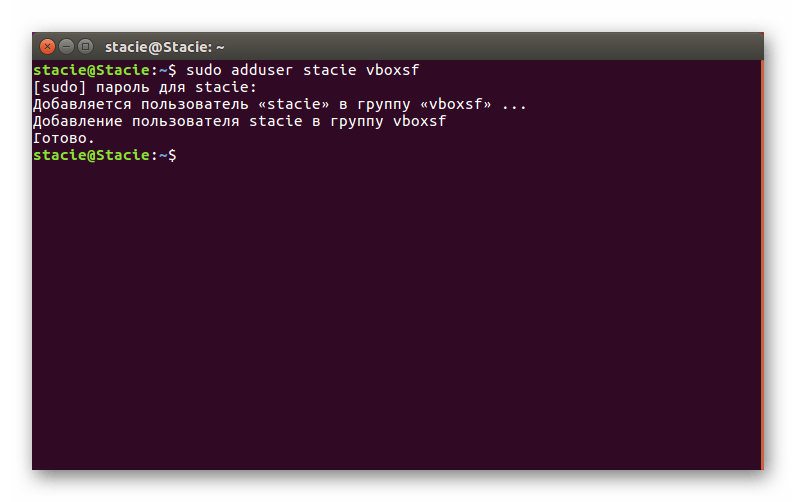
- Созданная общая папка может быть недоступна со следующей ошибкой: «Не удалось показать содержимое этой папки. Недостаточно прав для просмотра содержимого объекта sf_Имя_папки». Поэтому заранее рекомендуется открыть новое окно «Терминала» и прописать в нем следующую команду: sudo adduser имя_учетной_записи vboxsf Введите пароль для sudo и дождитесь добавления пользователя в группу vboxsf.
- Перезагрузите виртуальную машину.
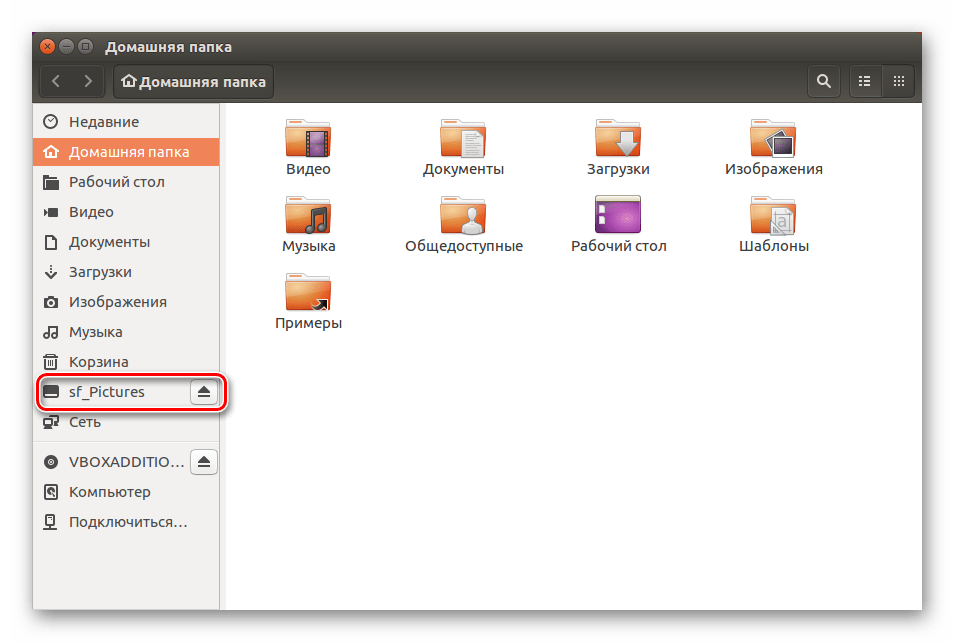
- После запуска системы зайдите в проводник, и в каталоге слева найдите ту папку, которую расшаривали. В данном случае общей стала стандартная системная папка «Изображения». Теперь ей можно пользоваться через хостовую и гостевую операционные системы.
В других дистрибутивах Linux последний шаг может несколько отличаться, однако в большинстве случаев принцип подключения общей папки остается таким же.
Таким несложным способом вы можете подключить любое количество общих папок в VirtualBox.


