- vCenter Server Appliance 6.7 U1 Installation and configuration Guide
- Software Requirements:
- Architecture:
- Installation Steps
- Install a New vCenter Server Appliance
- Use Embedded vCenter and PSC ratio button option
- Specify deployment target
- Select compute resource
- Provide VM name and root password
- Choose storage size depending on your environment
- Select datastore where those VMDKs will be stored.
- Configure network settings of your VCSA
- Post-Installation
- VMware vCenter Appliance Installer on Ubuntu Linux
- vCSA | How to install vCenter Server Appliance (vCSA)
- Deploying the vCenter Server 5 Appliance.
vCenter Server Appliance 6.7 U1 Installation and configuration Guide
VMware vCenter server Appliance 6.7 U1 (VCSA) is a VM running Photon OS, which is hardened and optimized VMware Linux distribution.
All future releases will only be available as VCSA which is the preferred deployment method of vCenter Server.
If you’re running an older version of vCenter server on Windows, you can migrate to VCSA via a built-in migration tool. The migration process is quite easy, but today we’ll focus only on clean installation and configuration of VCSA in a new environment.
Software Requirements:
- You must use ESXi host with version 5.5 and higher.
- The minimum hosts that can be connected as a part of the datacenter managed by VCSA 6.7 must be ESXi 6.0 and higher.
- You can check version compatibility with other VMware products see the Product Interoperability Matrix.
Architecture:
- Recommended VMware architecture is now a vCenter server and Platform Service controller (PSC) within a single VM.
- The VCSA with embedded PSC requires the following hardware resources (disk can be thin provisioned)
– Tiny (up to 10 hosts, 100 VMs) – 2 CPUs, 10 GB RAM
– Small (up to 100 hosts, 1000 VMs) – 4 CPUs, 16 GB RAM.
– Medium (up to 400 hosts, 4000 VMs) – 8 CPUs, 24 GB RAM.
– Large (up to 1000 hosts, 10,000 VMs) – 16 CPUs, 32 GB RAM.
– X-Large (up to 2000 hosts, 35,000 VMs) – 24 CPUs, 48 GB RAM
- Configure proper DNS with forward and reverse records. FQDN resolution should be in place when deploying vCenter Server.
- If you have firewall between vCenter and the rest of infrastructure, a Required Ports for vCenter Server and PSC can be found here.
Learn from this video about:
- The advantages of adding VCSA to Microsoft AD
- Requirements for joining VCSA to Microsoft AD domain
- Guidance on how to add VCSA to Microsoft AD
Installation Steps
It is a large ISO file. In our case, the latest version is this one: “VMware-VCSA-all-6.7.0-10244745.iso”
Installing the appliance is a two-stage process. The first stage will simply deploy a new appliance to the target vCenter Server or ESXi host. The second stage will finalize the setup of the deployed appliance.
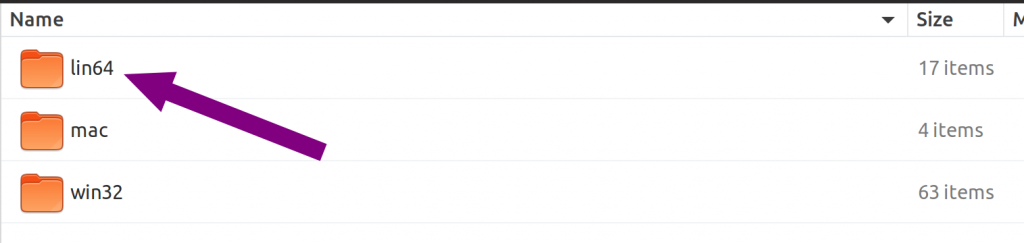
First mount the ISO and navigate to the folder which corresponds to the OS you have on your management workstation you’re trying to install from. You can use Windows, Linux or MAC to install VMware VCSA.
The folder is “vcsa-ui-installer” and inside you have 3 different folders. If you’re in Windows, simply chose the win32 folder. If you’re on Linux, chose the “lin64” etc.
Then launch the installer.exe (example under Windows).
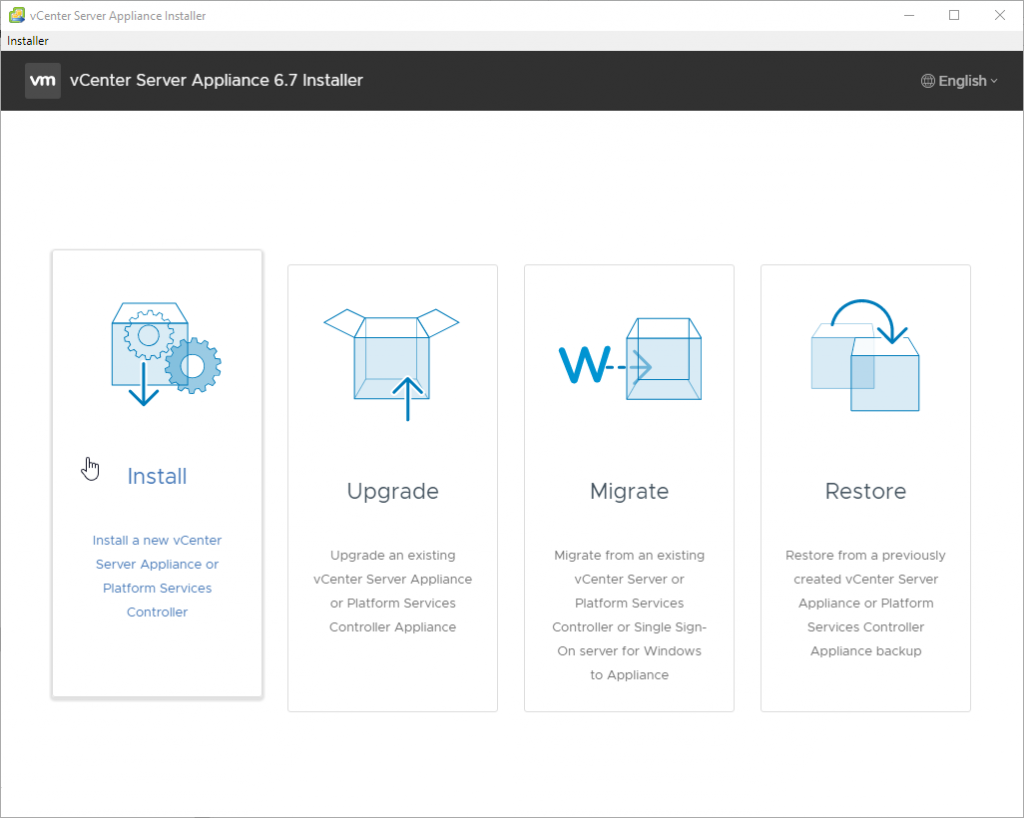
Install a New vCenter Server Appliance
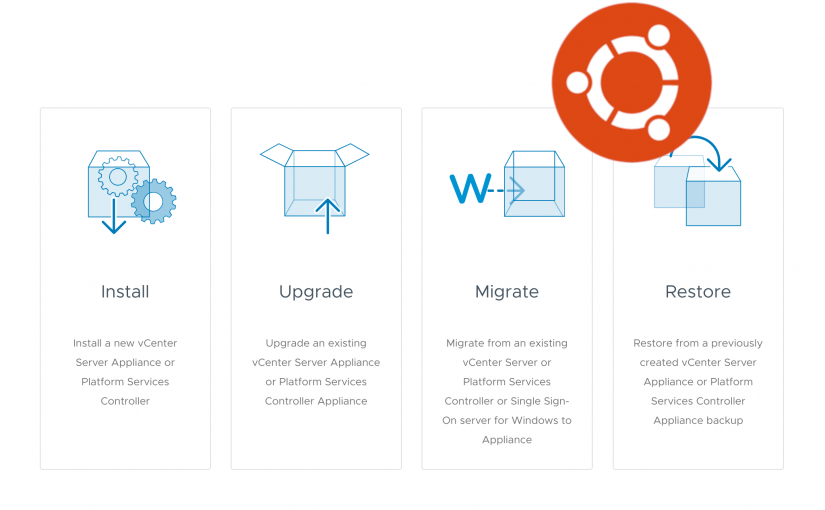
As you can see, other possibilities which the installer offers are Upgrade, Migrate or Restore. We’ll do a Migrate in one of our future posts.
Next, you’ll just follow the assistant which will walks you through. Remember to configure your DNS prior to continuing and make sure to check whether the resolution works.
You can test this with an “nslookup” command through a command line window.
Unless you really need to separate vCenter Server and PSC, keep the pre-selected option called “Embedded Platform Service Controller”, which keeps both components together in a single VM. It greatly simplifies management, upgrades and patching.
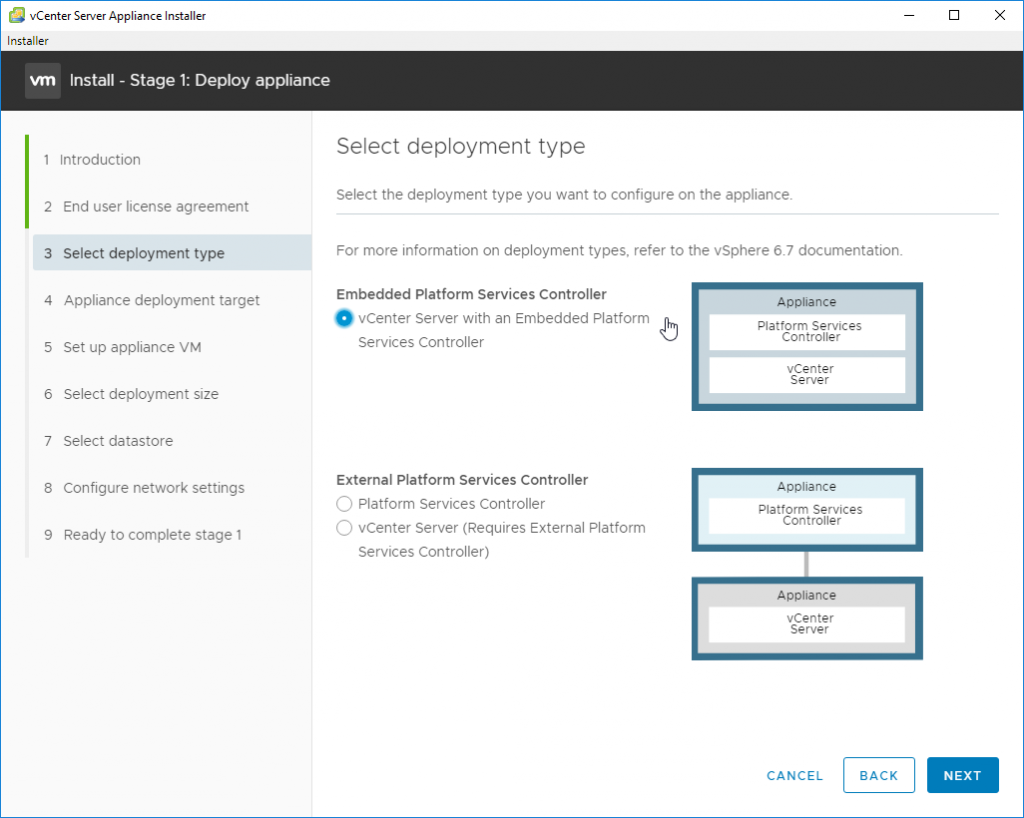
Use Embedded vCenter and PSC ratio button option
Next screen invites us to specify target for our deployment. It can be vCenter server or individual host. If you have individual host, just put an IP address of the individual host.
In my case I have small lab where I’m using vCenter server so I point to my current vCenter.
Enter the FQDN or IP address of the host, or vCenter upon which you wish to deploy the new VCSA. Enter the credentials of an administrative or root user and click Next. The installer will validate access, if prompted with an untrusted SSL certificate message click.
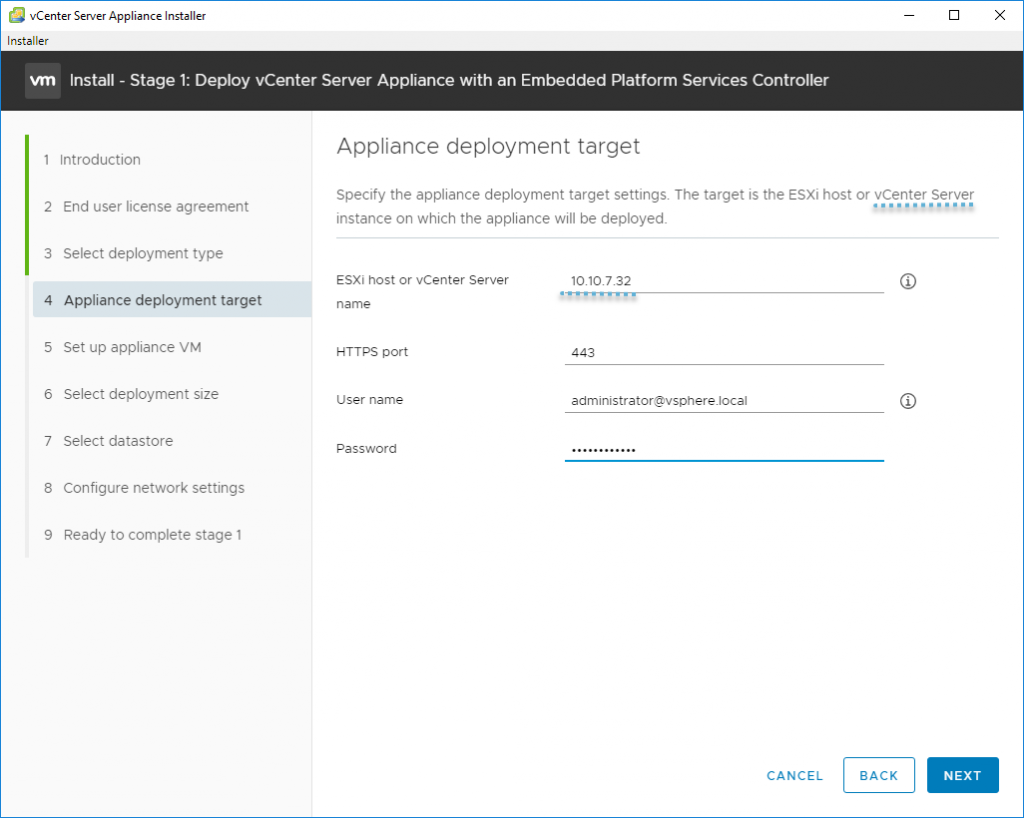
Specify deployment target
After this, we’ll continue with the assistant and have a view of our datacenter. We must choose a location where this VM will be registered and on which host/cluster.
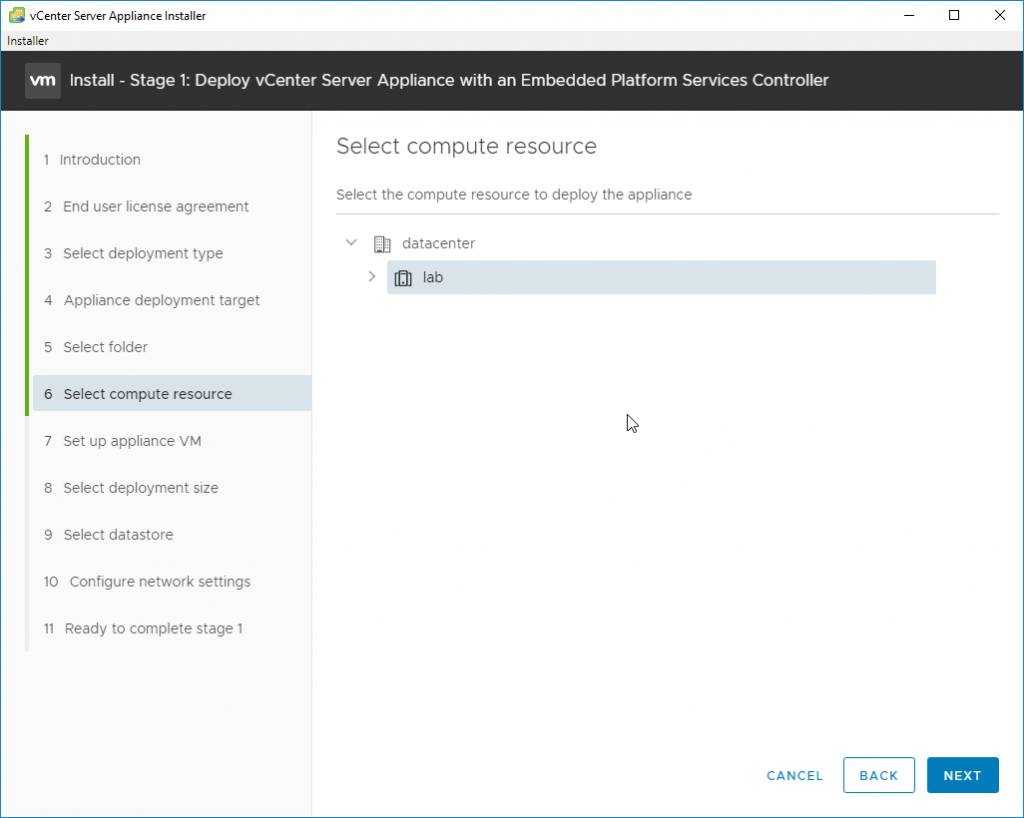
Select compute resource
Ensure that DRS is set to manual for the cluster temporarily so that the VMs for the Source and Target do not get moved during the upgrade.
And then provide the VM name and root password which must be complex enough and match. If not, the assistant won’t let you to continue.
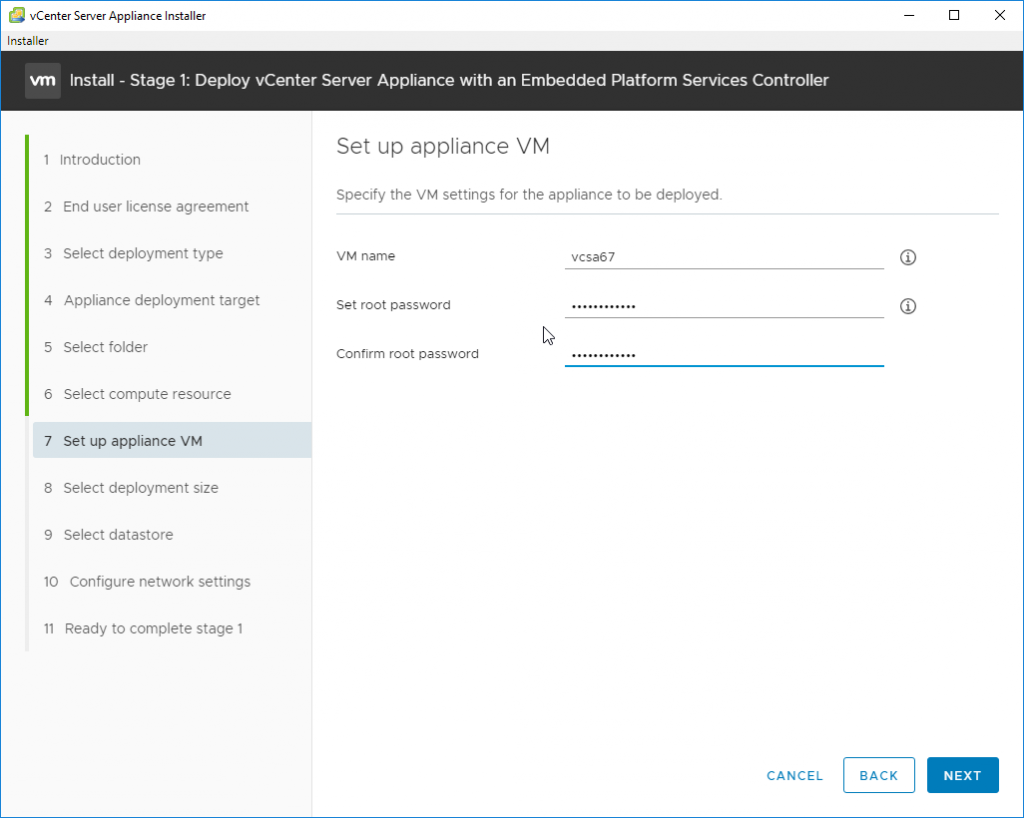
Provide VM name and root password
On the next screen we’ll chose a deployment size. We can choose between:
Tiny, Small, Medium, Large or X-Large. We can also increase the storage size of the VMDKs disks via the drop-down menu.
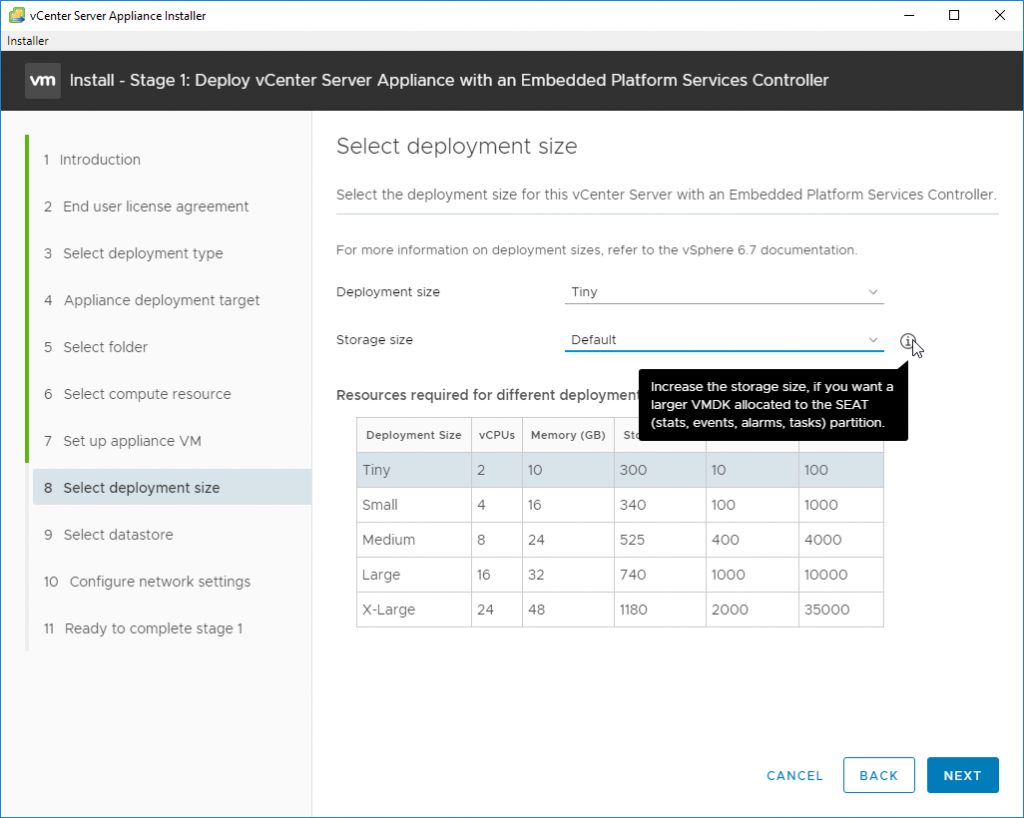
Choose storage size depending on your environment
And on the next screen we’ll need to select a datastore location for our VMDKs, VM’s config files and other files will be stored.
Note that we have an option to enable Think disk mode, which allows us to save some disk space.
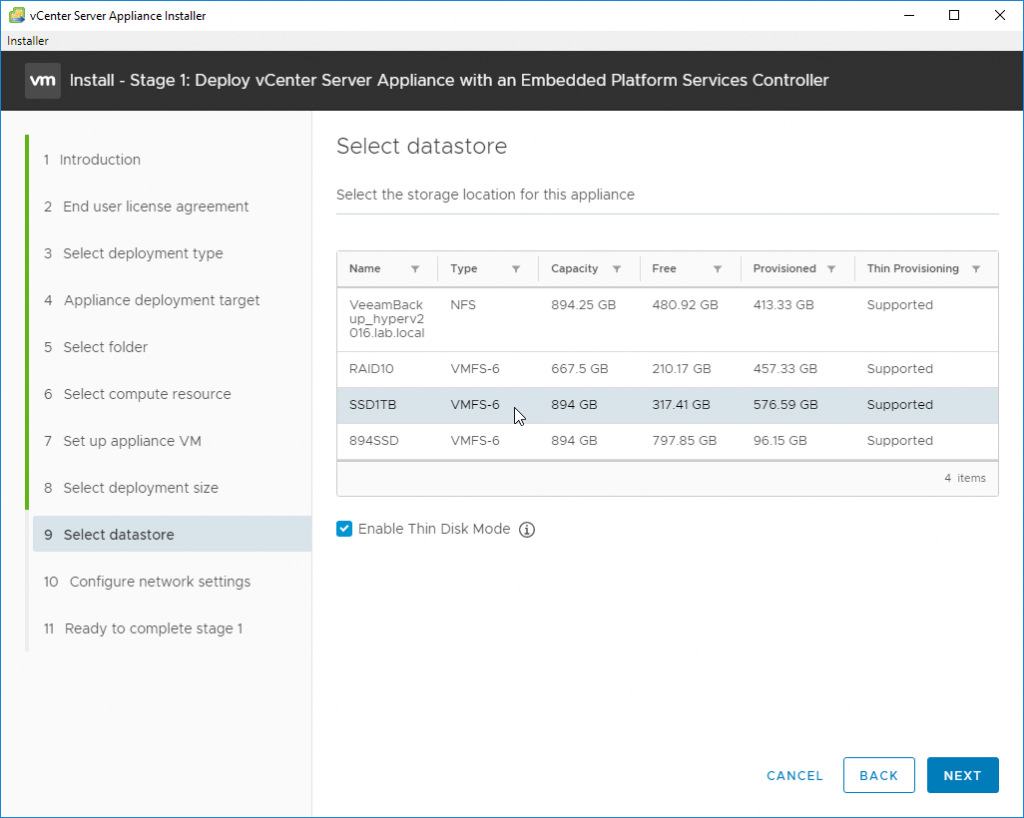
Select datastore where those VMDKs will be stored.
One last step is to configure network settings. Make sure you enter the correct values which depends on your environment.
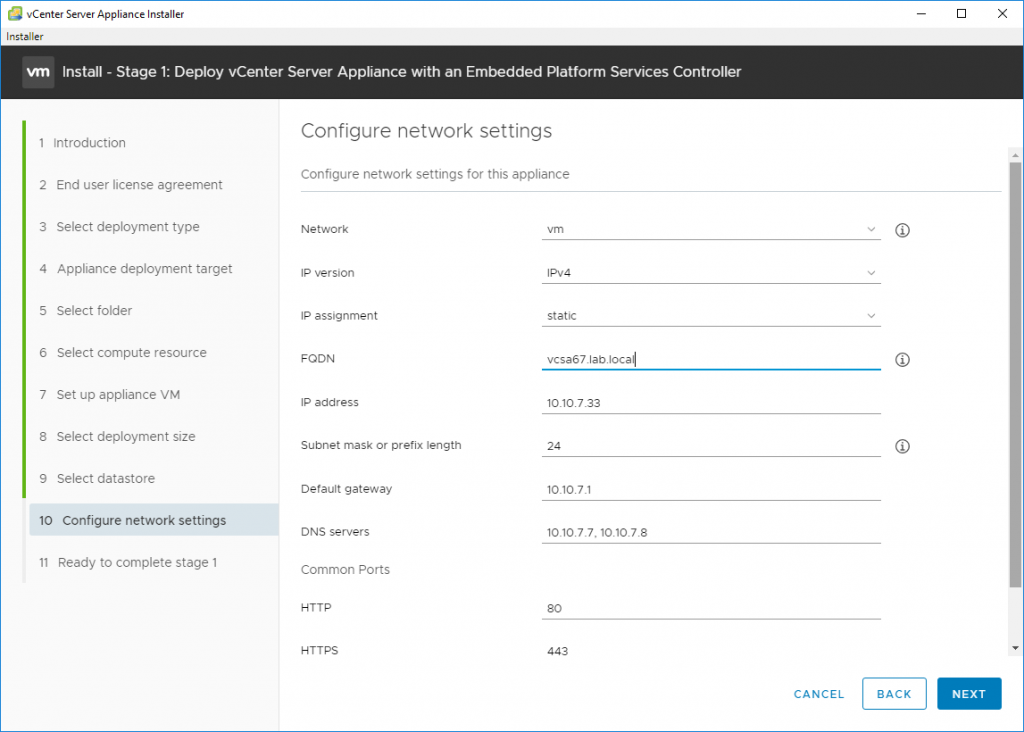
Configure network settings of your VCSA
After the recap screen, this closes the stage 1
You’ll see the deployment process to continue.
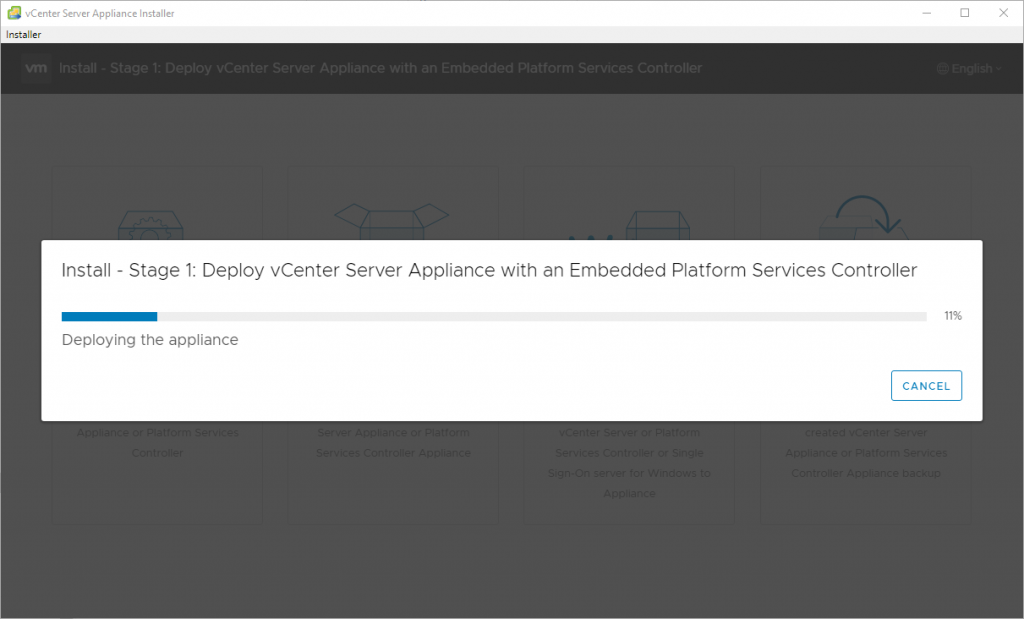
Stage 1 is deploying the VCSA appliance
Then you can click Continue for the phase 2 configuration.
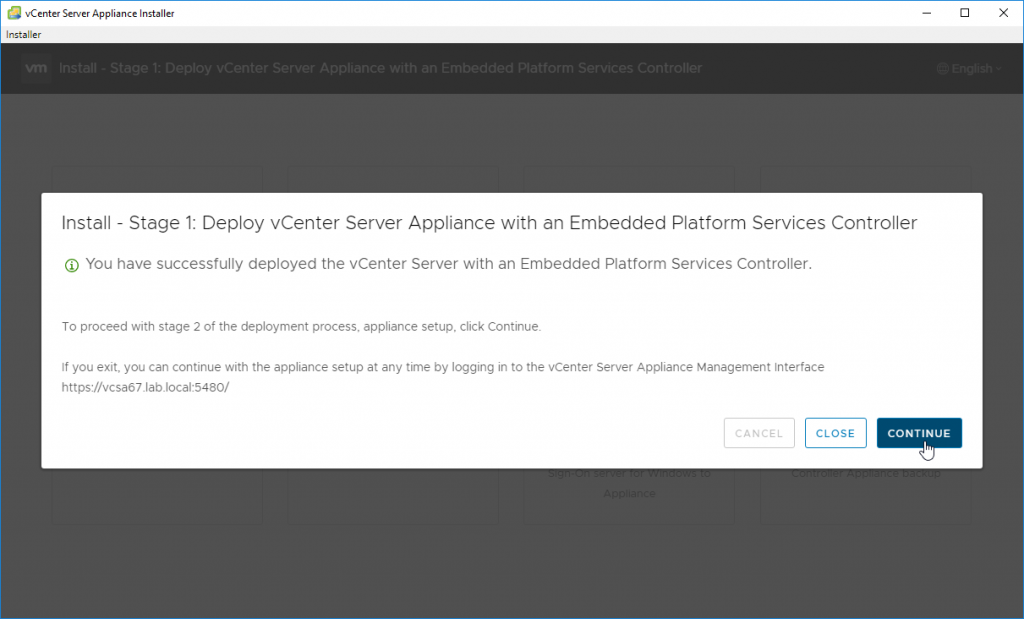
It will check the config and retrieve information before starting another assistant. Follow the assistant.
You’ll have an option to enable SSH and chose Time Synchronization Method. While you can do that during the configuration, there is also possibility to do that later when configuring and monitoring the VCSA appliance itself.
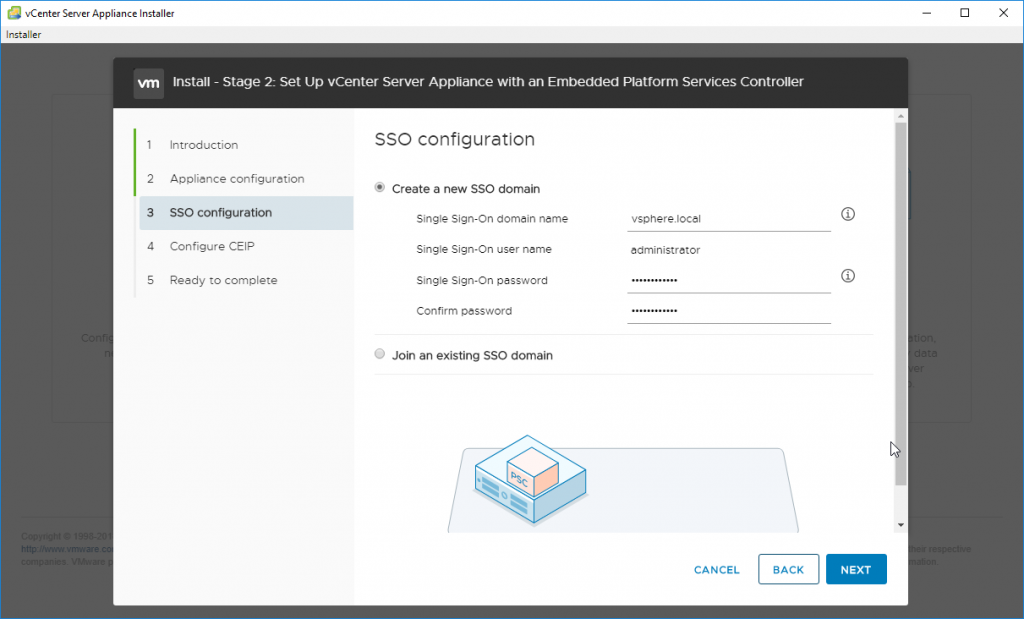
Next, we need to configure VMware SSO and Administrator’s password. We are creating new SSO domain as it is a greenfield installation.
You can also choose to join existing SSO domain if you’re installing another vCenter server within the same installation.
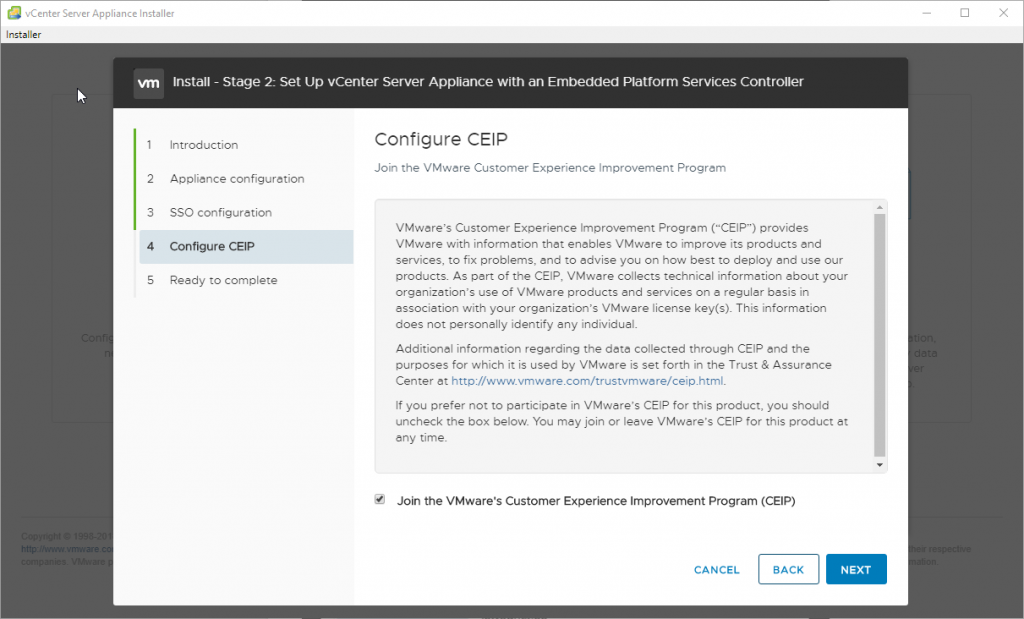
You can opt-in and join VMware customer experience improvement program (CEIP) which helps VMware to improve its products and services, to fix problems, and to advise you on how best to deploy and use their products.
However, VMware collects technical information about your organization, but not much. The advantage of joining the CEIP is that when you ask for a support, VMware has much more insight from your installation than if you haven’t checked that. They can see firmware/driver versions on host and also misconfigurations. This greatly helps in troubleshooting.
And the final screen looks like this.
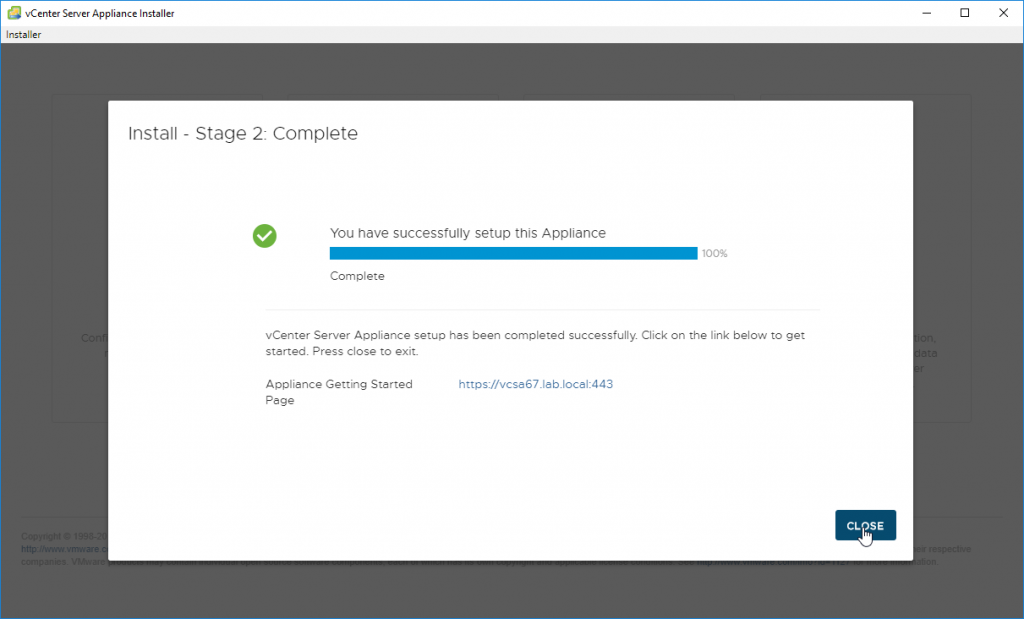
And at the end you can launch either the HTML 5 web client or the Flex based web client. Both works, but the Flex based client will not be developed further.
Post-Installation
Connect to the vCenter post install using the IP or FQDN of the vCenter. You’ll still have a choice between HTML5 vSphere client and Flex based vSphere client. You’ll have 60 days to apply a license key.
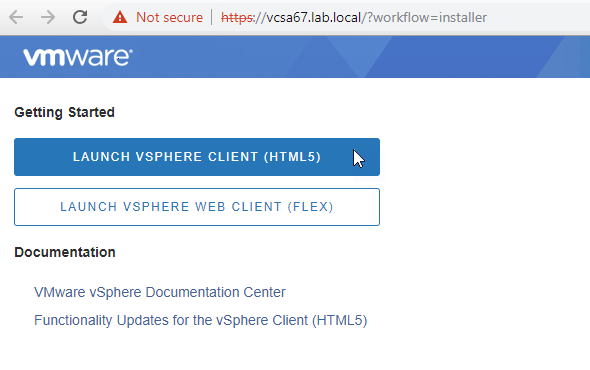
Launch vSphere HTML5 Web client
If it’s a fresh deployment, and If you have installed your hosts, you can now start to add them to your vCenter server.
You would start by creating Datacenter object, cluster object and add host after host to the cluster.
Basically, this is the end of our post on Installing and configuring VMware vCenter Server Appliance (VCSA) 6.7 U1.
Even though it is a Linux appliance, the process is very straightforward and simple. VMware has done a good job to keep things simple.
By slowly eliminating any plugins (old Flash based client is going slowly away) and providing good and simple workflows with form checks for password correction and network requirements, there is very few thins which could possibly go wrong.
Related materials:
Filed under:
Software by Vladan Seget
VMware vCenter Appliance Installer on Ubuntu Linux
I have found that, when working with VMware vSphere, there are many benefits of running Linux on your workstation.
Things like tight integration with SSH, ISO files, API’s, Python are all things that make your life easier not only on Linux, but also when working with VMware.
But there are also things that are easier on Windows, so you win some and you loose some.
If you are already running Linux you might not have noticed that you do not need a Windows machine to install og upgrade the vCenter Appliance. You can run the installer right from our Linux OS.
After unpacking the ISO file by right clicking and choosing extract, just head to the vcsa-ui-installer folder like you normally would.
Open the lin64 folder
Run the installer by double clicking.

If nothing happens you are most likely missing a dependency.
On a standard Ubuntu 18.10 you will be missing the libgconf2-4 package, and that is easy to fix.
Just run the following command in a terminal and you are good to go.
sudo apt install libgconf-2-4
If it still does not work. Start a terminal and run the installer from there. You should there be able to see it any other libraries are missing.
vCSA | How to install vCenter Server Appliance (vCSA)
![]()
As you know How to install vCenter, you need a dedicated infrastructure which includes VM, patching stuff, anti-virus and other management tasks for smoothly running of vCenter that involves costs and time overheads.
With the help of vCenter Server Appliance (vCSA), it is Linux based virtual machine, optimized for running vCenter Server.you doesn’t needs any dedicated Server for installing and configuring vCenter.
Doesn’t required any knowledge about Linux for managing, no installation has to be performed, it is a fastest way to get the vCenter Server up and running.
- It Supports all traditional vCenter features like DRS,SDRS,host profiles,dvSwitch, etc.
- No need of Windows Operating System.
- No need to install vCenter Server manually.
- Deployment is very simple & Fast
DisAdvantages:
- vCenter Server linked mode doesn’t work
- vCenter Server heartbeat doesn’t work.
- No single sign on using AD
- Doesn’t support SQL as an external database
- Doesn’t Supports IPv6.
Deploying the vCenter Server 5 Appliance.
Requirements:
- Need an already installed ESXi 5 as a host.
- vSphere client must be installed.
- Download the following files from the VWware.
- .OVF files
- Appliance data disk.
- Appliance system disk – About 4 GB.
Download vCenter Server Appliance:
Get the vCSA by doing the steps:
- Go to VMware.com
- Select Support & Downloads ———> VMware vSphere
- Click on Download vSphere free Trial.
- Login with your credentials.
- Expand the Download the management server and select below products for download.
Install vCSA on ESXi:
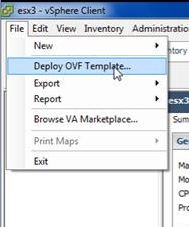
Follow the below mentioned steps to install vCSA on ESXi, Connect your vSphere Client to the ESXi server where you want vCSA to run
Step 1: Click File and select Deploy OVF Template…
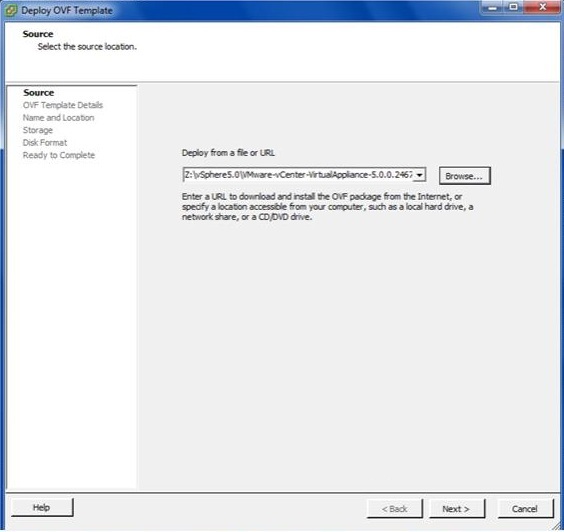
Step 2: In the Source page, click Browse and enter the location of .OVF file. Click Next.
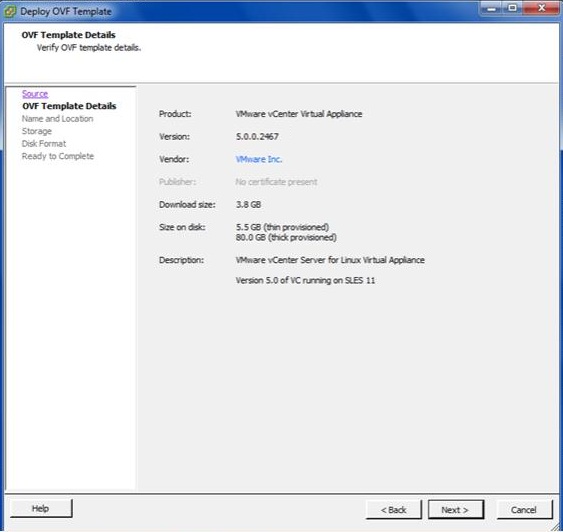
Step 3: Verify your OVF templates details, it will show the details of the OVF like Product, Vendor,Size,etc.Click Next.
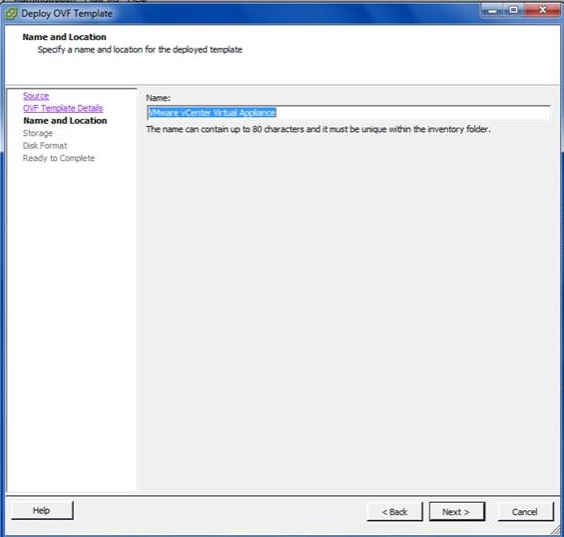
Step 3: In the Name and Location wizard, enter name for identification and click Next.
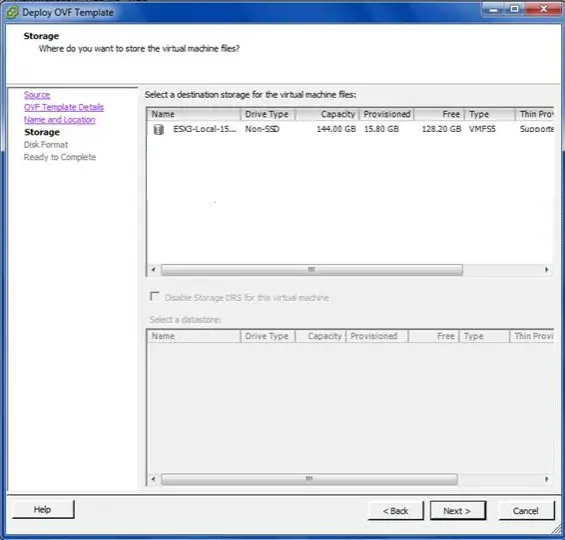
Step 4: In the Storage window, select the datastore that would be used for storing this VM. You can select local disk as well, but NAS/SAN is recommended. Click Next.
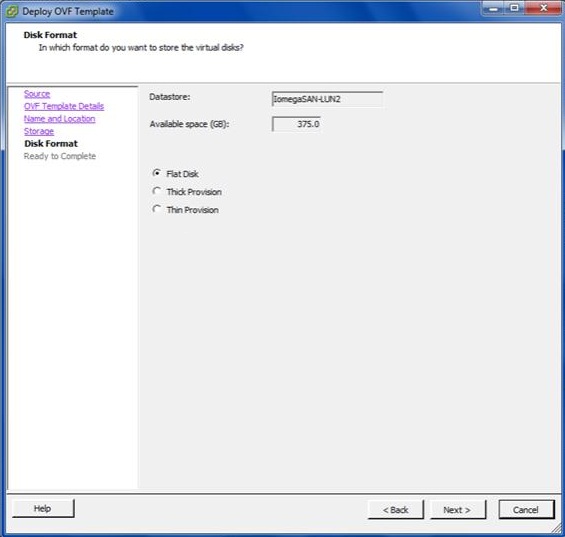
Step 5: Select VM disk format, Flat, thick or thin provision. Flat is recommended for the best performance, and thick is typically selected when you are using VMWare Fault Tolerance. Click Next.
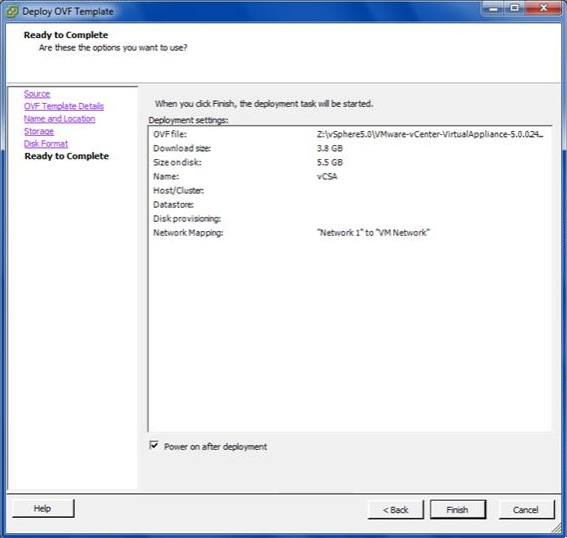
Step 6: Select Power on after Deployment and click Finish to start the installation process.
The Next window shows the deploying vCenter.
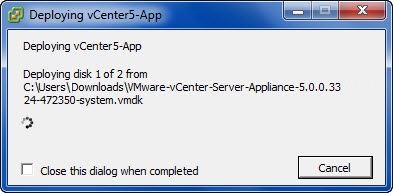
Once deployment is successful, you will see the new vCenter appliance as new virtual machine on your ESXi server.
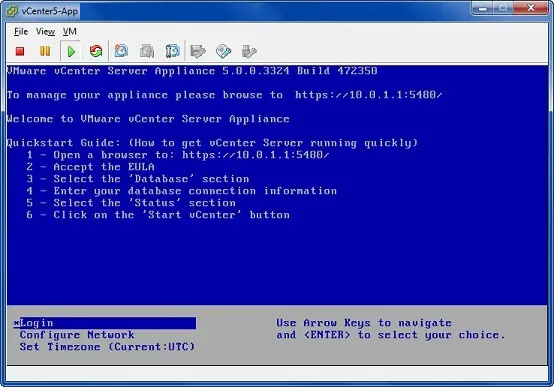
As seen the above vCSA console, you will ll have the IP address and port number to manage the vCSA, and the steps you will need to perform initial configuration of the vCSA .
Open your web browser, type the https://ipaddress:portname to access vCSA, in my case it will look like https://10.0.1.1:5480.
You can use this text-based console to perform the initial network configuration and set the time zone OR you can do those things in the GUI console. The vCSA does have a Linux-based CLI console, as well, if you go into “Login”, that can be used for management and troubleshooting of the appliance (if required).