- Installing Veeam Agent for Linux in Offline Mode
- How to Install Veeam Agent for Linux?
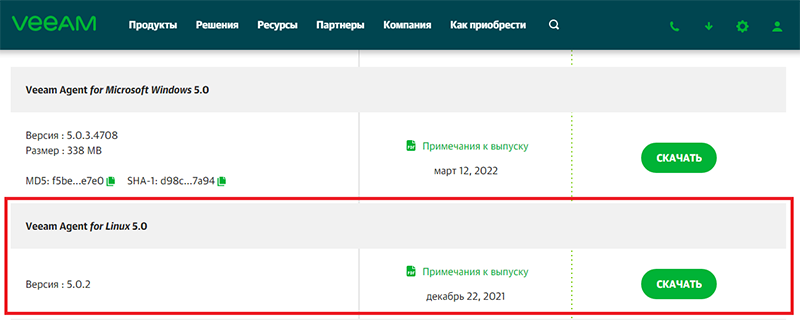
- Установка Veeam Agent на Linux — получение дистрибутива и файла лицензии
- Установка Veeam Agent Linux
- Не нашли инструкцию?
- Управление спамом — виртуальный офис Communigate
- Описание vCloud Availability
- Удаленный РОР -синхронизация с другими почтовыми сервисами виртуального офиса Communigate
- Dashboard — Главная страница Veeam Self Service Portal
- Настройка прав доступа к почтовому ящику
- Удаление резервных копий ВМ — Self Service Portal
Installing Veeam Agent for Linux in Offline Mode
If a computer where you want to install Veeam Agent for Linux has no connection to the internet, for example, for security reasons, you can install Veeam Agent in the offline mode. In this scenario, you do not need to download and install the Veeam software repository installation package ( veeam-release ). Instead, you need to download all Veeam Agent packages from the Veeam software repository and install them on the target computer.
To install Veeam Agent for Linux:
- On a computer that is connected to the internet, download Veeam Agent packages intended for your Linux distribution from the Veeam software repository .
- Veeam Agent for Linux packages in the Debian format reside in the following folders of the Veeam software repository:
- /backup/linux/agent/dpkg/debian/public/pool/veeam/v/veeam/
- /backup/linux/agent/dpkg/debian/public/pool/veeam/v/veeamsnap/
- /backup/linux/agent/dpkg/debian/public/pool/veeam/b/blksnap/
- /backup/linux/agent/dpkg/debian/public//pool/veeam/v/veeam-nosnap/
- For RPM packages, the Veeam Agent directory has the following structure: Package format > Distribution > Version > Architecture .
For example, Veeam Agent packages for 64-bit RHEL 8 reside in the /rpm/el/8/x86_64/ folder of the Veeam software repository, and packages for 64-bit SLES 15 SP3 reside in the /rpm/sles/SLE_15_SP3/x86_64/ folder.
- Save Veeam Agent packages to a directory that can be accessed from the computer where you want to install the product, for example, a directory on a local drive or USB drive, or a network shared folder.
- On the computer where you want to install Veeam Agent , navigate to the directory where you have saved the packages and install Veeam Agent :
- Installing Veeam Agent for Linux in CentOS 7 / RHEL
- Installing Veeam Agent for Linux in Oracle Linux
- Installing Veeam Agent for Linux in Fedora
- Installing Veeam Agent for Linux in SLES
- Installing Veeam Agent for Linux in openSUSE
- Installing Veeam Agent for Linux in Debian / Ubuntu
![]()
TIP
You can also set up a local mirror of the Veeam software repository in your internal network and add this repository to the list of software sources on a computer where you want to install the product. These operations may differ depending on the Linux distribution and package manager that you use. To learn more, refer to the documentation of your Linux distribution.
After you add a local repository to the list of software sources on a computer, you will be able to install and upgrade Veeam Agent in a regular way. To learn more, see Installing Veeam Agent for Linux and Upgrading Veeam Agent for Linux .
To install Veeam Agent for Linux, use the following commands:
rpm -i <. >/kmod-veeamsnap-6.0.2.1168-2.6.32_131.0.15.el6.i386.rpm
rpm -i <. >/veeam-6.0.2.1168-1.el6.i386.rpm
rpm -i <. >/kmod-veeamsnap-6.0.2.1168-2.6.32_131.0.15.el6.x86_64.rpm
rpm -i <. >/veeam-6.0.2.1168-1.el6.x86_64.rpm
rpm -i <. >/kmod-veeamsnap-6.0.2.1168-1.el7.x86_64.rpm
rpm -i <. >/veeam-6.0.2.1168-1.el7.x86_64.rpm
rpm -i <. >/kmod-veeamsnap-6.0.2.1168-1.el8.x86_64.rpm
rpm -i <. >/veeam-6.0.2.1168-1.el8.x86_64.rpm
rpm -i <. >/kmod-blksnap-6.0.2.1168-1.el9.x86_64.rpm
rpm -i <. >/veeam-6.0.2.1168-1.el9.x86_64.rpm
<. >— path to a directory where you have saved Veeam Agent packages.
![]()
NOTE
The pre-built veeamsnap binaries require kernel 2.6.32-131.0.15 or later for RHEL 6 (excluding 2.6.32-279.el6.i686) and kernel 3.10.0-123 or later for CentOS / RHEL 7.0 – 7.7 to operate.
To install Veeam Agent for Linux, use the following commands:
rpm -i <. >/veeamsnap-6.0.2.1168-1.noarch.rpm
rpm -i <. >/veeam-6.0.2.1168-1.el6.i386.rpm
rpm -i <. >/veeamsnap-6.0.2.1168-1.noarch.rpm
rpm -i <. >/veeam-6.0.2.1168-1.el6.x86_64.rpm
rpm -i <. >/veeamsnap-6.0.2.1168-1.noarch.rpm
rpm -i <. >/veeam-6.0.2.1168-1.el7.x86_64.rpm
rpm -i <. >/veeamsnap-6.0.2.1168-1.noarch.rpm
rpm -i <. >/veeam-6.0.2.1168-1.el8.x86_64.rpm
rpm -i <. >/blksnap-6.0.2.1168-1.noarch.rpm
rpm -i <. >/veeam-6.0.2.1168-1.el9.x86_64.rpm
<. >— path to a directory where you have saved Veeam Agent packages.
To install Veeam Agent for Linux, use the following commands:
rpm -i <. >/blksnap-6.0.2.1168-1.noarch.rpm
rpm -i <. >/veeam-6.0.2.1168-1.fc34.x86_64.rpm
<. >— path to a directory where you have saved Veeam Agent packages.
To install Veeam Agent for Linux, use the following commands:
zypper in <. >/veeamsnap-kmp-default-6.0.2.1168_k4.12.14_94.41-sles12.4.x86_64.rpm
zypper in <. >/veeam-6.0.2.1168-1.sle12.x86_64.rpm
zypper in <. >/veeamsnap-kmp-default-6.0.2.1168_k4.12.14_120-sles12.5.x86_64.rpm
zypper in <. >/veeam-6.0.2.1168-1.sle12.x86_64.rpm
zypper in <. >/veeamsnap-kmp-default-6.0.2.1168_k4.12.14_195-sles15.1.x86_64.rpm
zypper in <. >/veeam-6.0.2.1168-1.sle15.x86_64.rpm
For SLES 15 SP2 with default kernel
zypper in <. >/veeamsnap-kmp-default-6.0.2.1168_k5.3.18_22-sles15.2.x86_64.rpm
zypper in <. >/veeam-6.0.2.1168-1.sle15.x86_64.rpm
For SLES 15 SP2 with preemptive kernel
zypper in <. >/veeamsnap-kmp-preempt-6.0.2.1168_k5.3.18_22-sles15.2.x86_64.rpm
zypper in <. >/veeam-6.0.2.1168-1.sle15.x86_64.rpm
For SLES 15 SP3 with default kernel
zypper in <. >/blksnap-kmp-default-6.0.2.1168_k5.3.18_57-sles15.3.x86_64.rpm
zypper in <. >/veeam-6.0.2.1168-1.sle15.x86_64.rpm
For SLES 15 SP3 with preemptive kernel
zypper in <. >/blksnap-kmp-preempt-6.0.2.1168_k5.3.18_57-sles15.3.x86_64.rpm
zypper in <. >/veeam-6.0.2.1168-1.sle15.x86_64.rpm
zypper in <. >/blksnap-kmp-default-6.0.2.1168_k5.14.21_150400.22-sles15.4.x86_64.rpm
zypper in <. >/veeam-6.0.2.1168-1.sle15.x86_64.rpm
<. >— path to a directory where you have saved Veeam Agent packages.
To install Veeam Agent for Linux, use the following commands:
zypper in <. >/blksnap-6.0.2.1168-1.sle.noarch.rpm
zypper in <. >/veeam-6.0.2.1168-1.suse.x86_64.rpm
For openSUSE Leap 15.3 with default kernel
zypper in <. >/blksnap-kmp-default-6.0.2.1168_k5.3.18_59.10-opensuse_leap15.3.x86_64.rpm
zypper in <. >/veeam-6.0.2.1168-1.sle15.x86_64.rpm
For openSUSE Leap 15.3 with preemptive kernel
zypper in <. >/blksnap-kmp-preempt-6.0.2.1168_k5.3.18_59.10-opensuse_leap15.3.x86_64.rpm
zypper in <. >/veeam-6.0.2.1168-1.sle15.x86_64.rpm
zypper in <. >/blksnap-kmp-default-6.0.2.1168_k5.14.21_150400.22-opensuse_leap15.4.x86_64.rpm
zypper in <. >/veeam-6.0.2.1168-1.sle15.x86_64.rpm
<. >— path to a directory where you have saved Veeam Agent packages.
To install Veeam Agent for Linux, use the following commands:
For Debian 10 / Ubuntu 16.04, 18.04, 20.04 (kernel 5.4)
dpkg -i <. >/veeamsnap_6.0.2.1168_all.deb
dpkg -i <. >/veeam_6.0.2.1168_amd64.deb
For Debian 11 / Ubuntu 22.04 and 22.10
dpkg -i <. >/blksnap_6.0.2.1168_all.deb
dpkg -i <. >/veeam_6.0.2.1168_amd64.deb
<. >— path to a directory where you have saved Veeam Agent packages.
How to Install Veeam Agent for Linux?
In this article, we will look at how to install Veeam Agent for Linux on CentOS/RHEL/Rocky/Oracle Linux/Debian/Ubuntu.
You can install the Veeam agent manually. You must have python version 3.0 or newer installed on your host. On CentOS 7, you can add the ius repository:
$ sudo nano /etc/yum.repos.d/ius.repo[ius]
name = IUS for Enterprise Linux 7 — $basearch
baseurl = https://repo.ius.io/7/$basearch/
enabled = 1
repo_gpgcheck = 0
gpgcheck = 1
gpgkey = https://repo.ius.io/RPM-GPG-KEY-IUS-7
$ sudo yum install -y python36 python36-devel python36-pipNow add the veeam repository:
$ sudo nano /etc/yum.repos.d/veeam.repoAdd the following configuration to the file:
[veeam]
baseurl=http://repository.veeam.com/backup/linux/agent/rpm/el/7/x86_64/
gpgcheck=0
enabled=1
gpgkey=http://repository.veeam.com/keys/veeam.gpg
Now install the agent and add your user to the veeam group:
$ sudo yum install -y veeam $ sudo rpm -e --nodeps veeamsnap $ sudo yum -y install kmod-veeamsnap $ sudo usermod -a -G veeam sysopsNote. In my case, I removed the veeamsnap package because when it is installed, I got an error when performing a backup task:
Veeam — Failed to load module [veeamsnap] with parameters [zerosnapdata=1 debuglogging=0].
For RHEL-based distros, kmod-veeamsnap should be used instead of veeamsnap.
You can also install the Veeam repository:
# yum install http://repository.veeam.com/backup/linux/agent/rpm/el/8/x86_64/veeam-release-el8-1.0.7-1.x86_64.rpm# wget http://repository.veeam.com/backup/linux/agent/dpkg/debian/x86_64/pool/veeam/v/veeam-release-deb/veeam-release-deb_1.0.7_amd64.deb # apt-get install veeam-release-deb_1.0.7_amd64.deb # apt-get install veeamRe-login the system and start the agent:
The Veeam agent installer will prompt you to create a recovery image (a bootable ISO for your Linux host). In this case, you will need to install additional packages:
$ sudo yum -y install squashfs-tools genisoimage xorrisoHowever, you can skip this step.
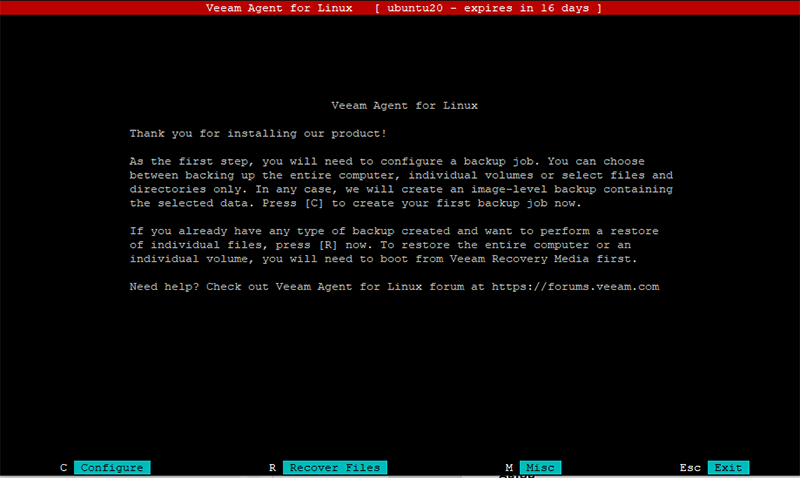
Then enter your license key. If you don’t have the key, just click Finish.

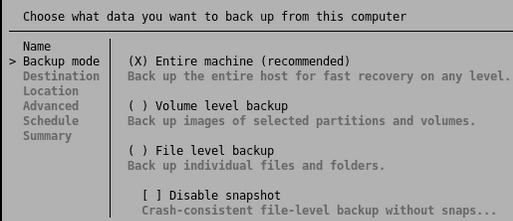
After that, you can create a Veeam backup task for your host. Press the C (Configure) button and follow the steps of the pseudographic wizard to create the job. The following modes are available
- Entire machine (recommended) – full host backup for fast recovery
- Volume level backup – backing up specific partitions
- File level backup – backing up individual directories and files
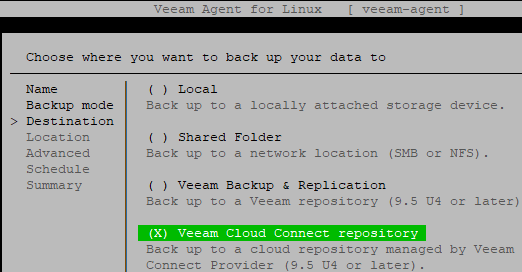
The backup can be sent to local or remote storage or a network folder (requires CIFS client installed).
You can also install the agent on Linux remotely over the network through the Veeam Backup and Replication console.
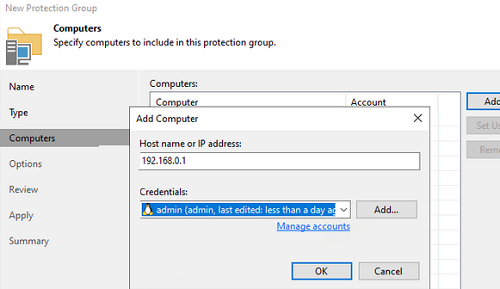
- Go to Inventory -> Physical Infrastructure
- Create a Protection Group, set Individual computers type
- Add the IP address (or DNS name) of your Linux host and user credentials to the list of computers.
- If you have Veeam Backup and Replication installed with a license, you can use this license for your Linux agent. To do this, go to License ->Instances and enable the option Allow unlicensed agents to consume instance.
Don’t forget to open the following ports on the firewall for access from the Veeam Backup server to the agent on Linux (https://helpcenter.veeam.com/docs/backup/vsphere/used_ports.html?ver=110#linux-server):
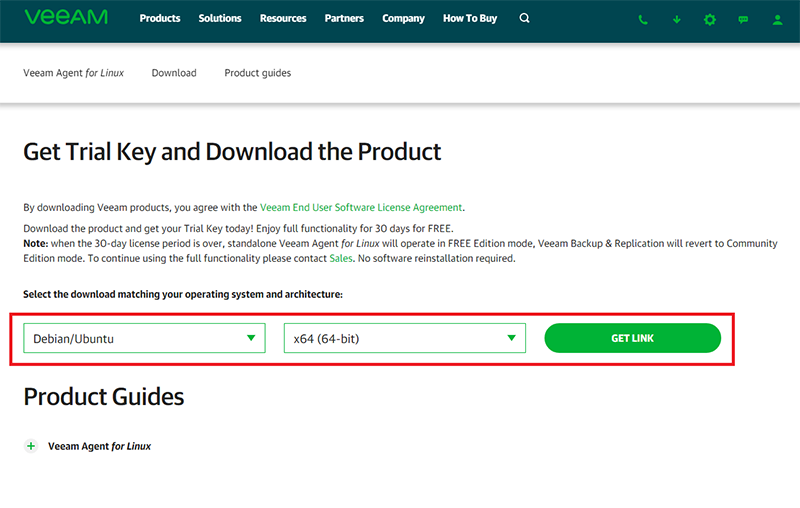
Установка Veeam Agent на Linux — получение дистрибутива и файла лицензии
В появившемся диалогом окне выбрать дистрибутив и его разрядность, нажать на кнопку «Get Link»:
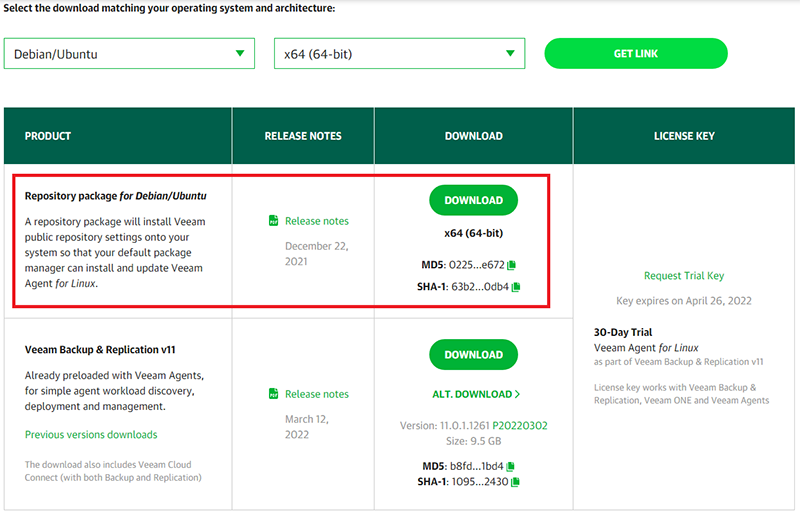
В появившемся диалогом нажать на кнопку Download:
Нажав на кнопку Request Trial Key Вам на почту будет направлен пробный 30-дневный лицензионный ключ
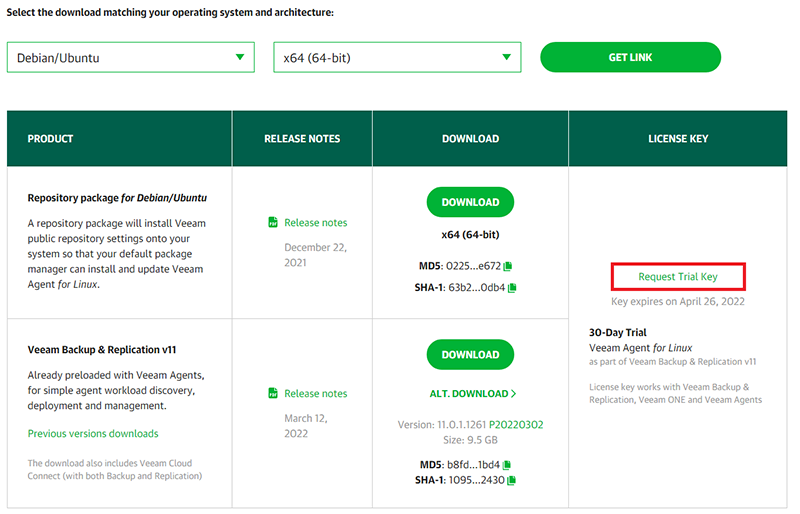
На почту придёт письмо с темой: Veeam 30-Day Evaluation Key: Veeam Backup & Replication.
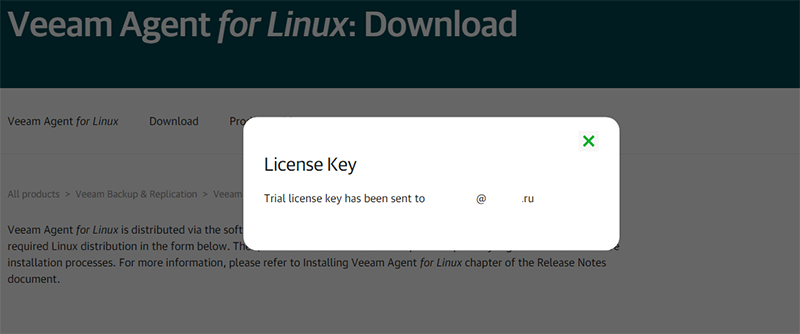
Во вложении к письму будет содержаться лицензионный ключ в формате lic. Скачайте его.
Установка Veeam Agent Linux
- Загружаем файл лицензии и пакет любым удобным способом на целевой хост/виртуальную машину
- Устанавливаем репозиторий из пакета: dpkg -i ./veeam-release* && apt-get update
- Читаем состав ранее установленного репозитория и устанавливаем агент: apt update apt install veeam –y
- Дожидаемся окончания установки
- Запуск и Настройка агента будет осуществляться через графический интерфейс. Запускаем агент veeam помощью команды: veeam
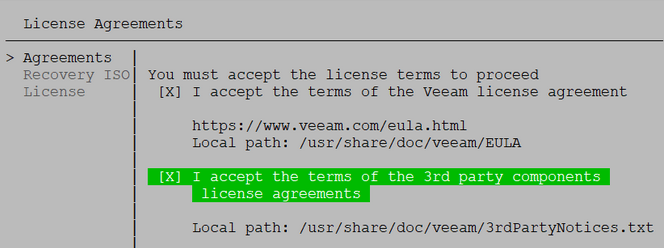
- На шаге License Agreements (Пользовательское соглашение) с помощью клавиши «пробел» необходимо принять соглашение, после чего нажать Next

- Пропускаем шаг Custom Recovery Media – Recovery ISO нажав Next
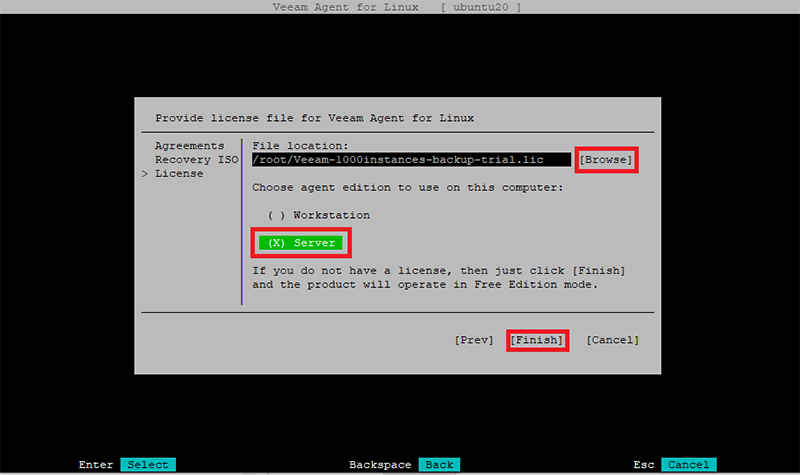
- На шаге Provide license file for Veeam Agent for Linux (Добавление файла лицензии) указываем путь до ранее полученного файла. Для этого необходимо: — выбрать «Browse» — в открывшемся файловом менеджере необходимо указать путь куда ранее был сохранен файл лицензии — изменить тип редакции с Workstation на Server — нажать клавишу Enter (Finish)
Установка Veeam агента успешно завершена.

Не нашли инструкцию?
Заполните форму, и наш специалист свяжется с вами.
Мы дополним информацию и ответим на Ваш вопрос.
Управление спамом — виртуальный офис Communigate
В данном разделе Вы можете настроить правила обработки спам-писем.
Описание vCloud Availability
vCloud на текущий момент поддерживает максимально hardware version 15. Это необходимо учитывать при подготовке к миграции с помощью vCloud Availability. Иначе есть риск столкнуться с ошибкой, что HWV виртуальной машины не поддерживается vCloud на площадках.
Удаленный РОР -синхронизация с другими почтовыми сервисами виртуального офиса Communigate
Позволяет настроить синхронизацию с другими почтовыми сервисами, например, Google. При синхронизации создается дополнительная папка, в которой отображаются письма другого почтового ящика.
Dashboard — Главная страница Veeam Self Service Portal
Настройка прав доступа к почтовому ящику
Для того чтобы настроить полномочия доступа к почтовому ящику и полномочия на отправку, выберите пункт:
Домашняя страница» Директор службы» Хостинг Exchange» Учетные записи Exchange» Управление сервисом
Удаление резервных копий ВМ — Self Service Portal
Для удаления резервных копий виртуальной машины выберите нужную виртуальную машину из списка и нажмите кнопку «Delete».