Installing Veeam Agent for Linux in Offline Mode
If a computer where you want to install Veeam Agent for Linux has no connection to the internet, for example, for security reasons, you can install Veeam Agent in the offline mode. In this scenario, you do not need to download and install the Veeam software repository installation package ( veeam-release ). Instead, you need to download all Veeam Agent packages from the Veeam software repository and install them on the target computer.
To install Veeam Agent for Linux:
- On a computer that is connected to the internet, download Veeam Agent packages intended for your Linux distribution from the Veeam software repository .
- Veeam Agent for Linux packages in the Debian format reside in the following folders of the Veeam software repository:
- /backup/linux/agent/dpkg/debian/public/pool/veeam/v/veeam/
- /backup/linux/agent/dpkg/debian/public/pool/veeam/v/veeamsnap/
- /backup/linux/agent/dpkg/debian/public/pool/veeam/b/blksnap/
- /backup/linux/agent/dpkg/debian/public//pool/veeam/v/veeam-nosnap/
- For RPM packages, the Veeam Agent directory has the following structure: Package format > Distribution > Version > Architecture .
For example, Veeam Agent packages for 64-bit RHEL 8 reside in the /rpm/el/8/x86_64/ folder of the Veeam software repository, and packages for 64-bit SLES 15 SP3 reside in the /rpm/sles/SLE_15_SP3/x86_64/ folder.
- Save Veeam Agent packages to a directory that can be accessed from the computer where you want to install the product, for example, a directory on a local drive or USB drive, or a network shared folder.
- On the computer where you want to install Veeam Agent , navigate to the directory where you have saved the packages and install Veeam Agent :
- Installing Veeam Agent for Linux in CentOS 7 / RHEL
- Installing Veeam Agent for Linux in Oracle Linux
- Installing Veeam Agent for Linux in Fedora
- Installing Veeam Agent for Linux in SLES
- Installing Veeam Agent for Linux in openSUSE
- Installing Veeam Agent for Linux in Debian / Ubuntu
![]()
TIP
You can also set up a local mirror of the Veeam software repository in your internal network and add this repository to the list of software sources on a computer where you want to install the product. These operations may differ depending on the Linux distribution and package manager that you use. To learn more, refer to the documentation of your Linux distribution.
After you add a local repository to the list of software sources on a computer, you will be able to install and upgrade Veeam Agent in a regular way. To learn more, see Installing Veeam Agent for Linux and Upgrading Veeam Agent for Linux .
To install Veeam Agent for Linux, use the following commands:
rpm -i <. >/kmod-veeamsnap-6.0.2.1168-2.6.32_131.0.15.el6.i386.rpm
rpm -i <. >/veeam-6.0.2.1168-1.el6.i386.rpm
rpm -i <. >/kmod-veeamsnap-6.0.2.1168-2.6.32_131.0.15.el6.x86_64.rpm
rpm -i <. >/veeam-6.0.2.1168-1.el6.x86_64.rpm
rpm -i <. >/kmod-veeamsnap-6.0.2.1168-1.el7.x86_64.rpm
rpm -i <. >/veeam-6.0.2.1168-1.el7.x86_64.rpm
rpm -i <. >/kmod-veeamsnap-6.0.2.1168-1.el8.x86_64.rpm
rpm -i <. >/veeam-6.0.2.1168-1.el8.x86_64.rpm
rpm -i <. >/kmod-blksnap-6.0.2.1168-1.el9.x86_64.rpm
rpm -i <. >/veeam-6.0.2.1168-1.el9.x86_64.rpm
<. >— path to a directory where you have saved Veeam Agent packages.
![]()
NOTE
The pre-built veeamsnap binaries require kernel 2.6.32-131.0.15 or later for RHEL 6 (excluding 2.6.32-279.el6.i686) and kernel 3.10.0-123 or later for CentOS / RHEL 7.0 – 7.7 to operate.
To install Veeam Agent for Linux, use the following commands:
rpm -i <. >/veeamsnap-6.0.2.1168-1.noarch.rpm
rpm -i <. >/veeam-6.0.2.1168-1.el6.i386.rpm
rpm -i <. >/veeamsnap-6.0.2.1168-1.noarch.rpm
rpm -i <. >/veeam-6.0.2.1168-1.el6.x86_64.rpm
rpm -i <. >/veeamsnap-6.0.2.1168-1.noarch.rpm
rpm -i <. >/veeam-6.0.2.1168-1.el7.x86_64.rpm
rpm -i <. >/veeamsnap-6.0.2.1168-1.noarch.rpm
rpm -i <. >/veeam-6.0.2.1168-1.el8.x86_64.rpm
rpm -i <. >/blksnap-6.0.2.1168-1.noarch.rpm
rpm -i <. >/veeam-6.0.2.1168-1.el9.x86_64.rpm
<. >— path to a directory where you have saved Veeam Agent packages.
To install Veeam Agent for Linux, use the following commands:
rpm -i <. >/blksnap-6.0.2.1168-1.noarch.rpm
rpm -i <. >/veeam-6.0.2.1168-1.fc34.x86_64.rpm
<. >— path to a directory where you have saved Veeam Agent packages.
To install Veeam Agent for Linux, use the following commands:
zypper in <. >/veeamsnap-kmp-default-6.0.2.1168_k4.12.14_94.41-sles12.4.x86_64.rpm
zypper in <. >/veeam-6.0.2.1168-1.sle12.x86_64.rpm
zypper in <. >/veeamsnap-kmp-default-6.0.2.1168_k4.12.14_120-sles12.5.x86_64.rpm
zypper in <. >/veeam-6.0.2.1168-1.sle12.x86_64.rpm
zypper in <. >/veeamsnap-kmp-default-6.0.2.1168_k4.12.14_195-sles15.1.x86_64.rpm
zypper in <. >/veeam-6.0.2.1168-1.sle15.x86_64.rpm
For SLES 15 SP2 with default kernel
zypper in <. >/veeamsnap-kmp-default-6.0.2.1168_k5.3.18_22-sles15.2.x86_64.rpm
zypper in <. >/veeam-6.0.2.1168-1.sle15.x86_64.rpm
For SLES 15 SP2 with preemptive kernel
zypper in <. >/veeamsnap-kmp-preempt-6.0.2.1168_k5.3.18_22-sles15.2.x86_64.rpm
zypper in <. >/veeam-6.0.2.1168-1.sle15.x86_64.rpm
For SLES 15 SP3 with default kernel
zypper in <. >/blksnap-kmp-default-6.0.2.1168_k5.3.18_57-sles15.3.x86_64.rpm
zypper in <. >/veeam-6.0.2.1168-1.sle15.x86_64.rpm
For SLES 15 SP3 with preemptive kernel
zypper in <. >/blksnap-kmp-preempt-6.0.2.1168_k5.3.18_57-sles15.3.x86_64.rpm
zypper in <. >/veeam-6.0.2.1168-1.sle15.x86_64.rpm
zypper in <. >/blksnap-kmp-default-6.0.2.1168_k5.14.21_150400.22-sles15.4.x86_64.rpm
zypper in <. >/veeam-6.0.2.1168-1.sle15.x86_64.rpm
<. >— path to a directory where you have saved Veeam Agent packages.
To install Veeam Agent for Linux, use the following commands:
zypper in <. >/blksnap-6.0.2.1168-1.sle.noarch.rpm
zypper in <. >/veeam-6.0.2.1168-1.suse.x86_64.rpm
For openSUSE Leap 15.3 with default kernel
zypper in <. >/blksnap-kmp-default-6.0.2.1168_k5.3.18_59.10-opensuse_leap15.3.x86_64.rpm
zypper in <. >/veeam-6.0.2.1168-1.sle15.x86_64.rpm
For openSUSE Leap 15.3 with preemptive kernel
zypper in <. >/blksnap-kmp-preempt-6.0.2.1168_k5.3.18_59.10-opensuse_leap15.3.x86_64.rpm
zypper in <. >/veeam-6.0.2.1168-1.sle15.x86_64.rpm
zypper in <. >/blksnap-kmp-default-6.0.2.1168_k5.14.21_150400.22-opensuse_leap15.4.x86_64.rpm
zypper in <. >/veeam-6.0.2.1168-1.sle15.x86_64.rpm
<. >— path to a directory where you have saved Veeam Agent packages.
To install Veeam Agent for Linux, use the following commands:
For Debian 10 / Ubuntu 16.04, 18.04, 20.04 (kernel 5.4)
dpkg -i <. >/veeamsnap_6.0.2.1168_all.deb
dpkg -i <. >/veeam_6.0.2.1168_amd64.deb
For Debian 11 / Ubuntu 22.04 and 22.10
dpkg -i <. >/blksnap_6.0.2.1168_all.deb
dpkg -i <. >/veeam_6.0.2.1168_amd64.deb
<. >— path to a directory where you have saved Veeam Agent packages.
Настройка резервного копирования Linux с помощью Veeam Agent
Настройка резервного копирования машины на Linux с помощью Veeam Agent for Linux Free.
Процедура не сложная, однако, некоторые мои коллеги сталкивались с трудностями, поэтому решил написать статью об этом.
- Качаем дистрибутив Veeam Agent For Linux Free под нашу систему. Они разделены по битности и по семейству.
RHEL — CentOS, RedHat, Oracle и прочие
Debian based — Ubuntu, Debian, Mint и прочие - Скачиваем и закидываем соответствующей вашей системе пакет на машину удобным вам способом.
- Далее инструкцию разделю на две части. Для Debian систем и Centos по отдельности.
RHEL на примере CentOS7
Переходим в каталог, в котором лежит дистрибутив и выполняем
rpm -ivh veeam-release-e17-1.0.7.-1.x86-x64.rpm && yum check-update
Далее устанавливаем veeam
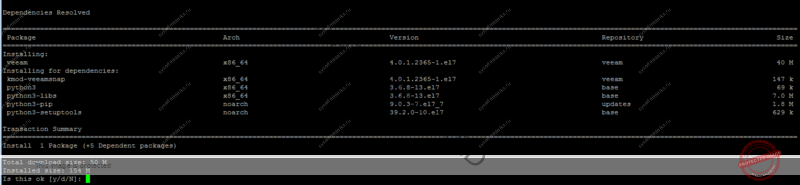
Таким образом мы установили репозитрии и из них установили самого агента. В последующем — при выходе новой версии достаточно будет просто обновиться через пакетный менеджер.
По завершении установки можно запускать агента командой
Debian на примере Ubuntu 20.04
Переходим в каталог, в котором лежит дистрибутив и выполняем
dpkg -i veeam-release-deb_1.0.8_amd64.deb
Обновляем репозитории и устанавливаем veeam
apt update && apt install veeam -y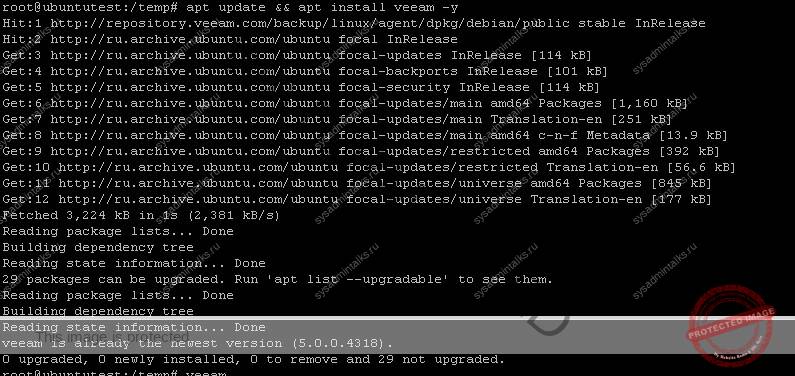
По завершению установки можно запускать агента командой:
Настройка задания
Навигация осуществляется только с помощью клавиатуры.
Стрелки, пробел для выбора и TAB для переключения.
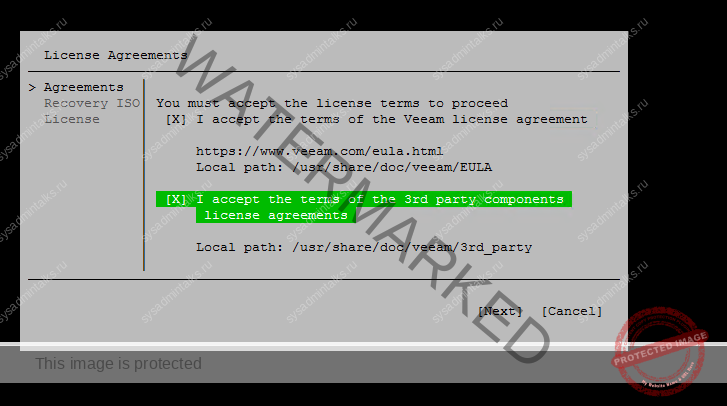
- Сперва ознакамливаемся и принимаем условия лицензии.
3. В последнем окне «License» устанавливаем флаг Workstation и сохраняем. (Если таки вдруг неожиданно окажется что у вас есть лицензия выше «free» то в этом окне надо будет указать путь до файла лицензии. Если не указывать — берется по умолчанию бесплатная.
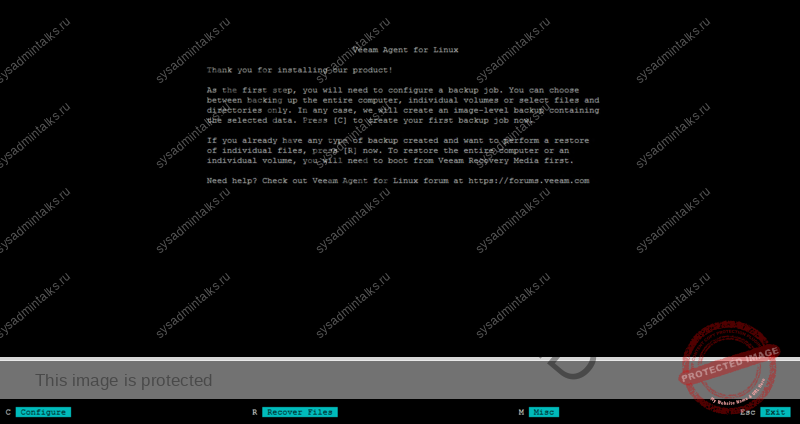
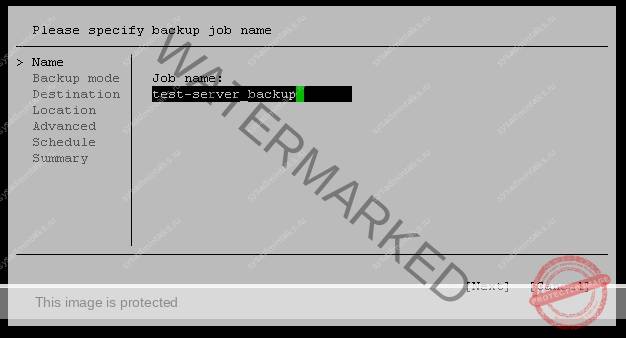
4. После завершения — сразу откроется основное окно Veeam, клацаем на клаве «С» — и создаем задание на архивацию
6. Выбираем режим резервирования:
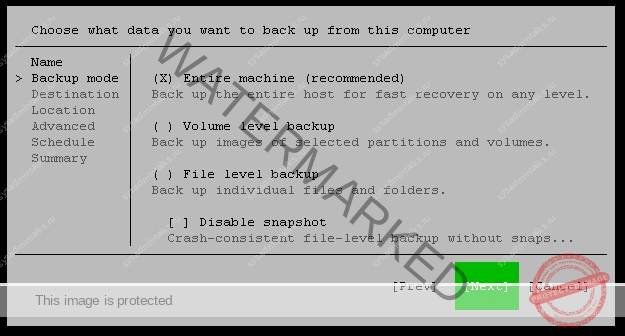
- Entire machine — вся машина целиком
- Volume level backup — позволяет выбрать отдельные тома
- File level backup — резервирование на файловом уровне, предложит выбрать список файлов\каталогов
- Disable snapshot — отклюение снэпшотов. Все копии будут полными. Пользуйтесь аккуратно, т.к. полные копии могут занимать много места и времени резервирования, в зависимости от объемов.
7. Следующее поле Destination — вообщем то требуется указать целевой место хранения
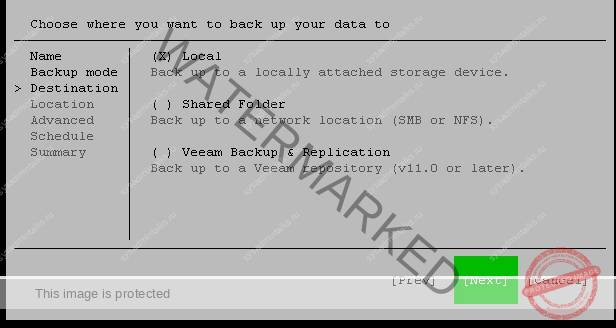
- Local — как говорит название — локально, категорически не рекомендую хранить копии сервера на самом сервере.
- Shared Folder — SMB или NFS шара
- Veeam Backup & Replication — для выполнения копирования на datastor Veeam B&R Сервера
8. Чаще всего для Агентских бэкапов используются SMB — шары, потому покажу его. Если у вас архитектура сложнее пары серверов — рекомендую использовать другие решения для централизованного бэкапа.
Для бэкапа на SMB так же требуется пакет cifs-utils, если он не установлен — шара не сможет примонтироваться, и бэкап не выполнится.
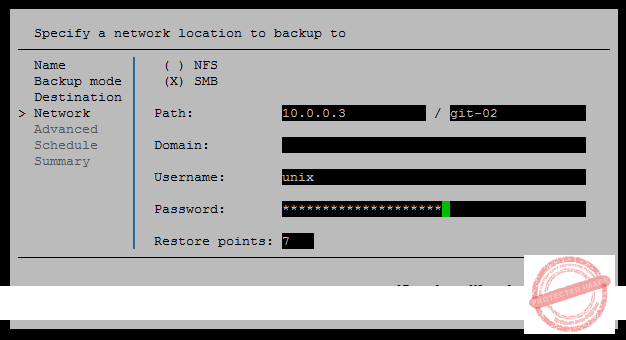
- Path — адрес сервера и каталог внутри
- Domain — Укажите домен, если шара в домене и авторизация по доменной учётке
- Username — имя пользователя, с доступом к шаре
- Password — парол пользователя
- Restore points — количество точек восстановления для хранения
9. В бесплатной версии, все параметры Advanced залочены, поэтому далее
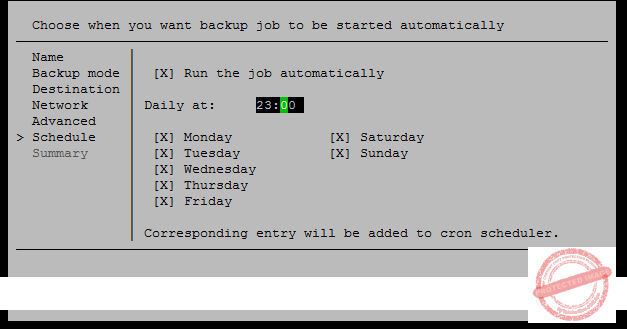
10. В меню Shedule — настраиваем параметры даты\времени выполнения задания. Ставим флаг «Run the job automatically» если хотите что бы задание само добавилось в cron и выполнялось автоматически.
11. В последнем меню проверяем парамтеры задания и устанавливаем флаг «Start Job Now» если хотите что бы оно сразу запустилось.
На этом настройка закончена. Не забудте проверять бэкапы или настройте уведомление на почту, как описанно в этой статье: Уведомления Veeam Agent for Linux по почте или в телегу
Deploying Veeam Agent for Linux
To deploy Veeam Agent for Linux using setup files generated by Veeam Backup & Replication, perform the following operations:
![]()
TIP
You can also find detailed instructions on the Veeam Agent deployment in the readme.txt file that is available among the setup files generated by Veeam Backup & Replication .
To install Veeam Agent for Linux and all the required components, do the following:
Keep in mind that you must use Veeam Agent setup files that are generated by Veeam Backup & Replication after the protection group for pre-installed Veeam Agents is created. To learn more, see Specifying Packages .
- Navigate to the directory where you have saved setup files and install Veeam Agent . This procedure is similar to the installation of the Veeam Agent for Linux in the offline mode. For details, see the Installing Veeam Agent for Linux in Offline Mode section in the Veeam Agent for Linux User Guide.
Keep in mind that if you use the APT package manager and the installation command reports that some dependencies for package not installed, run the following command instead:
After that, repeat the Veeam Agent installation procedure.
To configure Veeam Agent for Linux, you must apply connection settings from the configuration file that you obtained when the protection group for pre-installed Veeam Agents was created. To do this, run the following command from the directory where Veeam Agent setup files are located:
veeamconfig mode setVBRsettings —cfg .xml
where is a name of the protection group for pre-installed Veeam Agents. Alternatively, you can specify the full path to the configuration file passed with the — cfg option.
Consider that the connection between Veeam Backup & Replication and Veeam Agent is not persistent. Veeam Agent synchronizes with Veeam Backup & Replication every 6 hours. After you apply new backup policy settings in the Veeam Backup & Replication console, Veeam Agent will get these settings during the next synchronization.
To synchronize Veeam Agent immediately, run the following command on the Veeam Agent computer: