- Как создать резервную копию сервера Linux с помощью Veeam Agent
- Установка агента Veeam
- Конфигурация агента Veeam
- How to Backup Linux Server with Veeam Agent
- Veeam Agent Installation
- Veeam Agent Configuration
- Veeam Agent for Linux FREE
- FREE Linux Backup for Public Cloud and Physical Workloads
- Backup capabilities
- Recovery options
- More Backup and Recovery Options
Как создать резервную копию сервера Linux с помощью Veeam Agent
В нашем примере мы будем использовать ОС Ubuntu 20.04. Поэтому вам нужно скачать программное обеспечение агента Veeam отсюда Veeam Software for Enterprise и скопировать deb-файл на машину ubuntu, на которой вы планируете установить агента.
Установка агента Veeam
Перейдите в каталог, где вы сохранили пакет veeam-release, и установите пакет с помощью следующих команд для Debian / Ubuntu
И просто запустите установку пакета
После завершения установки просто запустите
Запустится руководство агента veeam.
Конфигурация агента Veeam
Резервное копирование с помощью Veeam Agent для Linux это достаточно просто. В нашем случае я буду делать полную резервную копию всей системы и перемещать ее на samba шару.
Итак, давайте создадим задачу для резервного копирования нашего сервера на наше хранилище с помощью smb. Запускаем вим:
Нам сразу же предлагается указать файл лицензии. Поскольку у нас нет лицензии, мы просто жмем Enter и проваливаемся в главное окно программы.
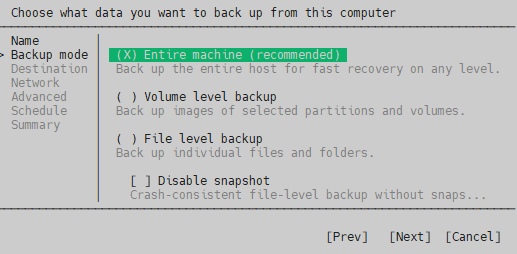
Нажимаем C (configure) для настройки задания резервного копирования. Даем заданию имя и выбираем, что мы хотим создать резервную копию всей машины.
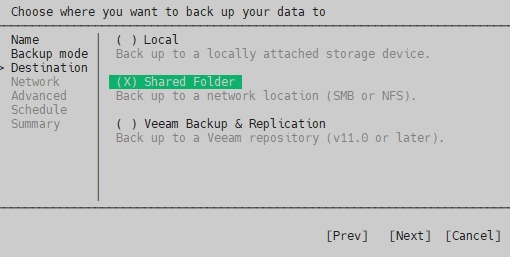
В качестве места назначения для резервного копирования системы мы выбираем Shared Folder.
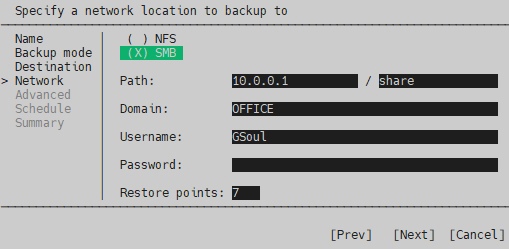
Далее необходимо ввести параметры доступа к месту резервного копирования. В моем примере я использовал общую папку на сервере Windows, поэтому я выбрал SMB share.
В пункте Restore points указывается глубина архива. Это количество копий, которые вы хотите сохранить на сервере. Если вы делаете резервное копирование каждый день и укажете 14, то будут сохранены резервные копии системы за последние 14 дней. Если вы делаете резервное копирование каждый второй день, то 28 дней и так далее.
Можно создать несколько заданий с разной глубиной резервного копирования. Например: каждый день — 7 резервных копий, раз в неделю — 4, раз в месяц — 12. Таким образом, у вас всегда будут последние 7 резервных копий системы за эту неделю. Затем по одной резервной копии в неделю за последний месяц и 12 резервных копий в месяц за последний год. Нажмите Enter для продолжения.
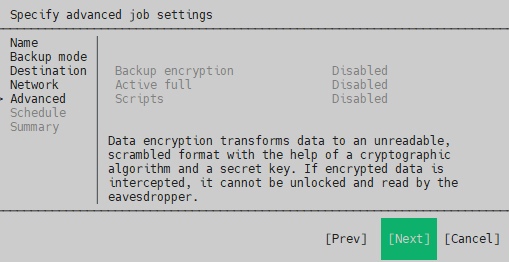
Дополнительные опции отключены по умолчанию в бесплатной версии, но если у вас есть лицензия, я рекомендую включить опцию Backup encryption чтобы зашифровать резервные копии.
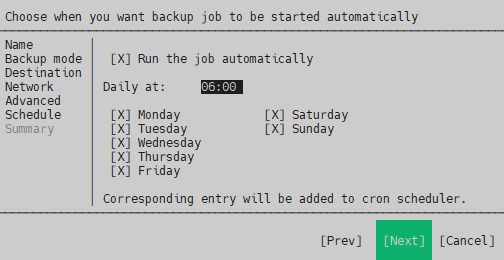
Нажмите Enter для продолжения и увидите расписание резервного копирования, в бесплатной версии вы также не можете его редактировать.
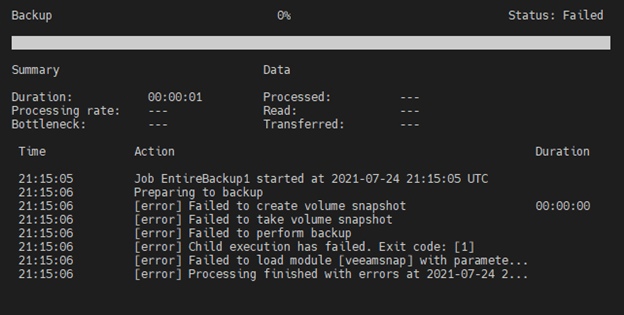
Резервное копирование сразу начнется. Если вы получите ошибку:
How to Backup Linux Server with Veeam Agent
In our example we will use Ubuntu 20.04 OS. So you need to download the Veeam agent software from here Veeam Software for Enterprise and copy the deb file your ubuntu machine where you plan to install the agent.
Veeam Agent Installation
Go to the directory where you have saved the veeam-release package and install the package with the following commands for Debian / Ubuntu
And just run the package installation
After installation finishes just run
and veeam agent gui will launch.
Veeam Agent Configuration
Backing up with Veeam Agent for Linux is very easy. There aren’t too many options to choose from, so you can check them out for yourself. In our case I will make a full backup of the whole system and move it to samba share.
So lets create a task to backup our server to our storage using smb.
We are immediately prompted to specify the license file. Since we don’t have a license, we refuse. We are greeted by the main window of the program.
Press C (configure) to setup a backup job. We give it a name for the job and then choose that we want to backup entire machine.
As a destination for the system backup, we select Shared Folder.
Next, you will need to enter access parameters to the backup location. In my example I’ve shared a folder on a Windows server, so I’ve chosen SMB share.
The Restore Points item specifies the depth of the archive. That’s the number of copies you want to keep on the server. If you make a backup every day and specify 14, the system backups for the last 14 days will be preserved. If you backup every other day, then 28 days, and so on.
You can create several tasks with different backup depths. For example: every day 7 backups, once a week 4, and once a month 12. This way you will always have the last 7 backups of the system for that week. Then one backup per week for the last month and 12 backups per month for the last year. Press Enter to continue
Advanced options disabled by default for free version, but if you have a license I recommend to encrypt the backup.
Press enter to continue and see the backup schedule, in free version you cannot edit this also.
Press enter and fishish.
The backup will start ASAP. If you get an error:
The current system does not support cifs. Please install the cifs client package.
Install the cifs client package:
Restart veeam and continue.
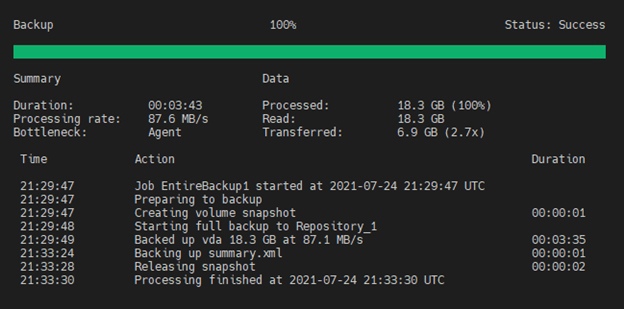
Now you have started the backup process. You can monitor its progress.
If you get an error that snapshot creation failed
We need to get deeper to the root cause so we go to the Backup log folder of VEEAM /var/log/veeam/Backup
Navigate to the job log and open it with text editor, for example nano.
We found that modeprobe failed to load module veeamsnap
For this we need to install linux-headers first, just check your kernel version :
And install the right linux-headers
And now we need to load veeamsnap:
Run veeam again and press S. It should work now
After completing a system backup, you can check the contents of your shared drive by accessing it directly from the Windows.
This completes the configuration of a full server backup. The system backup is now in a safe place.
Veeam Agent for Linux FREE
Backing up and recovering Linux Instances — whether they’re on premises or in the cloud — is often cumbersome, expensive and requires manual intervention and consumes an IT administrator’s valuable time.
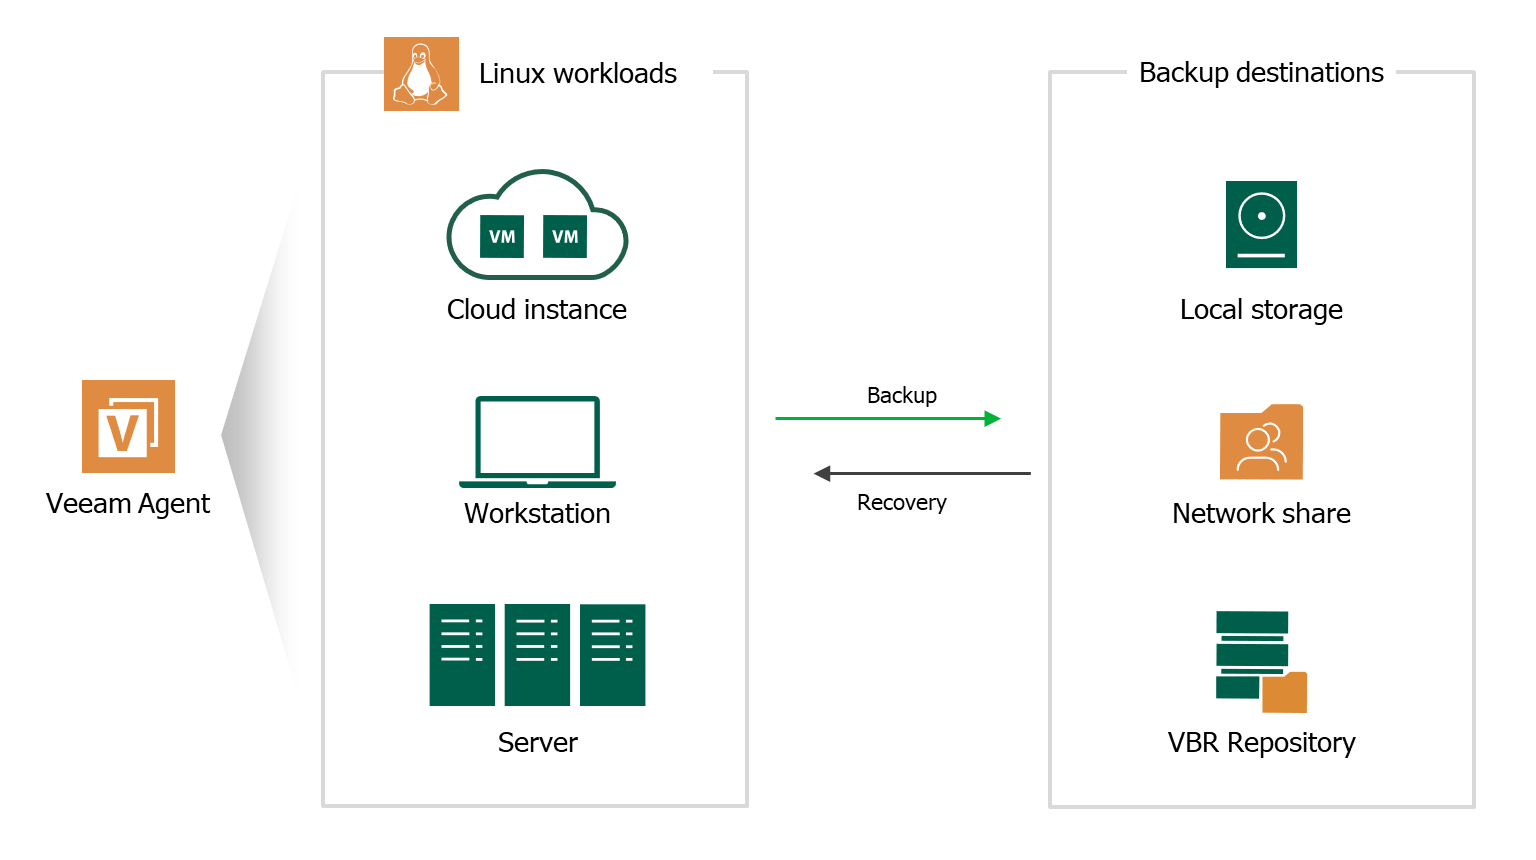
The NEW Veeam® Agent for Linux FREE is a simple backup agent that’s designed to ensure the Availability of your Linux Instances, regardless of if they’re deployed in the public cloud or on premises.
Back up Linux-based servers and workstations with ease
FREE Linux Backup for Public Cloud and Physical Workloads
Veeam Agent for Linux FREE is a solution that can perform image-based backups from inside the guest system, both at the file level and volume level. True incremental backup is enabled using Veeam’s kernel module changed block tracking (CBT) functionality. And, the best part is that this module is distributed as source code!
Backup capabilities
- Entire computer backup: Backup entire Linux systems while
automatically excluding unnecessary files.
- Volume-level backup: Use block-level backups for selected drives or
volumes on your computer.
- File-level: Choose individual file masks and folders to back up.
- Built-in snapshot and CBT drivers: Get true incremental Linux backups enabled by Veeam’s kernel module with built-in volume snapshot capabilities and proprietary CBT capabilities.
- Active full backups 1 : Meet your company’s backup policies by scheduling periodic active full Linux backups as needed.
Recovery options
- Bare-metal restore: Restore your entire system to the same or different hardware.
- Volume-level restore: Restore a failed hard drive or corrupted partition.
- File-level restore: Restore individual files from any backup type in minutes!
- Bootable recovery media: Create a recovery image of your Linux system on several different kinds of media and use it for volume or file-level restores.
More Backup and Recovery Options
Veeam Agent for Linux FREE enables fast recovery for your Linux Instances, which translates into increased uptime. Perform on-premises restores from backups of individual Linux Instances in the public cloud or perform cloud-based restores of on-premises backups.
Veeam Agent for Linux FREE now includes:
- Source-side encryption 1 : Encrypt your Linux backup data at the source, before it leaves the protected computer, which protects your data in flight and at rest on any backup target.
- Snapshotless backup mode 1 : Back up critical files from any mounted file system.
- Console UI or command line: Choose between a user-friendly UI or a more traditional Linux command line (via the veeamconfig command)
- Integration with Veeam Backup & Replication™ 2 : Take full advantage of Veeam backup repositories as target locations and leverage the existing capabilities for file-level recovery.
- Configure network 3 : Obtain network settings from a DHCP server to allow you to browse to a backup on a network share.
- Reboot 3 : Initiate a reboot of your Linux cloud Instance, on-premises server or workstation.
1 Requires Veeam Agent for Linux FREE v3 or later
2 Requires Veeam Backup & Replication 9.5 Update 1 or later
3 Via bootable recovery media
Perform restores quickly and easily with Veeam Agent for Linux FREE


