Configuring Advanced Settings
Veeam Agent for Linux allows you to configure the following settings:
If you want to use Veeam Agent for Linux to back up your data to a Veeam Cloud Connect repository, it might be required that you specify HTTP proxy settings for Veeam Agent.
Veeam Agent computer needs access to CRLs (Certificate Revocation Lists) of the CA (Certification Authority) who issued a certificate to the Veeam Cloud Connect service provider. In case it is not possible to establish a direct connection to CRLs, you must configure an HTTP proxy and specify settings to connect to the proxy in Veeam Agent.
To specify settings for an HTTP proxy, uncomment and edit the following lines in the [cloudconnect] section of the /etc/veeam/veeam.ini configuration file:
- — name of the account used to connect to the HTTP proxy.
- — password of the account used to connect to the HTTP proxy.
- — URL of a proxy used for CRL checks.
![]()
NOTE
If the proxy does not require authentication, you do not need to specify the account name and password. Keep in mind that only the basic authentication method is supported for connection to a proxy.
# HTTP proxy login
httpproxylogin= user01
# HTTP proxy password
httpproxypasswd= P@ssw0rd
# HTTP proxy URL for CRL checks
httpproxyurl= http://proxy.company.lan:3128
If you want to connect Veeam Agent computer to Veeam backup server as a member of the protection group for pre-installed Veeam Agents , you must apply connection settings from the configuration file. The configuration file is one of the Veeam Agent for Linux setup files that you must obtain from your System Administrator. To learn more about protection group for pre-installed Veeam Agents , see the Protection Group Types section in the Veeam Agent Management Guide.
To connect Veeam Agent for Linux to Veeam backup server:
- Get the configuration file from your System Administrator and upload this file on the Veeam Agent computer.
- Navigate to the directory where you have saved the configuration file and run the following command:
veeamconfig mode setvbrsettings —cfg .xml
where is a configuration file name.
Alternatively, you can specify the full path to the configuration file with the —cfg option.
user@srv01:~# veeamconfig mode setvbrsettings —cfg /home/Linux\ Servers\ Distribs/Linux/LinuxServers.xml
Mind that the connection between Veeam backup server and Veeam Agent computer added as a member of the protection group for pre-installed Veeam Agents is not persistent. Veeam Agent synchronizes with Veeam Backup & Replication every 6 hours. To synchronize Veeam Agent immediately, run the following command from the Veeam Agent computer:
Configure Veeam Linux proxy for Direct SAN
In this guide I will explain how to setup a backup proxy for Direct SAN with Veeam Backup and Replication version 11 using Ubuntu Linux 20.04 LTS. The guide is primarily focused on iSCSI configuration, however if you are using Fibre Channel, you can skip right to the MPIO section.
The open-iscsi package automatically assigns a name upon installation as seen in line 6 below. Get the iSCSI initiator name from the file /etc/iscsi/initiatorname.iscsi . :
## DO NOT EDIT OR REMOVE THIS FILE! ## If you remove this file, the iSCSI daemon will not start. ## If you change the InitiatorName, existing access control lists ## may reject this initiator. The InitiatorName must be unique ## for each iSCSI initiator. Do NOT duplicate iSCSI InitiatorNames. InitiatorName=iqn.1993-08.org.debian:01:8a7fa9c0e017 If desired, you may safely change the initiator name to a more meaningful one. Please ensure that your new initiator name adheres to RFC 3721. I am going to change mine as an example.
InitiatorName=iqn.2012-06.dk.cloudio:plavpx03 As a final step, we want to ensure that we automatically connect any discovered iSCSI nodes when iscsid starts. Open up the file /etc/iscsi/iscsid.conf , and set node.startup to automatic:
#***************** # Startup settings #***************** # To request that the iscsi initd scripts startup a session set to "automatic". # node.startup = automatic # # To manually startup the session set to "manual". The default is manual. node.startup = automatic After changing the initiator name and configuring automatic node login, restart the services:
systemctl restart open-iscsi.service iscsid.service You will now have to add the initiator name to your storage system, and allow it to access one or more volumes containing VMware datastores. My storage array has multiple IP addresses, so I will run discovery to ensure that they can all connect. First, we run it for the A-side discovery IP address:
[email protected]:~# iscsiadm -m discovery -t sendtargets -p 10.10.4.41 10.10.4.41:3260,15 iqn.2010-06.com.purestorage:flasharray.xyz 10.10.4.42:3260,15 iqn.2010-06.com.purestorage:flasharray.xyz 10.10.4.43:3260,15 iqn.2010-06.com.purestorage:flasharray.xyz 10.10.4.44:3260,15 iqn.2010-06.com.purestorage:flasharray.xyz [email protected]:~# iscsiadm -m discovery -t sendtargets -p 10.10.24.41 10.10.24.41:3260,25 iqn.2010-06.com.purestorage:flasharray.xyz 10.10.24.42:3260,25 iqn.2010-06.com.purestorage:flasharray.xyz 10.10.24.43:3260,25 iqn.2010-06.com.purestorage:flasharray.xyz 10.10.24.44:3260,25 iqn.2010-06.com.purestorage:flasharray.xyz Let us verify that the nodes are discovered properly:
[email protected]:~# iscsiadm -m node -o show |grep 10.10. node.discovery_address = 10.10.24.41 node.conn[0].address = 10.10.24.42 node.discovery_address = 10.10.4.41 node.conn[0].address = 10.10.4.44 [. ] Login to the target
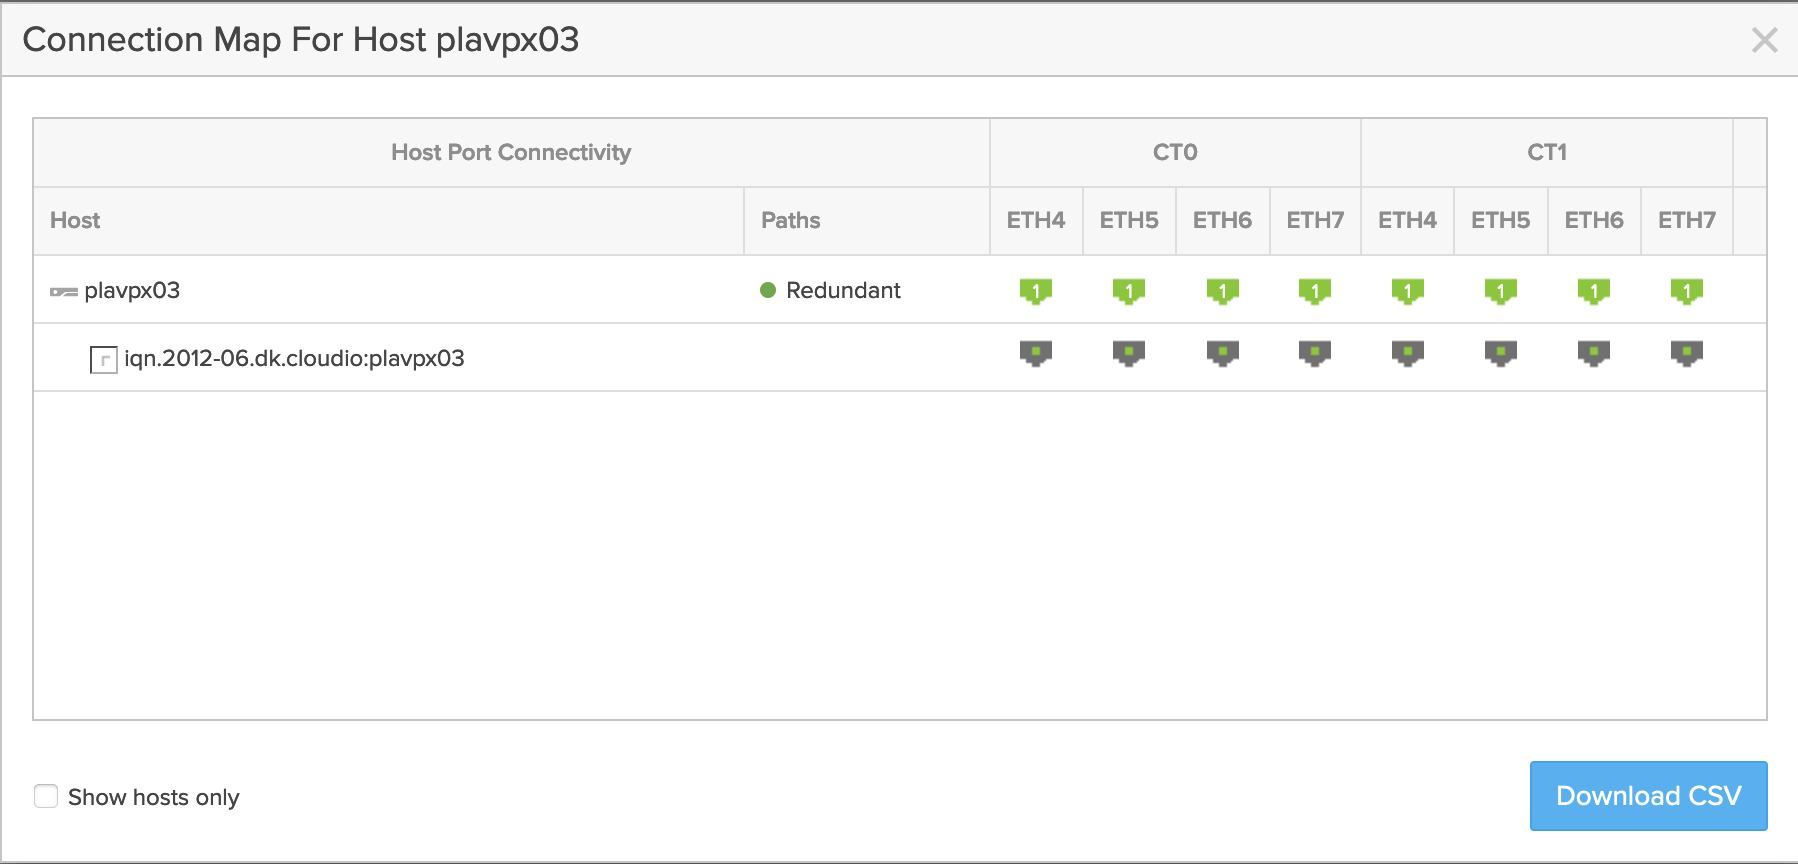
[email protected]:~# iscsiadm -m node --login Logging in to [iface: default, target: iqn.2010-06.com.purestorage:flasharray.xyz, portal: 10.10.24.42,3260] (multiple) Logging in to [iface: default, target: iqn.2010-06.com.purestorage:flasharray.xyz, portal: 10.10.4.44,3260] (multiple) Logging in to [iface: default, target: iqn.2010-06.com.purestorage:flasharray.xyz, portal: 10.10.4.41,3260] (multiple) [. ] Login to [iface: default, target: iqn.2010-06.com.purestorage:flasharray.xyz, portal: 10.10.24.42,3260] successful. Login to [iface: default, target: iqn.2010-06.com.purestorage:flasharray.xyz, portal: 10.10.4.44,3260] successful. Login to [iface: default, target: iqn.2010-06.com.purestorage:flasharray.xyz, portal: 10.10.4.41,3260] successful. [. ] As seen from the array side, all paths are up and redundant
Configure MPIO
A final, and very important step, is to check whether multipath IO (MPIO) is properly configured. Most vendors keep a specific document describing the recommended multipath settings for Linux clients using dm-multipathd which is included with the package multipath-tools on a standard Ubuntu Focal image.
Firstly, check if MPIO is discovered correctly already, by running multipath -ll . In my case, it showed no output initially. Pure Storage keeps a very detailed document called Linux Recommended Settings, and after adding the corresponding settings to /etc/multipath.conf , I got the following output:
[email protected]:~# multipath -ll 3624a93701b2356d49a454c1000011617 dm-4 PURE,FlashArray size=10T features='0' hwhandler='1 alua' wp=rw `-+- policy='service-time 0' prio=50 status=active |- 34:0:0:2 sdi 8:128 active ready running |- 36:0:0:2 sdl 8:176 active ready running |- 33:0:0:2 sdc 8:32 active ready running |- 38:0:0:2 sdr 65:16 active ready running |- 37:0:0:2 sdo 8:224 active ready running |- 35:0:0:2 sdf 8:80 active ready running |- 40:0:0:2 sdw 65:96 active ready running `- 39:0:0:2 sdv 65:80 active ready running 3624a93701b2356d49a454c1000011616 dm-1 PURE,FlashArray size=20T features='0' hwhandler='1 alua' wp=rw `-+- policy='service-time 0' prio=50 status=active |- 33:0:0:1 sdb 8:16 active ready running |- 35:0:0:1 sde 8:64 active ready running |- 34:0:0:1 sdg 8:96 active ready running |- 36:0:0:1 sdk 8:160 active ready running |- 38:0:0:1 sdp 8:240 active ready running |- 37:0:0:1 sdn 8:208 active ready running |- 39:0:0:1 sdt 65:48 active ready running `- 40:0:0:1 sdu 65:64 active ready running 3624a93701b2356d49a454c10000116e9 dm-0 PURE,FlashArray size=15T features='0' hwhandler='1 alua' wp=rw `-+- policy='service-time 0' prio=50 status=active |- 33:0:0:3 sdd 8:48 active ready running |- 35:0:0:3 sdh 8:112 active ready running |- 34:0:0:3 sdj 8:144 active ready running |- 36:0:0:3 sdm 8:192 active ready running |- 38:0:0:3 sds 65:32 active ready running |- 37:0:0:3 sdq 65:0 active ready running |- 39:0:0:3 sdx 65:112 active ready running `- 40:0:0:3 sdy 65:128 active ready running You can now add the proxy to Veeam Backup and Replication. As soon as the proxy is added, it will automatically discover what volumes are appilcable for Direct SAN backup.

VMware Backup Proxies
A VMware backup proxy is an architecture component that sits between the backup server and other components of the backup infrastructure. While the backup server administers tasks, the proxy processes jobs and delivers backup traffic.
Basic VMware backup proxy tasks include the following:
- Retrieving VM data from the production storage
- Compressing
- Deduplicating
- Encrypting
- Sending it to the backup repository (for example, if you run a backup job) or another VMware backup proxy (for example, if you run a replication job)
VMware Backup Proxy Transport Modes
Depending on your backup architecture, a VMware backup proxy can use one of the following data transport modes:
If the VM disks are located on the storage system and the storage system is added to the Veeam Backup & Replication console, the VMware backup proxy can also use the Backup from Storage Snapshots mode.
You can explicitly select the transport mode or let Veeam Backup & Replication automatically choose the mode. For details, see Transport Modes and Configuring Backup Proxy for Storage Snapshots .
VMware Backup Proxy Deployment
By default, the role of the proxy is assigned to the backup server itself. However, this is sufficient only for small installations with low traffic load. For large installations, it is recommended to deploy dedicated backup proxies.
To optimize performance of several concurrent jobs, you can use several backup proxies. In this case, Veeam Backup & Replication will distribute the backup workload between available backup proxies. You can deploy backup proxies both in the primary site and in remote sites.
To deploy a proxy, you need to add a Windows-based or Linux-based server to Veeam Backup & Replication and assign the role of the VMware backup proxy to the added server. For requirements and limitations that backup proxies have, see Requirements and Limitations for Backup Proxies .
VMware Backup Proxy Services and Components
Backup proxies run light-weight services that take a few seconds to deploy. Deployment is fully automated. Veeam Backup & Replication installs the following components and services:
- Veeam Installer Service is an auxiliary service that is installed and started on any Windows server once it is added to the list of managed servers in the Veeam Backup & Replication console. This service analyzes the system, installs and upgrades necessary components and services depending on the role selected for the server.
- Veeam Data Mover is a component that performs data processing tasks on behalf of Veeam Backup & Replication , such as retrieving source VM data, performing data deduplication and compression, and storing backed-up data on the target storage.