- Linux, Unix and Other File System Restore from Storage Snapshots
- Сценарии восстановления для Linux
- Сценарии восстановления
- Работа с Veeam Recovery Media
- Добавить драйверы в Recovery Media
- Проверить отпечаток сертификата
- Восстановление с помощью Veeam Linux
- Восстановление файлов из резервной копии
- Полное восстановление системы
Linux, Unix and Other File System Restore from Storage Snapshots
You can restore VM guest OS files from a storage snapshot. Veeam Backup & Replication supports file-level restore for the most commonly used file systems on Linux, Solaris, BSD, Unix and Micro Focus OES. For the full list of supported file systems, see Platform Support .
When you perform guest OS file restore, Veeam Backup & Replication provides the following options for mounting VM disks from a snapshot:
- Mounting disks to a helper host. As a helper host, you can select the target host where you want to restore files from the snapshot or any other Linux server. We recommend you to specify the same server to which you want to restore the files. This will improve the performance.
- Mounting disks to a helper appliance. The helper appliance is a helper VM running a stripped down Linux kernel that has minimal set of components. The appliance is quite small — around 50 MB. It requires 2048 MB RAM and 2 CPU.
When you perform file-level restore, Veeam Backup & Replication does the following:
- On an ESXi host in your virtual environment, Veeam Backup & Replication creates a clone/virtual copy of the storage snapshot where the VM disks are hosted. Veeam Backup & Replication mounts the clone/virtual copy to the selected ESXi host as a new datastore.
- [If you have selected to mount disks to a helper appliance] Veeam Backup & Replication copies an ISO of the helper appliance to the datastore and starts the helper appliance.
- Veeam Backup & Replication mounts the restored VM disks to the helper appliance or helper host as virtual hard drives. VMDK files are mounted directly from storage snapshots.
- After disks are mounted, Veeam Backup & Replication launches the Veeam Backup browser where mounted VM disks are displayed. In the browser, you can restore files and folders to their original location, local machine drive or save them in a network shared folder.
- Depending on which restore command you use, the operations differ:
- You select the Restore or Restore to command to restore files to the original location or to another VMware vSphere VM.
The helper host or helper appliance connects to the VM to which you restore files (target VM) over SSH or VIX API/vSphere Web Services if a connection over SSH cannot be established. Then Veeam Backup & Replication deploys on the VM the agent which performs restore.
The helper host or helper appliance connects to the VM to which you restore files (target VM) over the network. Then Veeam Backup & Replication deploys on the VM the agent which performs restore.
- When the restore process is finished, Veeam Backup & Replication deletes the datastore, unmounts the clone/virtual copy from the ESXi host and then deletes this copy.
- [If you have selected to mount disks to a helper appliance] Veeam Backup & Replication unregisters the helper appliance.
Prerequisites for FAT, NTFS or ReFS Restore from Storage Snapshots
Before you restore VM guest OS files from storage snapshots, check the following prerequisites:
- You must add the storage system to the backup infrastructure.
- You must check limitations for data recovery from storage snapshots .
- If you plan to restore VM guest OS files to their original location, make sure that VMware Tools are installed on the target VM.
- Veeam Backup & Replication restores ACL for recovered VM guest OS files. To let Veeam Backup & Replication detect the target Linux system architecture and kernel version, make sure that arch and uname are installed on the VM guest OS.
- Veeam Backup & Replication must have access to the guest OS of the target VM to be able to deploy a coordination process. The coordination process performs a number of administrative actions on the target VM guest OS, for example, collects information about mount points.
- The mount server, whether it is a helper host or a helper appliance, must have access over a network to a VM whose files you restore or direct access to vCenter or ESXi host where the VM resides. If the mount server is connected to a VM whose files you restore through VIX API/vSphere Web Services, you must use a root account for a target VM, otherwise the restore process will fail.
- For Linux target VM, consider the following:
- If you want to restore files over network, make sure that the SSH daemon is configured and SCP utility is available on the target VM.
- SELinux must be disabled on the target VM.
- A range of ports that are used for data transfer must be open on the target VM.
- [For storage systems working over Fibre Channel] To let Veeam Backup & Replication present snapshots of LUNs to an ESXi host, you must register the ESXi host with a WWN ID on the storage system.
- [For NetApp ONTAP storage systems] Depending on the storage type, you may need to install additional licenses on the storage system. For more information, see Required Licenses for NetApp .
- файлов и папок:
- с помощью Recovery Media — в общем случае для восстановления файлов Recovery Media не требуется. Операцию можно проводить на работающей машине с установленным бэкап-агентом. Однако в Recovery Media предусмотрена возможность восстановления файлов, и при необходимости вы можете ей воспользоваться;
- бэкап-агента — восстановление отдельных файлов и каталогов на работающей машине. Доступно восстановление через интерфейс бэкап-агента и командную строку;
Работа с Veeam Recovery Media
Если ОС не загружается, для восстановления всей машины или разделов необходим Recovery Media — образ системы с необходимыми драйверами. Скачать готовый стандартный образ можно:
- на сайте Veeam (требуется бесплатная учетная запись Veeam, далее Get Link → Additional Downloads);
- из репозитория Veeam (учетная запись не требуется, для текущих версий Veeam Agent рекомендуется скачивать veeam-recovery-amd64-6.0.0.iso).
Программы для записи образов могут повлиять на содержимое и сделать восстановление невозможным. Записывайте образ с помощью стандартной утилиты dd. Пример записи образа (подставьте значения параметров if и of):
sudo dd bs=4M if=/path/to/veeam-recovery-amd64-5.0.0.iso of=/dev/sdx status=progress oflag=syncПодробнее о содержимом стандартного образа на сайте Veeam.
Ограничения при использовании Veeam Agent и Recovery Media описаны в документации Veeam (Системные требования, Требования для Recovery Media).
Добавить драйверы в Recovery Media
Может потребоваться включить в образ дополнительные драйверы контроллеров и сетевых устройств, специфичные для конкретной машины. Для этого стандартный образ необходимо пропатчить с помощью Veeam Agent.
После создания загрузочного диска сохраните его на внешнем носителе, который будет доступен в случае восстановления.
- На машине с установленным бэкап-агентом запустите интерфейс Veeam:
Проверить отпечаток сертификата
Проверка отпечатка сертификата облачного репозитория Veeam Cloud Connect Selectel является опциональной.
- При подключении к облачному репозиторию Selectel выберите Verify Thumbprint:
- В открывшемся диалоге введите отпечаток сертификата:
49:E0:35:31:1D:A9:53:20:B6:8A:B1:F8:5F:01:23:92:C6:02:87:D7Восстановление с помощью Veeam Linux
В данной инструкции мы рассмотрим возможность восстановления данных сервера при помощи утилиты Veeam.
У нас уже есть сделанная резервная копия сделанная при настройке Резервное копирование с помощью Veeam Linux
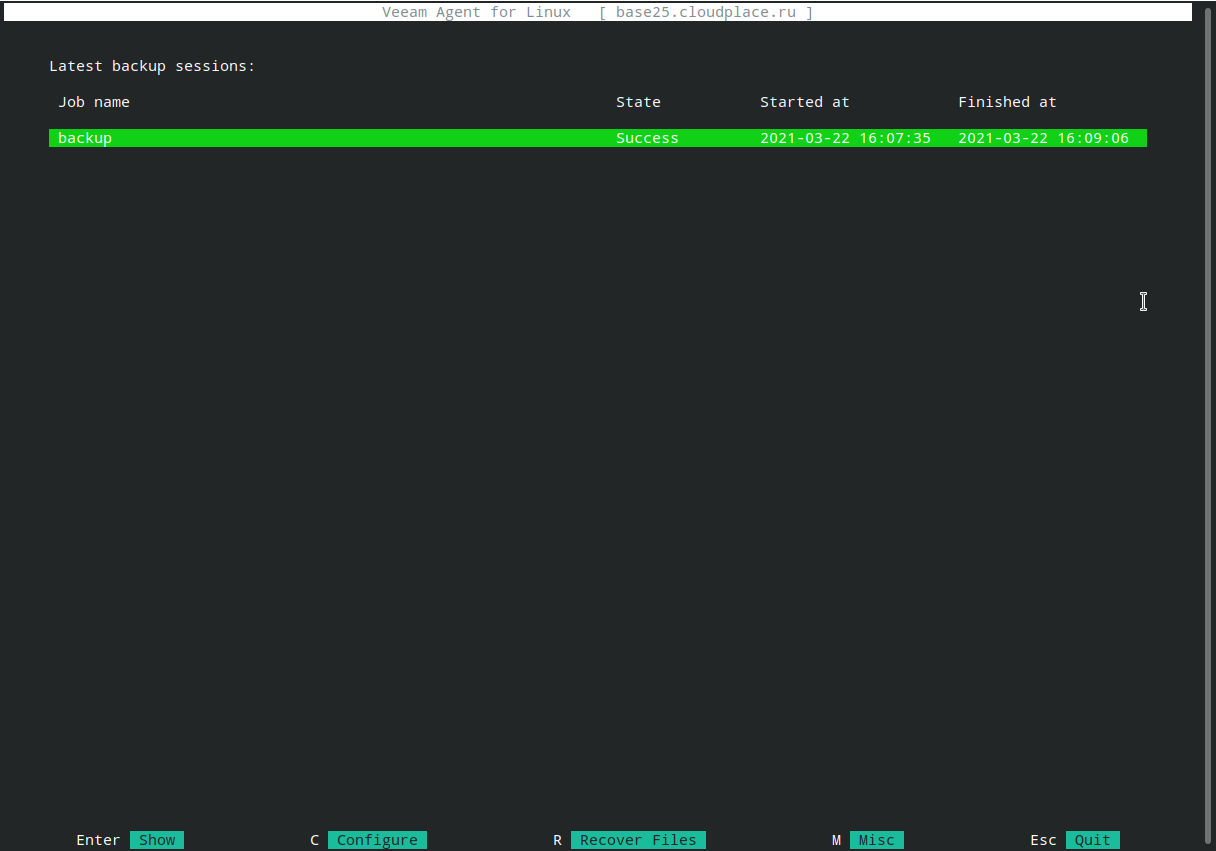
Восстановление файлов из резервной копии
В данном примере рассмотрим вариант восстановления отдельного каталога с файлами.

Выберите необходимое задание из списка и нажмите клавишу R — «Recover Files».
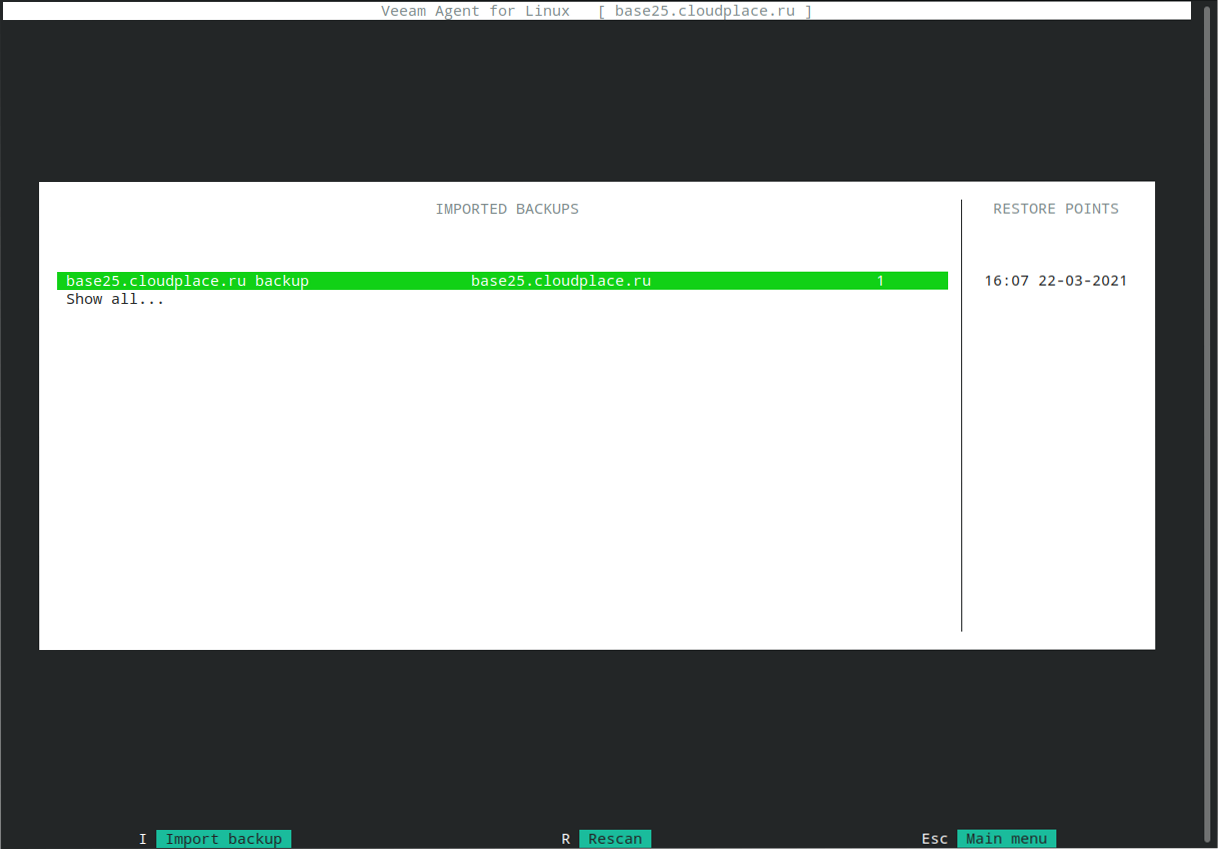
В данном случае рассматривается задание на восстановление данных из резервной копии размещенной в NFS-хранилище (услуга Backup Space).
Более подробно об этом в инструкции «Резервное копирование Linux с помощью утилиты Veeam».
Если Ваша копия находится в другом месте или на другом ресурсе, используйте его.Далее, выбираем нашу резервную копию из списка, внимательно сверяем дату и время ее создания, подтверждаем действие клавишей Enter:
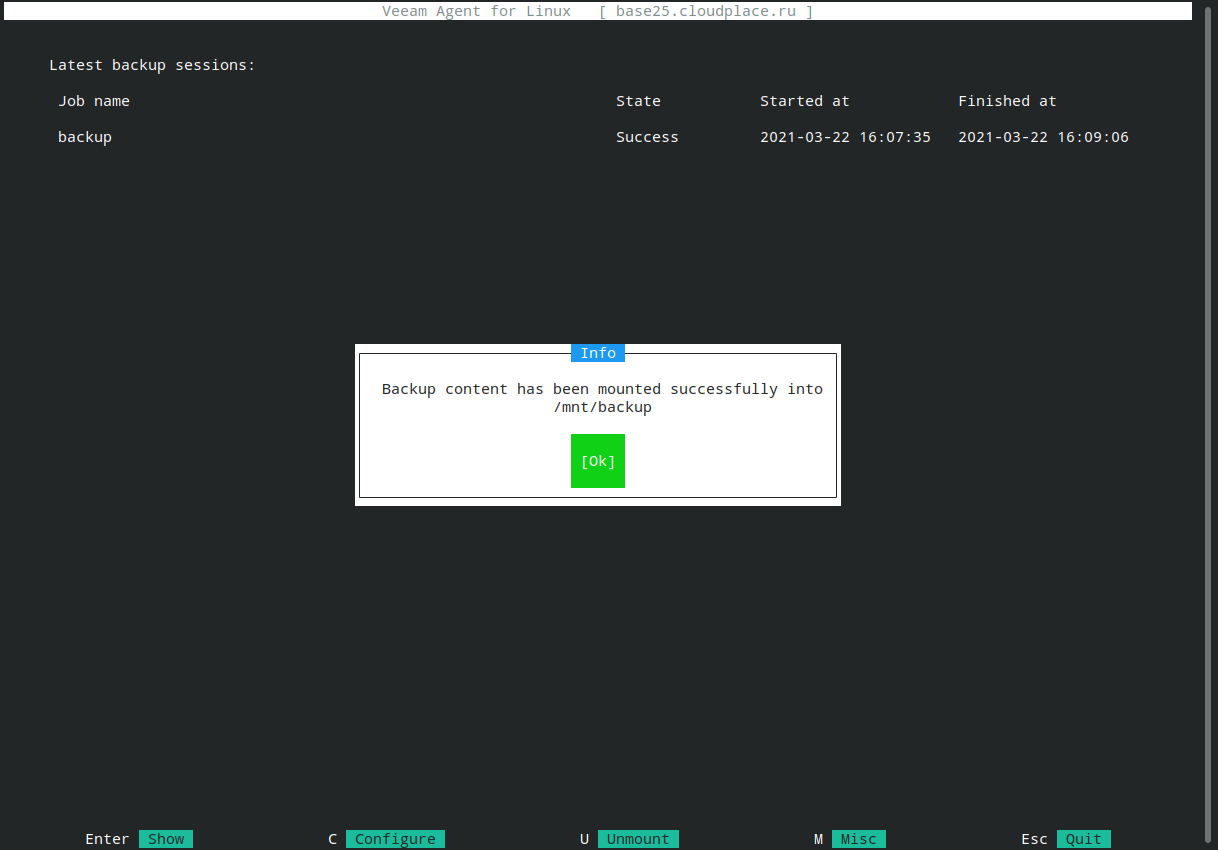
Резервная копия успешно смонтирована во временную папку /mnt/backup.
Выйдите из утилиты veeam «Esc»
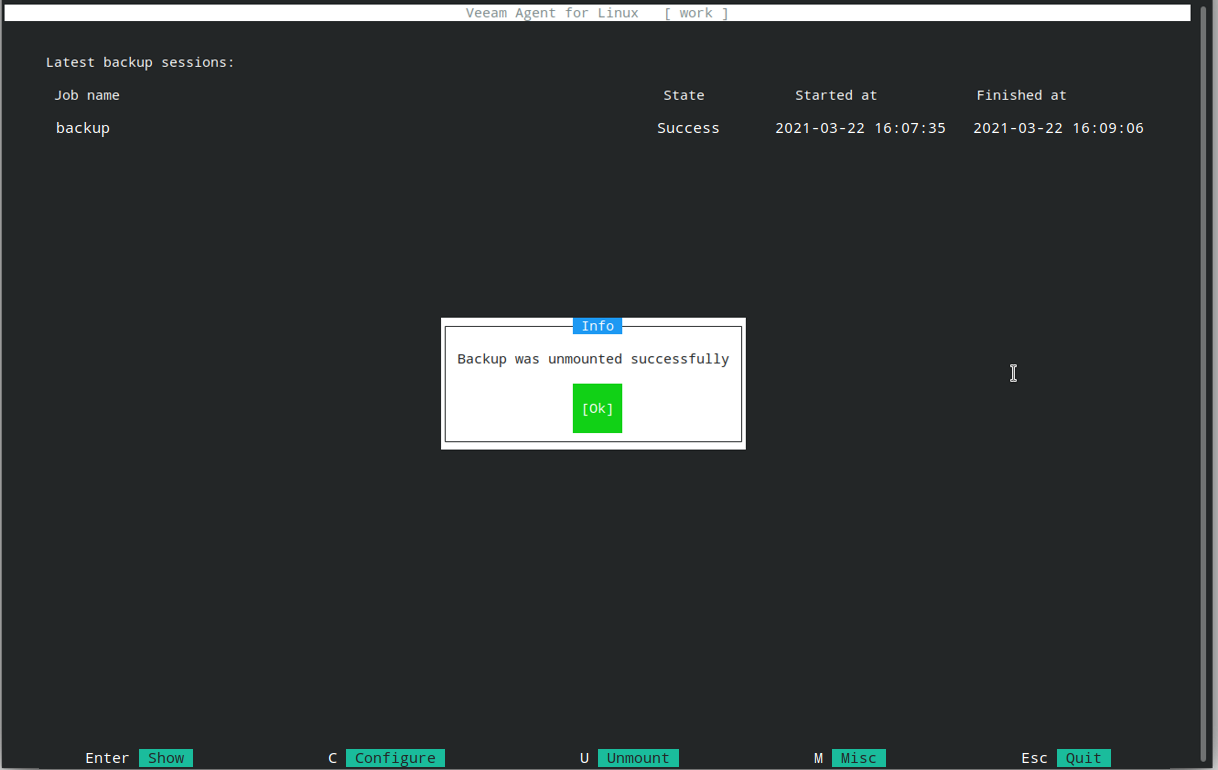
Скопируйте все необходимые данные из /mnt/backup и по окончанию всех восстановительных работ обязательно отмонтируйте резервную копию.
Для этого запустите утилиту командой:
Выберите резервный план из списка и нажмите клавишу U — «Unmount»:
В случае успешного размонтирования отобразится аналогичное сообщение.
На данном этапе работы по восстановлению данных завершены.
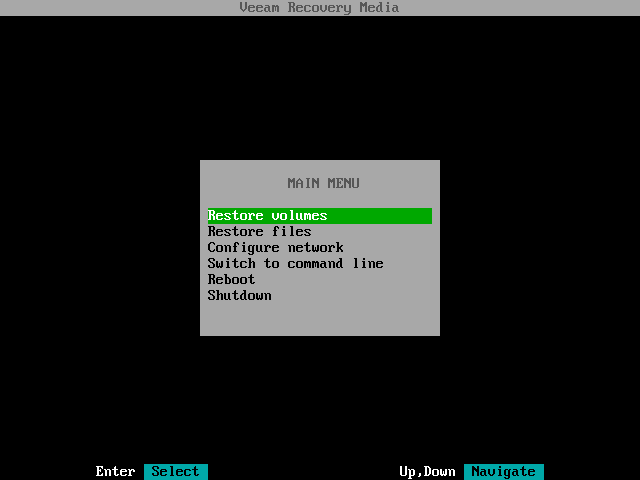
Полное восстановление системы
Выполняем загрузку с ISO-диска Veeam Recovery Media.
После успешной загрузки открывается главное меню, выбираем «Restore volumes» :
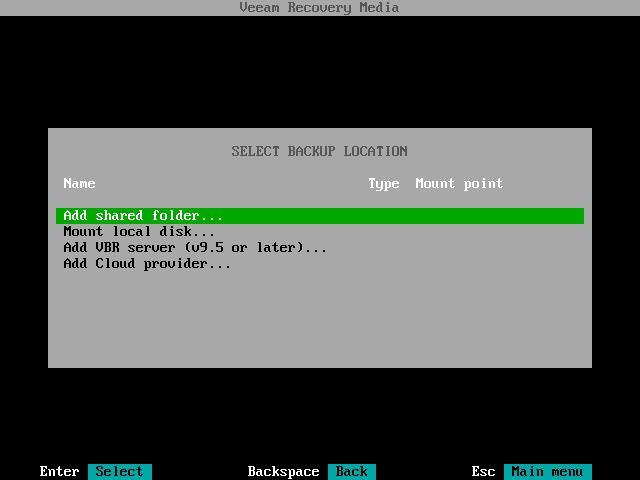
Так как мы будем подключать NFS-хранилище, то в таком случае выберем «Add shared folder» :
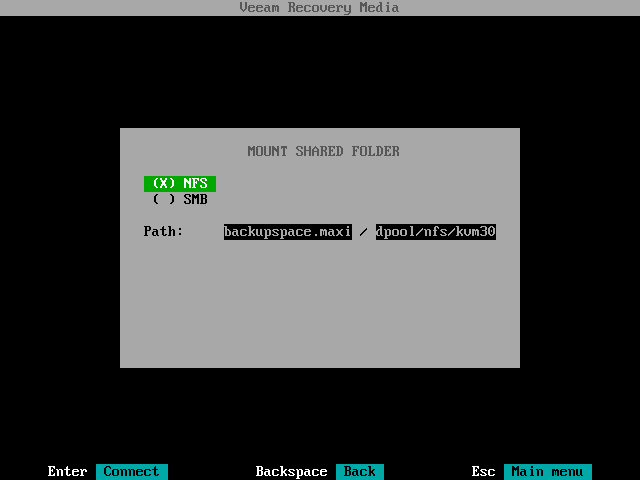
На данном этапе необходимо выбрать протокол NFS и указать месторасположение хранилища в секции Path:
Если по каким-то причинам Вы не получили эти данные, то обратитесь, пожалуйста, в техподдержку для уточнения.
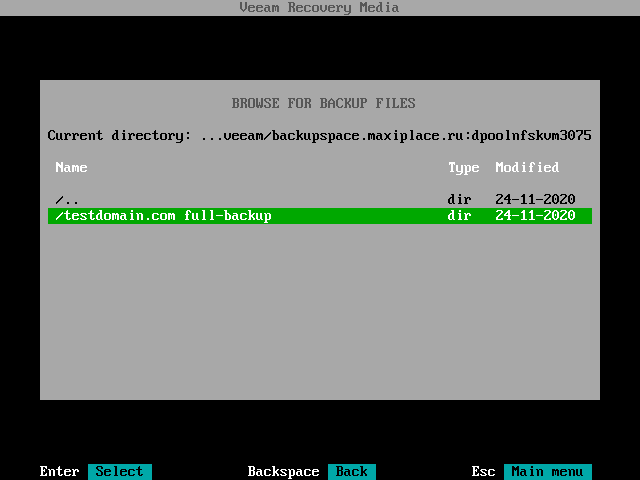
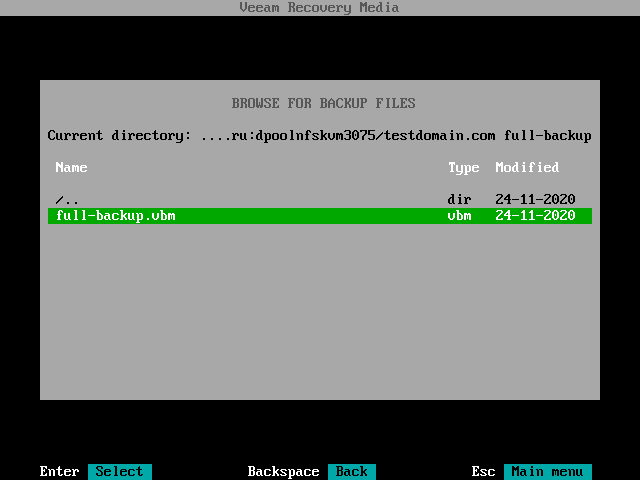
Видим каталог с резервной копией, войдем в него нажав «Enter»:
У Вас может быть несколько резервных копий. Находим нужную и подтверждаем выбор нажав «Enter»:
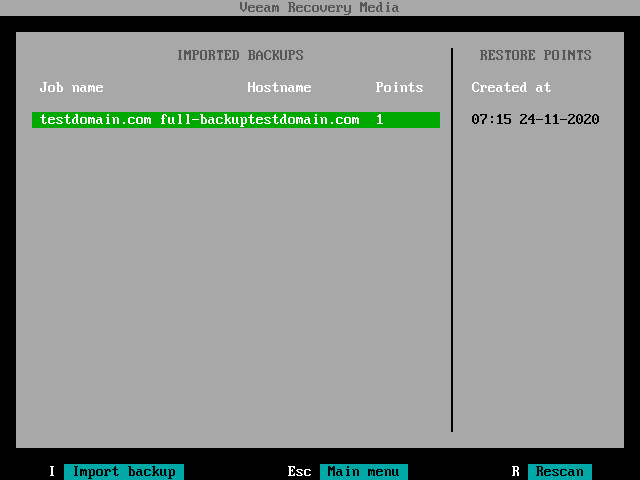
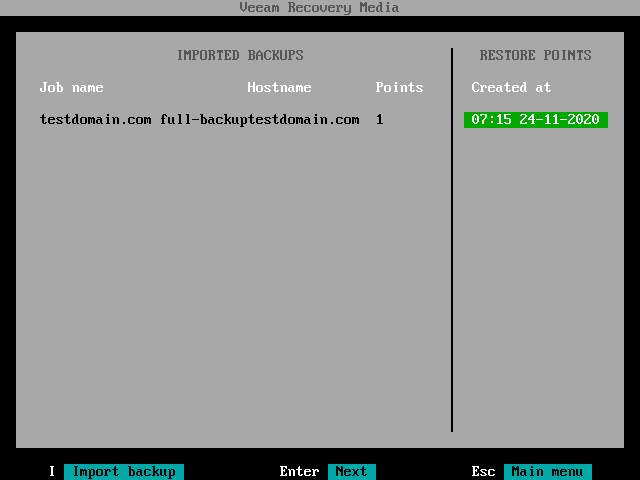
Проверяем суммарную информацию о резервной копии и нажимаем «Enter»:
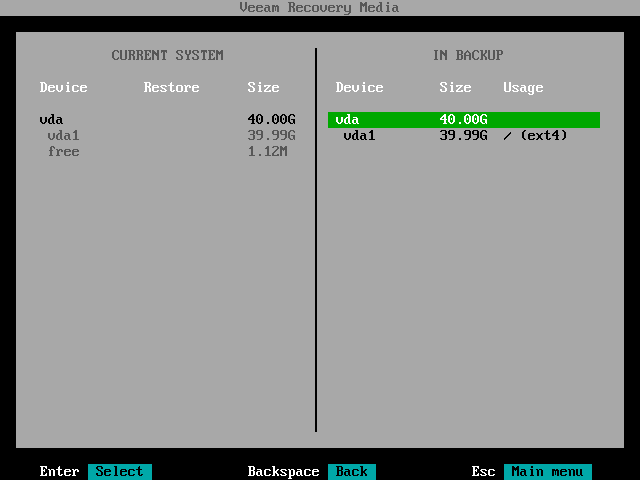
На следующем этапе окно разделено на две части:
- слева – CURRENT SYSTEM – текущая система;
- справа – IN BACKUP – резервная копия.
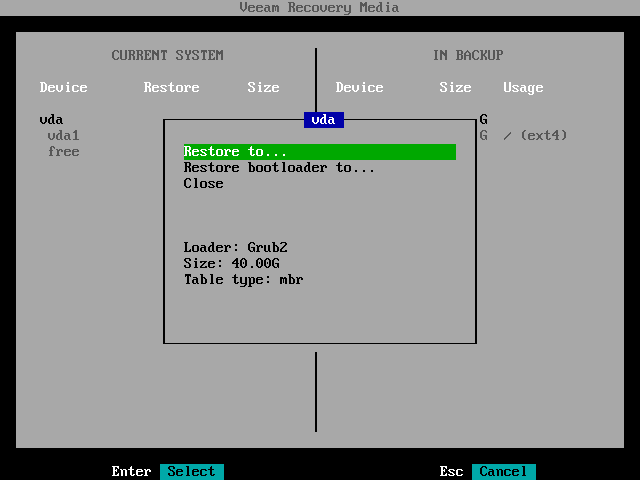
Если Вы хотите выполнить полное восстановление всего диска и его разделов, то для этого выберите в списке справа диск (vda) и нажмите «Enter»:
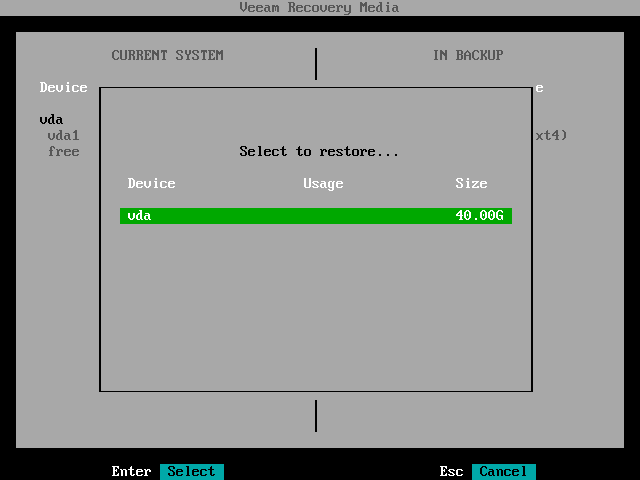
На данном этапе необходимо указать на какой диск мы будем восстанавливать данные, в нашем случае «vda»:
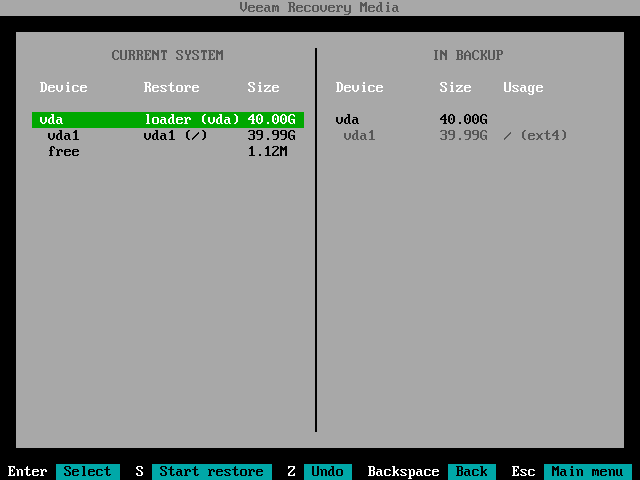
Теперь мы можем увидеть изменения.
В левой части окна, в столбце «Restore», отобразится ранее выбранный для восстановления диск «vda».
Чтобы запустить процесс восстановления нажмите на клавиатуре клавишу «S»:
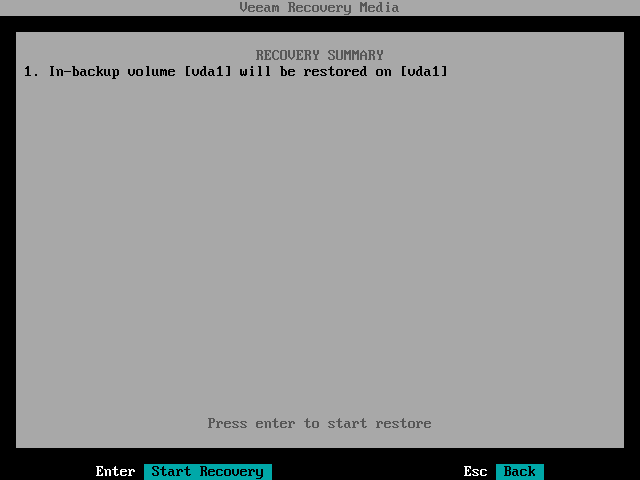
После этого отобразится суммарная информация о восстанавливаемых разделах.
Еще раз подтвердите начало процесса нажатием клавиши «Enter»:
Процесс восстановления начат. Дождитесь завершения операции.
После восстановления отмонтируйте ISO образ Veeam Recovery Media и загрузитесь с HDD.
For more information on configuring connection settings for Linux servers, see the Specify Credentials and SSH Settings step of the New Linux Server wizard.
Performing Linux, Unix and Other File System Restore from Storage Snapshots
For information on performing restore from Linux, Unix and other file systems, see section Restoring VM Guest OS Files (Multi-OS) .
Сценарии восстановления для Linux
Полное руководство по использованию различных режимов восстановления представлено в официальной документации Veeam по работе с бэкап-агентами для Linux.
В любом из сценариев заранее должно быть подключено резервное копирование агентами и сделан консистентный бэкап.
Сценарии восстановления
Сценарии выполнимы, если заранее был выполнен бэкап всей машины (Entire computer), отдельных разделов (Volume level backup) или отдельных файлов/каталогов (File level backup).
Восстановление доступно на уровнях: