- Working with VHD Files in Linux and Windows Azure
- Creating and Mounting VHD Files in Linux
- Create an NTFS-formated VHD File
- Mount and Unmount a VHD File (no superuser)
- Use nbd to Mount a VHD File (superuser required)
- Copying VHD Files to and from Windows Azure Storage
- HPC Linux Shell Prompt
- Windows Azure Service Instance
- Web Browser
- Mounting VHD Files in Windows Azure
- Additional Resources
- How can I attach a VHDx or VHD file in Linux? [closed]
- 1 Answer 1
- How do I mount .vhd file?
- 7 Answers 7
Working with VHD Files in Linux and Windows Azure
Virtual Hard Disk (VHD) is a file format from Microsoft which represents a virtual hard disk drive (HDD). It may contain what is found on a physical HDD, such as disk partitions and a file system, which in turn can contain files and folders. Windows Azure service instances can use the hpcpack command to mount VHD files as a drive directly from a Windows Azure storage account.
Local storage on Azure is not persistent. When a service instance is stopped and then restarted on a different hardware node, the data stored in local storage does not follow the instance. However, you can use a VHD file in your Windows Azure storage account to provide a persistent storage location for your projects. Also, multiple service instances can mount the same VHD file as read-only, making this a great way to distribute static data to compute cluster nodes, e.g. terrain or meteorological data in a WRF simulation run.
This work was sponsored by the Microsoft Developer and Platform Evangelism Team.
Creating and Mounting VHD Files in Linux
From an HPC Linux installation, we can create VHD files and format them, mount and unmount them, and copy files to and from them. You can do all this as a normal user; root access is not required.
Create an NTFS-formated VHD File
- From a shell prompt in HPC Linux, use the dd command to create a new fixed-size raw disk image file. For example, to create a raw image file named “image.raw” that is 50M in size, execute:
dd if=/dev/zero of=image.raw bs=1M count=50
You can set “bs” to be any block size you like in kilobytes (K), megabytes (M), gigabytes (B), or terabytes (T). “count” sets the image file size in blocks, so “bs=1G count=1” would create a file of one gigabyte, or “bs=10M count=10” would create a file of 100 megabytes. VHD files may not be larger that two terabytes.
Create a new NTFS filesystem on the raw disk image:
VBoxManage convertfromraw image.raw image.vhd --format VHD --variant Fixed
Converting from raw image file="test.dd" to file="test.vhd". Creating fixed image with size 52428800 bytes (50MB).
VBoxManage: error: Cannot create the disk image "test.vhd": VERR_INVALID_PARAMETER
VBoxManage convertfromraw image.raw image.vhd --format VHD rm image.vhd VBoxManage convertfromraw image.raw image.vhd --format VHD --variant Fixed
The VHD file must be in fixed format to be mountable from a Windows Azure storage account.
We’re done with the raw image file, so you can remote it to save space:
Mount and Unmount a VHD File (no superuser)
- Create a mountpoint folder and use FUSE to mount the VHD file:
mkdir -p $HOME/mnt/image ntfs-3g -o windows_names image.vhd $HOME/mnt/image
fusermount -u $HOME/mnt/image
Use nbd to Mount a VHD File (superuser required)
If you have root access, you can use the network block device kernel module to mount and unmount the VHD file.
- Load the network block device kernel module:
qemu-nbd -c /dev/nbd0 image.vhd
umount /mnt qemu-nbd -d /dev/nbd0 modprobe -r nbd
Copying VHD Files to and from Windows Azure Storage
There are many ways to copy files to Windows Azure storage blobs, both graphically and on the command line. Here are three ways you will probably find useful when working with a Windows Azure HPC Compute Cluster.
HPC Linux Shell Prompt
PToolsWin includes a command line utility for uploading and downloading files directly to and from Windows Azure blob storage. Enter your account name and storage key when prompted:
azurestorage put image.vhd
Similarly, you can download files by executing:
azurestorage get image.vhd
Windows Azure Service Instance
If your VHD file is stored locally on a service instance, you can use hpcpack upload to copy it to your storage account. Type the following command on one line in a Command Prompt window to upload “image.vhd” to a page blob in a container named “vhd”. Replace and with your storage account name and key, respectively:
hpcpack upload image.vhd /account: /key: /blobtype:pageblob /container:vhd
You can use hpcpack download if you wish to download the VHD file to a service instance. Type the following command on one line in a Command Prompt window to download “image.vhd” from a container named “vhd”. Replace and with your storage account name and key, respectively:
hpcpack download image.vhd /account: /key: /container:vhd
Remember, local storage on Windows Azure is not persistent. When a service instance is stopped and then restarted on a different hardware node, the data stored in local storage does not follow the instance. If you make changes in your VHD file, and you wish to preserve those changes, you must upload the VHD file back to your storage account. For this reason, it is better to mount the VHD file than to copy it to local storage.
Web Browser
You can access myAzureStorage Explorer from any web browser. Go to https://www.myazurestorage.com and enter your storage account name and primary access key. myAzureStorage is great for “small” files, may not work well for “large” files. You may not be able to transfer large VHD files, but it’s a nice way to browse your storage account’s contents and verify the results of your command line operations.
Mounting VHD Files in Windows Azure
After you’ve uploaded your VHD file to your Windows Azure storage account, you can use hpcpack mount to mount it as a drive in on your Windows Azure service instances. Any changes you made to the VHD file while it is mounted take place in your storage account instead of in the node instance’s local storage.
- Only one service instance at a time can mount the VHD with both read and write privileges. Execute this command to mount “image.vhd” from the “vhd” container as a read/write drive:
hpcpack mount image.vhd /account: /key: /container:vhd
If your VHD file contains static data that you wish to share with many service instances, you can mount the VHD file as a read-only snapshot.
- From a Command Prompt window on the cluster head node, execute this command to mount “image.vhd” from the “vhd” container as a read-only drive on all cluster nodes. Replace and with your storage account name and key, respectively:
clusrun /nodegroup:computenode hpcpack mount image.vhd /account: /key: /container:vhd /snapshot
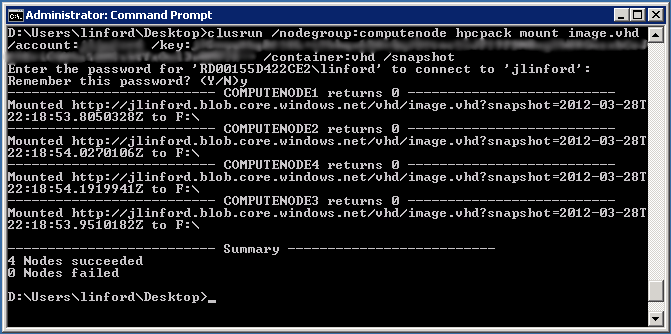
If the command succeeds, you will see output similar to this:
When you are done with the VHD file, unmount it by executing the following command. Replace ‘’ with the correct drive letter (e.g. “F:”)
clusrun /nodegroup:computenode hpcpack unmount
Additional Resources
How can I attach a VHDx or VHD file in Linux? [closed]
Closed. This question does not meet Stack Overflow guidelines. It is not currently accepting answers.
- This question does not appear to be about a specific programming problem, a software algorithm, or software tools primarily used by programmers. If you believe the question would be on-topic on another Stack Exchange site, you can leave a comment to explain where the question may be able to be answered.
- This question does not appear to be about a specific programming problem, a software algorithm, or software tools primarily used by programmers. If you believe the question would be on-topic on another Stack Exchange site, you can leave a comment to explain where the question may be able to be answered.
How can I attach a VHDX or VHD file in Linux?
I mean attach the virtual hard disk as a block device, and use external tools to read these devices.
The filesystem inside is not mountable. I do not need to mount the filesystem, but deal with it as if it was on a real hard disk.
I read the manual page of guestfish , but could not find how to do it.
1 Answer 1
You can use libguestfs-tools to achieve this.
- First, you need to install it, on Ubuntu/Debian-like Linux that would be:
sudo apt-get install libguestfs-tools guestmount --add yourVirtualDisk.vhdx --inspector --ro /mnt/anydirectory Using virt-inspector(1) code, inspect the disks looking for an operating system and mount filesystems as they would be mounted on the real virtual machine.
Add devices and mount everything read-only. Also disallow writes and make the disk appear read-only to FUSE.
When the vhd file is too big (say 1TB with millions of files), guestmount could successfully mount it but fail in reading files (you can’t even ls -1f to see the files). This must be an unsolved bug. Anyone who encounters this problem can try qemu.
And guestmount (with no args at all) just segfaults on me (after newly installed here on a Raspbian Jessie).
Thanks for bringing up guestmount which I hoped would allow me to mount my .vhd containing a single partition with a exFAT-volume inside. Sadly, guestmount (v1.38.4) did not accept my specification of the volume within the .vhd and asking me Did you mean to mount one of these filesystems? . /dev/sda1 (exfat) . What I had specified was -m «/dev/sda1» as this was what virt-filesystems had returned. When the volume is NTFS, mounting works. And yes, I’ve got exfat-utils.x86_64 (v1.2.8, a fuse-fs-driver) installed.
How do I mount .vhd file?
I’m using 13.04 Raring amd64 and I need to mount a .vhd file on my ubuntu. I’ve googled about it and found that virtualbox-fuse package is the answer. But the package was deleted from apt repository. Is there any way to install the package w/ 13.04? or is there any alternative to virtualbox-fuse?
I just did this same thing, and my search results ended in that you could convert the vdi to a raw image
boo. that is not a good solution when a vhd or vdi file can be way too large to make a duplicate of as a raw image
7 Answers 7
sudo apt-get install virtualbox-fuse sudo mkdir /mnt/vhd-disk/ sudo vdfuse -f disk.vhd /mnt/vhd-disk/ sudo mount -o loop /mnt/vhd-disk/Partition1 /mnt/partition1 Note that you may need additional options to mount to set permissions to your liking.
It works, you can download vdfuse from vdfuse.sourceforge.net for example in my case the last line was: sudo mount -o -loop /tmp/win/Partition1 /mnt/Windows
Using Ubuntu 15.10 (works also on Ubuntu 16.04), you can install vhdimount and tsk (The Sleuth Kit) via:
sudo apt-get install libvhdi-utils sleuthkit Then you can proceed as follows:
sudo mkdir -v /mnt/vhd sudo vhdimount -X allow_root /path/to/file.vhd /mnt/vhd/ sudo mmls -aB /mnt/vhd/vhdi1 Next, you’ll have to calculate the offset from the output of mmls like this:
sudo mkdir -v /media/$/your/folder sudo mount -vt ntfs-3g -o ro,noload,offset=offset-found /mnt/vhd/vhdi1 /media/$/your/folder Replace offset-found by your offset. You may also have to change the fs-type according to the fs-type included in your vhd file.
I’ve made a script so I don’t have to type this every time 😉
This mounts it as read only. What can I do to mount it with write permissions? Omitting the ro for mount still results in read only.
Change ro by rw and that should run in read/write instead of read/only. vhdimount maps to /mnt/vhd/vhdi1 in read/write mode but the next command using mount is in read/only if you don’t specify rw as an option
In Ubuntu 16.04: Instead of using mmls or fdisk to find out about the starting sector of the partition, you can also use kpartx to create a virtual device file that you can mount without an offset option: sudo kpartx -av /mnt/vhd/vhdi1; sudo mount -vt ntfs-3g -o ro,noload /dev/mapper/loop0p1 /media/$
Searching Ubuntu’s Launchpad space, the following comes up:
virtualbox (The binary ‘virtualbox-fuse’ is part of the virtualbox package)
This means that they merged virtualbox-fuse into the main package and you just need to install virtualbox from the repository (This is what used to be called virtualbox-ose , so if you need the PUEL licensed «full» version, this won’t help you.)
I’d prefer not to rely on a VM to access data on a vhd image. Since virtualbox-fuse and vdfuse is no longer available in Ubuntu (not since precise (12.04)) and Debian (not since Wheezy (7)). I was able to mount the NTFS partition of a personal VHD using blk-tap .
Insert the apropriate pid from tap-ctl spawn , of course. Your partitioning scheme may be different from mine, so adjust accordingly.
# apt-get install blktap-utils # modprobe blktap # tap-ctl allocate /dev/xen/blktap-2/tapdev0 # tap-ctl spawn tapdisk spawned with pid 1234 # tap-ctl attach -m 0 -p 1234 # tap-ctl open -m 0 -p 1234 -a vhd:/full/path/to/image.vhd # mount /dev/disk/by-id/dm-name-tapdev0p1 # ls -lh do/your/thing with/all/your/files.txt # tap-ctl close -m 0 -p 1234 # tap-ctl detach -m 0 -p 1234 # tap-ctl free -m 0 These steps came from the xen project’s wiki.
My block device was created at /dev/xen/blktap-2/blktap0 . For some reason, kpartx -a would not map partitions (I was looking for /dev/xen/blktap-2/tapdev0p1), but I found that /dev/disk/by-id/dm-name-tapdev0p1 had been linked to the block device for the partition.