- How to Create a Virtual Block or Loop Device in Linux
- How to Create A Loop Device
- 1. Create a File of Desired Size
- 2. Create the Loop Device
- 3. Mount the Loop device
- How to Remove loop device
- Final Words
- How to create virtual block device (loop device/filesystem) in Linux
- Create a file
- Create the loop device
- Create the filesystem
- Mount the loopback filesystem
- Removing loop device
- Enable Encryption on loop filesystem
- Maximum Lopback devices allowed
- Some more articles you might also be interested in …
- How do I create virtual ethernet devices in linux?
- 6 Answers 6
- How to Create a Virtual Device in Linux
- How to get started making a virtual device in Linux
- Cannot create Android Virtual Device in Android Studio in Ubuntu
- How to create Android Virtual Device with command line and avdmanager?
- How create a virtual io device in Linux that proxies data to real device?
- How to enable Android Virtual Devices (AVD)
- Virtual Serial Port for Linux
How to Create a Virtual Block or Loop Device in Linux
Loop device is getting popular in Linux, specially for isolation. Here’s a quick guide on creating loop devices on Linux.
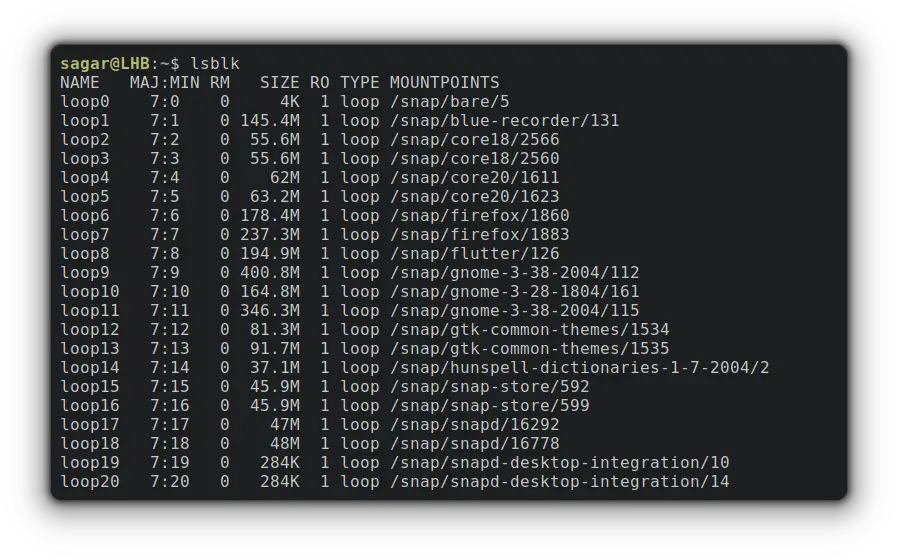
Linux users can have a virtual block device called a «loop device» that maps a normal file to a virtual block, making it ideal for tasks related to isolating processes.
And the best example for utilizing loop devices is snap packages, a sandboxed software solution containing every necessary dependency and mounted as a loop devices:
And if you’re interested in creating your own virtual block device, here’s a simple guide.
How to Create A Loop Device
For ease of understanding, I’ve decided the entire process in the form of simple steps so it can be easier to grasp.
And if you’re interested in learning more about loop device in Linux and its use, I’ll recommend the other guide of ours that covers the basics:
1. Create a File of Desired Size
In the first step, you’re required to create a file as per your needs. For this example, I’ll be creating a file of 3 Giga bytes:
dd if=/dev/zero of=VirtBlock.img bs=100M count=30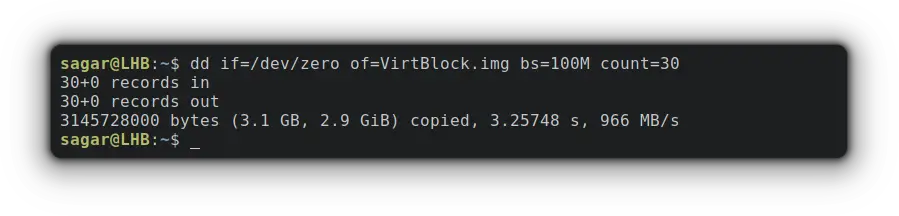
- if=/dev/zero will create a block of 0s to hold data.
- of=VirtBlock.img is where you’ll specify the name. I went with VirtBlock.img.
- bs=100M will set the size of a single block.
- count=30 will create copies of single blocks for given times. Meaning 100Mb * 30 times is about 3 GB in size.
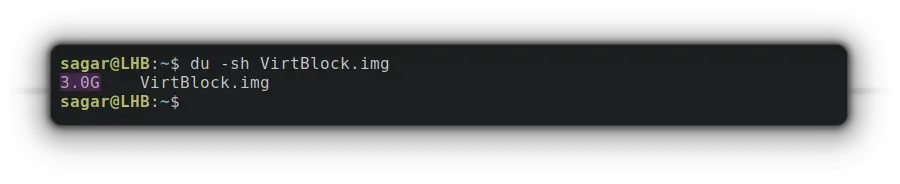
Now, let’s verify the size of the recently created block by the given command:
2. Create the Loop Device
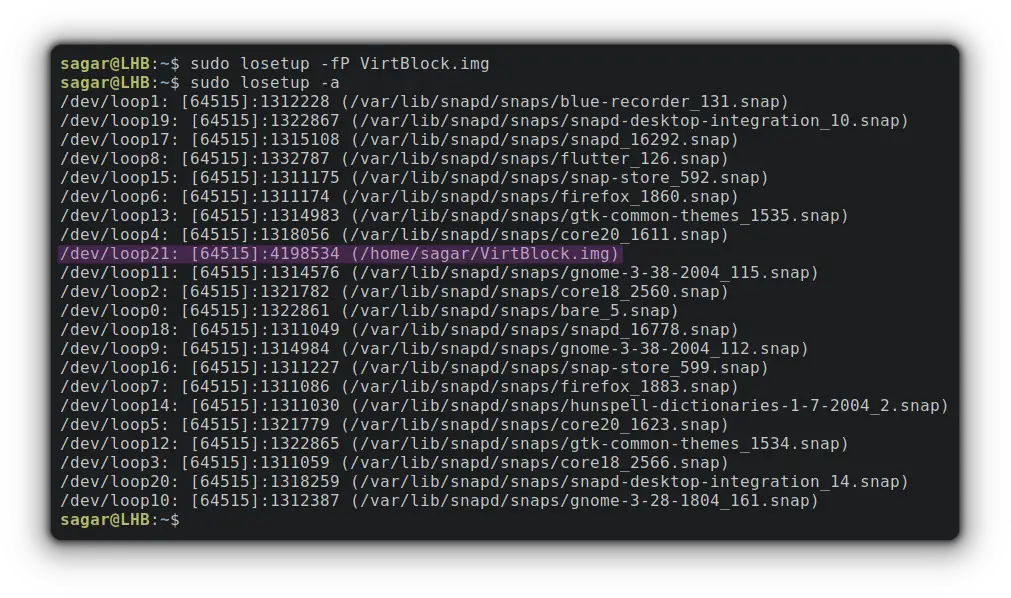
In this step, I’ll be utilizing the losetup utility to create a loop device mapping at a recently created file.
sudo losetup -fP VirtBlock.img- -f (find) will find us unused loop devices and save us from errors like «losetup: TO_BLOCK: failed to set up loop device: Device or resource busy”.
- -P will force the kernel to scan the partition table on the newly created loop device.
Now, its time for us to print all the loop devices using the -a option with losetup as given:
But your block needs to have a file system to create, store and configure files to that block and I’ll be going with ext4:
sudo mkfs.ext4 /home/sagar/VirtBlock.img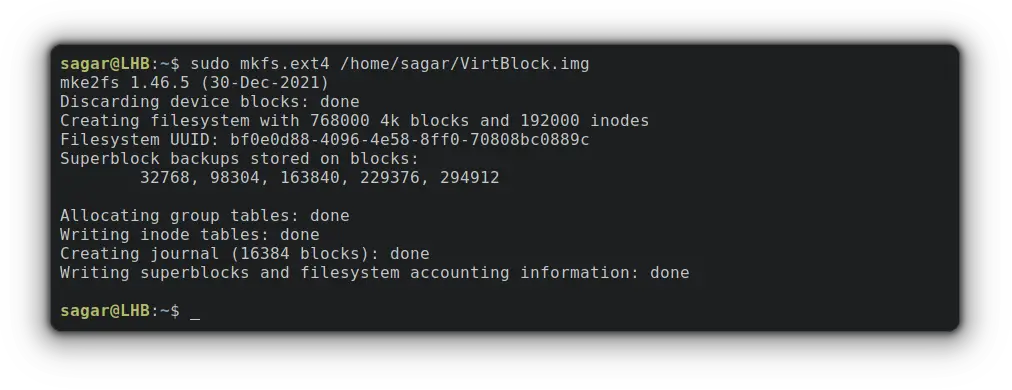
Make sure to use the exact path or it will throw an error. Use the reference from sudo losetup -a command.
3. Mount the Loop device
To mount created loop device, the first step should be creating a mounting directory which can be done through the given command:
To mount the loop device (mine is loop21), I’ll be using the -o loop option as given:
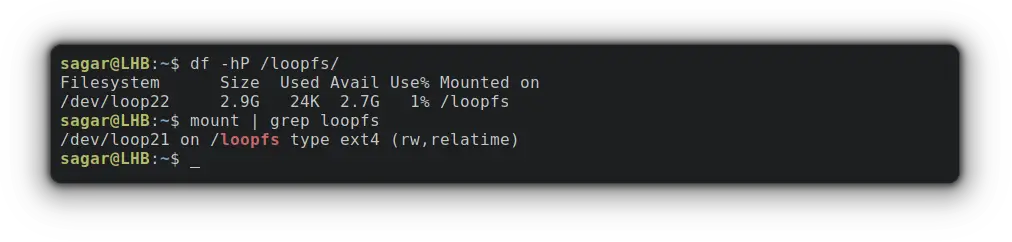
sudo mount -o loop /dev/loop21 /loopfsNow, you can verify the mounting point and size of the recently mounted loop device:
To verify the file system, you can go with the given command:
How to Remove loop device
Removing a piece of software is always easy than installation/configuration and that’s the same case here!
First, you’ll have to unmount and remove the mounting directory:
sudo umount /loopfs sudo rmdir /loopfsNow, you’ll have to detach the loop device (mine is loop21) which was created by «losetup -d» command:
Finally, you have to remove the file (VirtBlock.img) by the given command:
sudo rm /home/sagar/VirtBlock.imgFinal Words
Using a loop device for isolation is a handy Linux feature.
This guide went through the configuration and removal process in an easy manner. If you encounter any issues, leave a comment and I’ll try to help you out.
How to create virtual block device (loop device/filesystem) in Linux
Linux supports a special block device called the loop device, which maps a normal file onto a virtual block device. This allows for the file to be used as a “virtual file system” inside another file. With Linux it’s possible to create a file-system inside a single file. These storage devices are available as device files such as /dev/device_name.
Create a file
1. First step is to create a file of desired size. The following command will create a file that is 1 GB in size:
# dd if=/dev/zero of=loopbackfile.img bs=100M count=10 10+0 records in 10+0 records out 1048576000 bytes (1.0 GB) copied, 1.26748 s, 827 MB/s
2. Verify the size of the file you have just created.
# du -sh loopbackfile.img 1000M loopbackfile.img
Create the loop device
1. Next step is to create a loop device with the file. Use the command “losetup” to create a loop device “loop0”
# losetup -fP loopbackfile.img
Here,
-f – find the first unused loop device. If a file argument is present, use this device. Otherwise, print its name.
-P – force kernel to scan partition table on newly created loop device.
2. To print the loop device generated using the above command use “losetup -a”.
# losetup -a /dev/loop0: [64769]:4199216 (/root/loopbackfile.img)
Create the filesystem
1. Now lets create a ext4 filesystem on the loopback device.
# mkfs.ext4 /root/loopbackfile.img mke2fs 1.42.9 (28-Dec-2013) /root/loopbackfile.img is not a block special device. Proceed anyway? (y,n) y Discarding device blocks: done Filesystem label= OS type: Linux Block size=4096 (log=2) Fragment size=4096 (log=2) Stride=0 blocks, Stripe width=0 blocks 64000 inodes, 256000 blocks 12800 blocks (5.00%) reserved for the super user First data block=0 Maximum filesystem blocks=262144000 8 block groups 32768 blocks per group, 32768 fragments per group 8000 inodes per group Superblock backups stored on blocks: 32768, 98304, 163840, 229376 Allocating group tables: done Writing inode tables: done Creating journal (4096 blocks): done Writing superblocks and filesystem accounting information: done
Mount the loopback filesystem
1. We can now mount the loopback filesystem onto a directory. The “-o loop” additional option is used to mount loopback filesystems.
# mkdir /loopfs # mount -o loop /dev/loop0 /loopfs
2. Verify the size of the new mount point and type of filesystem using below commands.
# df -hP /loopfs/ Filesystem Size Used Avail Use% Mounted on /dev/loop1 969M 2.5M 900M 1% /loopfs
# mount | grep loopfs /dev/loop0 on /loopfs type ext4 (rw,relatime,seclabel,data=ordered)
Removing loop device
If you want remove the new filesystem, use the following steps:
1. Umount and delete the directory /loopfs
umount /loopfs rmdir /loopfs
2. Delete the loopback device “loop0” created using the “losetup -d” command.
3. Finally remove the file “/root/loopbackfile.img” used to create the loop device.
Enable Encryption on loop filesystem
‘losetup’ also allows to enable data encryption in order to get a crypted filesystem. The syntax to created a encrypted loop device si as shown below:
# losetup [ -e encryption ] loop_device file
The following encryption algorithms are accepted:
- NONE use no encryption (default).
- XOR use a simple XOR encryption.
- DES use DES encryption.
DES encryption is only available if the optional DES package has been added to the kernel. DES encryption uses an additional start value that is used to protect passwords against dictionary attacks.
Maximum Lopback devices allowed
You may get an error message ‘no such device’ while creating more than 8 loopback devices. This happens because You are being limited by the amount of loop devices available. Depending on your system, add ‘options loop max_loop=X’ to /etc/modprobe.conf on CentOS/RHEL 5 or create a new file named like disk.conf in directory /etc/modprobe.d on CentOS/RHEL 6. (Where X is number of loop device you need).
Some more articles you might also be interested in …
How do I create virtual ethernet devices in linux?
I am testing an implementation of a protocol that talks between two computers using ethernet (not IP). In order to not actually have to have two physical computers, I want to create two virtual ethernet interfaces. These would only be able to talk to each other, so one endpoint program would bind to one interface and the other endpoint would bind to the other. Is this possible and how do I do it?
6 Answers 6
You can use VDE2, a virtual switch.
For example (you will need a few terms):
# Install vde2 (assumes Debian/Ubuntu) sudo aptitude install vde2 # Create the switch and two tap interfaces attached to it sudo vde_switch -tap tap0 -tap tap1 # Configure the interfaces sudo ip addr add 10.0.31.10 dev tap0 sudo ip addr add 10.0.31.11 dev tap1 # Start a server socat - TCP-LISTEN:4234,bind=10.0.31.10 # Alternatively, an echo server: #socat PIPE TCP-LISTEN:4234,bind=10.0.31.10 # Start a client socat - TCP:10.0.31.10:4234,bind=10.0.31.11 Type on one side, it will appear on the other.
This example does not work: All traffic goes through the ‘lo’ interface as can be seen by using ‘tcpdump’. You may also notice that both tap interfaces are still down. After bringing them up tcpdump works on the tap interfaces but shows not traffic at all on them. The Linux kernel uses it local routing table (see ‘ip route show table local’) to find out that these IPs are local and just routes the packets locally, without using ‘vde_switch’. Having said all that, I have not yet found a way to make an socat connection through vde_switch and tap interfaces.
How to Create a Virtual Device in Linux
How to get started making a virtual device in Linux
You can start looking at this documentation An introduction to block device drivers
The best book is Linux Device Driver version 3, which is quite old now, but, a new release will happen very soon.
Linux Device Drivers, 4th Edition
Cannot create Android Virtual Device in Android Studio in Ubuntu
*.ini file will be created when you creating a emulator in android studio. I think /.android/avd file location have not permission to create that file.
Apply permission to this folder. then create into New
After that create it. It will working. 🙂
How to create Android Virtual Device with command line and avdmanager?
If you don’t care about it being a Nexus 6P, you can run
echo no | Android/Sdk/tools/bin/avdmanager create avd --force --name testAVD --abi google_apis/x86_64 --package 'system-images;android-23;google_apis;x86_64'
How create a virtual io device in Linux that proxies data to real device?
Examples can be found here: socat examples
You socat back to back on both the machines. One listens on a tcp port and forwards data to local virtual port or pty. The socat on other box uses real device as input and forwards any data to tcp port.
How to enable Android Virtual Devices (AVD)
In your screen there is error described: you don’t have Build Tools. Click on the blue link «Install Build Tools 26.0.2 and sync project».
Then go to Tools -> Android -> AVD Manager and click icon «+Create Virtual Device» (icon in lower left part of dialog window). On the next screens you will configure your VD (system, parameters) and you will have to download system image. It must be downloaded and selected to create Virtual Device. After that your VD should be accessible either by icon in main window or by list in Tools -> Android -> AVD Manager.
Virtual Serial Port for Linux
You can use a pty («pseudo-teletype», where a serial port is a «real teletype») for this. From one end, open /dev/ptyp5 , and then attach your program to /dev/ttyp5 ; ttyp5 will act just like a serial port, but will send/receive everything it does via /dev/ptyp5.
If you really need it to talk to a file called /dev/ttys2 , then simply move your old /dev/ttys2 out of the way and make a symlink from ptyp5 to ttys2 .
Of course you can use some number other than ptyp5 . Perhaps pick one with a high number to avoid duplicates, since all your login terminals will also be using ptys.