- How to Install KVM on Ubuntu 20.04
- Check Virtualization Support on Ubuntu 20.04
- Install KVM on Ubuntu 20.04
- Step 1: Install KVM Packages
- Step 2: Authorize Users
- Step 3: Verify the Installation
- Creating a Virtual Machine on Ubuntu 20.04
- Method 1: Virt Manager GUI
- Method 2: Using Command Line
- Установка виртуальных машин KVM под ubuntu server
How to Install KVM on Ubuntu 20.04
A type 2 hypervisor enables users to run isolated instances of other operating systems inside a host system. As a Linux based OS, Ubuntu supports a wide range of virtualization solutions.
Aside from popular third-party apps, such as VirtualBox and VMWare, the Linux kernel has its own virtualization module called KVM (Kernel-based Virtual Machine).
In this tutorial you will learn how to install and set up KVM on Ubuntu 20.04.
- A system running Ubuntu 20.04
- An account with sudo privileges
- Access to the command line/terminal
Check Virtualization Support on Ubuntu 20.04
1. Before you begin with installing KVM, check if your CPU supports hardware virtualization via egrep command:
egrep -c '(vmx|svm)' /proc/cpuinfoCheck the number in the output:

If the command returns a value of 0 , your processor is not capable of running KVM. On the other hand, any other number means you can proceed with the installation.
2. Now, check if your system can use KVM acceleration by typing:
The output should look like this:

If kvm-ok returns an error stating KVM acceleration cannot be used, try solving the problem by installing cpu-checker.
3. To install cpu-checker, run the following command:
sudo apt install cpu-checker4. When the installation completes, restart the terminal.
You are now ready to start installing KVM.
Note: When it is performed for servers, hardware virtualization is referred to as server virtualization.
Install KVM on Ubuntu 20.04
To enable KVM virtualization on Ubuntu 20.04:
- Install related packages using apt
- Authorize users to run VMs
- Verify that the installation was successful
Step 1: Install KVM Packages
1. First, update the repositories:
2. Then, install essential KVM packages with the following command:
sudo apt install qemu-kvm libvirt-daemon-system libvirt-clients bridge-utilsThis will start the installation of four KVM packages:

3. When prompted, type Y , press ENTER, and wait for the installation to finish.
Step 2: Authorize Users
1. Only members of the libvirt and kvm user groups can run virtual machines. Add a user to the libvirt group by typing:
sudo adduser ‘username’ libvirtReplace username with the actual username.

2. Now do the same for the kvm group:
sudo adduser ‘[username]’ kvm
Note: If you need to remove a user from the libvirt or kvm group, just replace adduser with deluser in the command above.
Step 3: Verify the Installation
1. Confirm the installation was successful by using the virsh command:
You can expect an output as seen below:

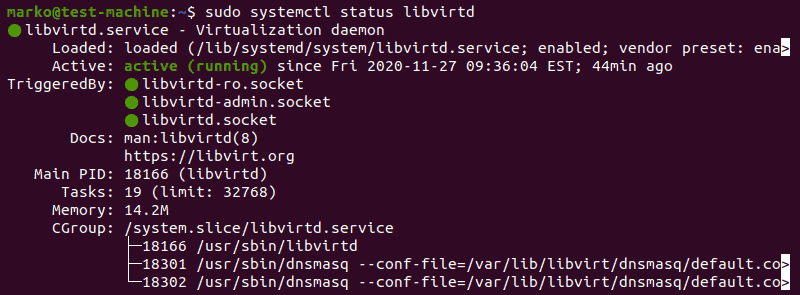
2. Or use the systemctl command to check the status of libvirtd:
sudo systemctl status libvirtdIf everything is functioning properly, the output returns an active (running) status.
3. Press Q to quit the status screen.
4. If the virtualization daemon is not active, activate it with the following command:
sudo systemctl enable --now libvirtdCreating a Virtual Machine on Ubuntu 20.04
1. Before you choose one of the two methods listed below, install virt-manager, a tool for creating and managing VMs:
sudo apt install virt-manager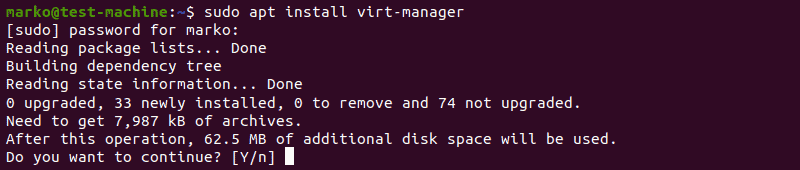
2. Type Y and press ENTER. Wait for the installation to finish.
Make sure you download an ISO containing the OS you wish to install on a VM and proceed to pick an installation method.
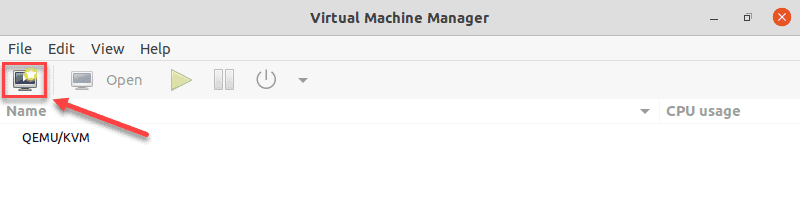
Method 1: Virt Manager GUI
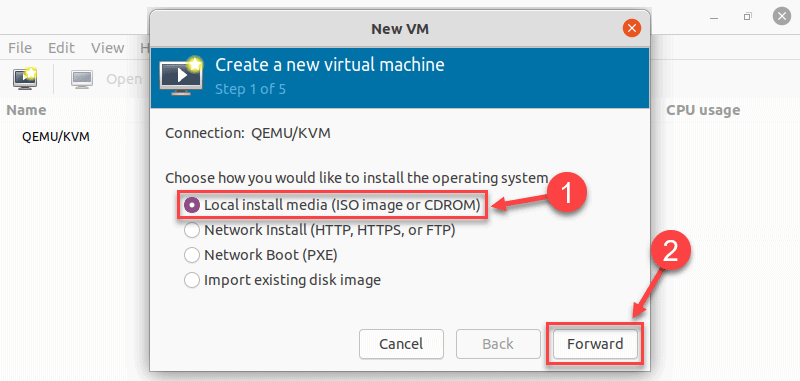
2. In the first window, click the computer icon in the upper-left corner.
3. In the dialogue box that opens, select the option to install the VM using an ISO image. Then click Forward.
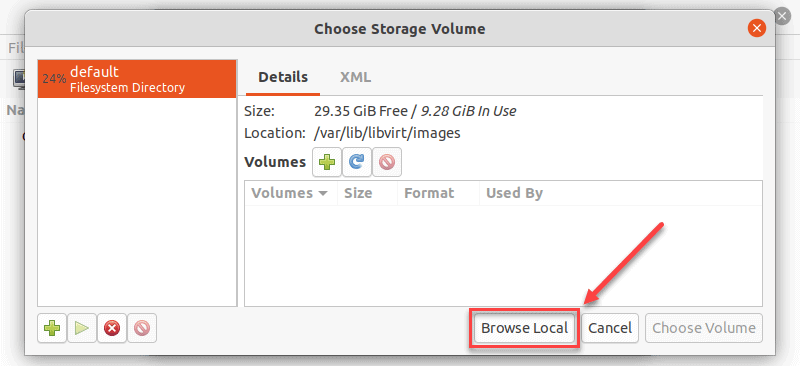
4. In the next dialogue, click Browse Local and navigate to the path where you stored the ISO you wish to install.
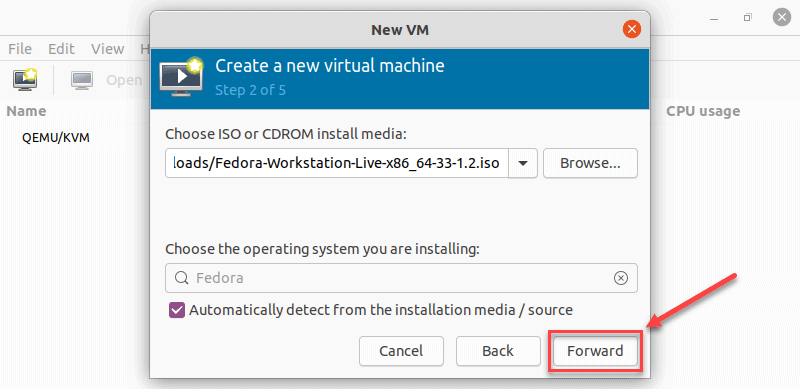
5. The ISO you chose in the previous window populates the field in Step 2. Proceed to Step 3 by clicking Forward.
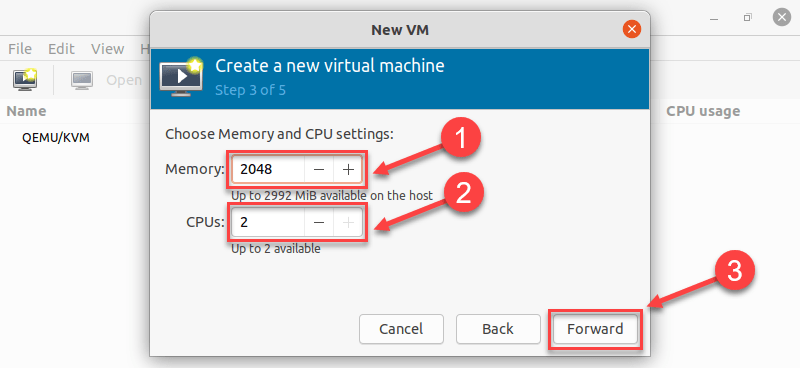
6. Enter the amount of RAM and the number of CPUs you wish to allocate to the VM and proceed to the next step.
7. Allocate hard disk space to the VM. Click Forward to go to the last step.
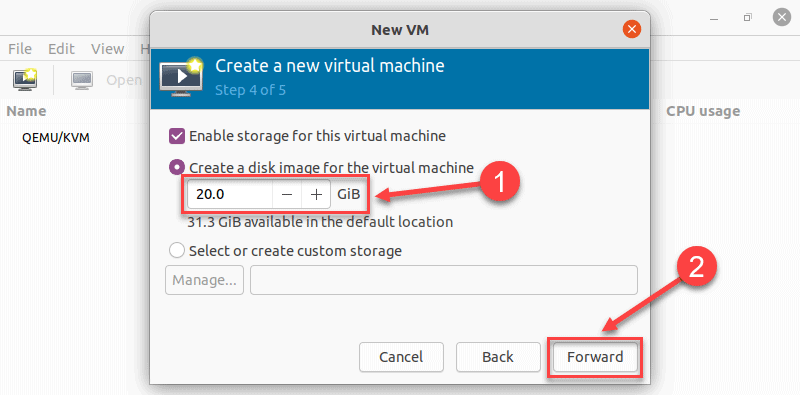
8. Specify the name for your VM and click Finish to complete the setup.
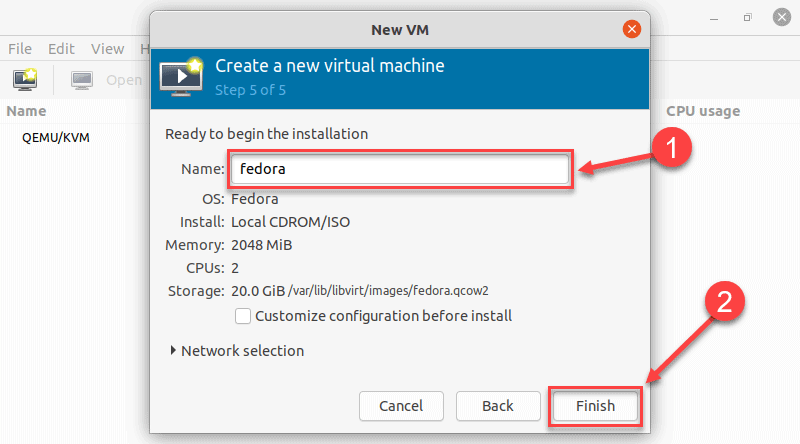
9. The VM starts automatically, prompting you to start installing the OS that’s on the ISO file.

Method 2: Using Command Line
Use the virt-install command to create a VM via Linux terminal. The syntax is:
virt-install --option1=value --option2=value . In the following example, virt-install is used to install Fedora 33 Workstation.
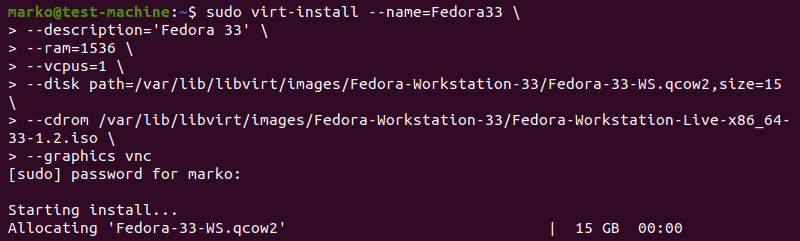
Tip: For tidier appearance of commands with many options, type a back-slash after each option. That way, when you press Enter, the command will not execute, and the cursor will go to the next line.
Options behind the command serve to define the parameters of the installation.
Here is what each of them means:
| Option | Description |
|---|---|
| —name | The name you give to the VM |
| —description | A short description of the VM |
| —ram | The amount of RAM you wish to allocate to the VM |
| —vcpus | The number of virtual CPUs you wish to allocate to the VM |
| —disk | The location of the VM on your disk (if you specify a qcow2 disk file that does not exist, it will be automatically created) |
| —cdrom | The location of the ISO file you downloaded |
| —graphics | Specifies the display type |
After reading this article, you should know how to install KVM on Ubuntu 20.04. Additionally, the article describes two methods of setting up virtual machines, using the virt-manager GUI and the virt-install command.
Установка виртуальных машин KVM под ubuntu server
Последнее время применение виртуализации при построении серверной инфраструктуры встречается все чаще. Гибкость, масштабируемость, экономия делают эту технологию очень перспективной. Сейчас на рынке существует достаточное количество решений, как проприетарных, так и open source, позволяющих развернуть виртуальные сервера. Один из таких вариантов я хочу рассмотреть в данной статье.
Поигравшись с ГУЙовыми платформами виртуализации от Microsoft, VMware и Sun, я решил попробовать сделать тоже самое через консоль. Установив давно понравившийся мне linux дистрибутив ubuntu, стал выбирать — на какой же реализации виртуальных машин (ВМ) остановиться. В википедии есть интересная табличка, хотя посмотрев оффициальный help к ubuntu я понял, что лучше начать с KVM.

Процедура установки хост-сервера в общем-то стандартная, но есть нюансы. Во время установки включил LVM (как я понял — гостевые ОС можно впоследстии размещать на LVM-томах, что придаст дополнительную гибкость), а в окне выбора доустанавлемого ПО отметил OpenSSH server и Virtual Machine host.
Хост-серверу задан статический ip 172.16.4.24, что можно увидеть далее в приведенных конфигах.
После установки хост-сервера, подключаемся к нему по ssh (одноименной командой из linux или putty/kitty из windows).
Первым делом необходимо проверить, поддерживает ли железо сервера аппаратную виртуализацию командой
egrep ‘(vmx|svm)’ /proc/cpuinfo
Если вывод команды не пустой, значит поддерживает.
Скачиваем в домашнюю папку iso-образ того дистрибутива операционной системы, которая в последствии будет гостевой. У меня это тот же самый ubuntu-9.04-server-amd64.iso
Устанавливаем необходимые пакеты:
sudo apt-get install kvm libvirt-bin python-virtinst bridge-utils
Добавляем пользователя, который будет рулить виртуалками (в простейшем случае это тот пользователь, которого мы завели во время установки системы, и под которым проделываем все описываемые действия):
sudo adduser $USER libvirtd
После этого лучше ребутнуться.
Проверяем, как установилась KVM, командой:
virsh -c qemu:///system list —all
В консоли должно появиться примерно следующее:
az@vsrvs:~$ virsh -c qemu:///system list —all
Connecting to uri: qemu:///system
Id Name State
———————————-
если все так, продолжаем.
Для того, чтобы виртуальные сервера работали в нашей реальной локальной сети на хост-машине создаем сетевой мост. Для этого надо подредактировать файл /etc/network/interfaces
Так он выглядел до модификации:
# This file describes the network interfaces available on your system # and how to activate them. For more information, see interfaces(5). # The loopback network interface auto lo iface lo inet loopback # The primary network interface auto eth0 iface eth0 inet static address 172.16.4.24 netmask 255.255.255.192 network 172.16.4.0 broadcast 172.16.4.63 gateway 172.16.4.1
# This file describes the network interfaces available on your system # and how to activate them. For more information, see interfaces(5). # The loopback network interface auto lo iface lo inet loopback # The primary network interface auto eth0 iface eth0 inet manual auto br0 iface br0 inet static address 172.16.4.24 netmask 255.255.255.192 network 172.16.4.0 broadcast 172.16.4.63 gateway 172.16.4.1 bridge_ports eth0 bridge_fd 9 bridge_hello 2 bridge_maxage 12 bridge_stp off
Далее переходим к инсталляции ВМ:
sudo virt-install -n vsrv1 -r 384 -f vsrv1.img -s 10 -c ubuntu-9.04-server-amd64.iso —accelerate —os-type=linux —os-variant=generic26 -v —vnc -w bridge:br0
где:
-n vsrv1 — имя ВМ;
-r 384 — выделяемый объем ОЗУ для нее;
-f vsrv1.img — файл, являющийся виртуальный жестким диском для гостевой ОС;
-s 10 — объем этого диска в гигабайтах;
-c ubuntu-9.04-server-amd64.iso — образ cd дистрибутива гостевой ОС, подключаемый как виртуальный cdrom;
—accelerate —os-type=linux —os-variant=generic26 -v — ускоряем, оптимизируем ВМ для конкретной гостевой ОС и задействуем аппаратные возможности виртуализации;
—vnc — запускаем для ВМ vnc-сервер;
-w bridge:br0 — указываем использовать сетевой мост.
Если после запуска этой команды не появилось никаких ошибок, а отобразилось нечто следующее:
Starting install…
Creating domain… 0 B 00:01
/usr/lib/python2.6/dist-packages/virtinst/Guest.py:1086: DeprecationWarning: integer argument expected, got float
for ignore in range(1, (5 / .25)): # 5 seconds, .25 second sleeps
Unable to connect to graphical console: virt-viewer not installed. Please install the ‘virt-viewer’ package.
Domain installation still in progress. You can reconnect to
the console to complete the installation process.
То все отлично, виртуальная машина запустилась, что можно проверить командой:
virsh -c qemu:///system list —all
Поэтому преступаем к установке гостевой ОС.
Для начала необходимо подключится к vnc-серверу, который отображает экран ВМ. Я делал это из WinXP, хотя, из практически любого linux дистрибутива, это делается аналогично.

Устанавливаем (если в самом начале не установили, а настраивали сервер локально) ssh-клиент, например, kitty (доработанный вариант putty). Запускаем, настраиваем:
- Во вкладке Session — Host Name (or IP address) адрес нашего хост-сервера (в моем случае 172.16.4.24).
- Во вкладке Windows-Translation — выбираем UTF-8.
- Во вкладке Connection-SSH-Tunnels — заполняем поля Source port 59000, Destination localhost:5900, нажимаем Add. Должна появится следующая запись:
- Жмем Open и мы должны подключится по SSH к хост-серверу. Одновременно у нас произойдет перенаправление порта 5900 хост-сервера (порт vnc-сервера) на наш локальный 59000 порт.
Примечание. При запуске еще одной ВМ, порт vnc-сервера увеличится на 1, поэтому для того, чтобы увидеть ее экран необходимо сделать перенаправление порта 5901 хост-сервера на, например, порт 59001.
Устанавливаем vnc-клиент, например UltraVNC, запускаем UltraVNC Viewer и подключаемся к localhost:59000. Если все сделано правильно, то мы увидим экран нашей ВМ с запущенным инсталлятором гостевой ОС.
Устанавливаем гостевую ОС.

Так она начинает загружаться после установки:
После установки и настройки гостевой ОС, ВМ можно клонировать командой
sudo virt-clone -o vsrv1 -n vsrv2 -f vsrv2.img —connect=qemu:///system
UPD: После клонирования для того, чтобы заработал сетевой интерфейс необходимо на клоне удалить файл /etc/udev/rules.d/70-persistent-net.rules ну и заодно изменить в /etc/hostname и в /etc/hosts имя сервера на новое.
- virsh -c qemu:///system help
Встроенная помощь по командам - virsh -c qemu:///system list —all
Посмотреть статус установленных ВМ - virsh -c qemu:///system start vsrv1
Запусить ВМ vsrv1 - virsh -c qemu:///system shutdown vsrv1
Послать команду завершения работы ВМ - virsh -c qemu:///system destroy vsrv1
Принудительно завершить работу ВМ - virsh -c qemu:///system undefine vsrv1
Удалить ВМ