- How to Install VirtualBox Guest Additions on CentOS 8
- Requirements
- Step 1: Installing EPEL on CentOS 8
- Step 2: Installing Kernel Headers and Build Tools
- Step 3: Install VirtualBox Guest Additions in CentOS 8
- Install VirtualBox Guest Additions Graphically
- Install VirtualBox Guest Additions Manually
- Установите гостевые дополнения VirtualBox в CentOS, RHEL и Fedora
- Как установить гостевые дополнения VirtualBox в CentOS
- Установите гостевые дополнения через графический интерфейс
- Установка гостевых дополнений через терминал
- How to Install VirtualBox Guest Additions on CentOS 8
- Installing VirtualBox Guest Additions on CentOS 8
- Step 1: Open VirtualBox and Start CentOS 8
- Step 2: Install Packages for Building Kernel Modules
- Step 3: Insert Guest Addition CD Image
- Step 4: Create a new directory and mount the ISO file
- Step 5: Execute VirtualBox Linux Addition Script
- Step 6: Reboot CentOS 8 Machine
- Step 7: Verify Installation of Guest Addition and Kernel
- Conclusion
- About the author
- Shehroz Azam
How to Install VirtualBox Guest Additions on CentOS 8
When you first install a virtual machine with a GUI on VirtualBox, the screen size is usually scaled-down and the user experience is usually quite bland. To improve the appearance and functionality of a virtual machine, VirtualBox provides a set of software packages and drivers known as VirtualBox guest additions in the form of an ISO image known as VBoxGuestAdditions.iso. The image is then mounted onto the guest system and the guest additions are thereafter installed.
The VirtualBox guest additions enable the functionalities listed below:
- Improved the graphical display/appearance.
- Mouse pointer integration between the host and guest machine.
- Shared folders between the host and guest system.
- Copy & paste and cut & paste functionality between the host and the guest system.
Requirements
VirtualBox guest additions can be installed on both Linux and Windows systems. In this guide, we will walk you through the installation of VirtualBox guest additions on CentOS 8.
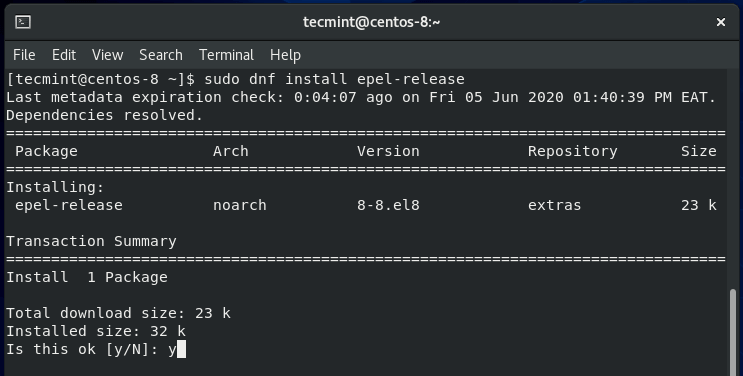
Step 1: Installing EPEL on CentOS 8
To start off, begin by installing the EPEL repository, in short for Extra Packages for Enterprise Linux, which is a repository that provides extra open-source software packages for RedHat flavors such as CentOS and Fedora.
To install the EPEL repository on CentOS 8, run the following dnf command on the terminal.
$ sudo dnf install epel-release
Once installed, confirm the version installed by running the command.

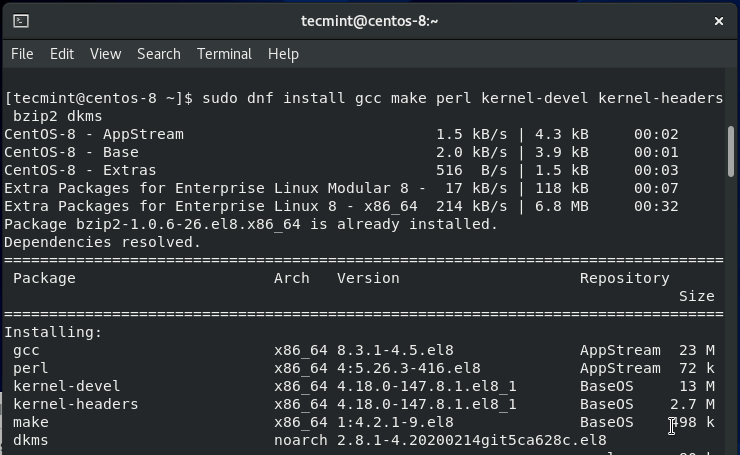
Step 2: Installing Kernel Headers and Build Tools
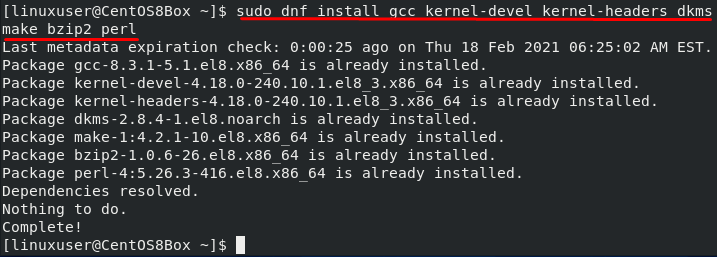
With the EPEL repository installed, proceed and install the kernel headers and build tools required to install the guest additions as shown.
$ sudo dnf install gcc make perl kernel-devel kernel-headers bzip2 dkms
Once installed, confirm that the version of kernel-devel corresponds to the version of your Linux kernel by running these commands:
$ rpm -q kernel-devel $ uname -r
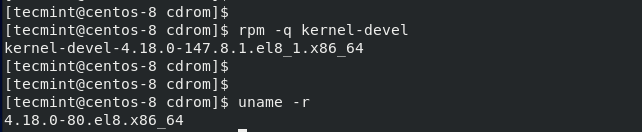
The output clearly indicates a conflict between the two versions. The kernel-devel version is 4.18.0-147.8.1.el8_1.x86_64 whilst the Linux kernel version is 4.18.0-80.el8.x86_64.
To resolve the issue, update the Linux kernel by running the command:

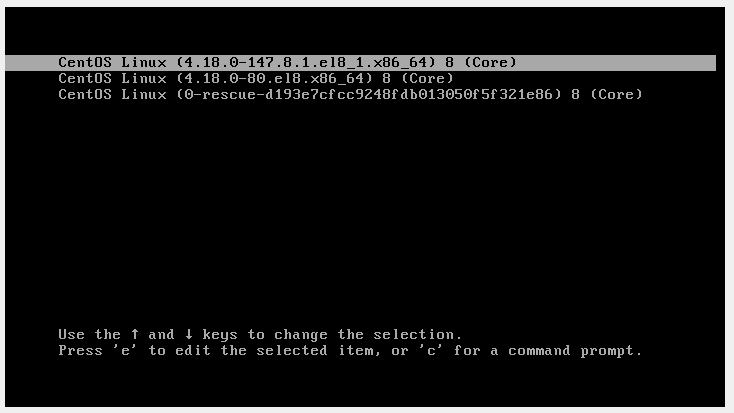
Once prompted, press ‘Y’ and hit ENTER to continue with the update. When the update the complete, reboot your CentOS 8 system.
During the reboot, be sure to boot into the latest kernel entry that corresponds to the kernel-devel version. This is usually the first entry as you can see.
Once the system is done with booting, log in and once again confirm that the kernel-devel version now matches the version of the Linux kernel.
$ rpm -q kernel-devel $ uname -r
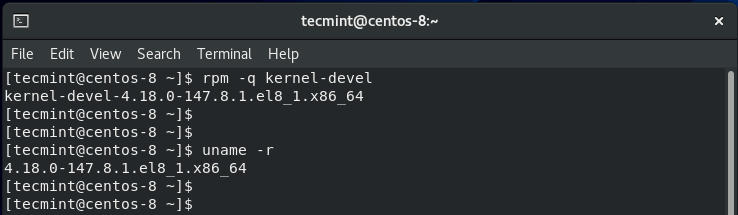
The two versions are now in sync. Great! Now you can go ahead and install VirtualBox guest additions.
Step 3: Install VirtualBox Guest Additions in CentOS 8
There are two ways to install guest additions, and we will cover both ways here:
Install VirtualBox Guest Additions Graphically
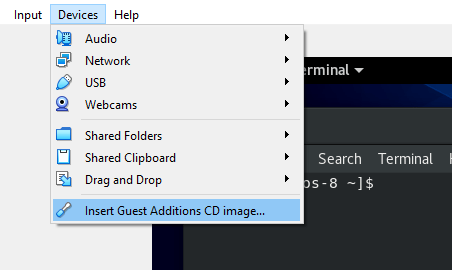
To install the VirtualBox guest additions, Head out to the menu bar and click Devices –> Insert Guest Additions CD image.
A pop will appear as shown. From here, you can take two approaches:
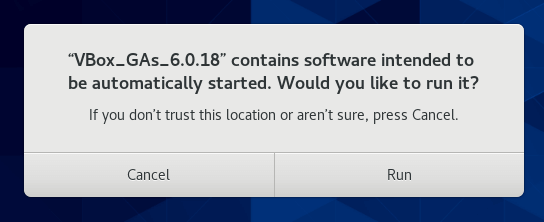
You can hit ‘Run‘ and later authenticate when prompted. Thereafter, you will see some verbose output on the terminal. Once the installation is done, reboot the system and boot into a full-screen.
Install VirtualBox Guest Additions Manually
The second option is to install a command-line. To achieve this, choose ‘Cancel’ option and thereafter, open your terminal and create a mount point for the guest additions ISO image.
Next, mount the ISO image on the mount point.
$ sudo mount /dev/cdrom /mnt/cdrom
Then finally navigate to the mount location and run the VirtualBox installer script.
$ cd /mnt/cdrom $ sudo ./VBoxLinuxAdditions.run
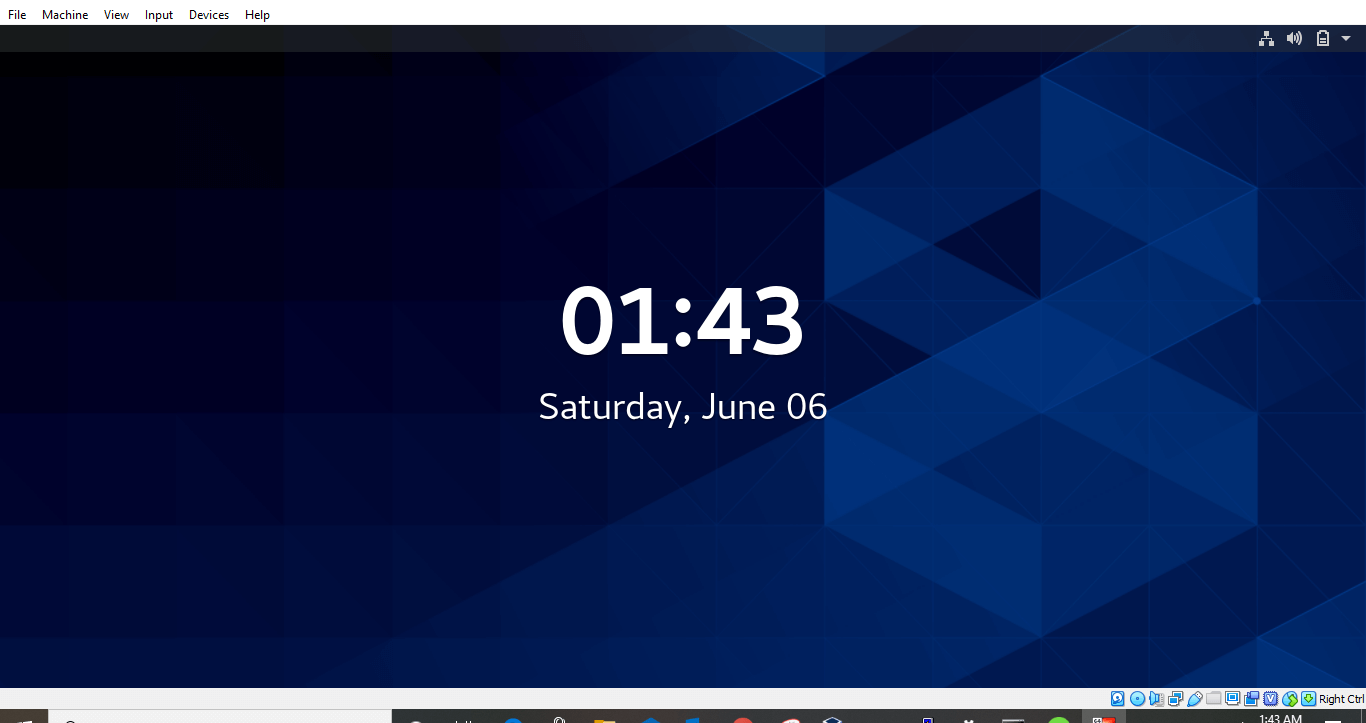
Once the script is done running, you will immediately observe the screen panning to full size. If this doesn’t happen in your case, reboot your system and finally boot into your full-screen CentOS 8 virtual machine 🙂
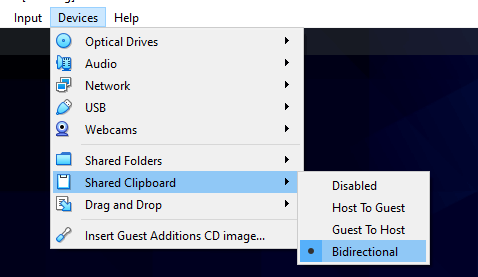
To enable mouse pointer integration, navigate to ‘Shared Clipboard‘ –> ‘Bidirectional‘. This enables you to copy and paste content between the host and guest system.
We hope this article has been helpful to you, If you encounter any challenges, please reach out to us. Thank you.
Установите гостевые дополнения VirtualBox в CentOS, RHEL и Fedora
Гостевые дополнения VirtualBox — это программное обеспечение (обычно это драйверы устройств и другие специальные системные приложения), обеспечивающее бесшовную интеграцию между хост-системой и гостевой системой. Они помогают максимально эффективно использовать гостевую операционную систему для повышения производительности и удобства использования.
Некоторые из функций, предлагаемых Guest Additions, включают интеграцию указателя мыши, функцию Drag’n’Drop, общий буфер обмена, общие папки, расширенную поддержку видео, синхронизацию времени, общие каналы связи между хостом и гостем, бесшовные окна и более.
Гостевые дополнения предназначены для установки на виртуальную машину после установки гостевой операционной системы.
В этой статье мы объясним, как установить Гостевые дополнения VirtualBox в CentOS и дистрибутивах на основе RHEL, таких как Fedora и Научный Linux.
Как установить гостевые дополнения VirtualBox в CentOS
1. Сначала включите репозиторий EPEL в вашей гостевой операционной системе CentOS/RHEL, чтобы установить некоторые необходимые пакеты, необходимые для процесса установки, как показано ниже. .
# yum -y install epel-release
2. Затем обновите каждый пакет в вашей гостевой системе, включая ядро, до последней доступной и разрешимой версии, как показано на рисунке. После завершения процесса обновления перезагрузите свою систему, чтобы завершить процесс обновления и начать использовать новое ядро.
# yum -y update [On RHEL/CentOS] # dnf -y upgrade [On Fedora 22+]
3. После завершения процесса обновления установите все заголовки ядра, инструменты разработчика и другие связанные пакеты, необходимые для установки гостевых дополнений из исходного кода, как показано.
---------- On RHEL/CentOS ---------- # yum install make gcc kernel-headers kernel-devel perl dkms bzip2 ---------- On Fedora 22+ ---------- # dnf install make gcc kernel-headers kernel-devel perl dkms bzip2
4. Затем установите для переменной среды KERN_DIR каталог с исходным кодом ядра (/usr/src/kernels/$ (uname -r) ) и экспортируйте его одновременно, как показано.
# export KERN_DIR=/usr/src/kernels/$(uname -r)
5. Теперь вы можете смонтировать ISO-образ Guest Additions и запустить программу установки двумя способами:
Установите гостевые дополнения через графический интерфейс
Если у вас установлена среда рабочего стола, используйте этот параметр, в строке меню виртуальной машины перейдите к разделу Устройства => нажмите Вставить образ компакт-диска с гостевыми дополнениями, чтобы смонтировать >Гостевые дополнения ISO в вашей гостевой ОС.

Откроется диалоговое окно с просьбой Запустить программу установки, нажмите Выполнить, чтобы выполнить ее. Это, в свою очередь, откроет терминал, который покажет детали установки (следуйте инструкциям на экране).


Установка гостевых дополнений через терминал
Войдите в терминал и выполните следующие команды, чтобы смонтировать ISO-файл Guest Additions, перейдите в каталог, в который был смонтирован ISO-образ гостевых дополнений, внутри которого вы найдете установщики гостевых дополнений VirtualBosx для различных платформ, запустите для Linux следующим образом.
# mount -r /dev/cdrom /media # cd /media/ # ./VBoxLinuxAdditions.run
6. После завершения установки выключите гостевую систему, чтобы выполнить определенные настройки, как описано ниже.
Примечание. Если у вас не установлена среда рабочего стола, вы можете установить рабочий стол Gnome 3 или пропустить следующий раздел. Тебе должно быть хорошо идти.
7. Теперь вам нужно включить общий буфер обмена и функцию перетаскивания для вашей гостевой операционной системы. В настройках гостевой машины CentOS, RHEL и Fedora выберите Общие => Дополнительно и включите эти две опции оттуда, нажмите на раскрывающиеся опции, чтобы выбрать опцию.

Когда вы закончите, нажмите ОК, чтобы сохранить настройки и загрузить гостевую ОС, а также подтвердить, что внесенные вами изменения работают должным образом.
Вот и все! Гостевые дополнения VirtualBox упрощают вашу жизнь при использовании гостевых операционных систем, обеспечивая бесшовную интеграцию между хостом и гостевой системой. Если у вас возникли проблемы во время установки, воспользуйтесь формой обратной связи ниже, чтобы задать любые вопросы.
How to Install VirtualBox Guest Additions on CentOS 8
![]()
With the VirtualBox virtualization open-source software, you can create virtual machines and run more than one operating system at once on the same machine. VirtualBox provides a lot of additional guest features, such as a shared folder, mouse integration, shared clipboard, and better graphical appearance. These extra features can be obtained in a virtually created CentOS 8 machine by installing the VirtualBox Guest Additions using the VirtualBox Addition ISO image. This article shows you how to install VirtualBox Guest Additions on CentOS 8.
Installing VirtualBox Guest Additions on CentOS 8
To install the VirtualBox Guest Addition on your CentOS 8 machine, simply follow the step-by-step guide given below.
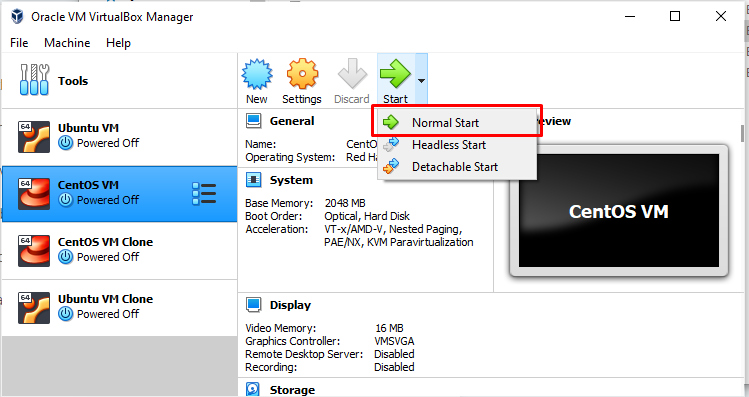
Step 1: Open VirtualBox and Start CentOS 8
First, open the VirtualBox application from the Application menu, select the CentOS machine, and start it.
Step 2: Install Packages for Building Kernel Modules
Next, open the terminal and enter the following command:
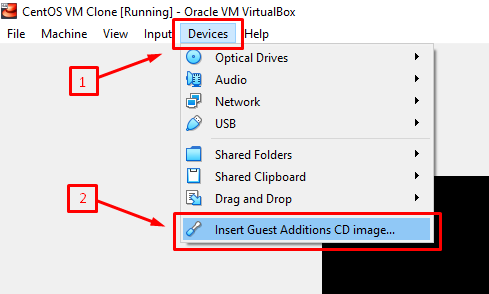
Step 3: Insert Guest Addition CD Image
From the menu bar, go to “Devices” and click the “Insert Guest Addition CD Image” option to insert the guest addition CD image, as shown in the picture below:
After the Guest Additions CD image has been inserted, the CentOS machine will automatically prompt you to run the VirtualBox Guest Addition Image. Simply click “Run” to install the Guest addition image. Once you have completed the installation of the Guest addition image, reboot the machine. On boot, you will see a full-screen view of the CentOS 8 machine, which confirms the installation of the VirtualBox Guest Addition image on the CentOS 8 machine.
If the window does not appear, then you can install the VirtualBox Guest Addition image manually by following the procedure given below.
Step 4: Create a new directory and mount the ISO file
To create a directory, issue the following command:

To mount the ISO file, issue the command given below:

Step 5: Execute VirtualBox Linux Addition Script
To run the “VBoxLinuxAdditions.run” script, first, go to the newly created “/mnt/cdrom” directory by entering the following command:

Now, run the script using the command given below:
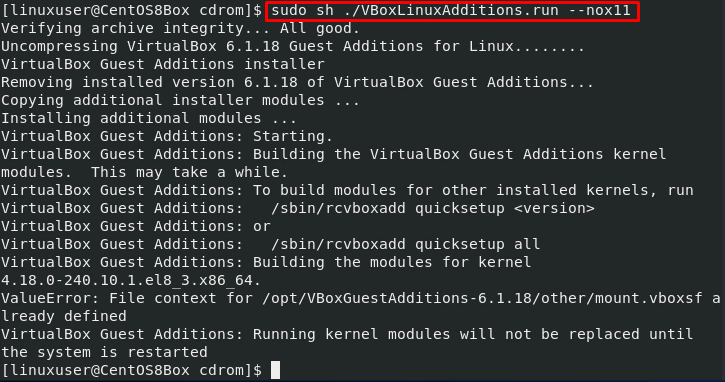
After running the “VBoxLinuxAdditions.run” script, the window should automatically adjust itself to fullscreen. If the window does not adjust automatically, you can simply reboot the machine and have the changes.
Step 6: Reboot CentOS 8 Machine
To reboot the CentOS 8 machine, issue the following command:
After rebooting the CentOS 8 virtual machine, you will verify that the kernel modules have been loaded.
Step 7: Verify Installation of Guest Addition and Kernel
After logging in to the CentOS 8 machine after reboot, issue the command given below to confirm the installation of the Guest Addition image:

If you do not have an output like the above, then you must reload the kernel module. If your output does look like the above, this means that you have successfully installed the Guest Addition, and you can use all of the related features, such as sharing the clipboard and folders.
Conclusion
The Guest Addition provides some useful features, such as a shared folder, mouse integration, shared clipboard, and better graphical appearance in a virtual machine of VirtualBox. This article showed you how to manually install and configure the VirtualBox Guest Addition image.
About the author
Shehroz Azam
A Javascript Developer & Linux enthusiast with 4 years of industrial experience and proven know-how to combine creative and usability viewpoints resulting in world-class web applications. I have experience working with Vue, React & Node.js & currently working on article writing and video creation.