- Setting up VirtualBox Guest Additions
- For recent guest OSs
- Ubuntu or similar
- Getting VBoxGuestAdditions.iso
- Making VBoxGuestAdditions.iso visible to the guest
- Executing install script for Guest Additions on older Linux guests
- References
- How to Install VirtualBox Guest Additions On Ubuntu 22.04
- Prerequisites
- Install Guest Additions on Ubuntu 22.04
- Install VirtualBox Guest Additions Using Terminal
- Install VirtualBox Guest Additions using Graphical Interface
- Conclusion
Setting up VirtualBox Guest Additions
Guest Additions are distributed on their own CD image (.iso file) named VBoxGuestAdditions.iso. How you get that file to the guest can depend on the OS of the guest — see below.
After installing Guest Additions, on some, older guests you might need to restart the guest.
For recent guest OSs
In the guest virtual machine, choose Devices -> Install Guest Additions from the menubar of VirtualBox.
VirtualBox will look for the needed file. Failing to find it, it may give you an opportunity to download the file from the internet.
If all that fails, follow one of the steps below.
Ubuntu or similar
Getting VBoxGuestAdditions.iso
- Download a VirtualBox package from https://www.virtualbox.org/wiki/Downloads (you might have installed this package when you installed VirtualBox). The package should include the VBoxGuestAdditions.iso file.
- Open http://download.virtualbox.org/virtualbox/ and enter the subdirectory for the latest version of VirtualBox. It should contain the corresponding VBoxGuestAdditions_X.Y.Z.iso file.
- Install a package through the usual channels for your distribution. For example, you might use:
sudo apt-get install virtualbox-guest-additions-iso
Some, recent versions of VirtualBox will now be able to find the file on the host when you choose Device -> Install Guest Additions on the VirtualBox running a guest. Continue with instructions for setting up file sharing.
For other, older versions of guest OS’s and VirtualBox, the .iso file is on the host, but the guest needs to see it (and file sharing is not yet enabled.) Follow the next two steps for mounting the .iso file and executing the scripts in the .iso file.
Making VBoxGuestAdditions.iso visible to the guest
Just as you mounted a .iso CD image for your guest OS when installing it on the guest, now mount VBoxGuestAdditions.iso as a CD on the guest. For example, in the VirtualBox window, choose the Storage section under Details, and so forth.
Note that recent versions of VirtualBox have changed the method of mounting .iso files.
Executing install script for Guest Additions on older Linux guests
Make sure you have the image, for example VBoxGuestAdditions.iso or VBOXADDITIONS, mounted as CDROM.
If you are running a Linux guest, open a terminal and type:
in for instance Ubuntu Lucid, the CD image should mount at /media/ so that would be
sudo sh ./VBoxLinuxAdditions.run
If you would like to uninstall the Guest Additions, run:
sudo sh ./VBoxLinuxAdditions.run uninstall
References
VirtualBox/GuestAdditions (последним исправлял пользователь 78-0-208-105 2012-10-20 16:28:08)
The material on this wiki is available under a free license, see Copyright / License for details
You can contribute to this wiki, see Wiki Guide for details
How to Install VirtualBox Guest Additions On Ubuntu 22.04
![]()
VirtualBox guest additions are a collection of device drivers and software application packages shipped with Oracle VirtualBox. Installing Guest additions improve the guest operating system’s performance and extra features.
Guest Addition provides seamless mouse support, file transfer between the host and the VM, VM screen resolution will match the size of the VirtualBox window, automated guest login using credentials from a master login system, and many more.
Prerequisites
Before installing Guest additions, install the build tools and kernel headers for the current kernel.
sudo apt update sudo apt install -y build-essential linux-headers-$(uname -r)
Install Guest Additions on Ubuntu 22.04
VirtualBox guest additions are stored in an ISO file VBoxGuestAdditions.iso inside the VirtualBox installation directory. To install the Guest additions, you need to mount the ISO image in your VM.
Install VirtualBox Guest Additions Using Terminal
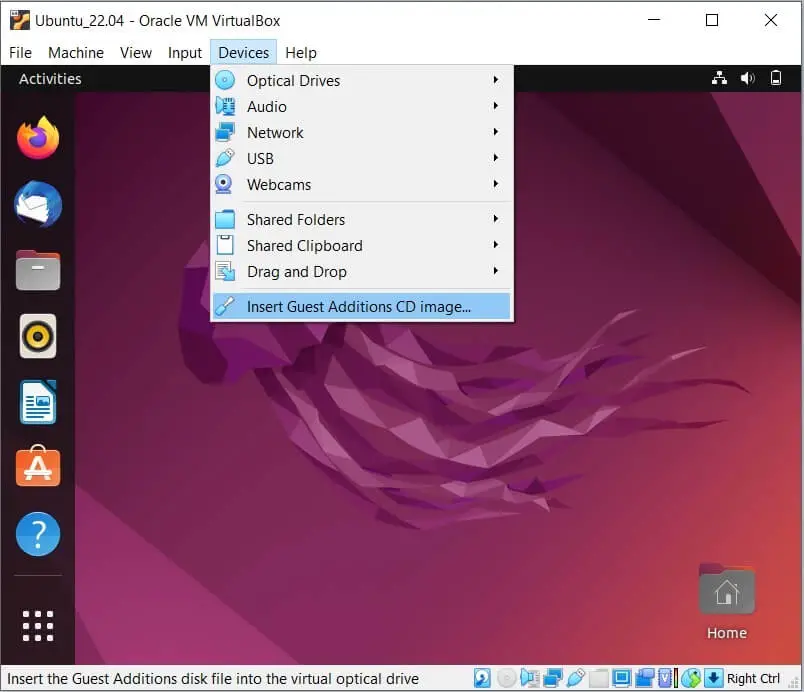
Go to Devices>>> Insert Guest Additions CD Image on the VM window.

First, mount the ISO image to the /media directory.
sudo mount /dev/cdrom /media
Then, execute the VirtualBox guest addition installer.
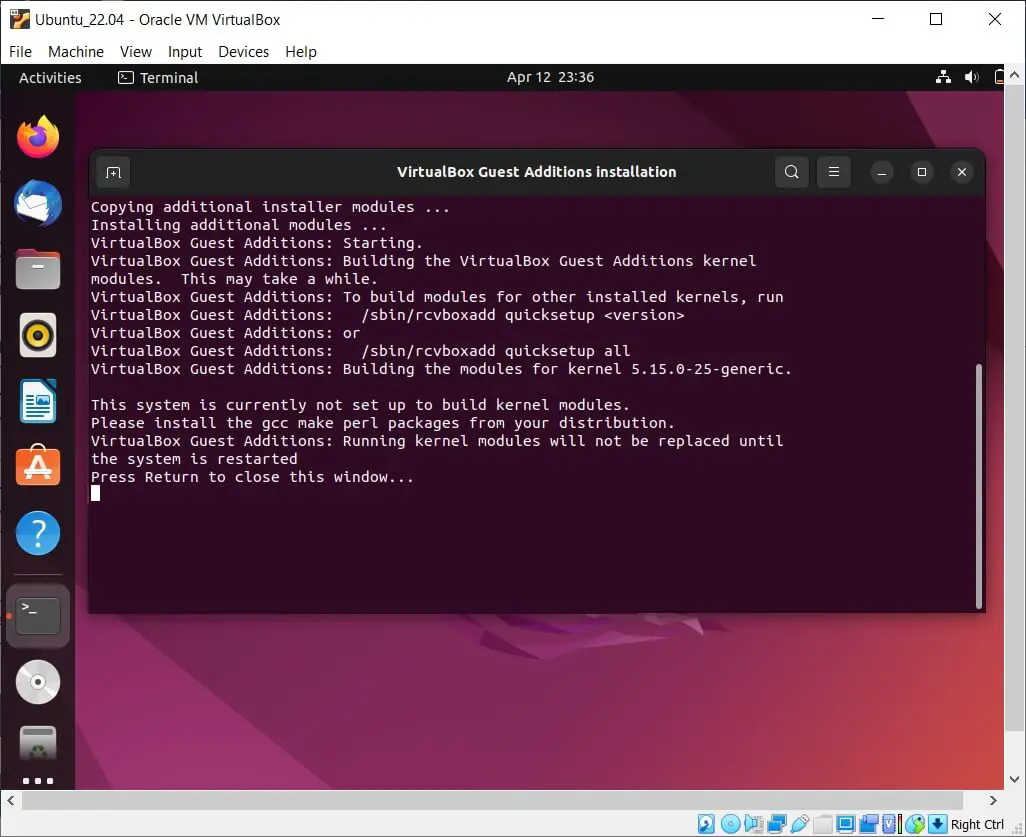
cd /media sudo ./VBoxLinuxAdditions.run
Even before the installation gets complete, your system will get a full-screen view which confirms that the installation is successful.
Finally, you may reboot the system to complete the installation.
If your VM guest screen resolution doesn’t change to the size of the VirtualBox window, try clicking maximize and minimize the button of the VM window.
Install VirtualBox Guest Additions using Graphical Interface
Go to Devices » Insert Guest Additions CD Image on the VM window.
As soon as you attach the guest additions image to a VM, you will get a prompt to run the automatic installation. Click Run.
Files >> CD Drive (VBOX_GAs_6.1.32) >> autorun.sh (Right-click) >> Run as a Program.
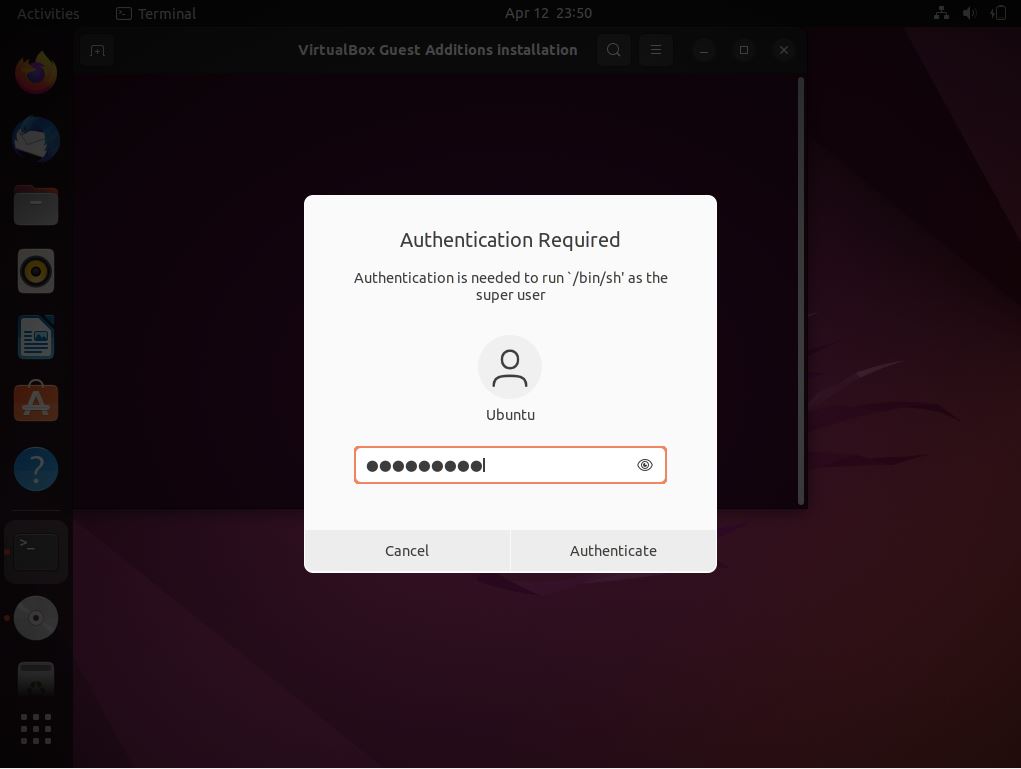
Next, you will get a window to enter a password to authorize the installation.
Even before the installation gets complete, your system will get a full-screen view which confirms that the installation is successful.
Finally, you may reboot the system to complete the installation.
If your VM guest screen resolution doesn’t change to the size of the VirtualBox window, try clicking maximize and minimize the button of the VM window.
Conclusion
That’s All. I hope you have installed guest additions on Ubuntu 20.04. Please share your feedback in the comments section.