- Install 64bit Ubuntu in VirtualBox [closed]
- 2 Answers 2
- 64-bit guests
- В VirtualBox нет x64 вариантов, только x32 для эмуляции – почему, и как это исправить
- Как включить возможность установки x64 битных версий систем в виртуальной машине VirtualBox
- Fix: VirtualBox only showing 32-bit and no 64-bit versions
- My experience with this problem
- Make sure that “Intel Virtualization Technology” and “VT-d” are enabled
- Windows 10 (host) must be a 64-bit operating system
- Hyper-V must be disabled
- Solution 1: Repair VirtualBox installation
- Solution 2: Disable “Memory integrity” in Windows 10
Install 64bit Ubuntu in VirtualBox [closed]
I installed VirtualBox and downloaded Ubuntu 64 bits. When I select Linux under VirtualBox, only Ubuntu 32 bits is shown. Am I doing something wrong that stops the 64bit option from appearing? My machine as a Windows 7 64 bit OS with 8GB of RAM. VBox screenshot
I have translated your post to English, sorry but this site only accepts posts in English. Next time, try using translate.google.com.
My guess is that this is happening after installing the virtualbox package in Ubuntu 14.04. The VirtualBox installed by that package only appears to support 32 bit operating systems.
2 Answers 2
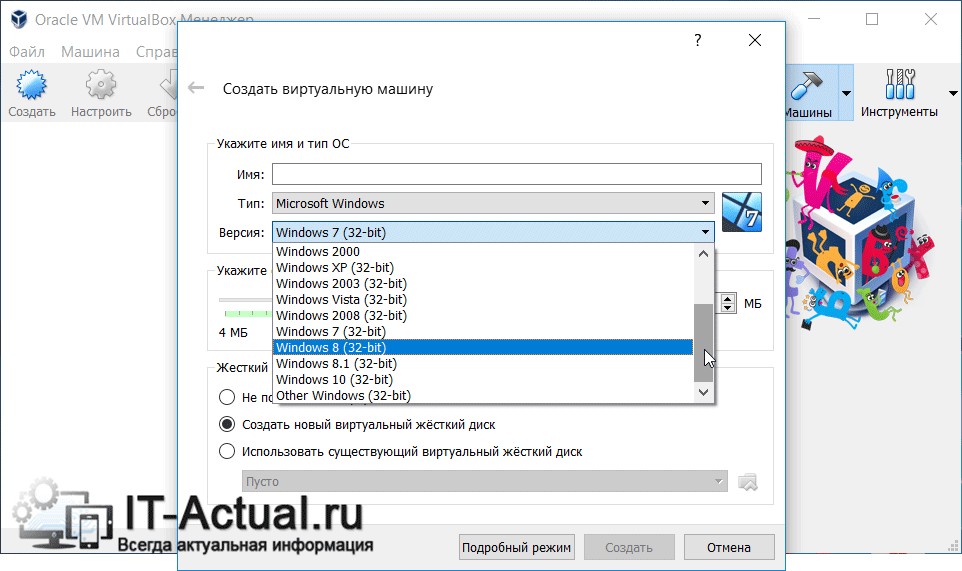
Your issue is that you need to create a 64bit virtual machine. You have probably created a 32bit one which is why the option does not appear. From the VBox website (emphasis mine):
64-bit guests
- You need a 64-bit processor with hardware virtualization support (see the section called “Hardware vs. software virtualization”).
- You must enable hardware virtualization for the particular VM for which you want 64-bit support; software virtualization is not supported for 64-bit VMs.
- If you want to use 64-bit guest support on a 32-bit host operating system, you must also select a 64-bit operating system for the particular VM. Since supporting 64 bits on 32-bit hosts incurs additional overhead, VirtualBox only enables this support upon explicit request. On 64-bit hosts (which typically come with hardware virtualization support), 64-bit guest operating systems are always supported regardless of settings, so you can simply install a 64-bit operating system in the guest.
So, just try creating a new Virtual Machine and select Ubuntu 64 as the OS. All the settings should be correctly configured by VirtualBox and you should be able to install with no problems.
I had this problem and all I needed to do was go into the BIOS menu (Lenovo G50-80) and enable Hardware Virtualisation. Now 64bit ubuntu appears as an option for me in VirtualBox
BIOS needs to enable virtualization of course, but for me, I also had to uninstall Hyper-V («remove windows 10 feature») which for some reason interfered with this
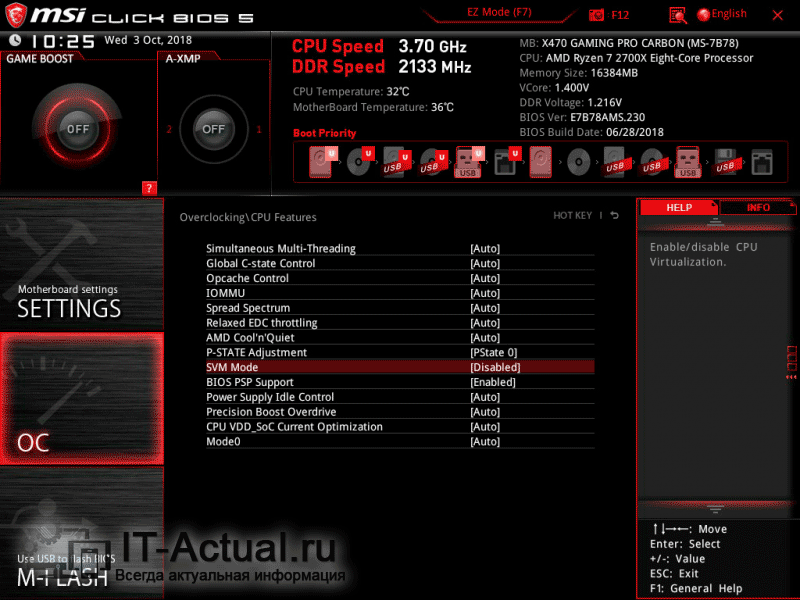
In my case, I went into the BIOS for my AMD Gigabyte X570 motherboard, and found the setting buried in «M.I.T» -> «Advanced Frequency Settings» -> «Advanced CPU Core Settings» -> «SVM Mode». This enabled me to see the Ubuntu 64-bit option in Virtualbox 6.1.4 on Windows 10.
Most probably your processor is not the 64-bit one, thats why VirtualBox is not able to run 64-bit kernels,or in most cases of new computers VT (Virtualization Technology) which is required to run 64-bit guest is disabled in BIOS settings which you could change in BIOS section of your machine.
To check whether your processor is able to support VT or not,run the following commands in your terminal window.
grep --color vmx /proc/cpuinfo. grep --color svx /proc/cpuinfo As vmx is a flag for Intel’s processor and svm is for AMD’s processor. If the output shows vmx or svm your machine is capable to VT.
В VirtualBox нет x64 вариантов, только x32 для эмуляции – почему, и как это исправить
Приветствую, уважаемый посетитель!
Установив VirtualBox – бесплатную программу для виртуализации тех или иных операционных систем, вы можете столкнуться с проблемой отсутствия возможности выбора профиля для установки x64 битных вариантов операционных систем. В выпадающем меню выбора устанавливаемой версии ОС будут доступны только x32 (32 бит) варианты. Это вызывает особое недоумение, если принять во внимание тот факт, что сама VirtualBox устанавливается и отлично работает в x64 битной среде.
Проблема известная, а вот причин её возникновения может быть несколько.
Далее будут описаны способы решения данной проблемы. Поступательно выполняйте действия до момента, пока проблема не будет устранена.
Как включить возможность установки x64 битных версий систем в виртуальной машине VirtualBox
- Удостоверьтесь, что вы используйте последнюю версию виртуальной машины VirtualBox. Не стоит пренебрегать обновлениями, ведь в них устраняются выявленные ошибки и повышается общая производительность. При обновлении с созданными виртуальными машинами ничего не случится, они останутся на своих местах и будут полностью работоспособны.
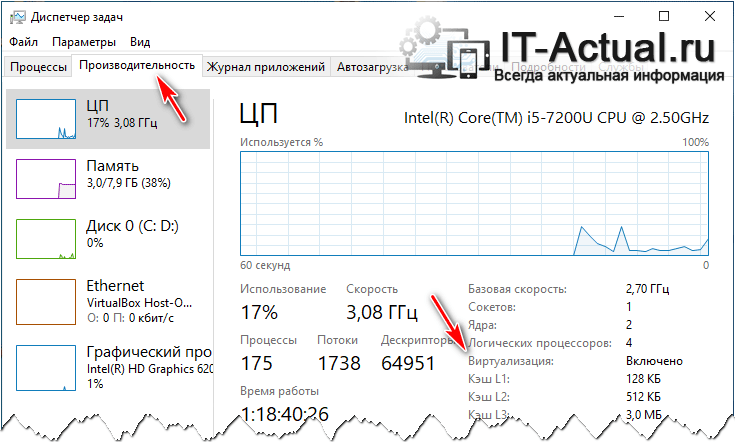
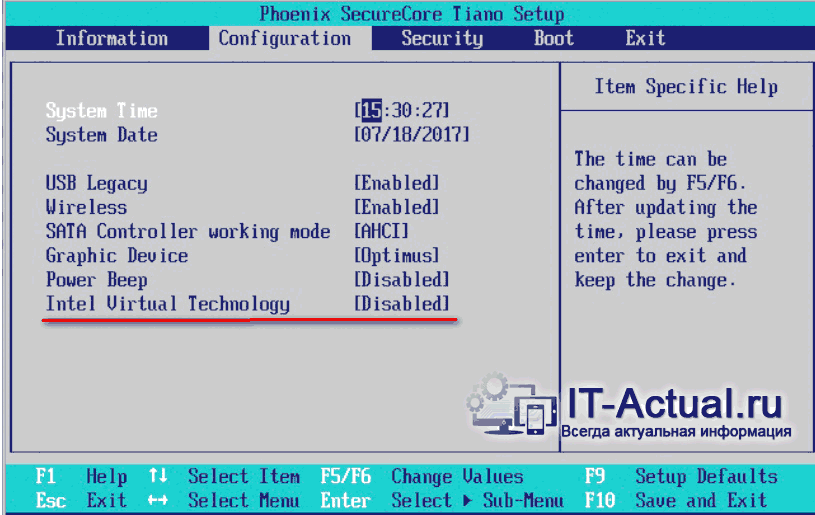
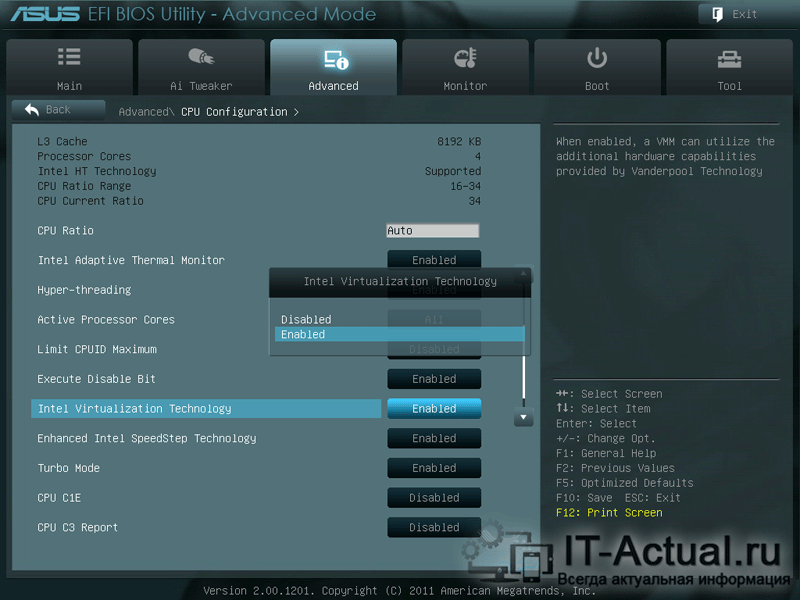
И не забудьте скачать и установить (а если уже установлено, то обновить) дополнение под названием «Oracle VM VirtualBox Extension Pack», оное располагается на официальном сайте, чуть ниже ссылки на скачивание самого VirtualBox. - Причина исчезновения 64 битных вариантов операционных систем из VirtualBox часто заключается в отключенной функции аппаратной виртуализации в центральном процессоре компьютера. Стоит отметить, что данная опция включается \ отключается не в операционной системе, а исключительно в опциях BIOS компьютера. Давайте для начала проверим, включена ли она. Это делается просто в Windows 10 и 8 версиях. Откройте диспетчер задач, переключитесь на вкладку Производительность и посмотрите, что отображается в пункте с говорящим названием Виртуализация. Если виртуализация отключена, то вам необходимо войти в BIOS вашего компьютера, найти там опцию, которая имеет название Intel Virtual Technology (для процессоров Intel), SVM Mode (для процессоров AMD) или нечто похожее (в зависимости от типа BIOS и производителя процессора) и переключить её в состояние Enabled.
После включения не забудьте сохранить изменения. Сохранив изменённые настройки и выйдя из BIOS, будет загружена операционная система.
Запустив программу VirtualBox, вы сможете лицезреть и выбирать x64 битные варианты для устанавливаемых систем. 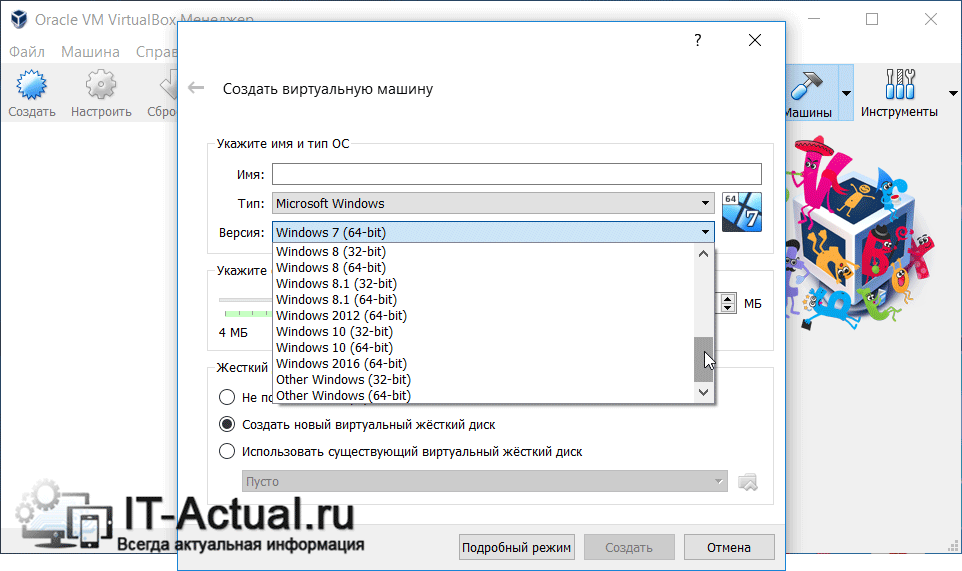 Но если пункты так и не появились, то следуем далее.
А в Windows 10 имеется своя система виртуализации Hyper-v, которая занимает ресурсы, которые необходимы VirtualBox для эмуляции 64 битного режима. Отключение Hyper-v осуществляется просто.
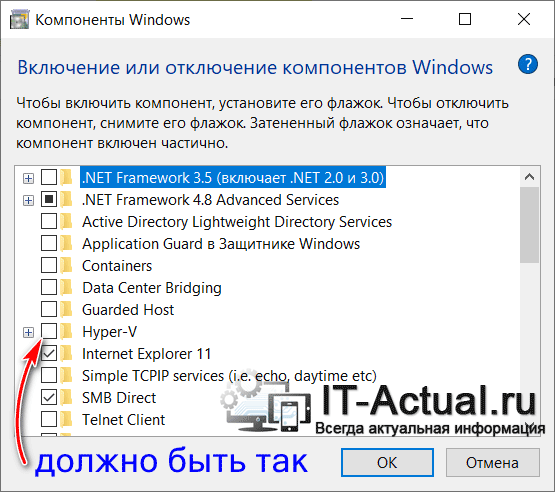
Вызовите окно ввода команд, нажав комбинацию клавиш Win + R. В появившемся окне введите «OptionalFeatures.exe» (без кавычек) и нажмите по клавише OK.
В открывшемся окне проверьте, чтобы пункт Hyper-v не был отмечен (чёрного квадратика там тоже не должно быть). Если оный отмечен, то снимите галочку (или уберите чёрный квадратик, если таковой есть). И нажмите по кнопке OK.
 Перезагрузите компьютер и проверьте, появились ли 64 варианты в VirtualBox.
А во встроенном антивирусе, что имеется штатно в Windows 10, следует отключить проверку целостности памяти. Для этого кликните по значку «Безопасность Windows», что находится в панели задач.
 Далее перейдите в Безопасность устройства и там кликните по пункту Сведения об изоляции ядра.
  Отключите находящуюся там опцию.
  Перезагрузите компьютер и проверьте, возымело ли это действие.
Ну вот и всё. Проделав описанные мероприятия, вы с очень высокой степенью вероятности решите проблему с «пропавшими» x64 битными вариантами устанавливаемых систем в VirtualBox.
Напоследок хочу напомнить, что вы можете подписаться на рассылку полезных и актуальных материалов, что публикуются на сайте IT-Actual.ru
Мы рады, что смогли помочь Вам в решении поставленной задачи или проблемы.
В свою очередь, Вы тоже можете нам очень помочь.
Просто поделитесь статьей в социальных сетях и мессенджерах с друзьями.
Поделившись результатами труда автора, вы окажете неоценимую помощь как ему самому, так и сайту в целом. Спасибо!
Fix: VirtualBox only showing 32-bit and no 64-bit versions
This tutorial will show you step by step what to do when VirtualBox is only showing 32-bit and no 64-bit versions of operating systems as options while creating a new virtual machine.
Note: This may be obvious for most of you, but your host operating system should be 64-bit to run 64-bit guest operating systems in VirtualBox.
If VirtualBox has no 64-bit option on Windows 10, then you can try the solutions on this page to fix the problem.
My experience with this problem
I experienced the same problem while trying to install a 64-bit version of Linux Mint inside VirtualBox.
I opened VirtualBox, clicked on NEW, entered a name for the virtual machine, choose the type of operating system, but when I wanted to choose a version, I only saw 32-bit versions and NO 64-bit versions as an option.
Fortunately, I found a simple solution online and on this page, I will share that solution with you.
Note! Your host operating system (OS installed on your PC) must be 64-bit.
I was using a 64-bit version of Microsoft Windows 10 Pro while creating this tutorial.
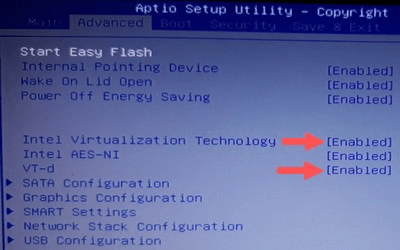
Make sure that “Intel Virtualization Technology” and “VT-d” are enabled
Enter BIOS settings and check if “Intel Virtualization Technology” and “VT-d” are enabled.
The following steps may be slightly different on your computer.
1. Start (or restart) your PC.
2. Press the right keyboard key to enter the BIOS setup. This must be done before Windows starts, so it’s best to press the key a few times directly after you start your PC.
The exact key or key combination depends on your computer manufacturer and model.
Common keys to enter the BIOS are F1, F2, F10, DEL, and ESC.
3. Look for the following settings Intel Virtualization Technology and VT-d.
4. Make sure that they’re both enabled.
5. If you made changes, then you must save the settings.
Windows 10 (host) must be a 64-bit operating system
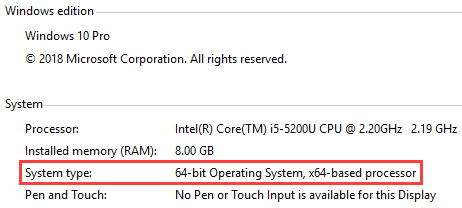
To check if your Windows 10 is a 64-bit operating system, press the Windows + Pause keyboard keys.
At System type (located under System), you should see something like 64-bit Operating System, x64-based processor.
Hyper-V must be disabled
Hyper-V is Microsoft’s hardware virtualization product.
It lets you create and run virtual machines (like VirtualBox).
Many third-party virtualization applications (including VirtualBox) do not work together with Hyper-V.
That’s why you must make sure that Hyper-V is disabled.
To check if Hyper-V is disabled, follow the following steps:
1. Right-click on the Windows start menu button.
3. Enter optionalfeatures.exe in the Run window.
4. Click on OK or press Enter.
The Windows Features window will appear.
5. Check if the Hyper-V option is unchecked.
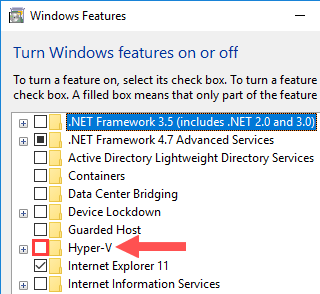
6. If the Hyper-V option unchecked (like in the screenshot above), then you can close the Windows Features window.
If the option is checked, then you will need to uncheck it and then click on OK.
If you want to be 100% sure that Hyper-v is disabled then follow these steps:
1. Right-click on the Windows start menu button.
2. Click on Command Prompt (Admin).
3. Enter the following command:
bcdedit /set hypervisorlaunchtype off
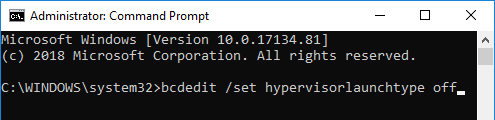
5. After the command is finished, you will need to power down and reboot your PC.
Solution 1: Repair VirtualBox installation
1. Right-click on the installer file (the one you used to install VirtualBox) and choose Run as administrator.
If you don’t have the installer file anymore, then you will need to download it from the VirtualBox website (www.virtualbox.org). The installer file must be the same version as the version of VirtualBox that’s installed on your computer.
2. When the Windows User Account Control window appears, you click Yes.
Note: You might need to enter an administrator password in the User Account Control window and then click Yes.
A setup window will appear.
4. Click on the Repair icon.
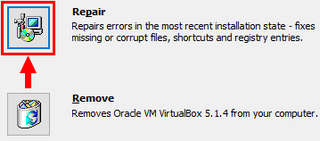
5. Click on Repair located at the bottom right.
VirtualBox will now start the repairing process. This will only take a few seconds.
6. After the repair process is finished, you click on Finish.
VirtualBox may ask you to restart your PC.
Hopefully, this simple solution will solve your problem.
Solution 2: Disable “Memory integrity” in Windows 10
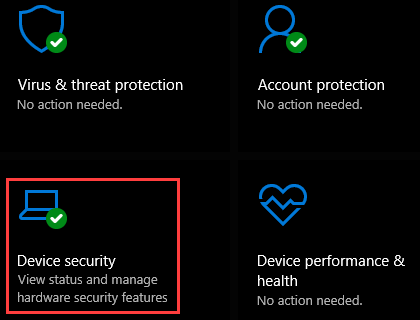
1. Open Windows Security.
![]()
2. Click on Device security.
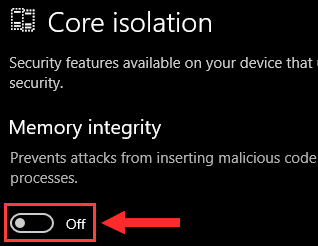
3. Under Core isolation, you click on Core isolation details.

4. Make sure that Memory integrity is turned off.
If Memory integrity was enabled and you just disabled it, then you may need to restart your PC.
Hopefully, this simple solution will solve your problem.