- Как установить Kali Linux на VirtualBox
- Что такое Kali Linux
- Особенности Kali Linux
- Как установить Kali Linux на виртуальную машину VirtualBox
- Этап 1. Создание виртуальной машины на VirtualBox
- Этап 2. Настройка виртуальной машины для Kali Linux
- Этап 3. Установка операционной системы Kali Linux
- Virtualbox виртуальная машина kali linux
- Preparation
- Download
- Setup
- Virtualbox виртуальная машина kali linux
- Wizard
Как установить Kali Linux на VirtualBox
В этой статье мы расскажем, что такое Kali, в каких случаях она используется и как происходит установка Kali Linux на виртуальную машину в VirtualBox.
Что такое Kali Linux
Kali Linux — это дистрибутив операционной системы Linux. Это одна из немногих систем, которая предназначена для специалистов информационной безопасности. В неё входит ряд утилит, которые созданы для тестирования уязвимостей. Kali редко используется как основная ОС, чаще всего она устанавливается как гостевая.
Система Kali Linux была разработана в 2013 году. Над ней работала команда из Offensive Security. За основу была взята структура Debian, а инструменты тестирования информационной безопасности были взяты из ОС BackTrack. Первый релиз был выпущен 13 марта 2013 года.
В комплект Kali входят такие хакерские утилиты как Armitage, nmap, Wireshark, John the Ripper, Aircrack-ng, Burp Suite. С их помощью можно:
- собирать информацию об инфраструктуре объекта. Можно точно определить, какие узлы и сервисы работают в сети, какие операционные системы установлены и как защищена сеть;
- искать уязвимости в системе. Слабые места могут быть в корпоративной сети, базах данных и в программном обеспечении;
- проверять на уязвимость веб-приложения. Можно определить, какая версия CMS установлена на сайте, что позволит использовать уже известные уязвимости для взлома и атак;
- делать брутфорс (Password Attacks). Это метод угадывания пароля или ключа шифрования. Программа перебирает все возможные комбинации символов пока не будет найдена правильная;
- проводить стресс-тесты. Система искусственно нагружается, чтобы выявить все проблемы, которые могут быть вызваны перегрузкой;
- делать спуфинг. Спурфинг (spoofing) — это кибер-атака, в которой мошенник выдаёт себя за какой-либо надёжный источник, чтобы получить доступ к важным данным или информации. Подменяться могут веб-сайты, электронная почта, телефонные звонки, текстовые сообщения, IP-адреса и серверы;
- преобразовывать машинный код в текст программы для восстановления исходного кода;
- устраивать DOS-атаки для Wi-Fi;
- делать бэкдор в системе.
Все утилиты будут готовы к использованию сразу после завершения инсталляции.
Особенности Kali Linux
Так как это узкоспециализированная система, вы не сможете добавить к стандартным источникам ПО Kali дополнительные пакеты и репозитории. Они не будут работать. Например, в Кали нет поддержки для команды apt-add-repository, LaunchPad или PPAs. Даже для установки широко распространённых пакетов Node.js потребуются дополнительные настройки и технические навыки.
Наряду с командами терминала и базовыми утилитами, есть возможность просмотра изображений и PDF-файлов, калькулятор и простой текстовый редактор. Однако привычных пользователю офисных программ (почтовых программ, органайзеров) в этой системе нет.
Kali Linux постоянно работает под пользователем root. Суперпользователь нужен для выполнения большинства встроенных функций, поэтому разработчики сделали эту функцию по умолчанию. Именно из-за постоянно включенного root на Кали опасно работать с привычными пользователю офисными приложениями или выходить в интернет для обычного серфинга. Этот факт ещё раз доказывает, что ОС лучше использовать как гостевую.
Как установить Kali Linux на виртуальную машину VirtualBox
Установка Кали Линукс на виртуальную машину происходит в 3 этапа:
- Создание виртуальной машины для Kali Linux.
- Настройка виртуальной машины.
- Установка ОС Kali Linux.
Этап 1. Создание виртуальной машины на VirtualBox
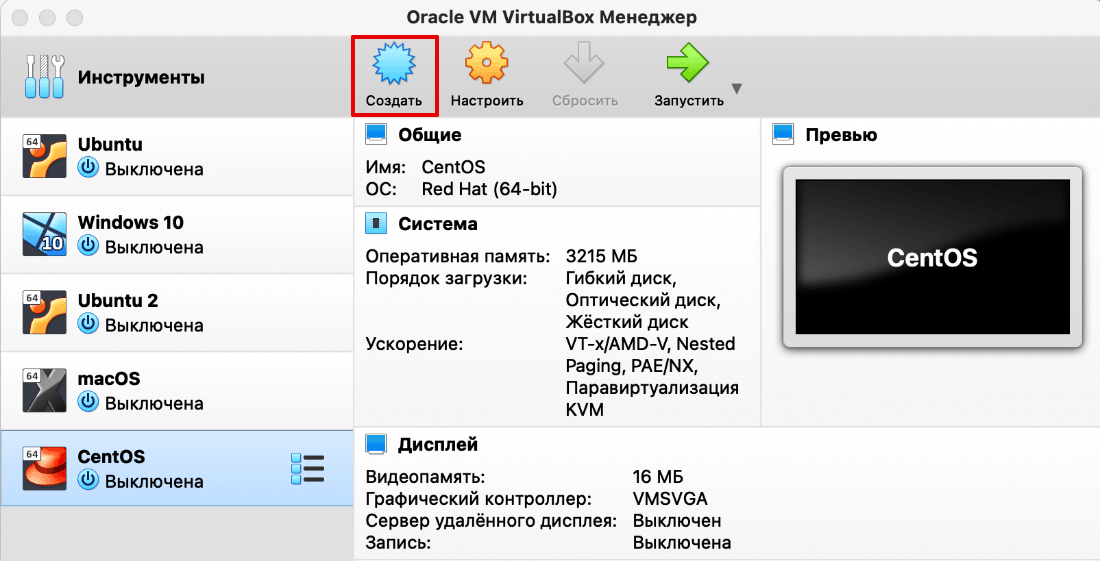
Запустите VirtualBox и нажмите Создать:
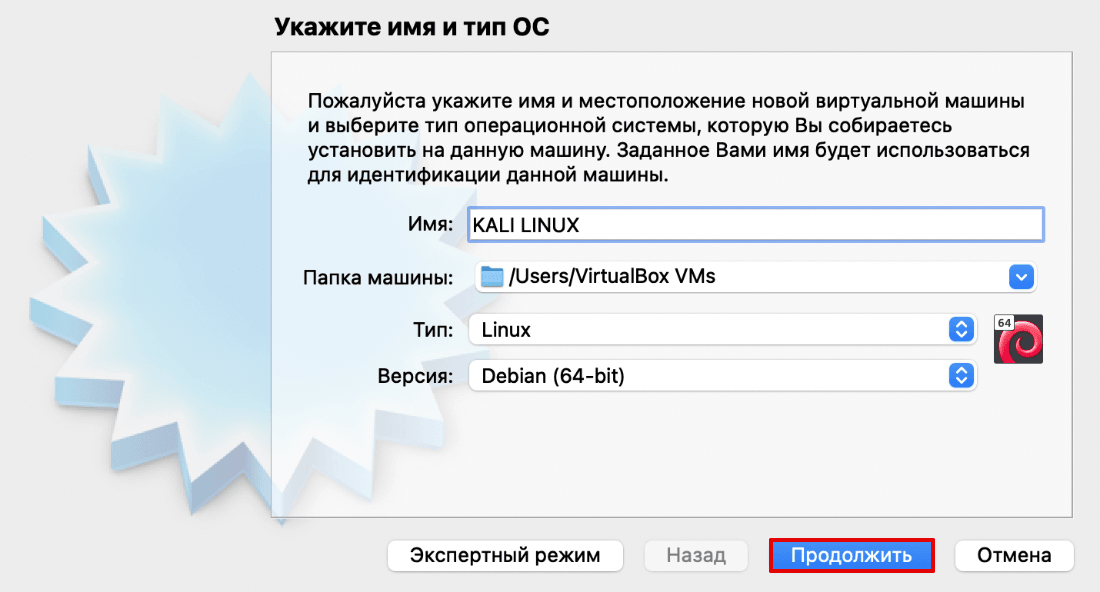
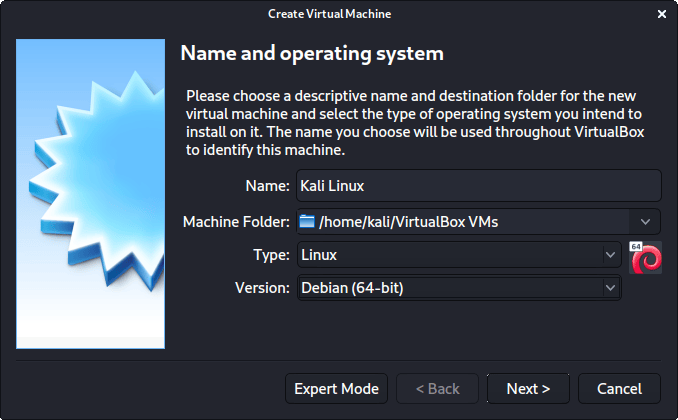
Так как Kali Linux разработана на основе Debian, в строке «Тип» выберите Linux. В строке «Версия» выберите Debian 64-bit и нажмите Продолжить:
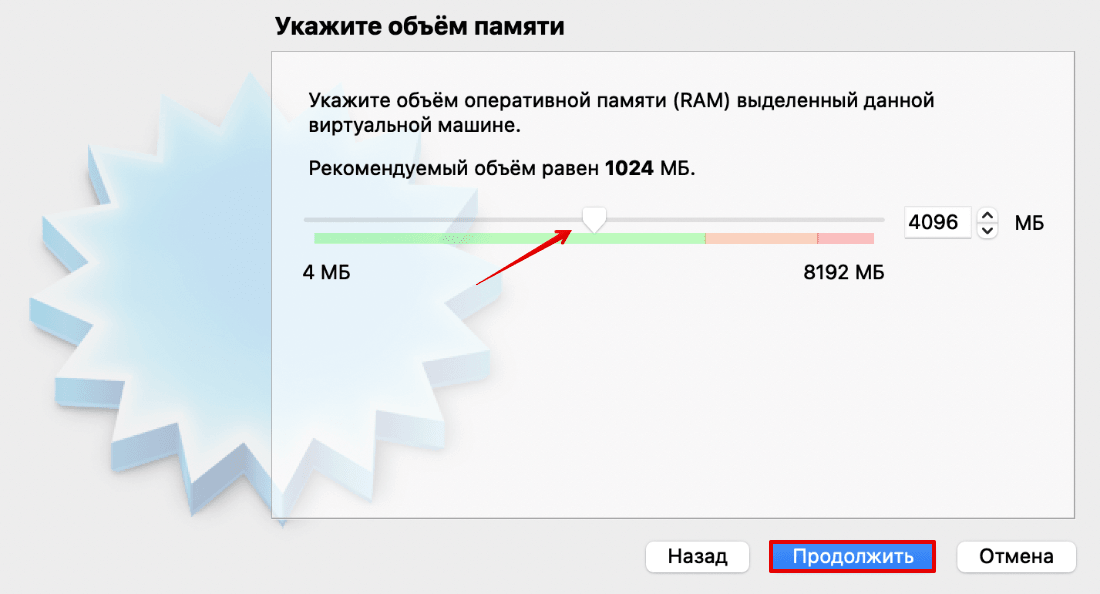
Чтобы выделить объём памяти для машины, сдвиньте ползунок вправо. Мы рекомендуем указать объём 4 ГБ, но если на вашем компьютере недостаточно оперативной памяти, выбирайте 2-3 ГБ. Нажмите Продолжить:
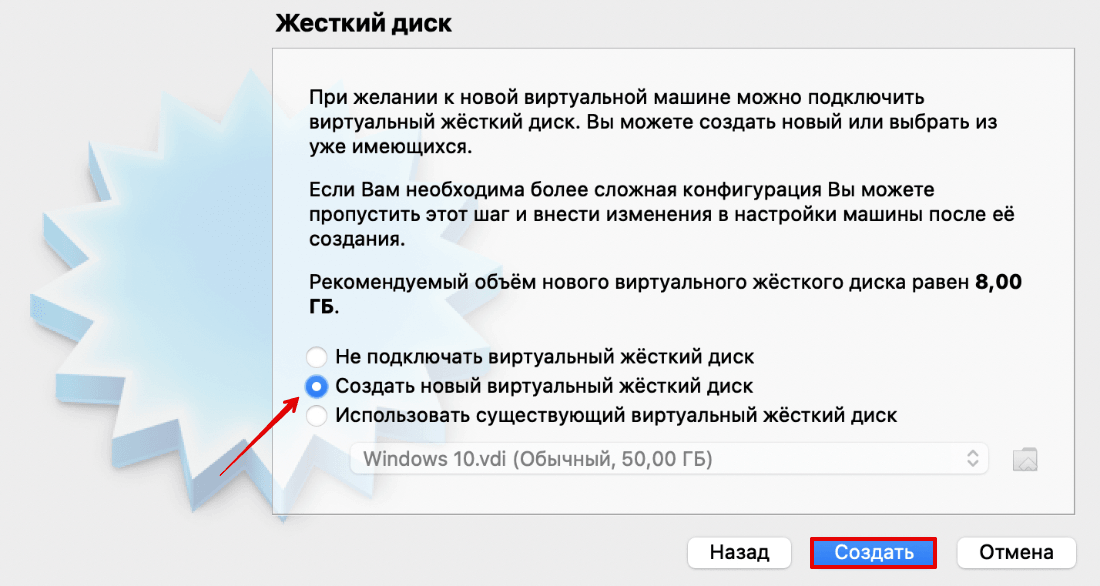
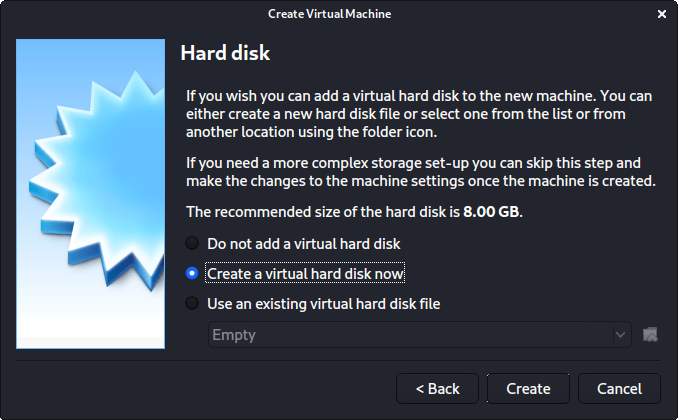
Выберите пункт Создать новый виртуальный жёсткий диск и кликните Создать:
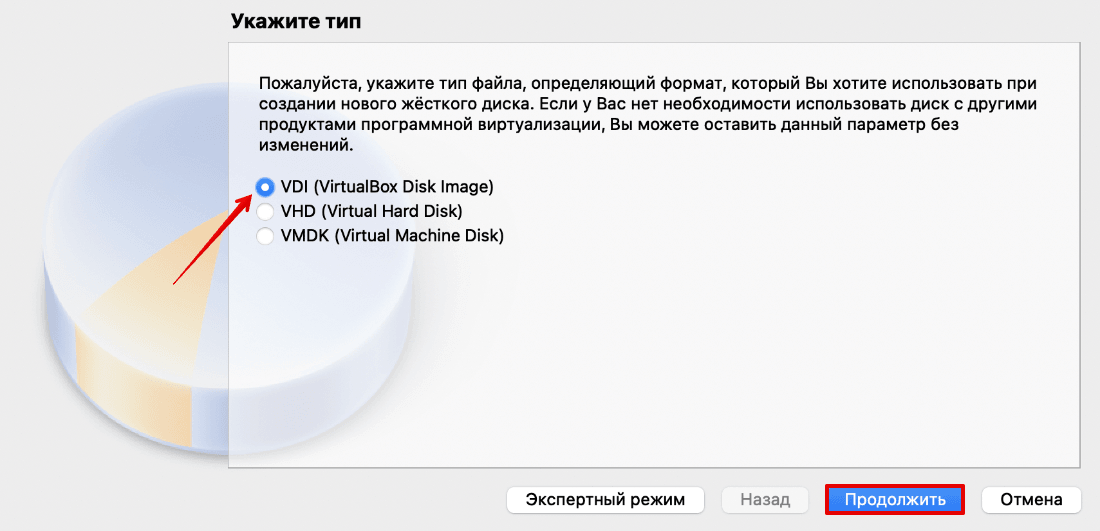
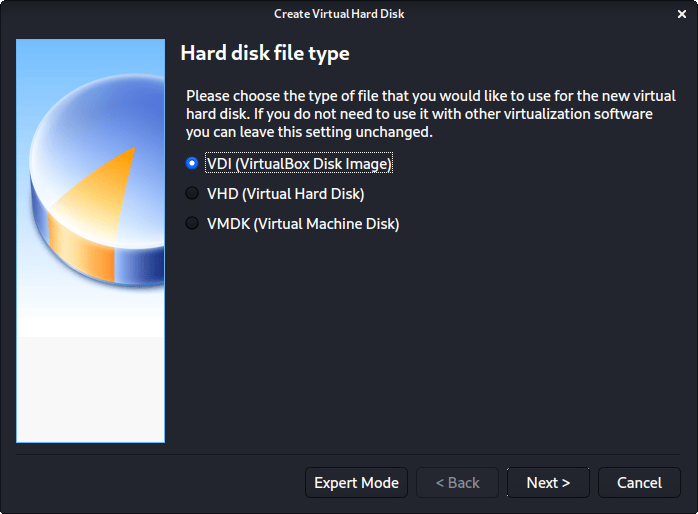
Укажите тип файла VDI (VirtualBox Disk Image) и нажмите Продолжить:
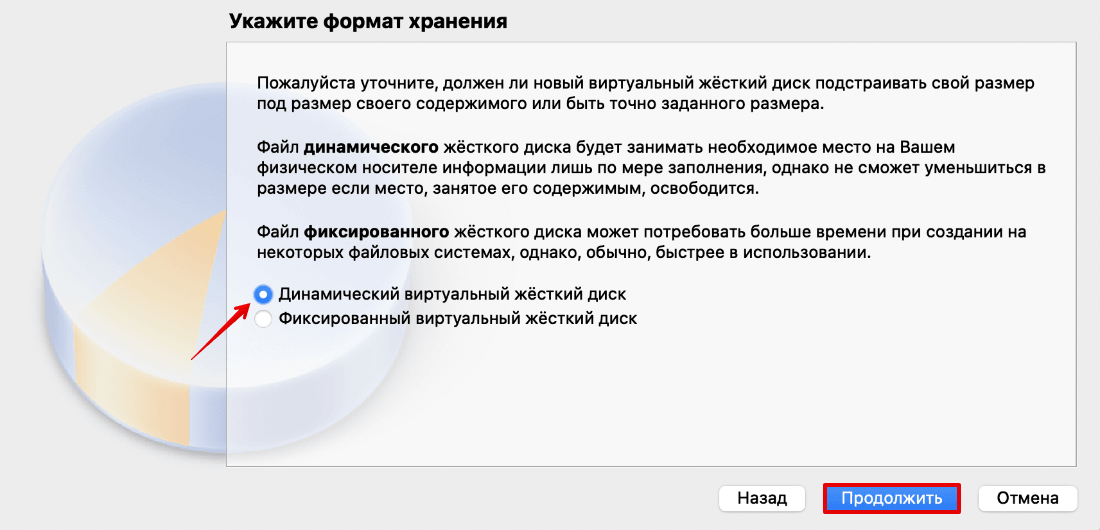
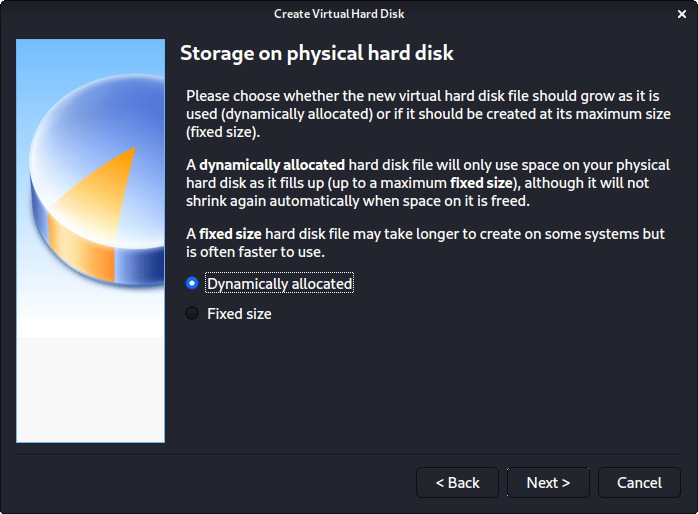
Выберите формат хранения Динамический виртуальный жёсткий диск. Нажмите Продолжить:

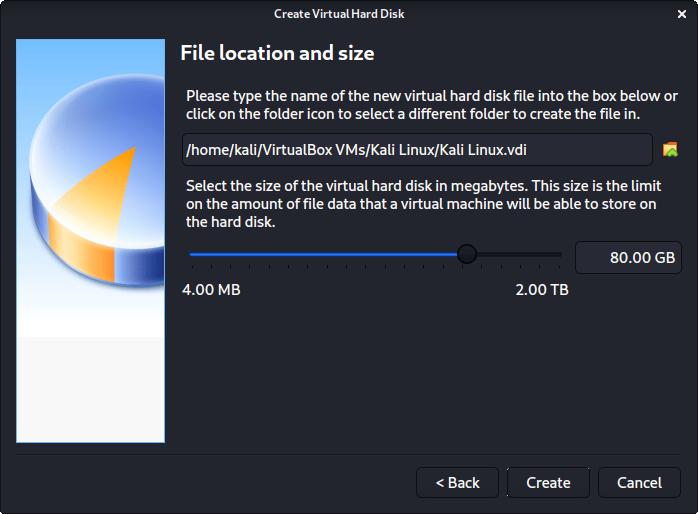
Выберите объём диска виртуальной машины. Для установки Kali Linux будет достаточно 20 ГБ. Передвиньте ползунок вправо и нажмите Создать:
Готово, вы создали виртуальную машину.
Этап 2. Настройка виртуальной машины для Kali Linux
Kali Linux очень требователена к количеству процессоров, а также использует PAE-ядро. Если вы сразу начнёте установку ОС в обычном режиме, то увидите ошибку. Поэтому перед установкой операционной системы нужно включить функцию PAE и увеличить количество ядер. Для этого:
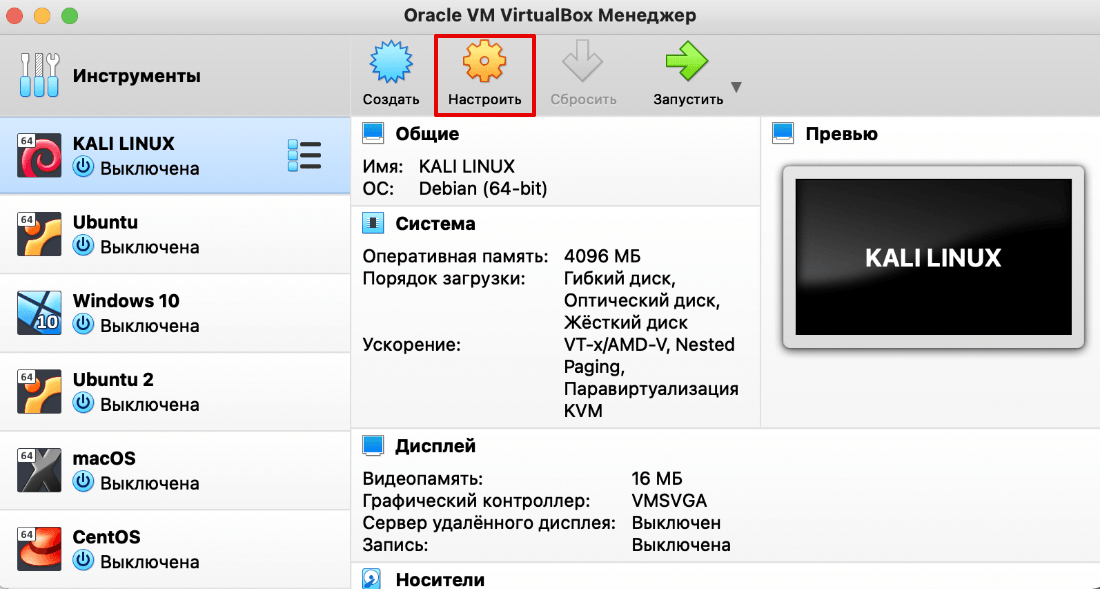
Нажмите Настроить:
Перейдите во вкладку Система ― Процессор. По умолчанию для виртуальной машины выделяется одно ядро процессора. В строке «Процессор(ы)» поставьте значение 2.
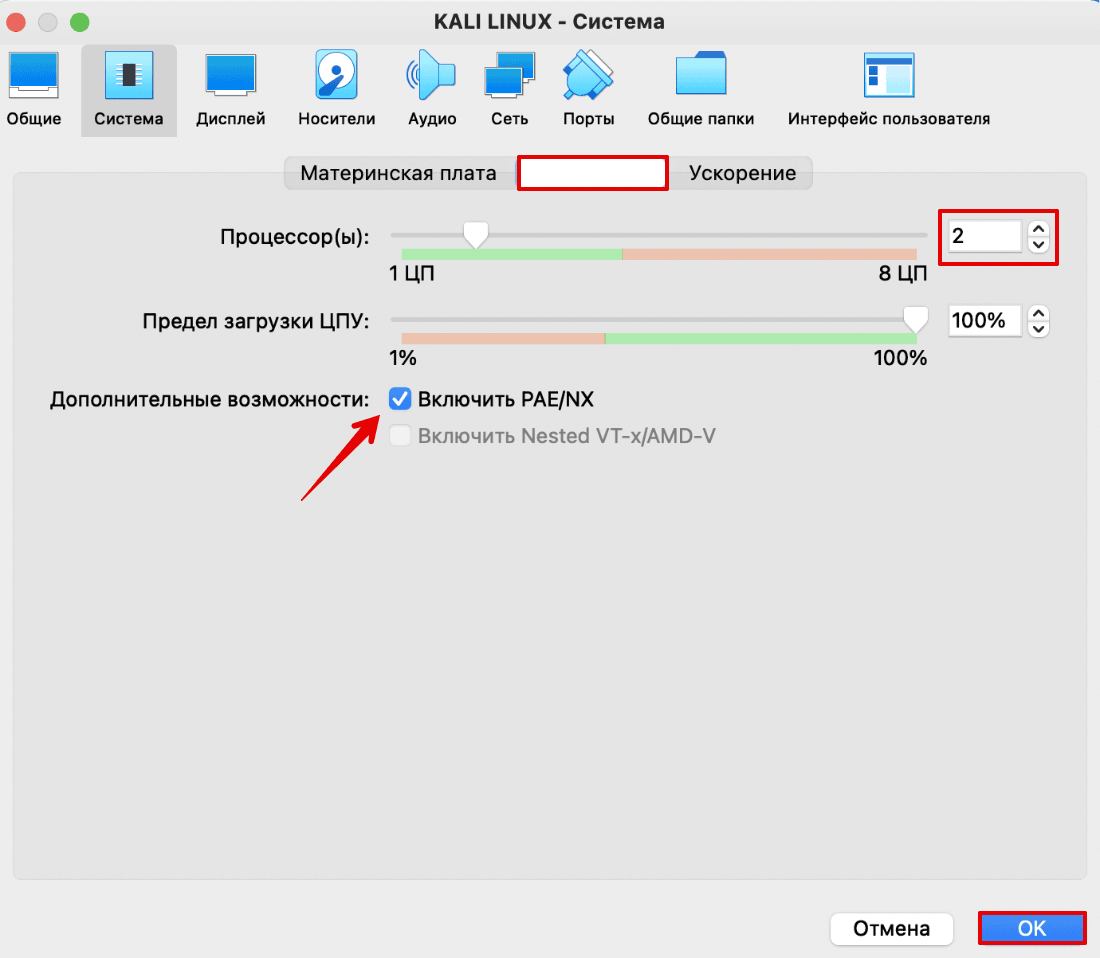
Отметьте галочку напротив «Включить PAE/NX». Нажмите OK: Теперь переходите к установке операционной системы.
Этап 3. Установка операционной системы Kali Linux
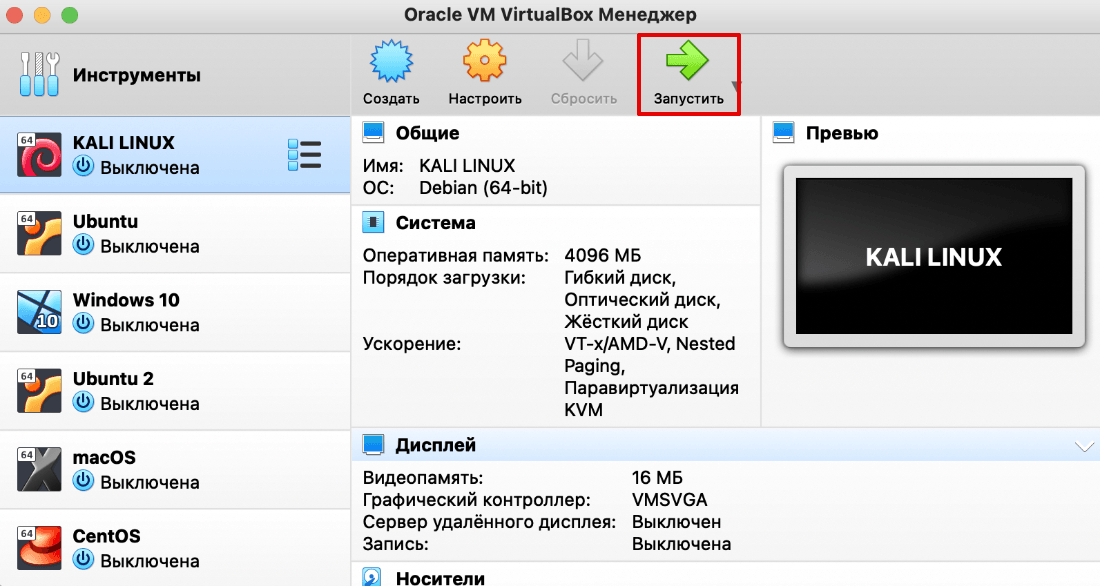
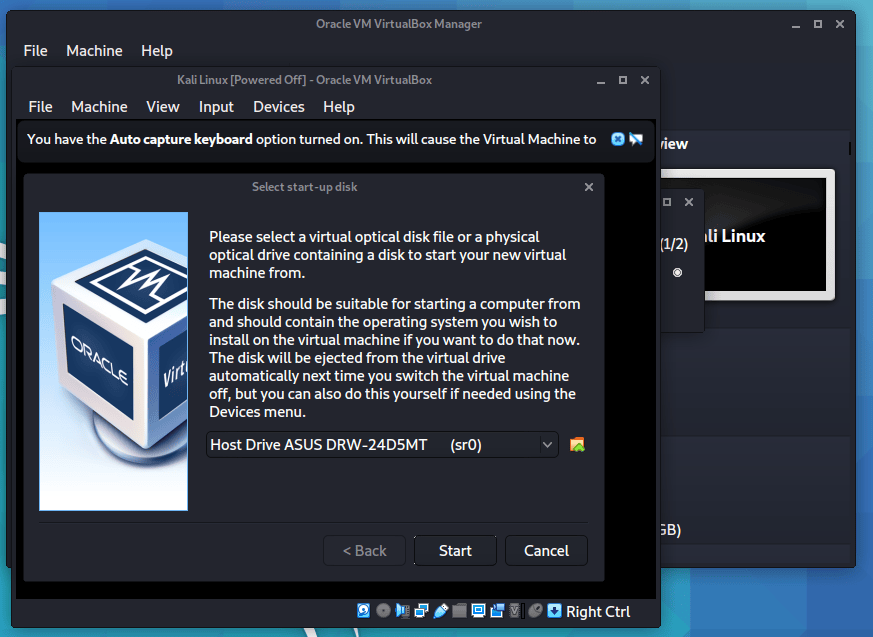
Запустите виртуальную машину:
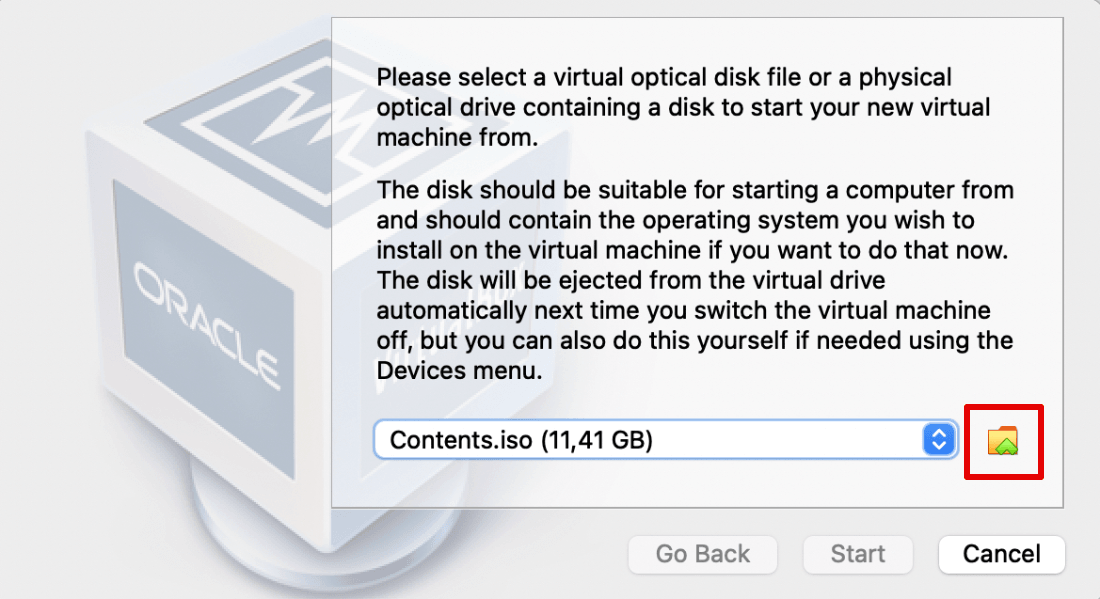
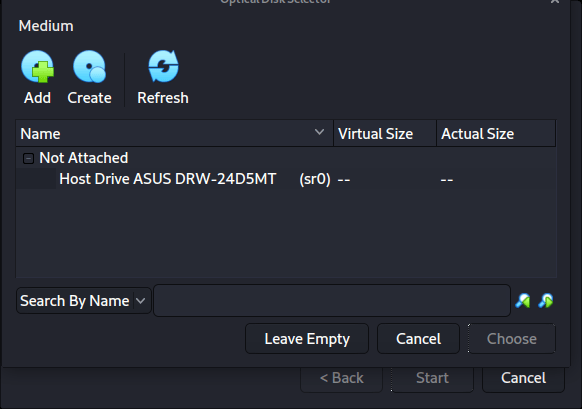
Загрузите скачанный образ. Для этого справа нажмите на иконку папки:
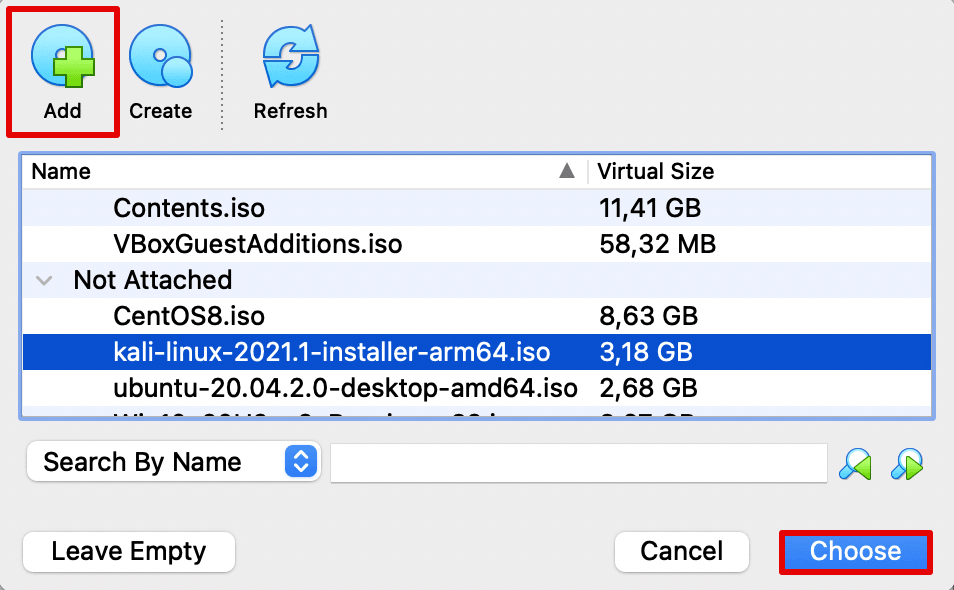
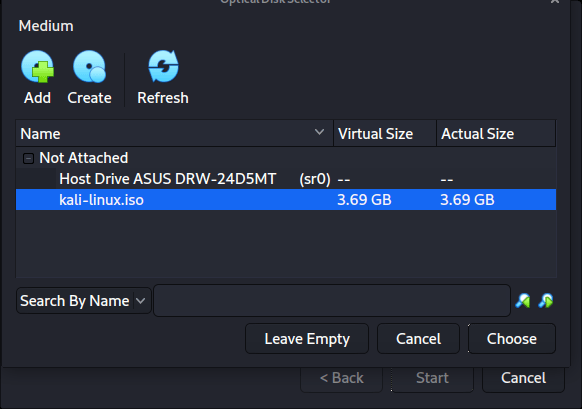
Нажмите Choose:

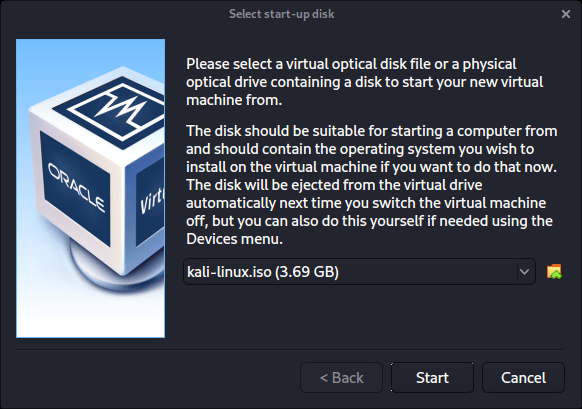
Затем нажмите Start:
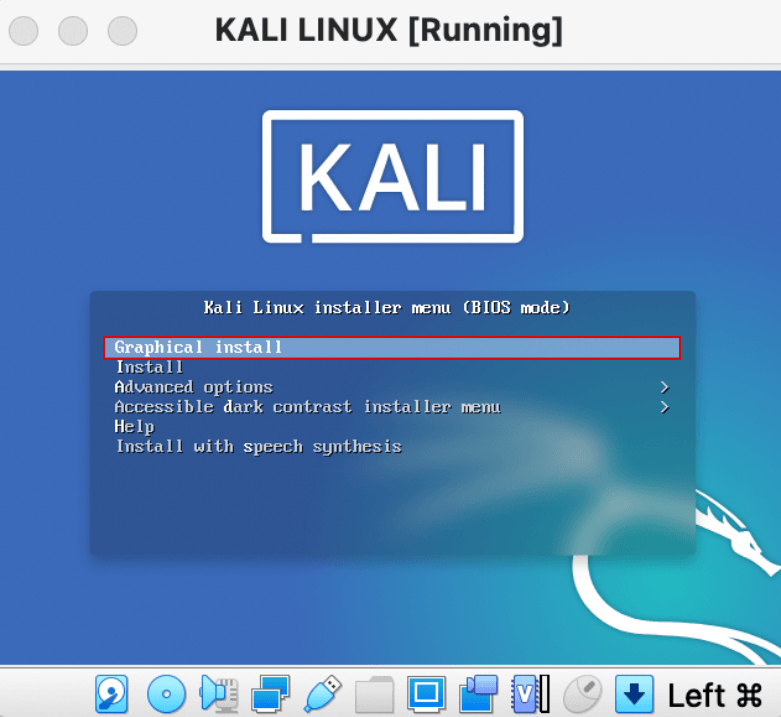
Чтобы выбрать установку с графическим интерфейсом, нажмите Enter. Это самый простой способ установки ОС без работы в командной строке:
Для завершения установки следуйте подсказкам системы. На последнем этапе виртуальная машина будет перезагружена.
Готово, установка завершена.
Несмотря на то? что многие инструменты Кали больше похожи на хакерские, на самом деле ОС чаще всего используют для пентестов (тестов на проникновение). Kali помогает обнаружить слабые места в защите корпоративной сети, элементах сетевой инфраструктуры и сайтах. Тщательная проверка помогает избежать проникновения злоумышленников.
Virtualbox виртуальная машина kali linux
You can install VirtualBox on Kali Linux, allowing you to use virtual machines (VMs) inside of Kali Linux. However if you are wanting to install Kali Linux as a VM, you want our Kali Linux Guest VirtualBox guide.
VMs are great. There are many upsides with using them. One of the being, able to run multiple Operating Systems (OSs) at the same time. You can have your host machine “untouched”, and then only interact with the guest VMs. Another is when something is going right, take a snapshot. When something goes wrong, revert back.
VirtualBox is free and open source. There are a few other software such as QEMU, KVM/Xen with virt-manager. Then there is also VMware Workstation & Fusion, which is a commercial software (there is VMware Player which is free but it is limited in features).
Preparation
Before trying to install VirtualBox, please make sure your version of Kali Linux is up-to-date, and if required, reboot the machine:
[email protected]:~$ sudo apt update [. ] [email protected]:~$ [email protected]:~$ sudo apt full-upgrade -y [. ] [email protected]:~$ [email protected]:~$ [ -f /var/run/reboot-required ] && sudo reboot -f [email protected]:~$ Download
The first thing we are going to do is import VirtualBox’s repository key:
[email protected]:~$ curl -fsSL https://www.virtualbox.org/download/oracle_vbox_2016.asc|sudo gpg --dearmor -o /etc/apt/trusted.gpg.d/oracle_vbox_2016.gpg [. ] [email protected]:~$ curl -fsSL https://www.virtualbox.org/download/oracle_vbox.asc|sudo gpg --dearmor -o /etc/apt/trusted.gpg.d/oracle_vbox.gpg [. ] [email protected]:~$ We then move onto adding VirtualBox’s repository. We add this to a separate file, so it does not interfere with Kali Linux’s main repository. We also will be making sure to state where the keyring is at so the files can be properly signed. Our CPU architecture is amd64. You may need to alter the example below if yours is different.
One thing to bear in mind, Kali Linux is based on Debian, so we need to use Debian’s current stable version (even though Kali Linux is a rolling distribution). At the time of writing, its “bullseye”:
[email protected]:~$ echo "deb [arch=amd64] https://download.virtualbox.org/virtualbox/debian bullseye contrib" | sudo tee /etc/apt/sources.list.d/virtualbox.list [email protected]:~$ As we have altered our network repository, we need to re-build the cache:
[email protected]:~$ sudo apt update [. ] [email protected]:~$ As VirtualBox has various kernel modules (e.g. vboxdrv , vboxnetflt and vboxnetadp ), we need to make sure they are kept up-to-date when Kali Linux’s kernel gets updated. This can be achieved using dkms:
[email protected]:~$ sudo apt install -y dkms [. ] [email protected]:~$ Setup
Now its time to install VirtualBox itself (along with its Extension Pack to expand VirtualBox’s advanced features):
[email protected]:~$ sudo apt install -y virtualbox virtualbox-ext-pack [. ] [email protected]:~$ When prompted, read and accept the license.
You can now find VirtualBox in the menu or start it via the command line:
[email protected]:~$ virtualbox [email protected]:~$ If you now wish, you are able to install Kali Linux in a VirtualBox VM (on Kali Linux).
Virtualbox виртуальная машина kali linux
This guide is about virtualizing Kali Linux inside of VirtualBox, allowing you to have a Kali VM. This is a great way to use Kali, as it is completely separate from the host, allows you to interact with other VMs (as well as the host machine and other machines on the network), and allows you to revert to snapshots.
You may wish to follow our other guide if you are trying to install VirtualBox on Kali Linux (as a host).
The guide below is what we use to generate our pre-made Kali Linux VirtualBox images. You may alter this to your needs. We always generate the images using the latest version of VirtualBox.
You may need to enable virtualization in your BIOS/UEFI for (e.g. Intel VT-x/AMD-V)
Wizard
Upon starting up VirtualBox, select “New” (Machine -> New).
The next screen is “Name and operating system” which is where you name the VM. This name is also used in any filenames (such as the configuration, hard disk and snapshot — which isn’t changed from this point).
We are keeping it generic in this guide (as Kali is a rolling distribution, and we update it), however for our releases, we use the version number in the name as it is a fixed release ( kali-linux-YYYY.N-vbox-ARCH . Example: kali-linux-2023.2-vbox-amd64 ).
For the “Type”, we set it as Linux . For the “Version”, we are going to be using the x64 desktop image, so we are going to select Debian (64-bit) .
“Memory size” is the next section, where we can define how much RAM to use. Again, the higher the amount of RAM, the more applications can be open and at increased performance. Various tools inside of Kali can be demanding of resources. When we make the general VMs, we select 2048 MB (2GB) for RAM, but we often increase this for our personal machines as we have high-performing devices with spare RAM which Kali can utilize.

This screen below, “Hard disk”, allows us to Create a new virtual disk now .
For the “Hard disk file type”, we select VDI (VirtualBox Disk Image) (and its the default option).
For the following screen, “Storage on physical hard disk”, we go with the default option of Dynamically allocated .
Now with “File location and size”, we can now define how large the virtual hard disk will be. We use 80.00 GB for our VMs.
After clicking on “Create”, the wizard is complete.
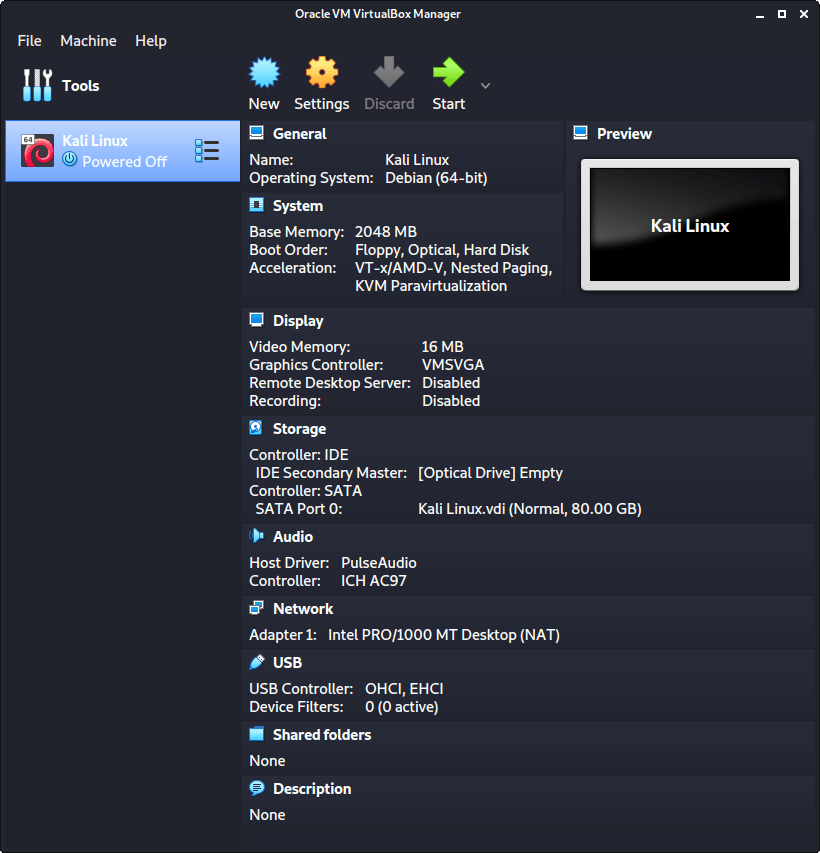
Now we click on “Settings”, to customize the VM further.
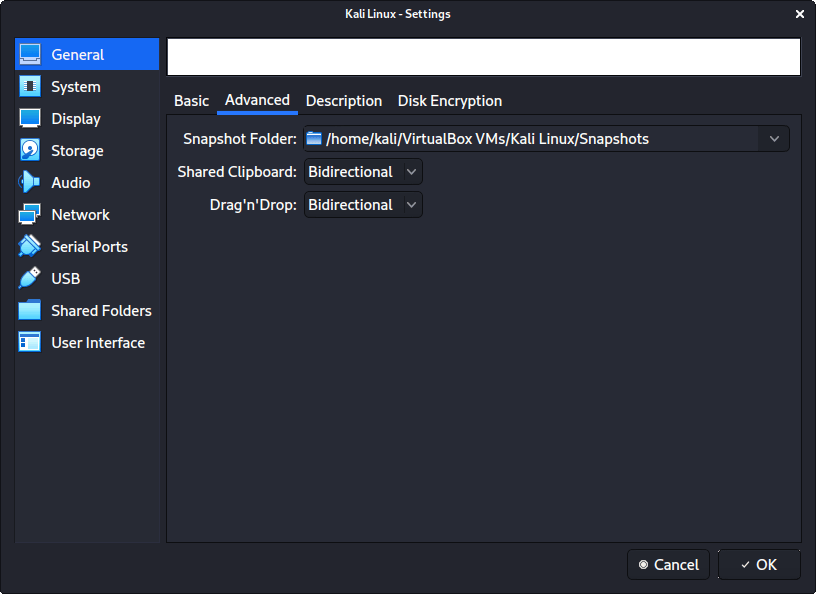
In “General” -> “Advanced”, we make sure to set “Shared Clipboard” to bidirectional , as well as “Drag’n’Drop” to bidirectional
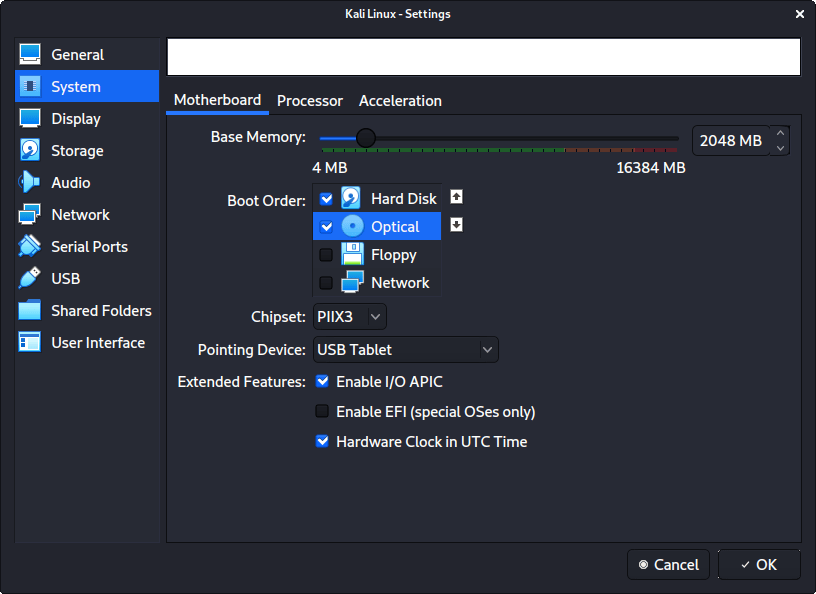
In “System” -> “Motherboard”, we change the “Boot Order” to make sure Hard Disk is top and Optical is the second. Everything else is disabled.
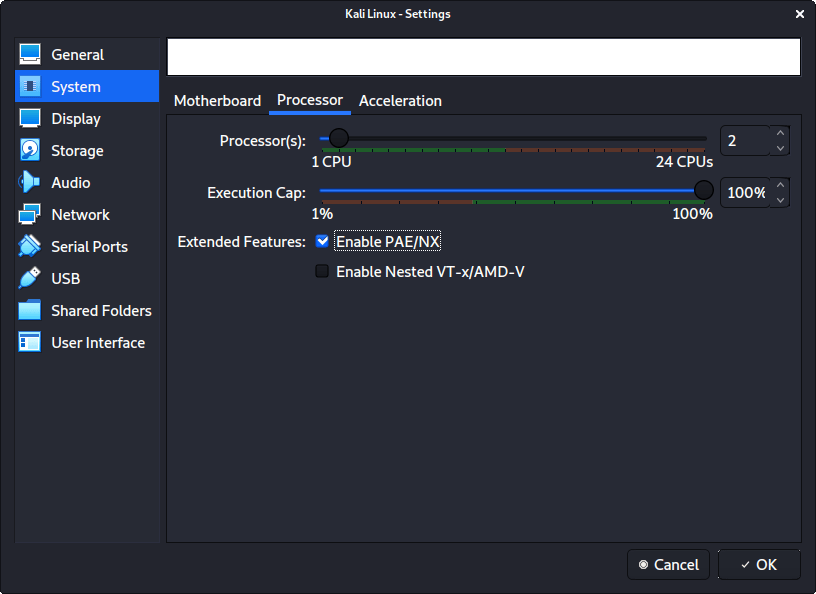
In “System” -> “Processor”, we increase the “Processor(s)” to be 2 .
At the same time, we also enable “Extended Features” for Enable PAE/NX .
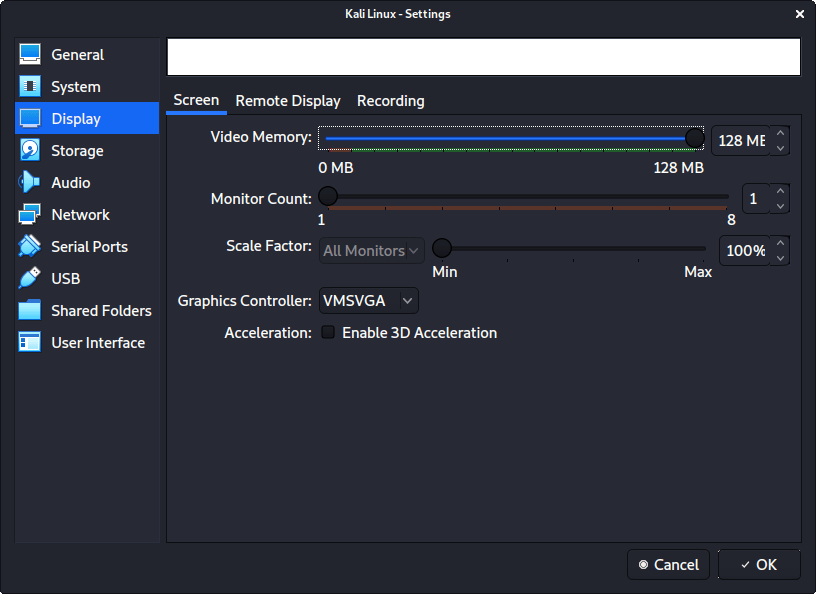
In “Display” -> “Screen”, we make sure to have “Video Memory” set to 128 MB
Another item to point out is to make sure that “Accelerated 3D graphics” is disabled, as people have reported that causes issues.
The final settings view looks like the following:
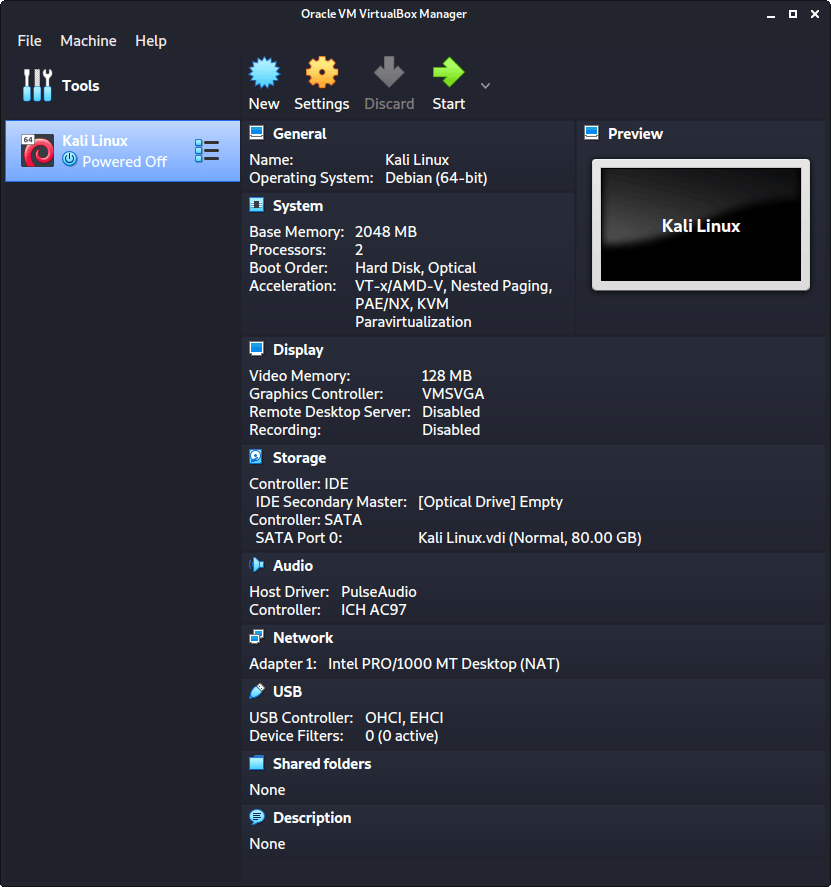
When we are ready to go, press “Start”.
The first time we run it, we will get a prompt saying do we wish to mount an image to use as a “start-up disk”. We want to use our Kali image, rather than a physical drive, so we select the icon to the side of the drop down.
A new pop up will open, “Optical Disk Selector”. We will now press “Add”, then navigate to where our ISO is located.
After pressing “Open”, we can see its been added, so we make sure its selected and press “Choose”.
All that is left now to do is press “Start”.
After all this is done, we save, start up the VM, and then continue installing Kali Linux as we normally would for a bare metal install.
During Kali Linux setup process, the install wizard should detect if its inside a VM. If it is, should then automatically install any additional tools (such as virtualbox-guest-x11 ) to give a better user experience. If you want to manually re-install it, you can see our VirtualBox Guest Guide.
Updated on: 2023-May-30
Author: g0tmi1k