- Как подключить ADB WIFI в Android Studio?
- 4 ответа 4
- ADB отладка по WiFi с компьютера и смартфона (без Root)
- Отладка по adb с компьютера по Wi-Fi
- Отладка adb с телефона по Wi-Fi
- How can I use adb over WiFi? [duplicate]
- 3 Answers 3
- How to Set Up and Use ADB Wirelessly With Android
- Setup ADB to use Wirelessly(Over Wifi)
- Follow the steps to Setup WiFi ADB on Android:
- Prerequisites
- Preparation
- Installation of android-tools within Termux:
- Create folderstructure and first script to be executed by Tasker
- !/data/data/com.termux/files/usr/bin/bash
- Create a second script for pairing Termux with Wifi-ADB
- !/data/data/com.termux/files/usr/bin/bash
- Allow Tasker to run Commands in Termux environment
- Import of profiles and tasks in Tasker
- Explanation and how to use the profiles
- How the other profiles work
- Final Words:
Как подключить ADB WIFI в Android Studio?
Скачал плагин ADB WIFI для запуска приложения через WIFI. При нажатии на Tools, ADB to WIFI ничего не происходит. Как его подключить?
4 ответа 4
Если не пользоваться плагинами, которые будут работать через раз то можно и руками всё сделать. Там всего пара действий и плагин тут не очень нужен.
- Подключаем девайс по USB
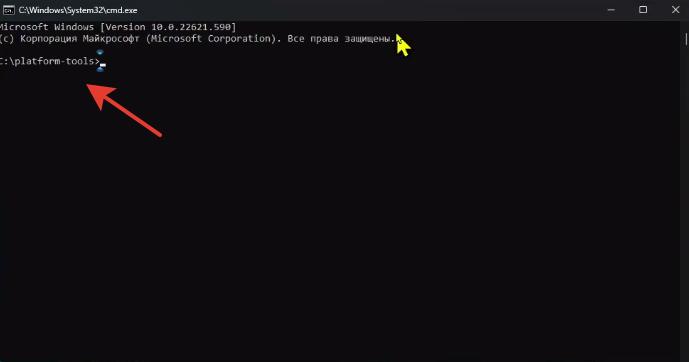
- Открываем терминал в папке с adb по пути ПУТЬ_ДО_SDK/sdk/platform-tools
- Убеждаемся что девайс и комп в одной Wi-Fi сети.
- Набираем adb tcpip 5555
- Набираем adb connect IP_ДЕВАЙСА
Далее, в 95% случаев достаточно выполнить лишь п5.
Если вы про этот плагин, то для того чтобы подключить устройство по wi-fi, его необходимо хотя бы раз подключить с помощью провода. Об этом сказано здесь.
Немного сейчас не так. Эта инструкция должна помочь.
- Подключаем девайс по USB В терминале:
- cd C:\Users\mxsof\AppData\Local\Android\Sdk\platform-tools
- adb tcpip 5555
- adb connect ЛОКАЛЬНЫЙ_IP_ДЕВАЙСА:5555
- Девайс и компьютер должны быть в одной Wi-FI сети.
- Как найти путь к platform tools : Settings > вбиваем в поиск «android sdk» , копируем путь , у меня это C:\Users\mxsof\AppData\Local\Android\Sdk , добавляем к пути \platform-tools .
- Посмотреть ваш локальный ip-адрес можно в настройках в разделе о телефоне , или воспользовавшись любым онлайн сервисом.
ADB отладка по WiFi с компьютера и смартфона (без Root)

ADB (Android Debug Bridge – отладочный мост Android) – инструмент, он устанавливается вместе с Android SDK и позволяет управлять устройством на базе ОС Android. Работает на всех Android-смартфонах с начиная с версии Android 11, где данный функционал не был намеренно заблокирован производителем.
В этой статье я предлагаю вам пошаговую инструкцию.
Отладка по adb с компьютера по Wi-Fi
Шаг 1. Скачиваем Platform Tools с офиц. сайта, выбираем ОС, которая стоит на вашем компьютере (macOS, Windows, Linux). Распаковываем скачанный архив желательно на диск С.
Шаг 2. Открываем папку с распакованным архивом и в адресной строке вызываем командную строку (команда “cmd“).
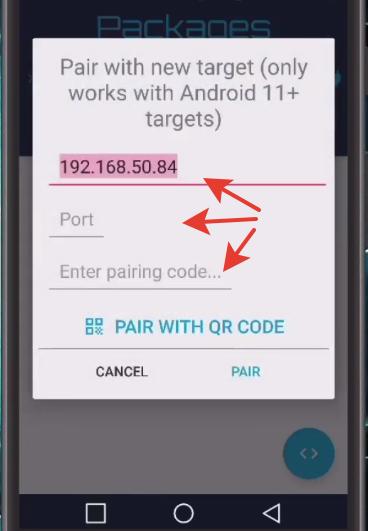
Шаг 3. В телефоне переходим в настройки для Разработчиков и активируем пункт “Отладка по Wi-Fi”.
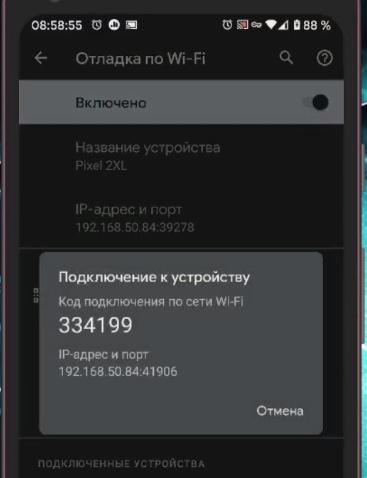
В настройках этого пункта выбираем “Подключить устройство с помощью кода подключения”.
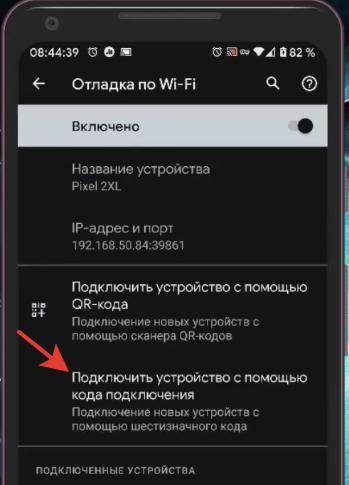
На экране смартфона появится код для подключения, IP-адрес и номер порта. Их нужно будет ввести на ПК в командной строке (об это далее).
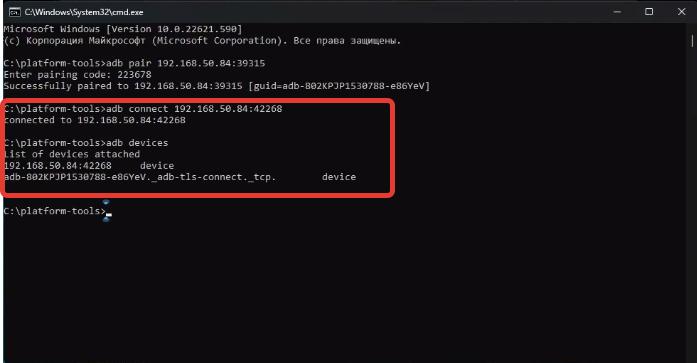
Шаг 4. На компьютере в командной строке вводим:
adb pair 192.168.50.84:3915 (ваш IP-адрес и номер порта)
и вводим код в строке “Enter pairing code”.
Произойдет подключение компьютера к телефону по Wi-Fi, о чем вы узнаете из всплывающего сообщения на смартфоне.
Шаг 5. Теперь выполним соединение. В командной строке вводим строку:
adb connect 192.168.59.1:42268 (ваш IP-адрес и номер порта).
Теперь проверяем, подключено ли наше устройство: adb devices.
Теперь вы сможете по Wi-Fi с компьютера пользоваться всеми прелестями команд adb для управления смартфоном (не подключая при этом смартфон по кабелю). Например, удалить штатные системные приложения.
Отладка adb с телефона по Wi-Fi
Для отладки оба телефона должны находиться в одной беспроводной сети, т.е. подключены к одному роутеру.
Шаг 1. Установим на первый смартфон, с которого будем управлять, программу Bugjaeger Mobile ADB (есть в Google Play).
Шаг 2. На втором телефоне в настройках разработчика включаем отладку по Wi-Fi.
Шаг 3. В настройках отладки выбираем “Подключить устройство с помощью кода подключения”. Нам дадут код, IP-адрес и номер порта.
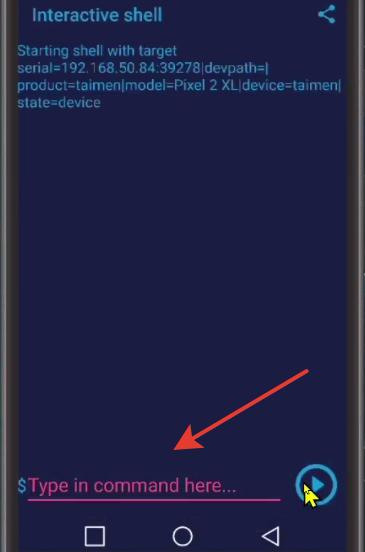
Шаг 4. Запускаем Bugjaeger на первом смартфоне и выбираем “Подключение” (иконка розетки) -> Pair. Далее вводим код, IP-адрес и номер порта для подключения.
В конце жмем Connect для сопряжения.
Программа Bugjaeger имеет огромное количество команд, обширный функционал. Но для работы через свои собственные команды жмем на иконку <> и вводим свои adb команды.
Теперь в любой момент, подключившись к одной точке доступа (роутеру) можно будет соединяться по Wi-Fi и отсылать команды как с ПК, так и с любого смартфона/планшета с версией Android 5.0 и выше на другие устройства, которые имеют отладку по Wi-Fi (начиная с версии Android 11 и выше).
How can I use adb over WiFi? [duplicate]
I am debugging USB devices connected to my Android phone, this means I cannot use ADB over a USB connection. How can I connect to adb over WiFi? Note: Similar question here refers to adb over tcp, however, I’m specifically asking about WiFi.
There is a plugin for Android Studio. github.com/pedrovgs/AndroidWiFiADB Work with it is very easy and has a great explanation on the read-me page. After connecting device to the adb over wi-fi it acts as normal connected device
Yes Android Wifi ADB plugin is there and you can install from android studio refer this link android.jlelse.eu/…
3 Answers 3
- Connect Android phone and host machine to same WiFi network
- Connect Android phone to host machine using USB cable (to start with)
- Run adb tcpip 5555 from a command prompt
- Run adb shell «ip addr show wlan0 | grep -e wlan0$ | cut -d\» \» -f 6 | cut -d/ -f 1″ to obtain the phone’s IP address
- Disconnect USB cable and run adb connect :5555
You can now view logcat output by running adb logcat or by viewing the Android Monitor tab within Android Studio.
Or to get the IP address in a «simpler» (well, faster) way: adb shell «ifconfig | grep -A 1 wlan0 | tail -n 1 | cut -f2 -d: | cut -f1 -d’ ‘»
Using ifconfig on Android Q I get ifconfig: ioctl 8927: Permission denied . I’ve updated my answer to use ip addr show wlan0 instead.
Is there anyway to get around having to make the initial physical connection? Sometimes when I’m debugging its a hassle to go find a cord. could i write an app that makes my phone get into a state that will allow the connection without needing to be plugged in?
How to Set Up and Use ADB Wirelessly With Android
ADB provides a command line to establish an advanced connection between android and Windows or MAC PC. Usually, we use USB cables to connect Android to PC to use ADB commands. But you can also Use ADB wirelessly with Android. All it needs wifi and a PC. This guide explains the steps to set up and use ADB wirelessly.

ADB command line is used to make changes to your android device that are not available on the device. An ADB connection gives you the advantage of altering the default Android settings that are usually not possible to use on the phone.
Tasks like removing system apps, rooting the device, Uninstall bloatware, changing MAC address,and OTA Update etc require ADB access on the device. The typical ADB connection is established using a USB cable to connect android to a windows PC or MAC.
But, you can also use ADB commands wirelessly by establishing an ADB connection to PC via wifi.
Setup ADB to use Wirelessly(Over Wifi)
In order to use ADB wirelessly with android, we need to make some changes to android settings before using the ADB commands to make changes on android via ADB.
If you have already set up ADB on your Android and PC, then you can skip this step. If you haven’t, there is a first time for everything!
In order to use ADB on the system, you require to download Android SDK Platform tool. MAC Users can use Homebrew to install ADB using the command:
brew install homebrew/cask/android-platform-tools
Follow the steps to Setup WiFi ADB on Android:
Prerequisites
- Android > 11 (or have an option to enable ADB Wifi from within the Settings of your phone)
- You need to be connected to a Wifi (you don’t need internet access though)
- Tasker (obviously)
- WRITE_SECURE_SETTINGS and READ_LOGS permissions granted to Tasker (this tool may be very helpful)
- Termux (I highly recommend the F-Droid version due to the updated repository!)
- Termux:Tasker
Preparation
Whenever a popup comes up asking for confirmation of Wifi ADB connections, etc., you obviously have to accept it. I can’t recall in detail when they might show up.
In the past, I’ve been using AutoInput to auto-accept them, but I disabled it because I didn’t want to have AutoInput scan my screen all the time for these popups. And I couldn’t find a reliable Logcat entry.
Installation of android-tools within Termux:
pkg install android-tools
Create folderstructure and first script to be executed by Tasker
mkdir -p .termux/tasker
nano .termux/tasker/adb.sh
#!/data/data/com.termux/files/usr/bin/bash host="$1" adb=$PREFIX/bin/adb $adb connect $host $adb tcpip 5555 $adb disconnect $adb kill-server
!/data/data/com.termux/files/usr/bin/bash
Save the script by selecting CTRL (in Termux) and then pressing “x” – confirm by pressing “y”
Create a second script for pairing Termux with Wifi-ADB
nano .termux/tasker/adb_pair.sh
#!/data/data/com.termux/files/usr/bin/bash host="$1" code="$2" adb=$PREFIX/bin/adb echo $code | $adb pair $host $adb kill-server
!/data/data/com.termux/files/usr/bin/bash
Save the script by selecting CTRL (in Termux) and then pressing “x” – confirm by pressing “y”
Allow Tasker to run Commands in Termux environment
- open android settings -> Apps -> Tasker -> permissions -> additional permissions
- grant permission to “Run commands in Termux environment“
Import of profiles and tasks in Tasker
I first thought I’d explain how to set it up manually. But actually, this would take too much time. So I provide you with my profiles: Taskernet Download
Explanation and how to use the profiles
Pairing yourAndroid to Wifi ADB
- Disable all profiles in the project and only enable the profile ADB_Pairing (Long Press Volume Up)
- Navigate to Android phone settings ->developer options -> Debugging over WLAN ->
- Pair device with pairing code (or something like this)
- With the pairing code and IP:Port shown, press and hold Volume UP.
This will call the adb_pair.sh script created previously and send the pairing code and IP:Port to Termux, which will then pair with your device. Finally, a flash message will be shown with your IP:Port and pairing code as a kind of confirmation. The profile will then be disabled because you won’t need it anymore.
If everything went fine, you should now find at least one paired device at the “Debugging over WLAN” settings screen. (most likely named xxx@localhost)
Now disable Wifi ADB from the settings again.
How the other profiles work
I’ve created three more profiles. You should enable the first and third profiles. The second profile will be enabled on device startup. I will explain what the different profiles do and how to make use of them.
1_Set Var on Boot
This profile runs on device boot and simply sets the variable %ADB_enabled to 0 and enables the second profile 2_enable ADB Wifi
2_enable ADB Wifi
This profile runs on device unlock. With this profile, I will check for how long the device is enabled (I’m waiting for at least 60 seconds to make sure everything is settled after device boot) and that the variable %ADB_enabled is set to 0.
If both conditions are true I’m enabling the global setting Debugging over WLAN.
3_Get Port (Logcat) + Exec Termux
Now I’m checking Logcat for adb wifi entries. Once it found one we will extract the port and use it with the script adb.sh. The script will then connect to Debugging over WLAN and run adb tcpip 5555 to enable ADB Wifi.
Afterwards we wait 2 seconds and check if ADB-Wifi is enabled. If it was successful (%has_adb_wifi == true) tasker will say that to us and disable “Debugging over WLAN” (because it’s not needed anymore). Furthermore, we disable the second profile (because I don’t want this to be run every time I unlock my phone) and change the %ADB_enabled variable to 1.
Final Words:
Enabling Wifi ADB on Android allows you to use ADB commands on android wirelessly. Cherry on the cake, you are not required a working internet connection to use ADB wirelessly on android. All the latest Android phones running on Android 11 or later are capable of wireless ADB. All you need is a working wifi adapter to connect the PC and android together wirelessly.
WHAT TO READ NEXT?