Настройка маскарадинга (NAT) в Ubuntu
Для примера выполню настройку маскарадинга IPv4 (NAT) на Ubuntu Server.
Сначала нужно включить поддержку пересылки пакетов в /etc/sysctl.conf, чтобы трафик мог ходить между разными сетевыми интерфейсами.
Проверим текущее состояние:
sysctl net.ipv4.conf.all.forwarding cat /proc/sys/net/ipv4/ip_forward
Если оно равно 0, то включим следующей командой:
sysctl -w net.ipv4.conf.all.forwarding=1
Чтобы после перезапуска системы оно не сбросилось, откроем файл /etc/sysctl.conf например в редакторе nano (Ctrl+X для выхода, y/n для сохранения или отмены изменений):
net.ipv4.conf.all.forwarding=1
При необходимости можно очистить существующие NAT правила:
Теперь осталось в iptables добавить правило, например:
iptables -t nat -A POSTROUTING -s 192.168.99.0/24 -j SNAT --to-source 172.16.16.94
Где, 192.168.99.0/24 внутренняя сеть, а 172.16.16.94 адрес через который нужно идти в интернет, аналогично прописываются другие внутренние сети.
Напомню маску для частных сетей:
10.0.0.0/8 172.16.0.0/12 192.168.0.0/16
Если IP адрес на внешнем сетевом интерфейсе меняется (динамический), тогда вместо SNAT укажем MASQUERADE:
iptables -t nat -A POSTROUTING -s 192.168.99.0/24 -j MASQUERADE
Не забываем сохранить добавленные правила iptables.
Например можно открыть файл конфигурации сетевых интерфейсов (его содержимое подгружается при запуске системы):
nano /etc/network/interfaces
И в конце добавлять правила iptables, например укажу маскарадинг этой сети сразу на несколько IP адресов, а также с указанием сетевого интерфейса:
post-up /sbin/iptables -t nat -A POSTROUTING -s 192.168.99.0/24 -o eth3 -j SNAT --to-source 172.16.90.1-172.16.90.5 --persistent
nano /etc/rc.local /sbin/iptables -t nat -A POSTROUTING -s 192.168.99.0/24 -o eth3 -j SNAT --to-source 172.16.90.1-172.16.90.5 --persistent
Рекомендую указывать исходящий сетевой интерфейс, если его не указать, то локальный трафик будет возвращаться в сеть под NAT IP.
Если исходящий интерфейсов несколько, допустим балансируется нагрузка через BGP и т.д., то укажем двумя правилами:
/sbin/iptables -t nat -A POSTROUTING -s 192.168.99.0/24 -o eth3 -j SNAT --to-source 172.16.90.1-172.16.90.5 --persistent /sbin/iptables -t nat -A POSTROUTING -s 192.168.99.0/24 -o eth4 -j SNAT --to-source 172.16.90.1-172.16.90.5 --persistent
Можно посмотреть под которым IP адресом NAT выходит трафик серого IP адреса, а также все подключения:
conntrack -L conntrack -L -p tcp --dport 25 conntrack -L | grep 192.168.5.5 > ixnfo.com.txt
Защитим клиентов запретив к ним трафик на случайно открытые у них порты, а также защитим сеть от уже заражённых устройств (составил небольшой список iptables правил, рекомендую применить хотя бы их):
iptables -A FORWARD -d 172.16.0.0/12 -p tcp -m tcp --dport 25 -m comment --comment SMTP_Blocked_to_local -j DROP iptables -A FORWARD -d 172.16.0.0/12 -p udp -m udp --dport 53 -m comment --comment DNS_Blocked_for_local -j DROP iptables -A FORWARD -d 172.16.0.0/12 -p tcp -m tcp --dport 53 -m comment --comment DNS_Blocked_for_local -j DROP iptables -A FORWARD -d 172.16.0.0/12 -p tcp -m tcp --dport 111 -m comment --comment Blocked_for_local -j DROP iptables -A FORWARD -d 172.16.0.0/12 -p udp -m udp --dport 111 -m comment --comment Blocked_for_local -j DROP iptables -A FORWARD -d 172.16.0.0/12 -p udp -m udp --dport 123 -m comment --comment NTP_Blocked_for_local -j DROP iptables -A FORWARD -d 172.16.0.0/12 -p tcp -m tcp --dport 135 -m comment --comment Blocked_for_local -j DROP iptables -A FORWARD -d 172.16.0.0/12 -p tcp -m tcp --dport 139 -m comment --comment NetBIOS_Blocked_for_local -j DROP iptables -A FORWARD -d 172.16.0.0/12 -p udp -m udp --dport 137 -m comment --comment NetBIOS_Blocked_for_local -j DROP iptables -A FORWARD -d 172.16.0.0/12 -p udp -m udp --dport 138 -m comment --comment NetBIOS_Blocked_for_local -j DROP iptables -A FORWARD -d 172.16.0.0/12 -p tcp -m tcp --dport 445 -m comment --comment NetBIOS_Blocked_for_local -j DROP iptables -A FORWARD -d 172.16.0.0/12 -p udp -m udp --dport 161 -m comment --comment SNMP_Blocked_for_local -j DROP iptables -A FORWARD -d 172.16.0.0/12 -p tcp -m tcp --dport 179 -m comment --comment BGP_Blocked_for_local -j DROP iptables -A FORWARD -d 172.16.0.0/12 -p udp -m udp --dport 1900 -m comment --comment UPnP_Blocked_for_local -j DROP iptables -A FORWARD -d 172.16.0.0/12 -p udp -m udp --dport 11211 -m comment --comment memcached_attacks_block_for_local -j DROP
Смотрите также мои статьи:
How to Configure NAT on Ubuntu
![]()
NAT or Network Address Translation allows multiple computers on a private network to share a common IP to access the Internet. One set of IP addresses is used inside the organization and the other set is used by it to present itself to the internet. This helps in conserving limited public IP space. At the same time, it also provides security by hiding the internal network from direct access from the outside world.
How Does the NAT Work?
NAT simply converts the source address of the outgoing packet to a public IP address to make it routable on the internet. In the same way, the source address of the response packets coming from outside (internet) is converted back to local or private IP address.
What will we cover?
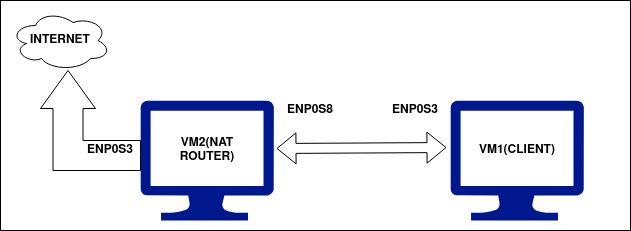
In this guide we will learn to set up Ubuntu 20.04 as a NAT router. For this we will use an Ubuntu VM as NAT router and another Ubuntu VM as client VM for the purpose of testing. To test the setup, we are using Virtualbox for creating and managing virtual machines(VMs).
Pre-flight Check
- Two Ubuntu VMs with one having two network interfaces(NICs).
- Ubuntu 20.04 installed on both the VMs.
- Administrative(sudo) access on both the VMs.
Experimental Setup
We have used the following setup for the two VMs mentioned above:
1. VM1 (NAT Router): Our Router machine has two network interfaces: enp0s3 and enp0s8 (these names may vary depending on the system). The enp0s3 interface acts as a WAN(internet) interface and is accessible from the outside world(Internet). Its IP address is assigned via DHCP and in our case it is 192.168.11.201.
The enp0s8 interface is a local or LAN interface and is accessible only on the local network where our client will be deployed. We have manually set the IP address for this interface as 10.10.10.1/24 and the “gateway address is left blank”.
2. VM2 (Client Machine): The client machine has only one local or LAN interface i.e. enp0s3. It is attached to the local network of the above machine(VM2) with the IP address set to 10.10.10.3/24. The only thing to care of is that the gateway in this case is the local interface (enp0s8) IP address of the above machine(VM2) i.e., 10.10.10.1
The summary of the configuration of the two virtual machines is given in the below table:
| Interface Name → | enp0s3 | enp0s8 | ||
|---|---|---|---|---|
| VM Name ↓ | IP address | Gateway IP | IP address | Gateway IP |
| VM1(NAT Router ) | 192.168.11.201/24 | Via DHCP | 10.10.10.1/24 | |
| VM2(Client) | 10.10.10.3/24 | 10.10.10.1 | ||
Let’s Begin…
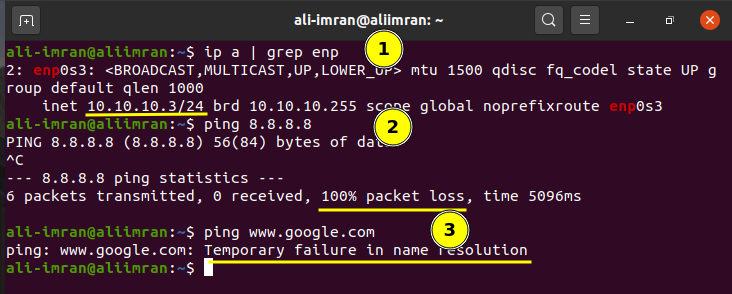
Now that we have set up the required IP addresses on our machine, we are set to configure them. Let us first check the connectivity between these machines. Both the machines should be able to ping each other. VM1, which is our NAT router machine, should be able to reach the global internet as it is connected to WAN via enp0s3. VM2, which is our local client machine, should not be able to reach the internet until we configure the NAT router on VM1. Now, follow the steps below:
Step 1. First check the IP addresses on both the machines with the command:
Step 2. Also check the connectivity of the machines before configuring the NAT router as mentioned above. You can use the ping command like:
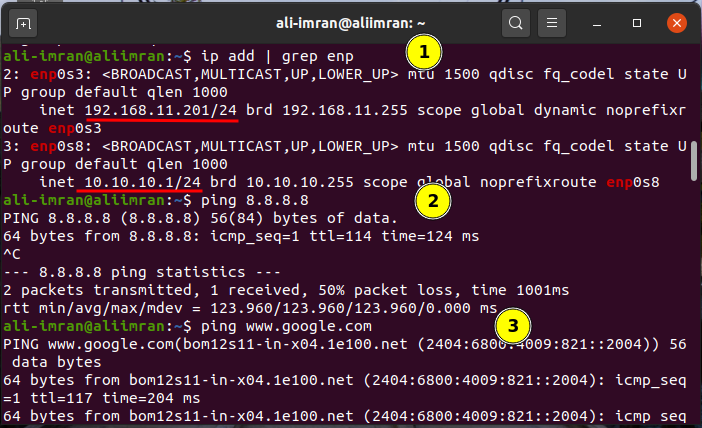
Result for the VM1 (NAT Router VM) are shown below:
Result for the VM2 (ClientVM) are shown below:
Both the VMs are working as we have expected them to be. Now we will start configuring VM2(NAT Router).
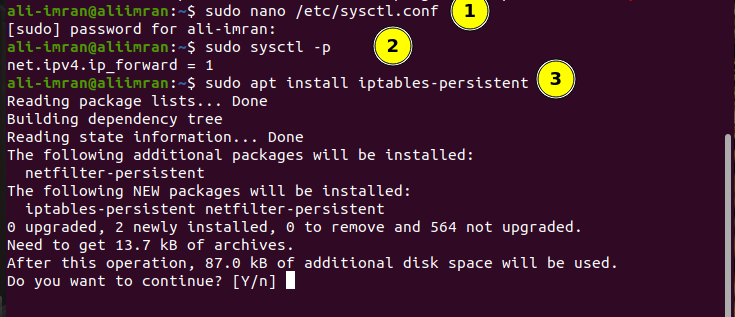
Step 3. On VM2 open the sysctl.conf file and set the “net.ipv4.ip_forward” parameter to one by uncommenting it:
Step 4. Now enable the changes to above file using the command:
Step 5. Now, install the iptables-persistent package (boot-time loader for netfilter rules, iptables plugin) using:
Step 6. List the already configured iptable policies by issuing the command:
Step 7. Now mask the requests from inside the LAN with the external IP of NAT router VM.
$ sudo iptables -t nat -A POSTROUTING -j MASQUERADE
Step 8. Save the iptable rules using:

Testing The Setup
Now, to check if everything is working fine, ping any public IP from the VM2(client):
Note: If you want, you can add a DNS server manually in the client network configuration for domain name resolution. This will suppress the ‘Temporary failure in name resolution’. We have used the Google DNS IP i.e. 8.8.8.8 in our VM1.
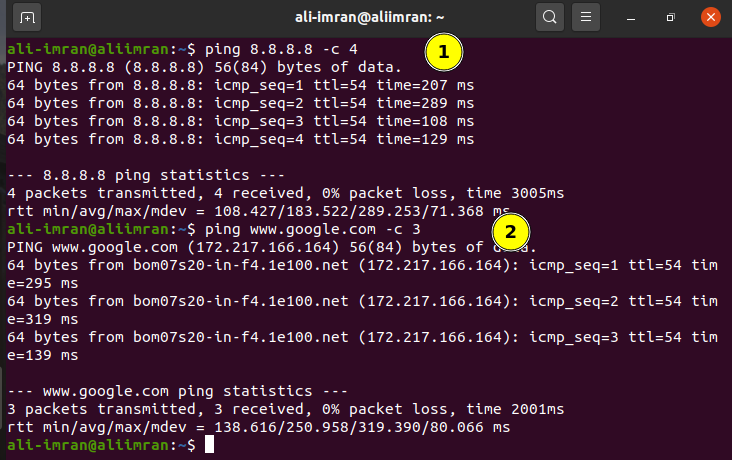
We can see that ping is now working as expected on VM1(client machine).
Conclusion
NAT is a very essential tool for preserving limited public IPv4 address space. Although IPv6 is emerging next generation IP protocol which is supposed to finish the IPv4 limitations, but that’s a long way process; so until then NAT is very important for organizations.
About the author
Ali Imran Nagori
Ali imran is a technical writer and Linux enthusiast who loves to write about Linux system administration and related technologies. You can connect with him on LinkedIn
.