- Владелец папки linux рекурсивно
- NAME
- SYNOPSIS
- DESCRIPTION
- OPTIONS
- EXAMPLES
- AUTHOR
- REPORTING BUGS
- COPYRIGHT
- SEE ALSO
- Команда chown в Linux
- Синтаксис
- Примеры
- Рекурсивно массово меняем права на папки и файлы
- How to Change Ownership of Files and Folders Recursively
- chown recursively
- Change both owner and group recursively
- Conclusion
- Как сменить владельца папки Linux
- Как сменить владельца папки Linux
Владелец папки linux рекурсивно
NAME
chown - change file owner and group
SYNOPSIS
chown [OPTION]. [OWNER][:[GROUP]] FILE. chown [OPTION]. --reference=RFILE FILE.
DESCRIPTION
This manual page documents the GNU version of chown. chown changes the user and/or group ownership of each given file. If only an owner (a user name or numeric user ID) is given, that user is made the owner of each given file, and the files' group is not changed. If the owner is followed by a colon and a group name (or numeric group ID), with no spaces between them, the group ownership of the files is changed as well. If a colon but no group name follows the user name, that user is made the owner of the files and the group of the files is changed to that user's login group. If the colon and group are given, but the owner is omitted, only the group of the files is changed; in this case, chown performs the same function as chgrp. If only a colon is given, or if the entire operand is empty, neither the owner nor the group is changed.
OPTIONS
Change the owner and/or group of each FILE to OWNER and/or GROUP. With --reference, change the owner and group of each FILE to those of RFILE. -c, --changes like verbose but report only when a change is made -f, --silent, --quiet suppress most error messages -v, --verbose output a diagnostic for every file processed --dereference affect the referent of each symbolic link (this is the default), rather than the symbolic link itself -h, --no-dereference affect symbolic links instead of any referenced file (useful only on systems that can change the ownership of a symlink) --from=CURRENT_OWNER:CURRENT_GROUP change the owner and/or group of each file only if its current owner and/or group match those specified here. Either may be omitted, in which case a match is not required for the omitted attribute --no-preserve-root do not treat '/' specially (the default) --preserve-root fail to operate recursively on '/' --reference=RFILE use RFILE's owner and group rather than specifying OWNER:GROUP values -R, --recursive operate on files and directories recursively The following options modify how a hierarchy is traversed when the -R option is also specified. If more than one is specified, only the final one takes effect. -H if a command line argument is a symbolic link to a directory, traverse it -L traverse every symbolic link to a directory encountered -P do not traverse any symbolic links (default) --help display this help and exit --version output version information and exit Owner is unchanged if missing. Group is unchanged if missing, but changed to login group if implied by a ':' following a symbolic OWNER. OWNER and GROUP may be numeric as well as symbolic.
EXAMPLES
chown root /u Change the owner of /u to "root". chown root:staff /u Likewise, but also change its group to "staff". chown -hR root /u Change the owner of /u and subfiles to "root".
AUTHOR
Written by David MacKenzie and Jim Meyering.
REPORTING BUGS
Report chown bugs to bug-coreutils@gnu.org GNU coreutils home page: http://www.gnu.org/software/coreutils/> General help using GNU software: http://www.gnu.org/gethelp/> Report chown translation bugs to http://translationproject.org/team/>
COPYRIGHT
Copyright © 2013 Free Software Foundation, Inc. License GPLv3+: GNU GPL version 3 or later http://gnu.org/licenses/gpl.html>. This is free software: you are free to change and redistribute it. There is NO WARRANTY, to the extent permitted by law.
SEE ALSO
chown(2) The full documentation for chown is maintained as a Texinfo manual. If the info and chown programs are properly installed at your site, the command info coreutils 'chown invocation' should give you access to the complete manual.
© 2019 Canonical Ltd. Ubuntu and Canonical are registered trademarks of Canonical Ltd.
Команда chown в Linux
В операционной системе Линукс множество пользователей и групп. При создании файла тот администратор, от чьего имени он был образован, становится его владельцем, который находится в собственной группе, но также может объединяться с другими. Утилита сhown (ее название произошло от сочетания слов «change» и «mode») позволяет изменять владельца или группу у папок и файлов. Когда меняется владелец, он получает возможность использовать иные возможности доступа и ограничить его для остальных администраторов. Подобное разрешение можно задавать при помощи чисел и символов.
Синтаксис
- USER (имя пользователя или идентификатор нового владельца)
- GROUP (название новой группы или ее индекс)
- FILE(s) (наименование одного или нескольких файлов, каталогов, ссылок).
- -c, —changes (подробный отчет о любых произошедших изменениях).
- -f, —silent, —quiet (сокращение данных, удаление сообщений о возможных неполадках).
- —dereference (поменять права для файла, помеченного символической ссылкой).
- -v, —verbose (используется для описания действий и вывода подробных данных о каждом обработанном файле).
- -h, —no-dereference (изменить полномочия касаемо символических ссылок, но оставить неизменными файлы, на которые они указывают).
- —from (изменить пользователя только для тех файлов, владельцем которых являются он и группа).
- -R, —recursive (последовательная обработка всех подкаталогов).
- -H (если передана символическая ссылка на каталог, перейти по ней).
- -L (переходить по всем символическим ссылкам на каталоги).
- -P (не переходить по символическим ссылкам на каталоги) (по умолчанию).
Примеры
Для первого примера изменим владельца «root» папки «katalog» на «ya». Для этого запустим команду без опций, укажем имя пользователя и путь к каталогу.

Меняем владельца и группу одновременно.
Чтобы изменить сразу владельца и группу необходимо применить двоеточие без промежуточных пробелов. Синтаксис данной процедуры такой: USER:GROUP KATALOG.
Для примера изменим владельца и group для каталога «katalog» на «ya» и «nogroup».
chown ya:nogroup /root/katalog

Тоже самое сделаем для документа «dokument».
Бывают ситуации, когда нужно поменять только группу. Для этого, впереди нужно добавить «:». Поменяем группу документа «dokument» на «nogroup».

Рекурсивно массово меняем права на папки и файлы
Чтобы последовательно (алгоритмически) проводить работу со всеми файлами и каталогами, используется аргумент -R (–recursive). Для удобства предварительно зайдем в целевую директорию с помощью команды cd.
Массово поменяем владельца и группу директории «primercataloga» включая вложенные папки и файлы.
ВАЖНО! Если слишком много файлов в каталоге, можно встретить ошибку «bash: /usr/bin/chown: Argument list too long». В таком случае требуется выполнить команду:
Если требуется поменять рекурсивно не только владельца и группу, а еще и права каталога, то используется другая команда chmod с таким же параметром -R (recursive).
Установим в директории /var/www 644. Что означает:
How to Change Ownership of Files and Folders Recursively
Learn how to use the chown command to recursively change the user and group ownership of files and directories in Linux command line.
chown owner_name file_or_folderThe problem arrives when you change the ownership of a directory, its content remains unchanged. The solution is not too complicated as well.
To change the ownership of all the contents of a directory, you can use the recursive option -R with chown command:
chown -R owner_name folder_nameIf you want to change both owner and group recursively, you can use it in the following manner:
chown -R owner_name:group_name folder_nameLet’s see it in detail and also see how you can change user and group recursively. Things are a lot easier to understand if you are familiar with the concept of file ownership and permission.
chown recursively
To recursively change the ownership of a directory, use it like this:
chown -R new_owner_name directory_nameIf you have to change the ownership of multiple directories with their contents, you can do it in the same line:
chown -R new_owner_name directory1 directory2 directory3Let me show that with a sample example. I have a directory named new_dir with some content in it. This directory and its content are owned by the root user.
[email protected]:~# ls -l /home/abhi/ total 4 drwxr-xr-x 3 root root 4096 May 30 07:30 new_dir [email protected]:~# ls -l /home/abhi/new_dir/ total 20 -rw-r--r-- 1 root root 12813 May 30 07:30 new.txt drwxr-xr-x 2 root root 4096 May 30 07:30 one_more_dirWhen I change the ownership of the new_dir, its ownership is changed:
[email protected]:~# chown abhi /home/abhi/new_dir [email protected]:~# ls -l /home/abhi/ total 4 drwxr-xr-x 3 abhi root 4096 May 30 07:30 new_dir But the files and folders inside it are still owned by root.
[email protected]:~# ls -l /home/abhi/new_dir/ total 20 -rw-r--r-- 1 root root 12813 May 30 07:30 new.txt drwxr-xr-x 2 root root 4096 May 30 07:30 one_more_dir Now, if I use the recursive option -R with chown command, it changes the ownership for everything inside the specified directory, not just the directory.
[email protected]:~# chown -R abhi /home/abhi/new_dir [email protected]:~# ls -l /home/abhi/new_dir/ total 20 -rw-r--r-- 1 abhi root 12813 May 30 07:30 new.txt drwxr-xr-x 2 abhi root 4096 May 30 07:30 one_more_dir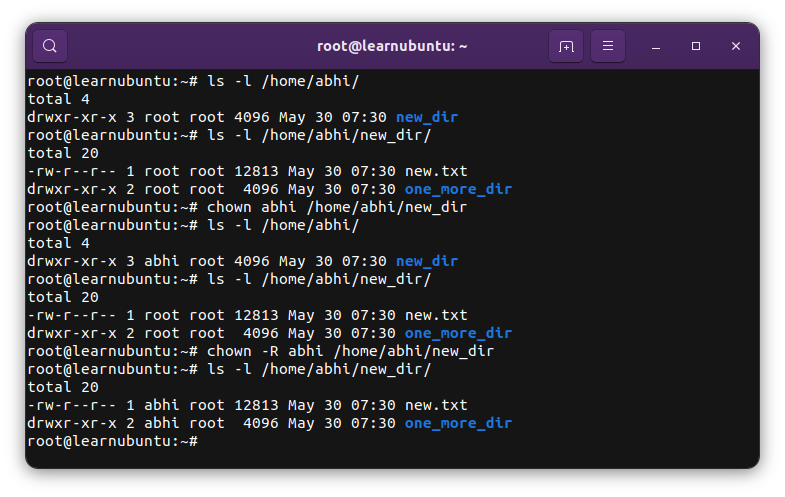
Change both owner and group recursively
The chown command allows you to change the owner as well as the group of files.
To recursively change the owner and group of a directory and all its content, use the chown command like this:
chown -R user_name:group_name directory_nameYou can use the same for changing the ownership of multiple folders:
chown -R user_name:group_name dir1 dir2Conclusion
Recently, I moved a self-hosted Ghost instance to a new server launched with DigitalOcean’s 1-click deployment. I had to upload the entire images folder from the backup (downloaded on the local system) to the new server. The system required changing the ownership of this image folder from root to ghost.
This method saved me the trouble. I hope this quick little tutorial helps you as well.
I highly recommend brushing up the basics of file permissions and ownership.
It’s one of the essential Linux concepts you must know.
Как сменить владельца папки Linux
В Linux права собственности на файлы и папки составляют основу управления доступом к различным возможностям операционной системы. То какому пользователю и группе принадлежит папка определяет кто сможет получить к ней доступ, создавать и удалять там файлы и другие папки и так далее.
В этой небольшой статье мы рассмотрим как сменить владельца папки Linux в графическом интерфейсе или с помощью терминала.
Как сменить владельца папки Linux
Вы можете изменить владельца папки с помощью файлового менеджера, например в Nautilus. Но для этого надо запустить файловый менеджер от имени суперпользователя. Откройте терминал с помощью сочетания клавиш Ctrl+Alt+T и выполните команду:
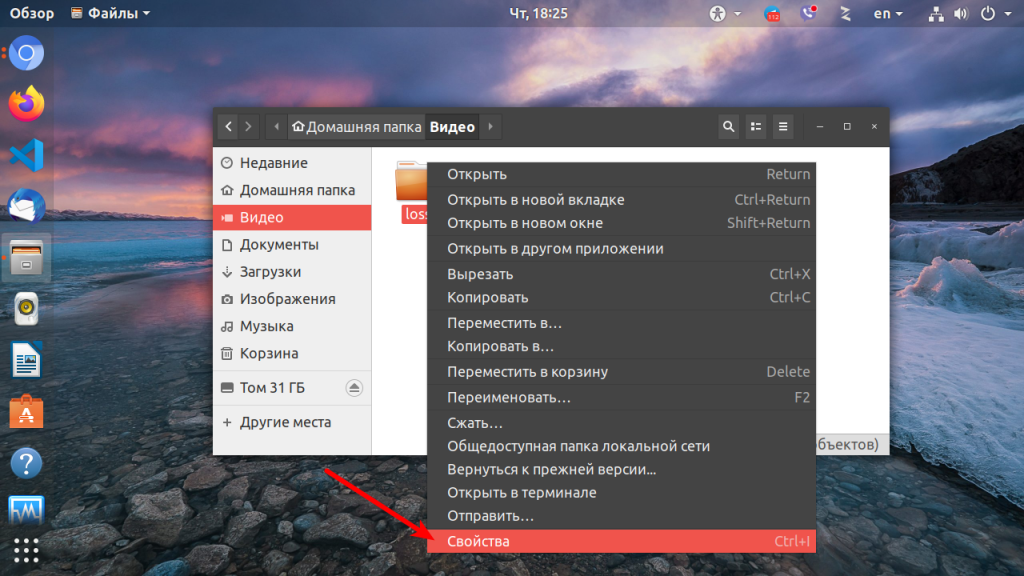
Затем найдите нужную папку, и кликните по ней правой кнопкой мыши. В открывшемся контекстном меню выберите пункт Свойства:
В появившемся окне перейдите на вкладку Права. Здесь можно изменить владельца папки и группу владельца с помощью выпадающего списка напротив соответствующего пункта:
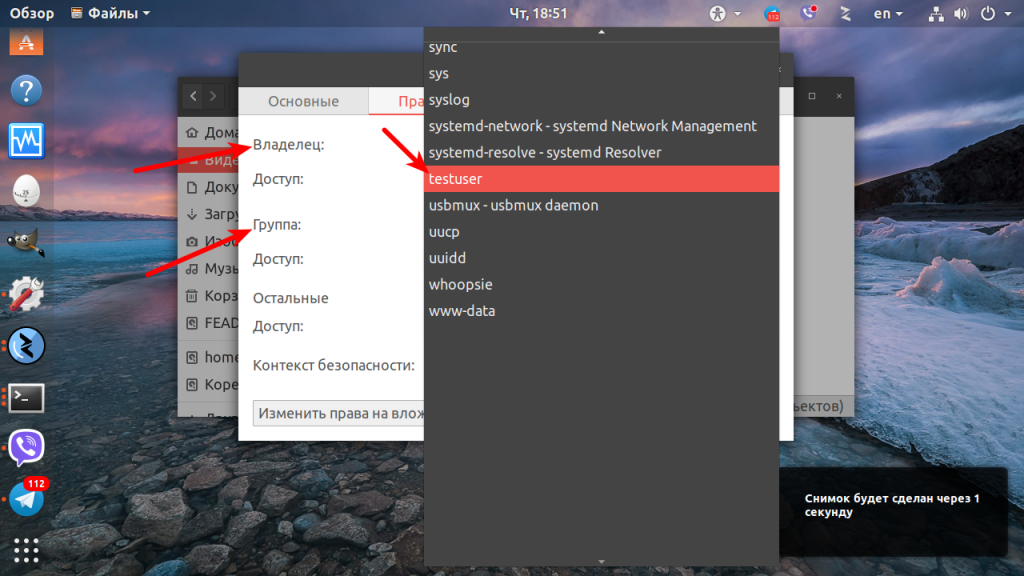
Если вам нужно чтобы эти изменения были применены для всех вложенных папок и файлов, нажмите внизу окна кнопку Изменить права на вложенные файлы.
Вот так всё просто. Если у вас не получается запустить файловый менеджер или вы хотите работать в терминале это тоже возможно. Для того чтобы сменить владельца папки следует использовать утилиту chown. Синтаксис у неё такой:
$ chown опции новый_владелец : новая_группа /путь/к/папке
Подробнее об этой утилите вы можете просмотреть в отдельной статье. Например, чтобы сменить владельца папки ~/Видео/losst/ на testuser следует выполнить такую команду:
sudo chown testuser ~/Видео/losst

В данном случае группа останется без изменений, чтобы изменить также группу-владельца выполните:
sudo chown testuser:testuser ~/Видео/losst

Если нужно сменить владельца папки Linux рекурсивно используйте опцию -R:
sudo chown -R testuser:testuser ~/Видео/losst
Обратите внимание, что все файлы и папки, создаваемые в системе по умолчанию будут иметь владельцем пользователя, который их создаёт, а группой-владельцем — основную группу этого пользователя. Такое поведение изменить нельзя. Чтобы избежать проблем с неверно присвоенным папке владельцем в будущем запускайте программу, которая создаёт папку или файл от имени пользователя, которому папка должна принадлежать. Сделать это очень просто с помощью sudo. Например, для пользователя losst:
Как видите, поменять владельца папки в Linux можно очень просто. Для этого достаточно выполнить несколько команд в терминале или сделать пару щелчков мышкой.
Обнаружили ошибку в тексте? Сообщите мне об этом. Выделите текст с ошибкой и нажмите Ctrl+Enter.