- Screen Recording
- How to record and save the file locally?
- How to live stream the screen recording?
- Sending the recording from the streaming device
- Receive the screen recording on the receiving device
- Additional information regarding streaming
- Automate the process of streaming the screen recording
- How to Capture a Screencast Using VLC
- In This Article
- About VLC
- How to Download VLC
- On Windows and Mac
- Set Up the Screen Capture
- Launch VLC
- Set Up Your Destination File and Encode Options
- Set Up Screen Capture Using the Command Line
- How to Edit Your Screencast
- How to record Ubuntu desktop with VLC
- How to record PC screen with VLC
Screen Recording
This page explains how to use VLC for recording the screen.
We will use screen:// while opening VLC from the terminal to capture raw frames for the screen recording. However, that alone will not be enough as we will need to process those raw frames and then save/stream the final output.
As the sout chain works as a pipeline, we can break the process in the following four steps:
- Use screen:// to capture raw frames.
- Encode the raw frames using the vcodec parameter of the transcode module.
- Mux the encoded stream using the mux parameter of the std module.
- Save or stream the muxed stream at the required destination using the access and dst parameters of the std module respectively.
As a pre-requisite, refer to How to transcode and save the file to understand how to do basic transcoding.
For screen recording, you can choose the relevant vcodec and mux as per your need, but make sure that they are compatible with each other. To set the rate at which the recording will be done, assign the required frame rate to the screen-fps option, like in the examples below.
How to record and save the file locally?
To record the screen and save it locally, run the following command on the terminal:
$ vlc screen:// --screen-fps=25 --sout="#transcode:std"
Running this command will open a VLC window and start the recording.
To stop it, press the stop icon in the bottom left region of the VLC window. As soon as the recording is stopped, the output file will be saved at the path specifed in the dst parameter. (In case no path is specified, like in the code above, the recording is saved in the directory from where the code was executed.)
How to live stream the screen recording?
As it can be noticed in the flow chart at the start of this page, the decision to save or stream is the last step of the process. Hence, we will only need to make the changes there while the rest of the process remains the same.
For this example, we will stream the recording over the local network using HTTP. Refer to the Stream over HTTP for information about streaming a simple file over HTTP, as that is a pre-requisite for this.
It is important to remember that streaming over the “local” network means that the streaming and the receiving device(s) need to be connected to the same router for the streaming to work.
In case of streaming over HTTP, we need the following information:
- Know the IP address of the streaming device.
- Decide a port number and path name where the streaming will be done.
For the following example, let’s assume that the IP address of the streaming device is 192.168.0.101 , and let’s choose to stream at port number 8090 and path name stream (you can choose your own port number and path name).
Sending the recording from the streaming device
Run the following code on the device whose screen-recording is to be streamed:
$ vlc screen:// --screen-fps=25 --sout="#transcode:std"
Receive the screen recording on the receiving device
To receive the screen-recording, run the following code on the receiving device(s):
$ vlc http://192.168.0.101:8090/stream
Diagramatically, this is how it might look in the network:
Additional information regarding streaming
You can also stream the screen-recording over UDP, RTP, and RTSP by modifying the code accordingly. Head over to the Stream over the Network section for exploring how to stream files over different protocols.
If you are a teacher who wishes to share their screen with the entire class, it might be useful to use SAP announcements as well, as they help receiving devices to connect to the stream without manually setting the IP address or running any code.
You can run the following command to multicast stream the recording over UDP with SAP announcements:
$ vlc screen:// --screen-fps=25 --sout="#transcode:std"
On the receiving device(s), the students can simply open VLC, go to View -> Playlist , and click on Network Stream (SAP) in the “Local Network” section on the left side.
They will see the SAP announcement named screen like in the following figure:

The receiver(s) can double click on the screen stream to start receiving the stream.
Automate the process of streaming the screen recording
You can use the Video Lan Manager (VLM) for storing the settings and configuration. This way, you will be able to start sharing your screen without having to write the entire sout chain everytime.
Refer to VLM Introduction to understand how to execute .vlm files, and refer to Screen Share using VLM to see how to automate the process of sharing your screen using a VLM file.
© Copyright This page is licensed under a CC-BY-SA 4.0 Int. License.
How to Capture a Screencast Using VLC
Aaron Weiss is a former Lifewire writer with 15+ years’ experience. He’s written for Wired and The New York Times, and is the author of 8 consumer technology books.
In This Article
This article discusses how to use VLC to record a screencast of your desktop or a process on your computer.
About VLC
VLC is a free and open-source multi-purpose application for audio and video playback and conversion. VLC plays a variety of video formats, including DVD media, on many operating systems, including Windows, Mac, and Linux.
VLC can also encode a live feed of your desktop, called a screencast. Create a screencast to demonstrate a software product or website, instruct viewers on how to use an application, or document an error or bug to help resolve a problem.
How to Download VLC
To begin, download and install the recent version of VLC, which is updated often. At the time of this guide, the latest version was 3.0.16, but VLC doesn’t change its interface often, if ever.
:max_bytes(150000):strip_icc()/vlc-download-987310e84df74463ad1439c9a5aba35a.jpg)
On Windows and Mac
Go to the download page and select the version of VLC for your operating system. Installation is straightforward, and you can safely walk through the install wizard to get it running.
Linux users should use the distribution’s package manager instead. VLC is open-source, and it’s a Linux favorite. The package name is usually vlc. On Ubuntu, Debian, Linux Mint, or another version based on these distributions, open a terminal and enter this command:
sudo apt install vlc
Set Up the Screen Capture
Once you have VLC, there are two ways to set up a screen capture: use the point-and-click graphical VLC interface or a command line. The command line lets you specify more advanced capture settings, such as desktop crop size and index frames, to make a video that is easier to edit. Most of the time, though, this is more than you need. The graphical VLC interface is easier to use.
Launch VLC
VLC is a typical media player with an orange traffic cone icon. You’ll find it among your other applications; the exact location depends on your operating system.
:max_bytes(150000):strip_icc()/vlc-main-d7bf442ac616439b8106b7dc73f80504.jpg)
- With the VLC window open, select Media.
:max_bytes(150000):strip_icc()/vlc-media-menu-eacfa21475f445f38eb0fb2281dc990a.jpg)
In the Media menu, choose Open Capture Device.
:max_bytes(150000):strip_icc()/vlc-capture-options-b6b376f009b54d81bf0b100779cdadf4.jpg)
In the Open Media dialog box, select the Capture mode drop-down arrow and choose Desktop.
:max_bytes(150000):strip_icc()/vlcshowmore-f3c3c0d804264d50bcf75ce758d98b06.jpg)
Select Show more options to reveal additional settings. Then, set the Caching option lower for less memory usage or higher if your system has enough memory.
:max_bytes(150000):strip_icc()/VLCplayconvert-ed0bd884f6e14821a440979edcd85d6c.jpg)
Select the drop-down arrow next to Play and choose Convert. This encodes the live desktop into a save file.
Set Up Your Destination File and Encode Options
The window will shift to let you set up your encoding options.
:max_bytes(150000):strip_icc()/vlcsourcescreen-605f496f208645039e0d7a395041ac40.jpg)
- In the Source text box, enter screen://.
VLC has presets for various devices and resolutions. Don’t choose an audio profile since it won’t contain any video data.
Set Up Screen Capture Using the Command Line
You can choose more configuration options by creating a screencast using VLC on the command line rather than the graphical interface. This approach requires that you are familiar with using the command line on your systems, such as the cmd window in Windows, the Mac terminal, or the Linux shell.
With the command-line terminal open, refer to this example command to set up a screencast capture on Windows:
On Linux and Mac, it is similar:
This command is one single line and must be pasted or typed that way. The example above is the exact command used to record the screencast video included in this article.
Several parts of this command can be customized:
- c:\path\to\vlc.exe: This should be the path to the vlc.exe executable. On Mac and Linux, this can just be vlc.
- :screen-fps=24: This should be set to the frames-per-second rate you want to record.
- :screen-follow-mouse: Include this to record the mouse pointer, or exclude if you want to hide the mouse pointer in the screencast.
- :screen-mouse-image: Supply a path to a pointer image when capturing the mouse pointer.
- vb=1024: Set this to the bitrate at which you want to record. A higher bitrate produces a better quality video but with a larger file size (this works in combination with the fps value). Try values of 1500 or 2048 to improve quality.
- :scale=1.0: Set this value to reduce or enlarge the video proportionally. For example, a value of 0.5 creates a screencast of your desktop scaled down to half-size.
- cropleft, croptop, cropright, cropbottom: These values represent the pixel size of the crop areas. Set to 0 to capture the entire desktop. For example, if you set cropleft to 100, the recorded desktop crops 100 pixels of width from the left side of the desktop. The same logic applies to each parameter.
- dst=»: The full path and name of the video file you want to create.
How to Edit Your Screencast
When recording a screencast, you might not get everything right in one take. When this happens, use video editing software to polish your screencast. Not all video editors can open MP4 format video files, though.
For simple editing jobs, try the free, open-source application Avidemux. Use this program to cut sections of a video and apply filters such as crop.
How to record Ubuntu desktop with VLC
Have you ever wanted to record your PC screen with Ubuntu and didn’t know how to do it? We may want to capture the screen of our devices, mobile and desktop, for many and varied reasons. Among them is sharing on social networks, especially captures of a single image, or making tutorials. With the amount of developers and programs available for Linux, many times we don’t know where to start, but what we want is videotape the screen from our PC, we can do it with the famous player VLC Media Player.
The best thing about using VLC to record our computer screen is that we can do it both in Linux, as in OS X and in Windows. Getting it is very easy, but you have to do all the necessary steps. There are tutorials that explain how to record the computer screen with VLC that are incomplete, they lack a step that if we do not take, at least on my computer with Ubuntu 15.10, it will not record the screen. Here are the steps to follow to do it successfully.
How to record PC screen with VLC
Updated in 2019 : From what it seems, in 2019 it is not possible without first installing a package. Therefore, before we start we will have to open a terminal and type this command:
sudo apt install vlc-plugin-access-extra
And an important fact: we do not have to have the VLC in full screen or it will feed back and fail.
- Logically, the first step is to open VLC.
- Next, we open the menu Medium / Open Capture device.
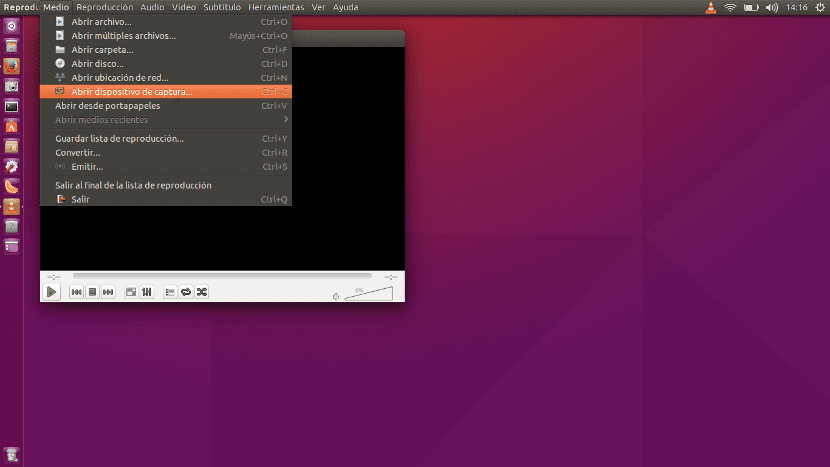
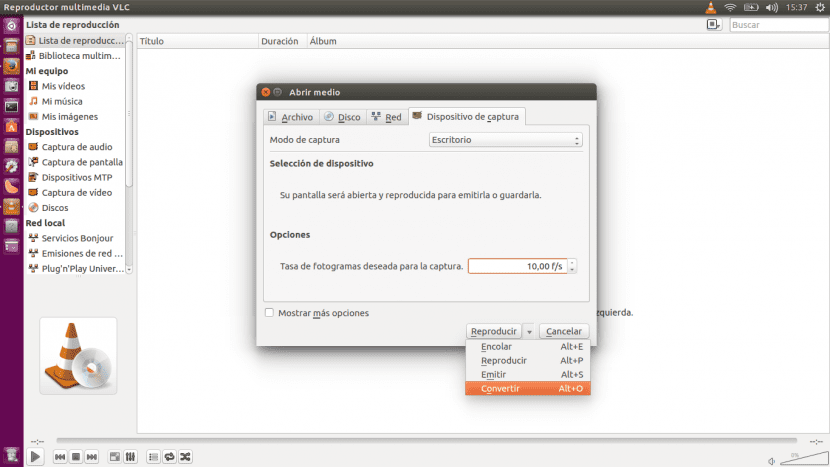
- In the window that opens we have to make three changes:
- We display the menu Capture Mode and we choose Desktop.
- This is an important point: we have to modify the Frame Rate. I have tried 10f / s and it works for me. Logically, it can be increased, but the default 1f / s won’t work out too well (it didn’t work for me anymore).
- At the bottom, we click on the triangle and select Convert.
- In the window that opens we will have to give the file a name including the extension. In the case of the example, I have used the name Ubunlog.mp4.
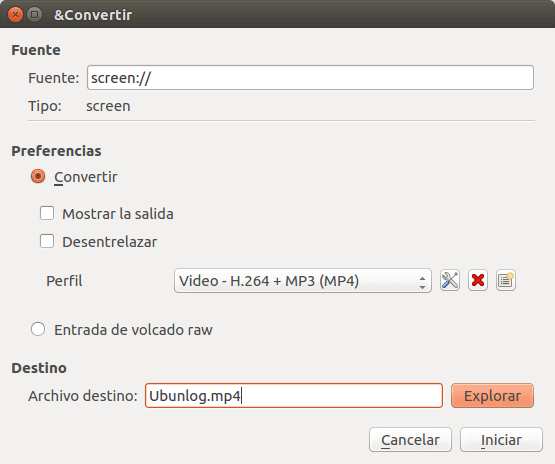

- Here we have to enter the Video Codec tab and change the Bit rate to 2000kb / s. Logically, this value can be modified, but with 2000 we know that it works.
- Then we click on Save. You will return to the previous tab. Steps 6 and 7 will only have to be done the first time we record the screen.
- Now all you have to do is click Start.
- To stop the recording, something that I do not like, we have to close VLC.
And we would already have it. The truth is that, knowing how to do it, it is simple. In addition, we will be using a program that we probably already have installed on the system. And more importantly, it’s free and cross-platform. How about?
The content of the article adheres to our principles of editorial ethics. To report an error click here.
Full path to article: ubunlog » Ubuntu » Tutorials » How to record Ubuntu desktop with VLC