- How to live stream video from webcam on Linux
- Install VLC on Linux
- Install VLC on Ubuntu, Debian or Linux Mint
- Install VLC on Fedora
- Install VLC on CentOS or RHEL 6
- Verify Webcam Device on VLC
- Configure Webcam Streaming on VLC
- Live Stream Webcam from the Command Line
- Watch Streaming Video from Webcam
- Security Protections for Your Webcam Feed
- Support Xmodulo
- Documentation:Streaming HowTo/Command Line Examples
- More complex transcoding example
- Multiple streaming
- Transcoding and multiple streaming
- More complex multi-transcoding example
- HTTP streaming
- RTSP live streaming
- RTSP on-demand streaming
- MMS / MMSH streaming to Windows Media Player
- Use the es module
- Keeping the stream open
- Using VLC as a reflector
How to live stream video from webcam on Linux
Have you ever wanted to live stream a video feed from your webcam for someone else? You could use any existing video chat software such as Skype, Google Hangouts. However, if you do not want to rely on any third-party streaming infrastructure, you can set up your own webcam streaming server in house.
In this tutorial, I will describe how to live stream video from webcam by using VLC. VLC is an open-source, cross platform media player which can handle virtually all video and audio formats. VLC can also run as a streaming server supporting various streaming protocol such as RTP, HTTP, RTSP, etc.
Before attempting to set up webcam streaming on your own, you need to understand the huge potential security risk of streaming a webcam over the Internet. Anyone can tap into your streaming feed unless you properly access control the streaming server, and encrypt the streaming traffic. I will briefly mention several security protections against threats towards the end of the tutorial.
Install VLC on Linux
Before setting up a streaming server with VLC, install VLC first.
Install VLC on Ubuntu, Debian or Linux Mint
Install VLC on Fedora
Install VLC on CentOS or RHEL 6
First set up EPEL repository, and then use the following commands:
$ cd /etc/yum.repos.d/ $ sudo wget http://pkgrepo.linuxtech.net/el6/release/linuxtech.repo $ sudo yum install vlc
Verify Webcam Device on VLC
Next, verify whether a webcam device is successfully detected on your Linux system and VLC.
To do so, first find out the device name of your webcam with the following command. In this example, the device name of the webcam is /dev/video0 .
Now use the following command to test video from your webcam. Replace video0 with your own device name.
If your webcam is successfully detected by VLC, you should see a video stream of yourself.
Configure Webcam Streaming on VLC
Assuming that your webcam is successfully recognized by VLC, I am going to show how to configure webcam streaming. In this setup, webcam is streamed over HTTP in WMV format.
To configure VLC for webcam streaming, first launch VLC:
Choose Streaming from VLC menu.
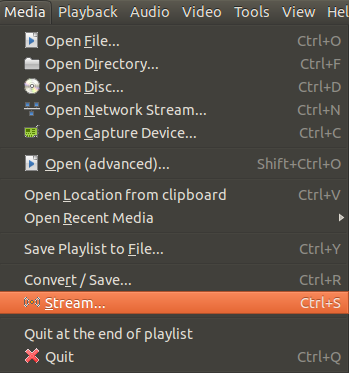
On the screen, choose webcam/audio device name (e.g., /dev/video0 for webcam, and hw:0,0 for audio). Click on the checkbox of Show more options . Make a note of value strings in MRL and Edit Options fields. We will use these strings later in the tutorial. Click on Stream button at the bottom.
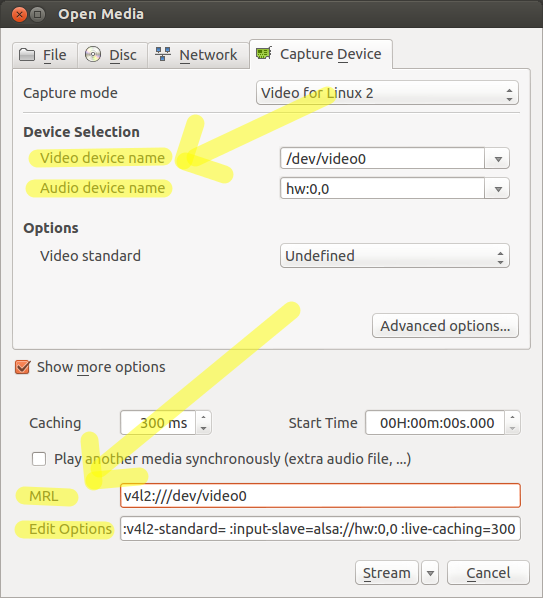
Verify the video source (e.g., v4l2:///dev/video ), and click on Next button to go next.

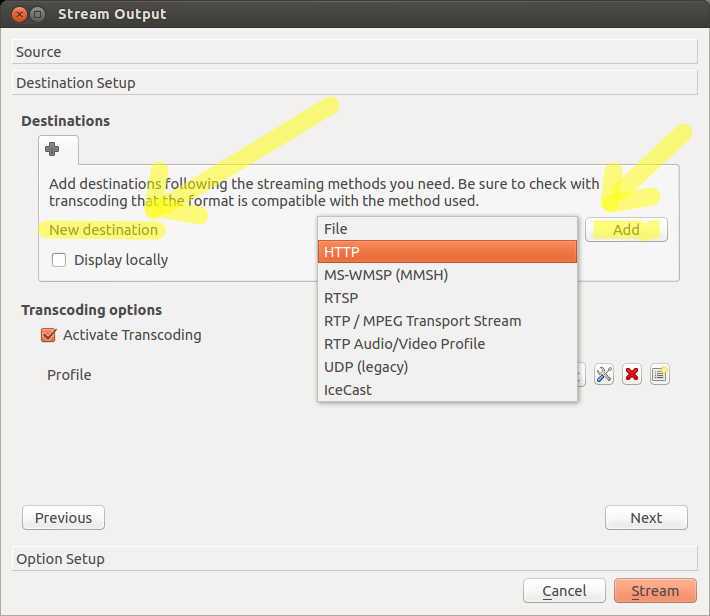
On this screen, choose the destination (i.e., streaming method/target) of webcam streaming. Since we use HTTP streaming, choose HTTP from the drop down list, and click on Add button.
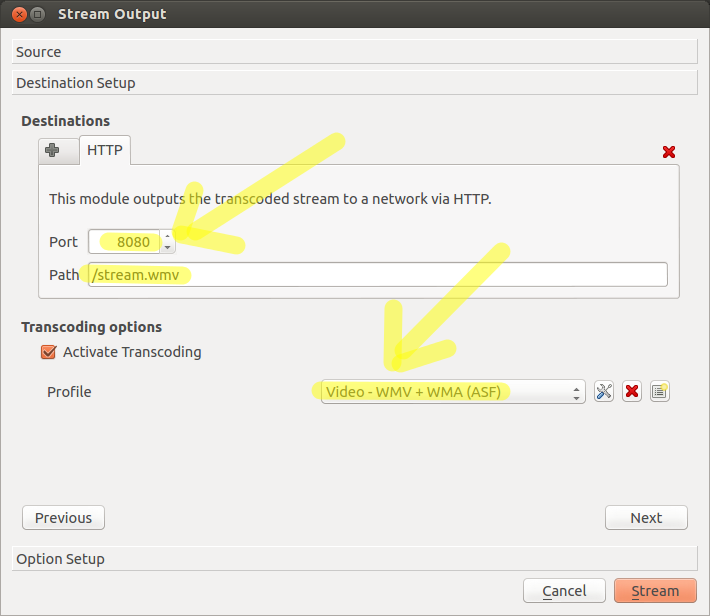
Next, specify port number and path of a streaming service. For port number, fill in 8080 (assuming that the port number is not occupied), and /stream.wmv as path. For transcoding, choose Video — WMV + WMA (ASF) profile from the drop down list. Click on Next button.
On this screen, you will see stream output string which is automatically generated. Make a note of this string, and click on Stream button at the bottom.
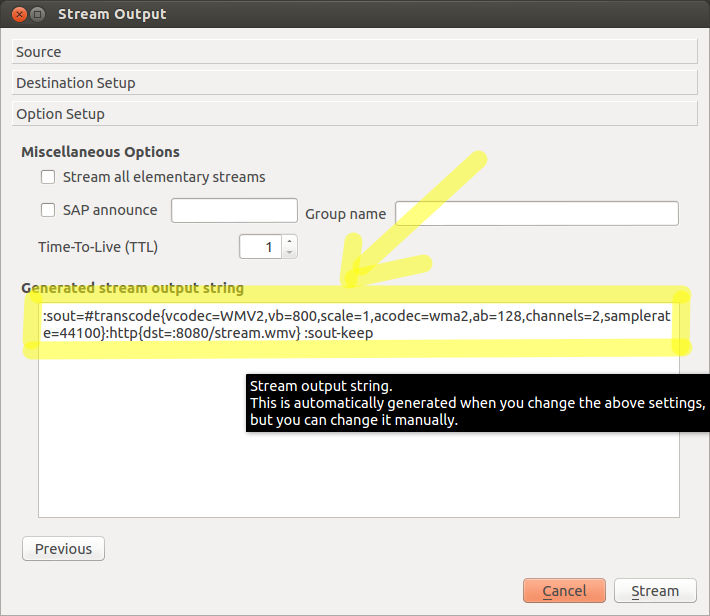
At this point, VLC should start streaming video from your webcam over HTTP. You will not see anything on VLC screen itself since streaming traffic is sent directly to localhost at TCP port number 8080.
To verify that VLC is running correctly at TCP port 8080, run the following command, and look for VLC.
$ sudo netstat -nap | grep 8080
tcp 0 0 0.0.0.0:8080 0.0.0.0:* LISTEN 11959/vlc tcp6 0 0 . 8080 . * LISTEN 11959/vlc
Live Stream Webcam from the Command Line
The method described earlier is setting up webcam streaming via VLC GUI. VLC comes with a command-line utility called cvlc which allows you to use VLC without its interface. cvlc is useful when you have to configure VLC streaming on a remote headless host.
To set up webcam streaming from the command line, you need to use three string values that I told you to make note of during the above GUI-based configuration. In this test setup, those string values were:
Concatenate those three strings to contruct arguments for cvlc command. That is, the following command will launch webcam streaming over HTTP in WMV format.
$ cvlc v4l2:///dev/video0 :v4l2-standard= :input-slave=alsa://hw:0,0 :live-caching=300 :sout="#transcode:http"
In the above command, specific string values (e.g., audio device name) might be slightly different depending on your hardware configuration. So go through the above GUI-based VLC configuration yourself to find out the correct cvlc arguments for your system.
Watch Streaming Video from Webcam
Once a streaming server starts running, the webcam live feed is available at http://:8080/stream.wmv
You can use VLC player or MPlayer to access the webcam feed as follows.
$ vlc http://:8080/stream.wmv $ mplayer http://:8080/stream.wmv
If you are testing the feed from the same host, use loopback address 127.0.0.1 instead.
Security Protections for Your Webcam Feed
As mentioned earlier, it is not a good idea to stream your webcam over the Internet without any security protection. Consider some of these measures to protect your webcam feeds.
- Download the latest firmware from webcam vendors.
- Stream webcam over a secure VPN.
- Use iptables to whitelist IP addresses that you trust, and block all other connections.
Support Xmodulo
This website is made possible by minimal ads and your gracious donation via PayPal or credit card
Please note that this article is published by Xmodulo.com under a Creative Commons Attribution-ShareAlike 3.0 Unported License. If you would like to use the whole or any part of this article, you need to cite this web page at Xmodulo.com as the original source.
Documentation:Streaming HowTo/Command Line Examples
Transcode a stream to Ogg Vorbis with 2 channels at 128kbps and 44100Hz and save it as foobar.ogg:
% vlc -I dummy -vvv input_stream --sout "#transcode:file"
Transcode the input stream and send it to a multicast IP address with the associated SAP announce:
% vlc -vvv input_stream --sout '#transcode: rtp'
Display the input stream, transcode it and send it to a multicast IP address with the associated SAP announce:
% vlc -vvv input_stream --sout #duplicate:rtp">'
Transcode the input stream, display the transcoded stream and send it to a multicast IP address with the associated SAP announce:
% vlc -vvv input_stream --sout '#transcode: duplicate>'
To receive the input stream that is being multicasted above on a client:
More complex transcoding example
Stream a SDI card to H.264 and AAC in TS on UDP
% cvlc -vvv --live-caching 2000 decklink:// --decklink-audio-connection embedded --decklink-aspect-ratio 16:9 --decklink-mode hp50 --sout-x264-preset slow --sout-x264-tune film --sout-transcode-threads 8 --no-sout-x264-interlaced --sout-x264-keyint 50 --sout-x264-lookahead 100 --sout-x264-vbv-maxrate 6000 --sout-x264-vbv-bufsize 6000 --sout '#transcode:std'
Multiple streaming
Send a stream to a multicast IP address and a unicast IP address:
% vlc -vvv input_stream --sout '#duplicate,dst=rtp>'
Display the stream and send it to two unicast IP addresses:
% vlc -vvv input_stream --sout '#duplicate,dst=rtp>'
Send parts of a multiple program input stream:
% vlc -vvv multiple_program_input_stream --sout'#duplicate,select="program=12345",dst=rtp,select="video,program=1234-2345">'
This command sends the program of the input stream which id is 12345 to 239.255.12.42 and all video programs with id between 1234 and 2345 to 239.255.12.43.
Transcoding and multiple streaming
Transcode the input stream, display the transcoded stream and send it to a multicast IP address with the associated SAP announce and an unicast IP address:
% vlc -vvv input_stream --sout '#transcode: duplicate, dst=rtp>'
Display the input stream, transcode it and send it to two unicast IP addresses:
% vlc -vvv input_stream --sout '#duplicate'
Send the input stream to a multicast IP address and the transcoded stream to another multicast IP address with the associated SAP announces:
% vlc -vvv input_stream --sout '#duplicate, dst="transcode: rtp">'
More complex multi-transcoding example
Take a SDI input, and transcode it twice, once in HD, and one in SD and send both on udp.
% cvlc -vv --live-caching 2000 --decklink-audio-connection embedded --decklink-aspect-ratio 16:9 --decklink-mode hp50 decklink:// --sout-x264-preset fast --sout-x264-tune film --sout-transcode-threads 24 --no-sout-x264-interlaced --sout-x264-keyint 50 --sout-x264-lookahead 100 --sout-x264-vbv-maxrate 4000 --sout-x264-vbv-bufsize 4000 --sout '#duplicate:std", dst="transcode:std">'
Take a SDI input, and restreaming it once in raw and transcoding it for the second
% cvlc -vv --live-caching 2000 --decklink-audio-connection embedded --decklink-aspect-ratio 16:9 --decklink-mode hp50 decklink:// --sout-x264-preset fast --sout-x264-tune film --sout-transcode-threads 24 --no-sout-x264-interlaced --sout-x264-keyint 50 --sout-x264-lookahead 100 --sout-x264-vbv-maxrate 4000 --sout-x264-vbv-bufsize 4000 --sout '#duplicate:std", dst="std">'
HTTP streaming
% vlc -vvv input_stream --sout '#standard'
% vlc http://server.example.org:8080
Transcode and stream in HTTP:
% vlc -vvv input_stream --sout '#transcode: standard'
Recording a live video stream:
% vlc http://example.com/live.asf --sout
For example, if you want to stream an audio CD in Ogg/Vorbis over HTTP:
% vlc -vvv cdda:/dev/cdrom --sout '#transcode:standard'
RTSP live streaming
% vlc -vvv input_stream --sout '#rtp'
% vlc rtsp://server.example.org:8080/test.sdp
RTSP on-demand streaming
MMS / MMSH streaming to Windows Media Player
% vlc -vvv input_stream --sout '#transcode channels=2>:std'
VLC media player can connect to this by using the following url: mmsh://server_ip_address:8080. Windows Media Player can connect to this by using the following url: mms://server_ip_address:8080.
Use the es module
Separate audio and video in two PS files:
% vlc -vvv input_stream --sout '#es'
Extract the audio track of the input stream to a TS file:
% vlc -vvv input_stream --sout '#es'
Stream in unicast the audio track on a port and the video track on another port (NOTE: This will not only work with VLC 0.8.6 or older — FIXME?): [Please check this]
% vlc -vvv input_stream --sout '#es url_video=192.168.1.2:1213>'
Stream in multicast the video and dump the audio in a file:
% vlc -vvv input_stream --sout '#es access-audio=file,mux-audio=ps,dst-audio=audio-%c.%m>'
Note: You can also combine the es module with the other modules to set-up even more complex solution.
Keeping the stream open
% vlc -vvv input_stream -sout-keep -sout=#transcode:duplicate, dst=gather:std,select="novideo">
The basic transcoding is an mp3 stream from the file you select (if it is a video file, then the video is ignored). It is streamed via http to localhost:8080/stream.mp3
The combination of :sout-keep and dst=gather:std mean that the stream is kept open and subsequent items are played through the same stream.
Using VLC as a reflector
Taking a UDP input and resending it once raw via IPv6 multicast, and once in HLS
% cvlc -vvv udp://@:4013 --ttl 60 --sout '#duplicate", dst=std, dst=std,mux=ts,dst=/path/to/stream-########.ts>>>
This page is part of official VLC media player Documentation (User Guide • Streaming HowTo • Hacker Guide • Modules)
Please read the Documentation Editing Guidelines before you edit the documentation
Permission is granted to copy, distribute and/or modify this document under the terms of the GNU General Public License as published by the Free Software Foundation; either version 2 of the License, or (at your option) any later version.