- How to Install Linux on VMware ESXi using ISO Image File from vSphere
- Select a Datastore
- Datastore Browser
- Upload Linux ISO File to DataStore
- Create New VM
- Select VM Properties
- Select ISO Install Image for VM
- Launch OS Installer from the ISO File
- If you enjoyed this article, you might also like..
- How to Install Ubuntu 19.04/18.10/18.04/17.10 on VMware ESXi 7.0 (7.0b)
- How to Run Ubuntu 19.04/18.10/18.04/17.10 on VMware ESXi 7.0 (7.0b)
- How to Use Ubuntu on vSphere
- How to Install VMware Tools for Ubuntu Virtual Machine
- Related Articles
How to Install Linux on VMware ESXi using ISO Image File from vSphere
On a VMware ESXi server, you can create a new VM and install a guest OS on the VM using a CD or DVD. For this, you need physical access to the server to insert the installation CD or DVD, which might not be possible, if the server is in a remote datacenter. The quick and easy way is to upload the OS ISO image to VMware datastore, and use that image to install OS on a new VM. The advantage of this method is that you don’t need physical access to the VMware ESXi server. This tutorial explains how to upload ISO image, and use that to install guest OS on a new VMware VM.
If you are new to VMware, read this tutorial: VMware Virtualization Fundamentals – VMware Server and VMware ESXi
Select a Datastore
If you have VMware ESXi servers running in your IT infrastructure, you should first Install VMware vSphere on your local machine, which is required to manage the remote VMware ESXi server. First, login to your VMware vSphere client, and from the left side panel, click on the ip-address of the resource pool at the top. If you expand this ip-address, you’ll see all existing individual VMs. Don’t click on the individual VM, instead click on the top-level which has the ip-address as shown below.
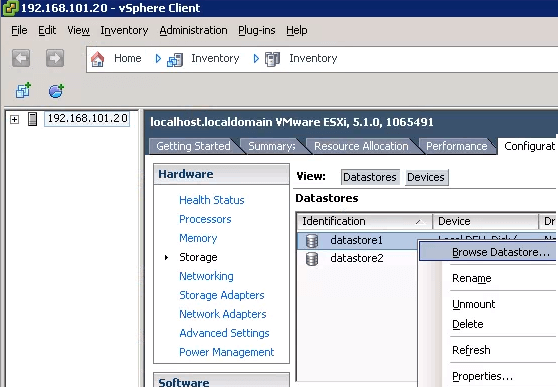
Next, select the “Configuration” Tab on the right panel. Now, under the hardware section, select “Storage”. This will display all the datastores available on this VMware server as shown below. From here, select a datastore where you want to upload your ISO image. You can select any datastore from this list, which has enough free space to store the ISO image that we are going to upload. Once a datastore is selected, right-click and select “Browse Datastore” as shown in the previous picture. In this example, we have selected “datastore1”.
Datastore Browser
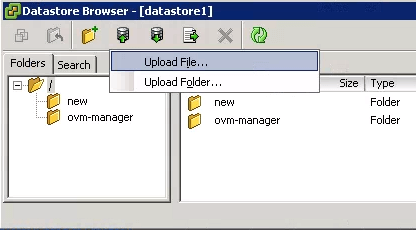
This will launch the datastore browser as shown below. Select the “Upload” icon on the top toolbar in this browser. This will display two options: 1) Upload File 2) Upload Folder. Select “Upload File” as shown above. This will give a warning message indicating that if the file already exists, it will be overwritten, click “Ok” for this.
Upload Linux ISO File to DataStore
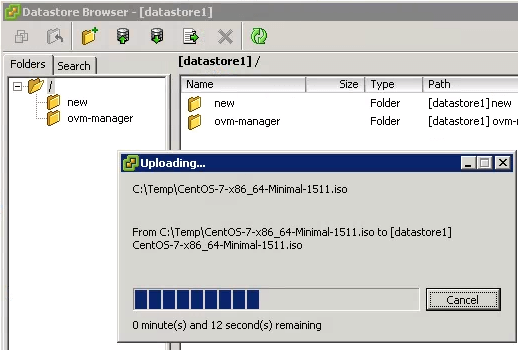
From vSphere, select the ISO image that is located on your local machine. This ISO image will be uploaded to the ESXi datastore. In this example, I want to install CentOS 7. So, I downloaded the CentOS 7 ISO image to my local machine. I will select this ISO image, and upload it to the datastore as shown below. Once the ISO image is uploaded, you’ll see it listed in the datastore browser.
Create New VM
Next, from the vSphere, create a new VM. To create a new VM follow this instruction: How to Create Virtual Machine from vSphere Follow the above instruction, and perform all the steps until step#7. Until this point, we have only created a empty VM template and have not yet installed guest OS.
Select VM Properties
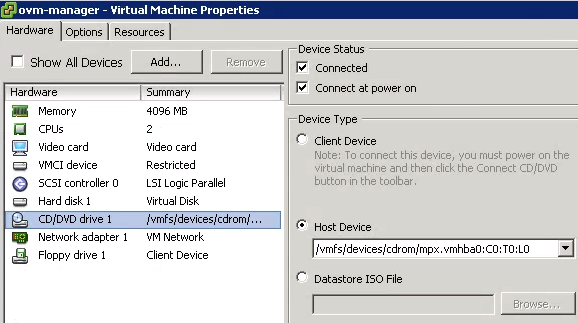
Next, select the new VM that you’ve created, and go to “Summary” tab, and click on “Edit Settings” from the Commands panel. This will display the Virtual Machine Properties as shown below. Select the “CD/DVD Drive 1”, on the Device Type, this will have the “Host Device” radio button selected as shown below. The value in this host device will display the CDROM. This indicates that currently CD/DVD Drive is the selected media for installation of new Guest OS.
Select ISO Install Image for VM
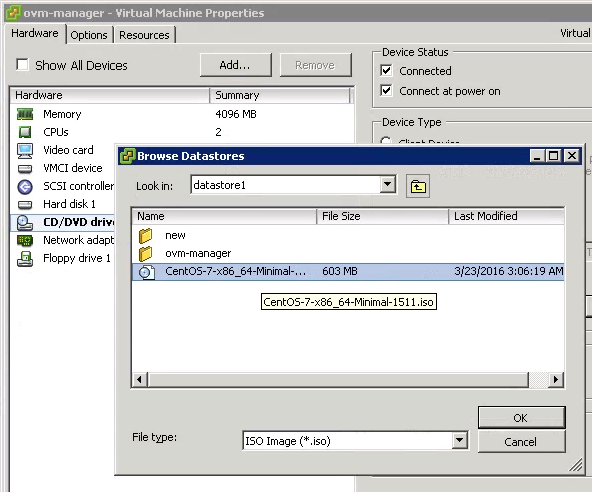
Now, under the Device Type, select the “Datastore ISO File” radio button, and click on “Browse”, and select the datastore where you uploaded the ISO image. In this example, I’ll select “datastore1”, as I uploaded the CentOS7 installation ISO file to that datastore. This will display the ISO image that we earlier uploaded to the Datastore. Select the ISO image and click OK as shown below.
Launch OS Installer from the ISO File
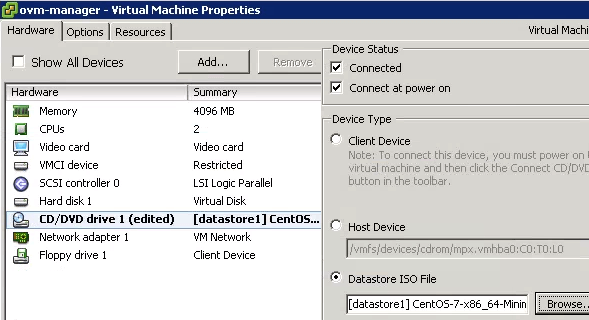
After the above change, in the new VM Properties, we’ll see “CD/DVD Drive1” says “edited”, and this will also show that we are now using the “Datastore ISO File”, and will display the name of the selected ISO file as shown below. Finally, select the VM, and click on Power-Off and Power-On, which will restart the VM. Click on the “Console” tab, which will now display the CentOS 7 installation screen, as it is now launching the ISO image of the CentOS 7 installation from the datastore.
If you enjoyed this article, you might also like..
Comments on this entry are closed.
“click on the ip-address of the resource pool at the top.” Resource pools do not have IP address. They have name. Resource Pool is a way to control resource allocation to VMs by away of limits and shares. Also, real world uses FQDN of the host to add it to vCenter. To create a new VM, you can right click on a 1) Datacenter
2) Cluster
3) Resource Pool
4) Host and select “New Virtual Machine” “First, login to your VMware vSphere client”
You don’t login to your vSphere client. You use your vSphere client to login to a vCenter or directly to an ESXi host. From the screenshot, I can see you login to the host.
Can I assume thats using Windows as the host OS? In my cloud computing class, in EPIC fasion, I failed to install vSPehere6 EXSi data server, on Ubuntu. I eventually attempting so many different changes in the implementation the potential host system crashed and I lost more than 50,000 lines of code, and 75 Gb’s of unbacked up (or sparsley backed up data) I widh you had this 4 weeks ago I would of had time to pick your brain
GeoWade, ESXi is bare metal Hypervisor. It is installed directly on the physical server. For testing and lab purpose, it can be installed on top of hosted virtualization like VMware Workstation or on top of ESXi itself. This is called Nested Virtualization.
Hi,
Thanks for sharing. We can also install the OS without uploading the image to local store, but from your desktop itself, thus saving storage on local disk.
Here is the procedure..
1. Right click on VM > Edit settings > Options > Boot options > Tick Force BIOS setup
2. Power on the VM and change the boot order CDROM being the first & save the settings, no reboot yet.
3. Now click on the CD icon and click “Connect to ISO image on Local disk”
4. Browse your desktop folder and Select the image
5. Now reboot the VM
hey, in step 4 of the VM creation also we are specifying the OS. what is that doing/contributing to the vm? what if is selected windows in step 4 of vm creation and mounted centos from data store to cd drive? thanks in advance 🙂
How to Install Ubuntu 19.04/18.10/18.04/17.10 on VMware ESXi 7.0 (7.0b)
![]()

Last Updated: March 31, 2023 | VMware Workstation | Tolga Bagci
In this article, we will examine how to setup Ubuntu 17.10 / 18.04 / 18.10 / 19.04 on a virtual machine on vSphere ESXi 7.0 (7.0b).

How to Run Ubuntu 19.04/18.10/18.04/17.10 on VMware ESXi 7.0 (7.0b)
VM ESXi is a Hypervisor Type 1 product and therefore needs to be installed on a physical server. By running multiple virtual machines on ESXi server, you can get rid of server costs.
For more information about ESXi, check out what is VMware ESXi, vSphere, and vCenter. It is recommended to install the ESXi on a server, but you can use and test it in a test environment with a virtualization software. Otherwise, using ESXi with virtualization programs is illogical.
In our previous articles, we installed Windows operating systems with ESXi. In this article, we will install Ubuntu 17.10 which is a popular operating system based on Linux.
If you want to browse our VMware ESXi articles;
If you also want to install Ubuntu 19.04/18.10/18.04/17.10 on VMware Workstation and Hyper-V virtualization programs, take a look at the links below.
How to Use Ubuntu on vSphere
With ESXi 7.0b running on the VMware Workstation Pro virtualization program installed on the Windows 10 Enterprise operating system, follow the instructions below to install Linux system.
Connect to your VMware ESXi server using a web browser and click on the Log in button after you type your username and password.

To create a new VM for Ubuntu, click on Virtual Machines in the left pane and then click Create / Register VM.

In the New VM window, select Create a new VM, and then click the Next button.

Specify the operating system family and version of the Ubuntu VM and click on the Next button.

Select Datastore1 and click Next.

To add the Ubuntu 17.10/18.04/18.10/19.04 ISO file to the VM, click Datastore ISO File from CD/DVD Drive 1.

Once the Datastore Browser is open, select the ISO file and click the Select button.

On the Ubuntu virtual machine settings on VMware ESXi 6.5, enable the Hardware Virtualization and Performance Counters options and click the Next button.

Assign the RAM and HDD values to the Ubuntu VM according to the hardware specifications of your computer. After you specify the 3 GB RAM value, click on the Next button.

The summary information of the VM to be installed on VMware ESXi is as shown below. Click the Finish button to continue.

Run the virtual machine by clicking Power on.

Ubuntu 17.10/18.04/18.10/19.04 installation is starting…

Select your operating language and click the Install Ubuntu button.

Click the Continue button.

To use the entire hard disk space that you assigned to the virtual machine, select Erase disk and install Ubuntu and click the Install Now button.

Click the Continue button to confirm that you want to write the changes on the hard disk.

Continue by choosing the region you live in.

Select your keyboard layout Click the Continue.

Type your Ubuntu user name and specify a new password.

Wait while installing Ubuntu in vSphere…

Restart the system by clicking on the Restart Now button after the installation copies the files.

To reboot the system, press the setup media and press Enter. If the installation media can not be removed, close the virtual machine and open its settings.

Change the option in the place where you added the ISO file as follows.

How to Install VMware Tools for Ubuntu Virtual Machine
Once you have installed Linux operating system, open the Terminal on your desktop and switch to Root access to install VMware Tools. Next, follow the steps below to install VMware Tools.
To install VMware Tools in the Ubuntu virtual machine, execute the following command.
apt-get install open-vm-tools-desktop -y
After installing VMware Tools, restart the virtual machine and do a Full Screen. If the virtual machine is not running in full-screen mode, close the VM and proceed to the next step.

Change the Video Card hardware setting of the Ubuntu machine to Auto-detect settings and click the Save button.

Once you restart the Linux machine, you can use full-screen mode.

You can check the Ubuntu operating system version in Settings / About.

You can watch the following video to install Ubuntu on your server, and also subscribe to our YouTube channel to support us!

Related Articles

TolgaBagci
Hello, I’m Tolga! I am a computer specialist who has been specializing in computer technologies for about 20 years. I provide solutions to problems encountered in many areas such as hardware, system, network, virtualization, server systems, and operating systems, and create relevant content on my website by explaining how to solve these problems. My goal is to be a reliable source of expert, quality, and trustworthy solutions for your computer problems. By following innovations and using the latest technologies, I aim to be successful in my job and provide you with the best service. Don’t hesitate to contact me for any questions or curiosity about technology. Have a nice day, stay up to date 🙂