Extending partitions on Linux VMware virtual machines
Lauren Malhoit explains how she extended her Linux partitions.
We may be compensated by vendors who appear on this page through methods such as affiliate links or sponsored partnerships. This may influence how and where their products appear on our site, but vendors cannot pay to influence the content of our reviews. For more info, visit our Terms of Use page.
I had a couple Zenoss VMware appliances that run Linux that needed to have more space allocated to them. I knew just adding another hard drive wouldn’t solve the issue so I set about finding the least intrusive way to do this and not break the whole VM appliance. If you’ve ever used Zenoss, you know the last thing you want to do is re-configure all of your settings again!
There is some information out there on this, but I found most of it to be hard to understand and didn’t really explain what the steps were. If you’re someone who isn’t used to working with Linux, I imagine it would be almost impossible to change these settings confidently. So, here are the steps I followed to extend my Linux partitions. This only applies to ext3 disks that use the logical volume manager. If you’re running a RedHat, CentOS or other similar Linux distro, this process will work for you.
- Shutdown the VM
- Right click the VM and select Edit Settings
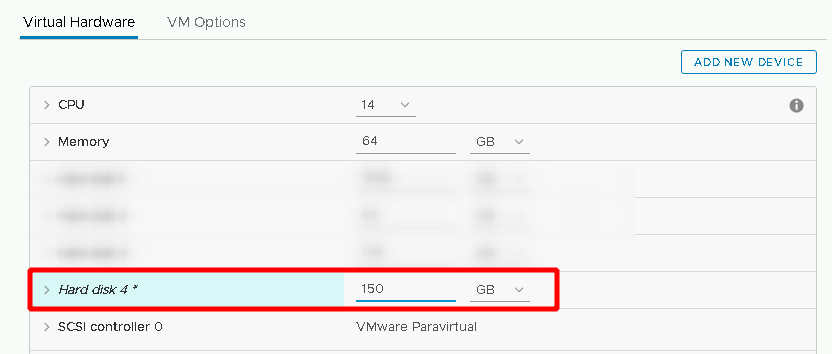
- Select the hard disk you would like to extend
- On the right side, make the provisioned size as large as you need it
- Click OK
- Power on the VM
- Connect to the command line of the Linux VM via the console or putty session
- Log in as root
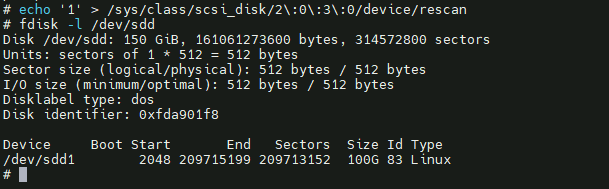
- The fdisk command provides disk partitioning functions and using it with the -l switch lists information about your disk partitions. At the command prompt type fdisk -l
- The response should say something like Disk /dev/sda : xxGB. (See Figure A)
- At the command prompt type fdisk /dev/sda. (if dev/sda is what was returned after step 10 as shown in Figure A)
- Type p to print the partition table and press Enter (also shown in Figure A)
- Type n to add a new partition
- Type p again to make it a primary partition
- Now you’ll be prompted to pick the first cylinder which will most likely come at the end of your last partition (ex: /dev/sda3 ends at 2610). So I chose 2611 for my first cylinder, which is also listed as the default.
- If you want it to take up the rest of the space available (as allocated in step 4), just choose the default value for the last cylinder.
- Type w to save these changes
- Restart the VM
- Log back in as root
- At the command prompt type fdisk -l. You’ll notice another partition is present. In Figure B it is listed as sda4.
- You need to initialize this new partition as a physical volume so you can manipulate it later using the Logical Volume Manager (LVM).
- Now you’ll add the physical volume to the existing volume group using the vgextend command. First type df -h to find the name of the volume group. In Figure C, the name of the volume group is vg_root. Now type vgextend [volume group] /dev/sdaX. (ex: vgextend vg_root /dev/sda4)
- To find the amount of free space available on the physical volume type vgdisplay [volume group] | grep “Free”
- Extend the logical volume by the amount of free space shown in the previous step by typing lvextend -L+[freespace]G /dev/volgroup/volume. (ex: lvextend -L+20G /dev/vg_root/lv_root)
- You can finally expand the ext3 file system in the logical volume using the command resize2fs /dev/volgroup/volume (ex: resize2fs /dev/vg_root/lv_root).
- You can now run the df command to verify that you have more space–df -h
Figure A
Figure B
Figure C
It seems like there are a lot of steps to this process, but it’s actually pretty quick and easy if you can afford to restart your server. So far I haven’t had any issues with dynamically extending the partitions and I’m getting a lot less Zenoss notifications about lack of free space.

Subscribe to the Daily Tech Insider Newsletter
Stay up to date on the latest in technology with Daily Tech Insider. We bring you news on industry-leading companies, products, and people, as well as highlighted articles, downloads, and top resources. You’ll receive primers on hot tech topics that will help you stay ahead of the game.
Vmware extend disk linux
Иногда возникает необходимость расширить диск Linux на лету, когда заканчивается место, а диск нельзя отмонтировать. К счастью, на файловой системе ext4 это возможно.
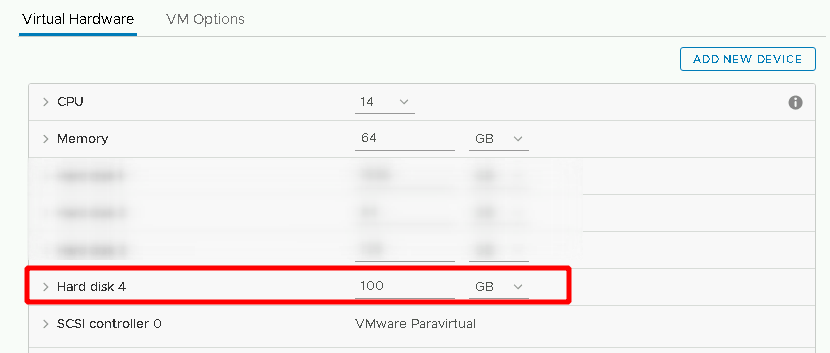
Например, у нас имеется диск /dev/sdd размером 100Гб. На нем раздел /dev/sdd1 и он примонтирован (это может быть даже корневой раздел).

Создадим раздел и отформатируем его
Потом можно нажать n, затем Enter, потом 4 раза Enter (если раздел будет занимать весь диск) и в конце w и Enter.
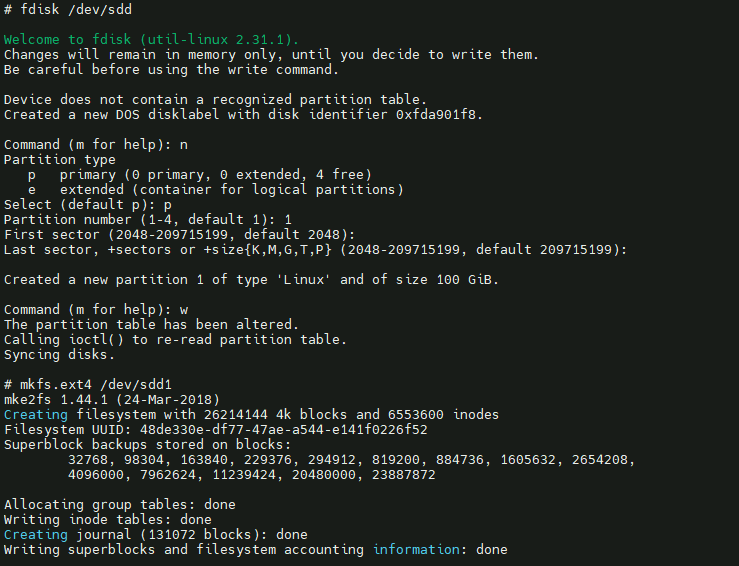
Как видим, на диске теперь есть раздел с файловой системой ext4

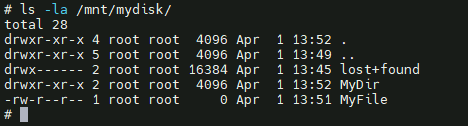
Сейчас создадим директорию, которая будет точкой монтирования и примонтируем раздел.
# mkdir /mnt/mydisk
# mount /dev/sdd1 /mnt/mydisk
Можем создать там файл MyFile и директорию MyDir
# touch /mnt/mydisk/MyFile
# mkdir /mnt/mydisk/MyDir
Расширим диск на лету
Сначала мы перейдем в настройки виртуальной машины и раширим диск, например, на 50Гб.
Посмотрим, что теперь в нашем Linux
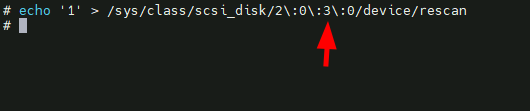
Ничего не изменилось… А все потому, что в линукс необходимо пересканировать диск вручную. Для этого выполним следующую волшебную команду:
# echo ‘1’ > /sys/class/scsi_disk/2\:0\:3\:0/device/rescan
У нас пересканируется диск 3 (счет начиная с 0), потому что у нас sdd.
Расширяем раздел и файловую систему
Конечно, мы могли бы упростить себе жизнь, имея X сервер и используя gparted с графическим интерфейсом для этого. Но мы сделаем это через коммандную строку.
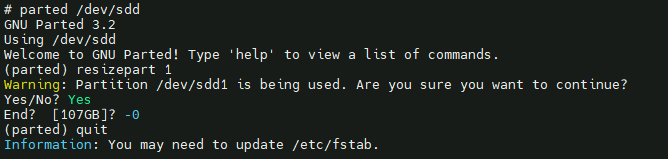
Для расширения раздела будем использовать parted
Затем пишем команду resizepart 1, жмем Enter. Пишем Yes, жмем Enter. И чтобы расширить до конца диск (то есть использовать все свободное пространство на диске) пишем -0 и жмем Enter. Выходим командой quit.
После этого нам необходимо расширить файловую систему. У нас ext4, поэтому мы можем это легко сделать с помощью команды resize2fs

Вот и все! Мы без отмонтирования раздела и перезагрузки хоста расширили раздел на нашем Linux.
How to extend partition in Ubuntu Guest on Vmware
On my Windows 7 host, I am using VMware Player to use Ubuntu. I had initially allocated 20GB and now getting Disk space full errors. So I wanted to extend partition. By searching on forums I saw how to add more disk and used this command to make it 30G —
sudo lvextend -L30G /dev/sda1 But still df command shows that max is 20GB. After more searching it seems that I need to extend partition using gparted. I tried using that but Resize button is disabled. I searched for that and they say that if the partition shows a key image then that partition is active and I cannot change it if it is live. Screenshot After some more search looks like this can also be fixed by using booting the OS from CD or using gparted boot from cd, boot using iso etc etc without giving any clear instructions. Can someone please guide or post any link which has clear instructions including screenshots for a linux layman as to how I can extend the partition.
3 Answers 3
Just did it in a Ubuntu 18.04 Server guest over a Windows 10 host.
The easiest way is, like you already suggested, to boot a live Ubuntu (the regular one, not server) and use GParted.
But first you need to «configure» the VMWare to increase the «virtual disk» size. Follow these steps:
- Shutdown the guest
- Click on «edit virtual machine settings» of that guest
- Click on «Hard disk» and «Expand. «
- A VMware window will let you modify the size, in GBs, of the device. Set the size you want and click on «Expand». After a while it will end.
At this point, the hard drive is bigger than before, but the partition is not. You must resize the partition also. To do so, download the ISO file of the regular Ubuntu distribution. Any other bootable device will also work, but this is the simplest way. Having the ISO downloaded do this:
- In the same configuration window as before, instead of configure the «Hard Disk» go to «CD/DVD» section.
- Make sure the option «Connect at power on» is set.
- Select «Use ISO image file:» and browse to the ISO file you downloaded.
After this, the guest is ready to be launched. Click in «Play virtual machine» and pay attention because you need to press the Esc key very quick to enter the boot menu, just before the VMWARE logo appears. As it were the BIOS of your physical computer.
Tip: After click on «Play. » click again over the VMWare window (black screen at this point) to make sure that the control of keyboard and mouse are in the guest, and not in the host. If you miss this step, you can simply reboot and try again.
Once you see the boot options:
- Press the down arrow key to highlight «CD-ROM Drive» and press enter.
- Ubuntu will start as live session.
- Select appropriate language and «Try Ubuntu».
- Wait until the desktop is loaded.
Look for the GParted tool and launch it. You will see two main blocks, one with some color (yellow probably) and the other in gray. The colored block is your actual partition (probably called /sda/sda1). To resize it do:
- Right click on the yellow block and select «ummount» or «stop»
- Right click again and «resize».
- In the new window, drag the limit of the partition to wherever you want of the free space (gray).
- Click «Ok»
- Don’t forget to click in «Apply changes» in Gparted’s main window before closing, otherwise the operation is not performed.
Once it is finished, you have already a bigger partition, just reboot and you will be good to go. (Don’t forget to uncheck the CD/DVD Connect at power on if it is not needed).