- How to Install VMware Tools in Linux Mint 19.1/18
- How to Configure / Enable VMware Tools in Linux Mint 19.1 / 18
- How to Setup VMware Tools Step by Step
- How to Build Virtual Machine Tools for Linux Mint 18
- How to Transfer a File Between Physical Computer and Virtual Machine
- Final Word
- Related Articles
- Как установить VMware Tools на Debian/Ubuntu/Linux Mint
- Как установить VMware Tools на Debian/Ubuntu/Linux Mint
- 9 thoughts on “ Как установить VMware Tools на Debian/Ubuntu/Linux Mint ”
- Добавить комментарий Отменить ответ
- Рубрики
- соц сети
- Архив новостей
- Свежие записи
- Свежие комментарии
How to Install VMware Tools in Linux Mint 19.1/18
![]()

Last Updated: June 18, 2022 | VMware Workstation | Tolga Bagci
In this article, we will build VMware Tools for Linux Mint 19.1 installed on a virtual machine using VMware Workstation.
How to Configure / Enable VMware Tools in Linux Mint 19.1 / 18
With the VMware Workstation virtualization program, after installing Linux operating system, the first thing you need to do is to install VMware Tools.
On Linux systems, you can install VMware Tools for VMware Workstation using two methods.
- You can install it with VM software software that is available on VMware Workstation.
- You can download VM software by using commands from the terminal.
In this post, we will build VM software through the terminal. Installing VM Tools with Terminal is sometimes more useful. Because in some cases, installing VM Tools on Workstation can lead to errors.
In our previous article, we implemented Linux Mint installation with VM. You can browse Linux Mint setup from the following link.
In this article, we will install VMware Tools for Linux virtual machine, which is installed on the VMware Workstation virtualization program. And finally, we’ll test how to make a file transfer between the virtual machine and the physical computer.
How to Setup VMware Tools Step by Step
The latest version of Mint is 19.1 Tessa. After installing Linux Mint on Workstation, the first thing you should do is to install VMware software. With VM software, you can use your VM more efficiently. You can also use the machine in full-screen mode.
Follow the steps below to build VM software on Linux Mint 19.1 step by step.
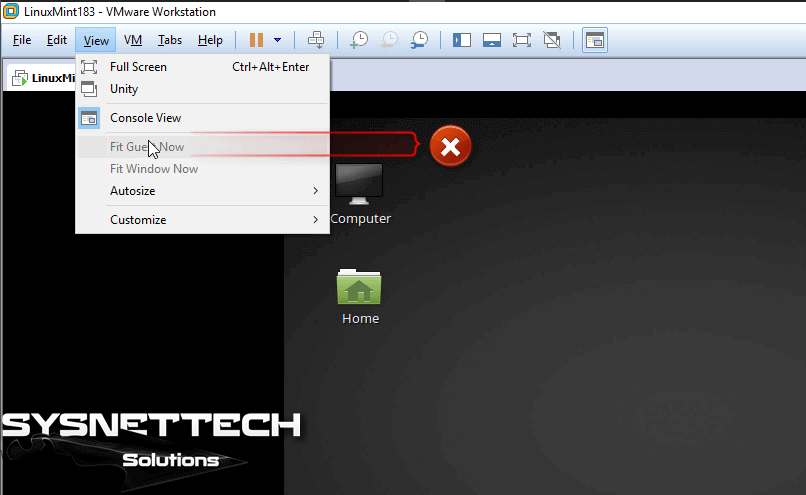
After running your Mint virtual machine, you will see that View / Fit Guest Now is disabled. This is because you have not installed VM software.
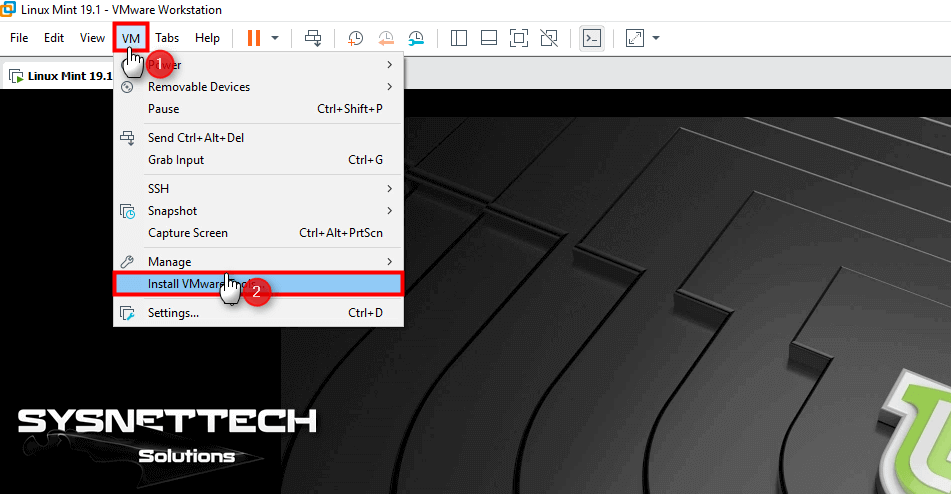
To start the setup, click VM / Install VMware Tools.
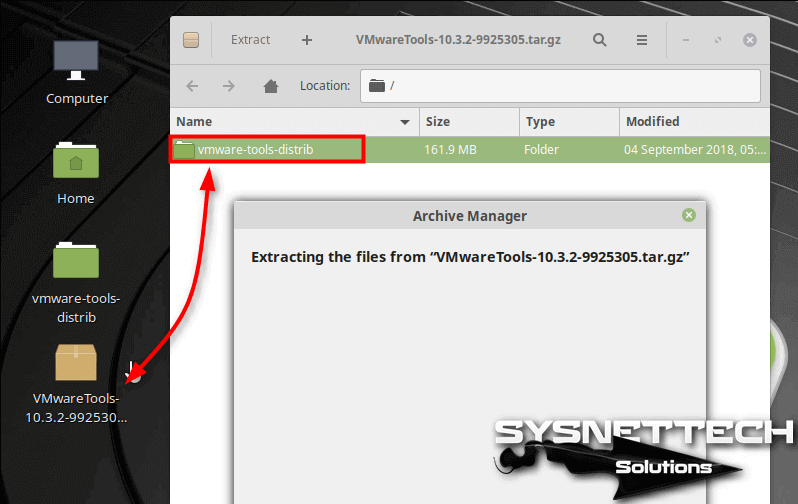
Once the image file is mounted on the system, drag and drop the VMwareTools.tar.gz file to the desktop.

Then open the VMwareTools.tar.gz file and drag and drop the vmware-tools-distrib folder to the desktop.
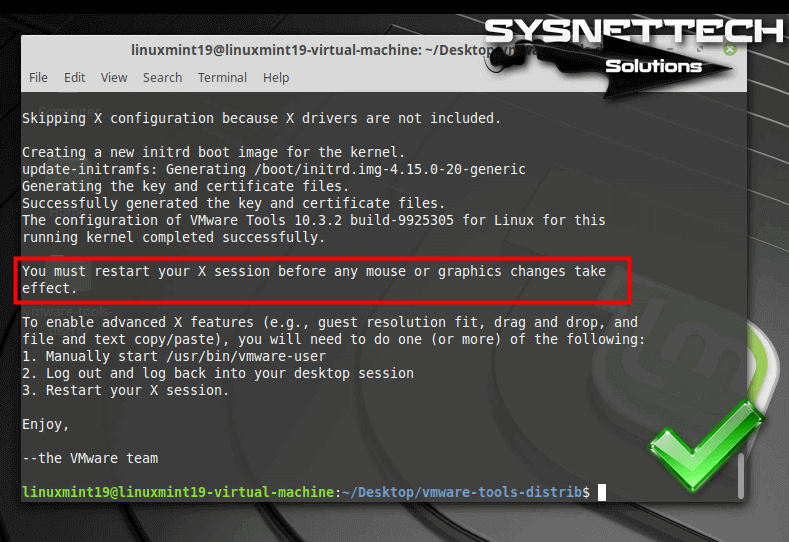
You will make the setup with vmware-install.pl file in the VMware-Tools-Distrib folder.

On the virtual machine, open Terminal and list the vmware-tools-distrib folder. To start the setup, execute sudo ./vmware-install.pl in Terminal. Press the Enter button repeatedly to complete the setup.
sudo ./vmware-install.pl 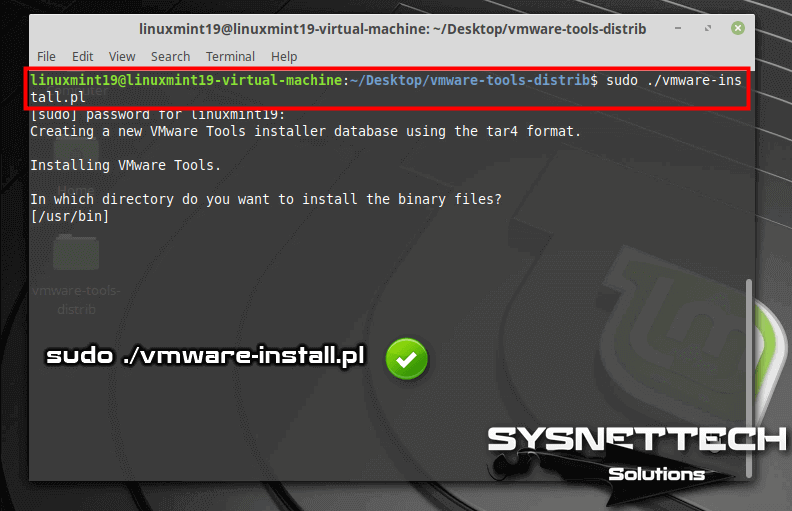
After the Linux VM Tools setup is complete, restart the virtual machine.
Restart your Linux Mint system.

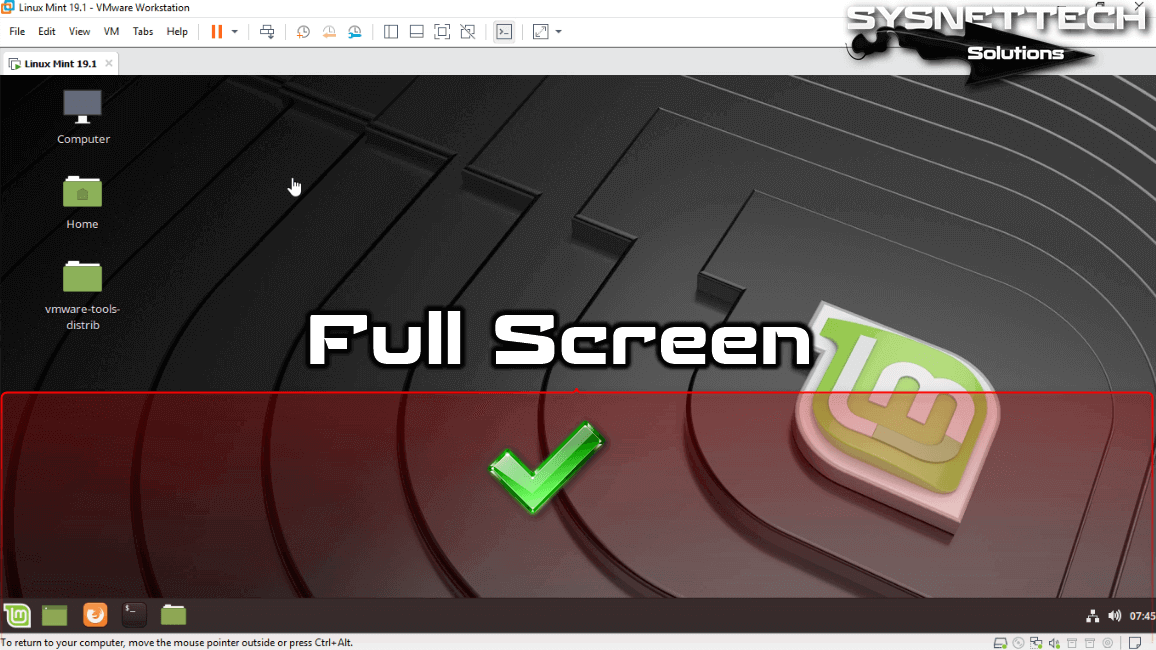
After installing VMware Tools, you can now set up your virtual machine into full-screen mode. To do this, click View / Fit Guest Now.

You can now use your virtual machine as a full screen and transfer files with your physical computer.
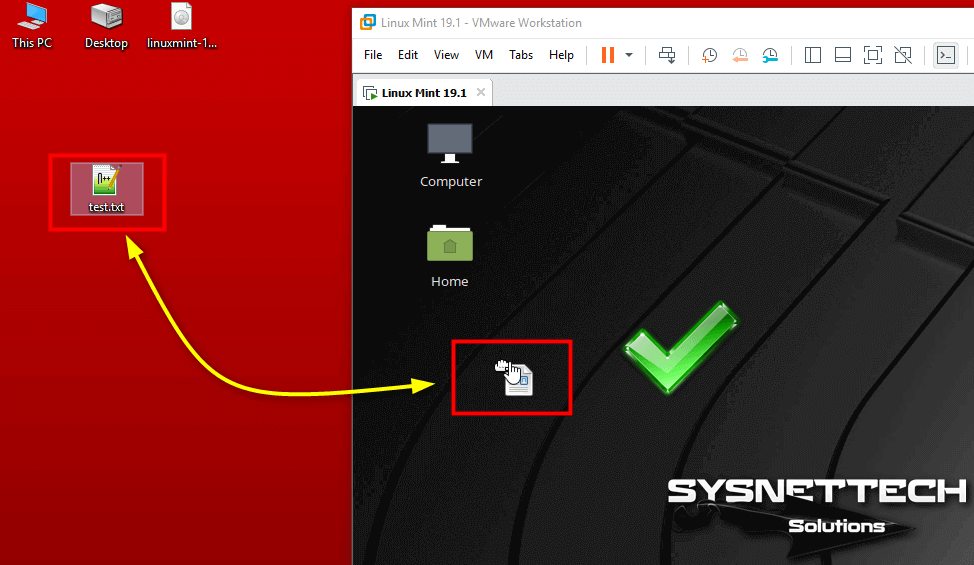
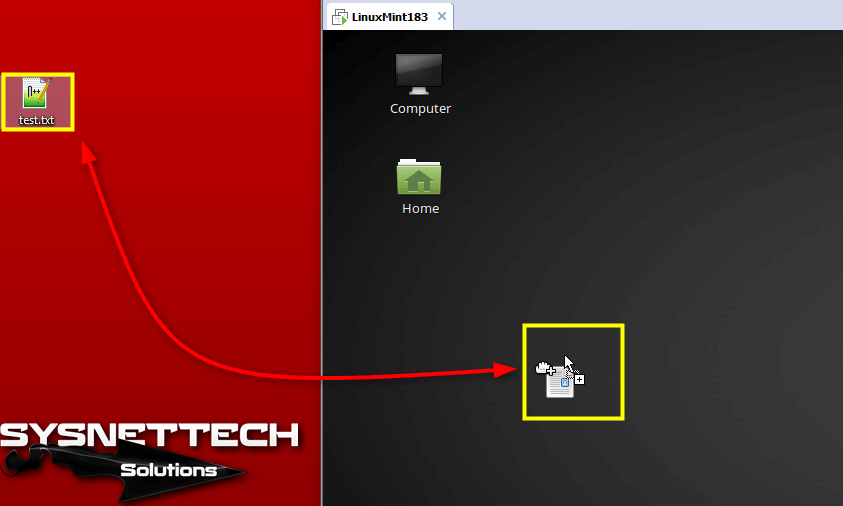
Create a new text document on your Host and test whether the file copy process works by dragging and dropping it to the desktop of your virtual machine.
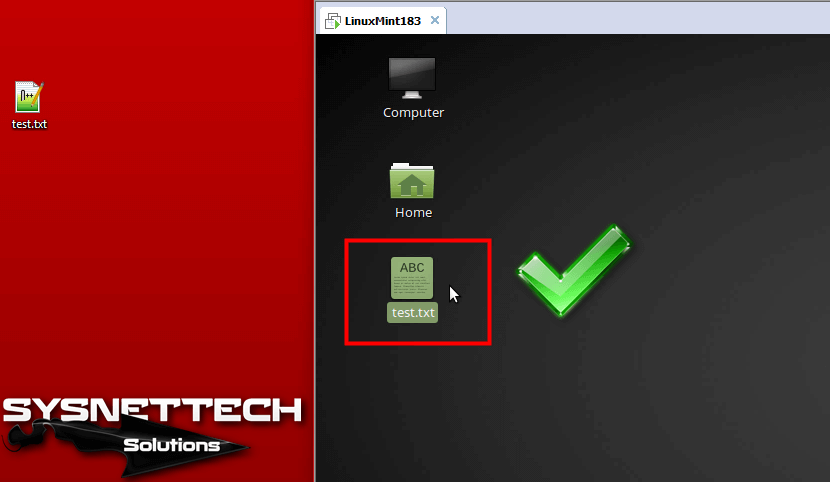
As with the image below, the file copy process between Host and virtual machine will be done successfully.
The setup of VM Tools on the latest version of Linux Mint 19 (Tessa) is the same as the above steps. You can watch the video below to build VM Tools on it!
How to Build Virtual Machine Tools for Linux Mint 18
After setting up VMware Tools, you will be able to use the virtual machine in full-screen mode. In addition, you can transfer files between your computer and the virtual machine and also use hardware devices such as USB 3.0, Webcam.
Run Mint on VM and then check whether the Fit Guest Now option in View is active. As you can see in the image below, you can see that VM Tools is not installed for VM.
For Mint VM software, first open the Terminal on your desktop.

Ping any site to check the internet connection. For example, you can use the ping -c 3 www.google.com command.
ping -c 3 www.google.com
To update existing software packages, run sudo apt-get update.

To download and build the VM software, execute the following command.
sudo apt-get install open-vm-tools-desktop -y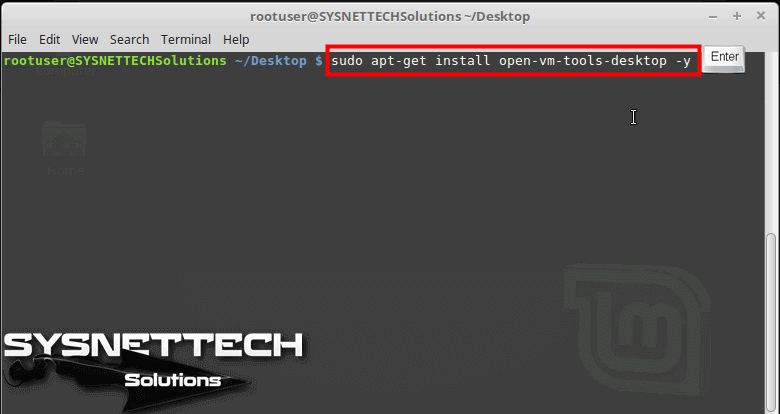
Now, restart the Mint 18/19 virtual machine using the shutdown -r now command.

After restarting the Mint 18/19 virtual machine, you can see that the Fit Guest Now option is active. Click Fit Guest Now to expand the virtual machine’s display.

After clicking Fit Guest Now, the virtual machine screen resolution will be as follows.

How to Transfer a File Between Physical Computer and Virtual Machine
After installing VMware Tools, you can transfer files between the physical computer and the machine. You can transfer a file by following the steps below.
Create the test.txt file on the physical computer and drag and drop the file to the Mint machine.
The generated test.txt file has been successfully copied to the machine!
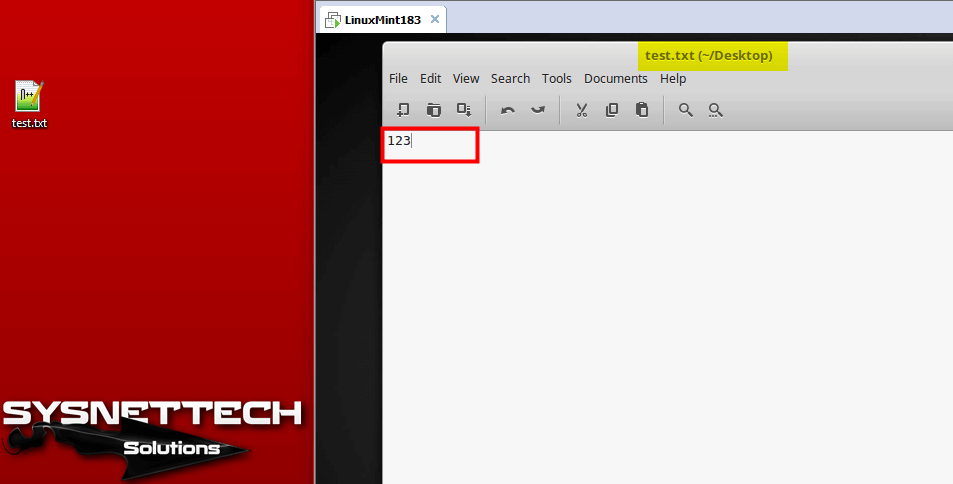
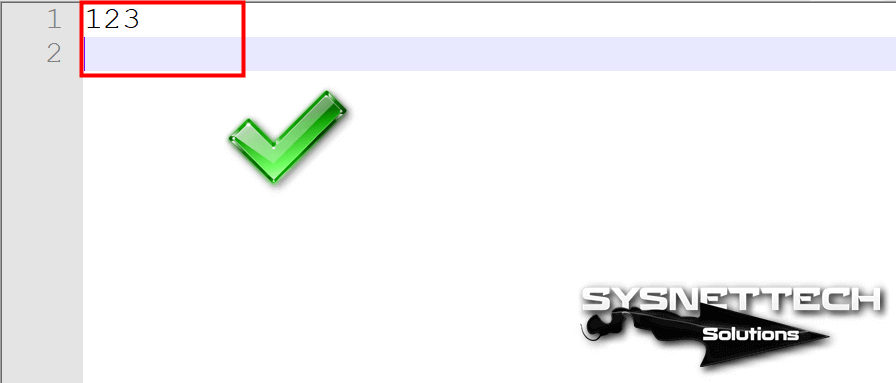
Open the test.txt file on the machine and type 123 in it. And then save the file by clicking on the Save button.
Drag the test.txt file from the machine to the host machine and click on Replace the file in the destination.
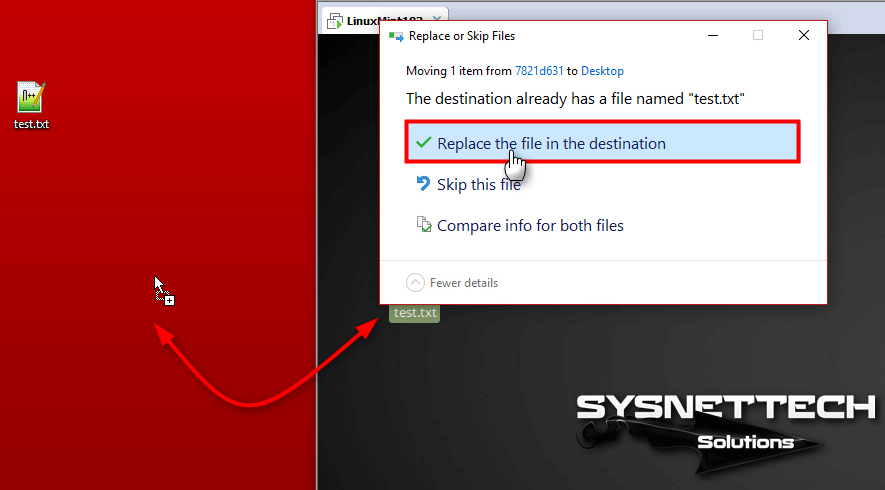
On the physical computer, open the file test.txt and you can see from the following image that the content of the file changed.
You can watch VM Tools installation video for the VM installed on VM Workstation 14.1.1 Pro.
Final Word
In this article, we have installed the VM Tools software required for VM virtual machines through the terminal. Thanks for following us!
Related Articles

TolgaBagci
Hello, I’m Tolga! I am a computer specialist who has been specializing in computer technologies for about 20 years. I provide solutions to problems encountered in many areas such as hardware, system, network, virtualization, server systems, and operating systems, and create relevant content on my website by explaining how to solve these problems. My goal is to be a reliable source of expert, quality, and trustworthy solutions for your computer problems. By following innovations and using the latest technologies, I aim to be successful in my job and provide you with the best service. Don’t hesitate to contact me for any questions or curiosity about technology. Have a nice day, stay up to date 🙂
Interesting: Linux 20: Drag and Drop from client desktop to host desktop works. Maximizing screen works.
But, hooking up a shared folder doesn’t.
And VMware Fusion doesn’t think the tools are installed. Reply
Как установить VMware Tools на Debian/Ubuntu/Linux Mint
Как установить VMware Tools на Debian/Ubuntu/Linux Mint
Это очень важно установить VMware Tools на вашу гостевую операционную систему. Инструменты VMware Tools обеспечивает поддержку, необходимую для общих папок и для операций перетаскивания.
Установщики для VMware Tools для Windows, Linux, FreeBSD, и NetWare гостевых операционных систем встроены в VMware Workstation в виде файлов ISO-образ.
Первым что нужно сделать, так это обновить систему и ядро, выполнив команду ниже:
# apt-get update && apt-get upgrade # apt-get install build-essential && apt-get install linux-headers-`uname -r`
Если получите ошибку, то можно настроить это дело по другому и я все собрал вручную ( скачал и запустил скрипт), вы можете прочитать это в статье Как установить VMware Tools на CentOS/RedHat/Fedora.
После того как установите все это, нужно перейти:
Запустить VMware->перейти во вкладку VM-> и выбрать Install VMware Tools…
Затем нужно узнать где ( на каком разделе) лежит скачанный архив и его нужно будет смонтировать:
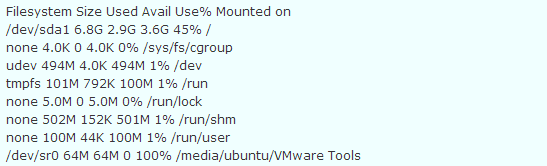
смотрим где лежит архив и нужно смонтировать раздел
Мы уже увидели нужный нам раздел, осталось смонтировать его:
# mount /dev/sr0 /media/ubuntu/VMware\ Tools
Обратный слеш между словами означает все навсего пробел. После монтирования нужно перейти в раздел для дальнейшей установки:
# cd /media/ubuntu/VMware\ Tools/ # ls # cp VMwareTools-9.2.0-799703.tar.gz /usr/local/src && cd /usr/local/src # tar -xzf VMwareTools-9.2.0-799703.tar.gz
Переходим в нужную директорию:
В этой папке лежит уже готовый скрипт, осталось его только запустить.
Сама установка займет некоторое время. Тема «Как установить VMware Tools на Debian/Ubuntu/Linux Mint» завершена. Если возникли вопросы, пишите, помогу всем.
9 thoughts on “ Как установить VMware Tools на Debian/Ubuntu/Linux Mint ”
Здравствуй(те)! Только только установил Linux Ubuntu Mate (на виртуальную машину. ) Надо устанавливать VMWaere Tools И получаю рекомендацию:
В этой папке лежит уже готовый скрипт, осталось его только запустить.
1
# ./vmware-install.pl
И что делать «чайнику» ? 🙂 Может как то по другому запустить? Не командой?
Данный файл: vmware-install.pl Я то его вижу. А запустить? Опыт то есть только в Windows.
# apt-get install open-vm-tools
# echo cups enabled >> /usr/sbin/update-rc.d
# echo vmware-tools enabled >> /usr/sbin/update-rc.d
# apt-get install gcc make linux-headers-$(uname -r)
# ln -s /usr/src/linux-headers-$(uname -r)/include/generated/uapi/linux/version.h /usr/src/linux-headers-$(uname -r)/include/linux/
# mkdir /mnt/vmware
# mount /dev/cdrom /mnt/vmware/
# cp -rf /mnt/vmware/VMwareTools* /tmp/
# cd /tmp/
# tar zxpf VMwareTools-*.tar.gz
# cd vmware-distrib/
# ls
# ./vmware-install.pl
# apt-get install xserver-xorg-input-vmmouse
# reboot Так же, если не поможет, попробуй еще 1 вариант:
$ cd ~
# apt-get install git gcc make linux-headers-$(uname -r)
# git clone https://github.com/rasa/vmware-tools-patches.git
# cd vmware-tools-patches Далее, установите VMware Tools ISO, нажав кнопку «Install VMware Tools» из соответствующего меню. После того, как VMware Tools ISO был присоединен к виртуальной машине, скопируйте установщик в папку загрузок, а затем запустить скрипт установки: # cd ~/vmware-tools-patches
# cp /media/cdrom/VMwareTools-9.9.0-2304977.tar.gz downloads/
# ./untar-and-patch-and-compile.sh
Установил Vmware Tools , но ничего не произошло , ни экран не поменялся ни копипаста не работает , при новом запуске снова предлагает установить пакет по новой. Подскажите что делать ? может эти дополнения еще как то включить отдельно ?))
Если делал все как у меня в инструкции, то должно работать — проверено на моей виртуальной машине. Попробуй еще раз произвести установку, но более внимательней 🙂
Спасибо большое, я редко где оставляю комментарии, потому что лень. Но тут мне эта статься реально помогла, и даже с первого раза =)) Спасибо еще раз
Добавить комментарий Отменить ответ
Этот сайт использует Akismet для борьбы со спамом. Узнайте, как обрабатываются ваши данные комментариев.
Рубрики
- Arch Linux (167)
- Commands (36)
- Debian’s (635)
- Administration tools Ubuntu (37)
- Backups Debian’s (7)
- Database в Ubuntu (58)
- Games (игры) (1)
- Monitoring в Debian и Ubuntu (49)
- Virtualization в Ubuntu / Debian/ Linux Mint (41)
- Docker (22)
- Kubernetes (6)
- KVM (4)
- OpenVZ (3)
- Vagrant (5)
- VirtualBox (6)
- ArgoCD (1)
- Concourse (1)
- Gitlab (1)
- Jenkinks (4)
- Spinnaker (1)
- Apache (32)
- Cherokee (1)
- FTP-services (5)
- Lighttpd (1)
- Nginx (26)
- PHP (27)
- Proxy для Debian’s (2)
- Tomcat (4)
- Панели управления в Ubuntu/Debian/Mint (24)
- Установка и настройка почты на Ubuntu/Debian (12)
- Хранилища (clouds) (2)
- Administration tools freeBSD (19)
- Database во FreeBSD (52)
- Monitoring во freeBSD (37)
- Virtualization во FreeBSD (22)
- VoIP (1)
- Установка Web сервисов (91)
- Установка и настройка почты (6)
- Установка из ports (пакетов) (19)
- Установка из sorce code (исходников) (23)
- Непрерывная интеграция (CI) (27)
- Database в MacOS (36)
- Monitoring в Mac OS (31)
- Security (безопасность) (12)
- Virtualization в Mac OS (30)
- Docker (19)
- Kubernetes (6)
- Vagrant (5)
- VirtualBox (5)
- ArgoCD (1)
- CircleCI (1)
- Concourse (1)
- Gitlab (1)
- Jenkinks (4)
- Spinnaker (1)
- Administration tools CentOS (49)
- Backups RPM’s (4)
- Database в CentOS (68)
- Monitoring в CentOS (67)
- Virtualization в CentOS/ Red Hat/ Fedora (42)
- Docker (23)
- Kubernetes (6)
- KVM (5)
- OpenVZ (2)
- Vagrant (5)
- VirtualBox (6)
- VMWare (3)
- ArgoCD (1)
- Concourse (1)
- Gitlab (1)
- Jenkinks (4)
- Spinnaker (1)
- Apache (35)
- Cherokee (1)
- DNS (3)
- FTP (10)
- Nginx (33)
- PHP (34)
- Proxy для RedHat’s (2)
- Tomcat (2)
- Voice (2)
- Панели управления в CentOS/Red Hat/Fedora (27)
- Прокси сервер на CentOS/RHEL/Fedora (4)
- Установка и настройка почты на CentOS/RHEL/Fedora (14)
- Хранилища (clouds) (1)
соц сети

Архив новостей
Свежие записи
Свежие комментарии
- Глеб к записи Установка Adobe Flash Player в Debian/Ubuntu/Mint
- Максим к записи Заблокировать User Agents используя Nginx
- Денис к записи Как включить EPEL репозиторий на CentOS
- Гость к записи Закомментировать/Раскомментировать строки vi/vim в Unix/Linux
- Sergey к записи Установка и настройка OpenVPN сервера на Debian/Ubuntu/Linux Mint