- Восстановление RAID 10 массива
- One Reply to “Восстановление RAID 10 массива”
- Raid 10 восстановление
- How to Recover Data and Rebuild Failed Software RAID’s – Part 8
- RAID Testing Scenario
- Setting up RAID Monitoring
- Simulating and Replacing a failed RAID Storage Device
- Recovering from a Redundancy Loss
- Summary
Восстановление RAID 10 массива
Поломался однажды RAID10 массив. Как обычно, все произошло внезапно: однажды перезапустили сервер, и получили «(что-то там) … not found». С поврежденным (degraded) массивом сервер стартовать отказался. Массив работал на полусофтовом-полухардварном псевдоконтроллере материнской платы Intel. Физически все жесткие диски оказались здоровыми, хотя для нижеописанного это не критично.
Далее следует описание восстановления информации с массива из серии «с помощью швейцарского перочинного ножа», т.е. без применения изощрённых средств восстановления. Если конкретно, понадобится компьютер с любым *nix и интерпретатором python3. Можно, конечно, воспользоваться программами вроде R-Studio, однако, по-моему это слишком простая задача для них.
Итак, делаем следующее. Открываем в бинарном редакторе все 3 диска и выбираем из них пару striped дисков, т.е. на которых чередующимися блоками составляют весь массив (как RAID 0). Делаем образы обоих жестких дисков в файлы с помощью замечательной утилиты dd по типу
dd if=/dev/sdX of=/tmp/vY.hdd bs=32M
В итоге получаем два больших файла v0.hdd, v1.hdd. С самими HDD далее не работаем.
Снова открываем с помощью бинарного редактора какой-нибудь из образов и определяем размер stripe-элемента (chunk size). Сделать это не сложно даже «невооружённым взглядом»: ищется несколько этих кусков с чёткими границами. Легче всего это сделать на файле с вразумительным содержимом, или даже на любом — если свободное место (почти) заполнено нулями. В нашем случае размер stripe оказался 64K. При этом на одном из образов в начальном секторе сразу обнаружился MBR, а во втором нечто совсем не похожее на MBR. Так стал понятен порядок stripe от разных дисков.
Осталось почти ничего: брать поочередно chunks куски с разных дисков, складывать их последовательно и получить образ всего массива. Пишем для этого элементарный скрипт на питоне:
#!/usr/bin/python3 """RAID0 recovery utility.""" dev0 = '/tmp/v1.hdd' dev1 = '/tmp/v0.hdd' DEV_OUT = '/tmp/out.hdd' # stripe 64k STRIPE = 64 * 1024 MAX_COUNT = 500 * 2**29 // STRIPE MAX COUNT if __name__ == '__main__': f0 = open(dev0, 'rb') f1 = open(dev1, 'rb') f_out = open(DEV_OUT, 'wb') offset = 0 while offset < MAX_COUNT: d0 = f0.read(STRIPE) d1 = f1.read(STRIPE) if d0 and d1: f_out.write(d0) f_out.write(d1) offset += 1 else: print("One of input files are finished. Read: blocks.".format(offset)) break f0.close() f1.close() f_out.close() Запускаем скрипт, оставляем его на ~10 минут и на выходе получаем полный образ диска. Разделы из него успешно монтируются самостоятельно или могут быть (всем образом) записаны на физический HDD. Так, совсем несложно и без дорогого софта, можно восстановить запоротый RAID10-массив.
One Reply to “Восстановление RAID 10 массива”
- Recuva 28.07.2016 at 18:19 На этой странице рассматриваются вопросы создания и обслуживания программного RAID-массива в операционной системе Linux.
Raid 10 восстановление
Развалился в дому raid10 по причине вылета диска. система загружаться отказалась поскольку корень находиться на /dev/md0. Я скачал и записал на болванку liveCD и с него пытаюсь заново собрать RAID. вопрос: после того как диски закончат синхронизироваться у меня запуститься система? и какие дополнительные действия требуется совершить?

после того как диски закончат синхронизироваться у меня запуститься система?
Если загрузчик цел, почему нет?
А вообще так всегда происходить что при вылете одного диска из 10raid система ругается на нехватку устройств и не грузит raid? по мойму если один диск вылетает массив продолжает работать или он работает до первой перезагрузки как-то что-то не логично.

10ый рэйд развалился из-за одного винта? что-то тут не так
Чтобы система загрузилась, нужно чтобы на каждом из дисков, которые перечисляются в списке загрузки BIOS, присутствовал загрузчик в MBR и далее по цепочке загрузки — его часть на активном разделе.

Насколько я понимаю, у ТС'а корень на /dev/md0, а /boot на отдельном разделе (GRUB c софтовой десятки грузиться вроде еще не научился). Так что здесь действительно что-то не так.
система загружаться отказалась поскольку корень находиться на /dev/md0.
Какая система и с какой ошибкой она не запустилась? При определённых насйтроках система должна загружаться и с деградированного массива, лишь бы данные целы были.
Я скачал и записал на болванку liveCD и с него пытаюсь заново собрать RAID. вопрос: после того как диски закончат синхронизироваться у меня запуститься система?
А это смотря как ты его собрал =).
А вообще так всегда происходить что при вылете одного диска из 10raid система ругается на нехватку устройств и не грузит raid? по мойму если один диск вылетает массив продолжает работать или он работает до первой перезагрузки как-то что-то не логично.
Как минимум в debian'е и ubuntu это настраивается при установке mdadm (или dpkg reconfigure mdadm). По умолчанию они с деградированного массива не стартуют.
>> . По умолчанию они с деградированного массива не стартуют.
Да, ибо «какого ?!». Это какое-то негодное умолчание. Надо стартовать.
Да, ибо «какого ?!». Это какое-то негодное умолчание. Надо стартовать.
Видать это сделано специально, чтобы одмины локалхостов _точно_ заметили рассыпавшийся массив =).
Ну разве что. Вообще да, выход из строя второго HDD может стать для них неприятным сюрпризом. Но вот надо ли на них ориентироваться . А уж если ориентироваться, то можно и следилку какую гуёвую сделать за /proc/mdstat. :-)
А уж если ориентироваться, то можно и следилку какую гуёвую сделать за /proc/mdstat. :-)
Ну так-то mdadm сам умеет следить за массивами и слать емейлы админам. Ещё ЕМНИП умеет запускать скрипты при возникновении разных событий, уж тут то возможности ограничиваются только фантазией - от отправки сообщений в джаббер до включения сирены =).

>> Это какое-то негодное умолчание.
Поскольку mdraid может быть построен на разделах (как правило, так и есть), то логично предположить, что на некоторых дисках могут оказаться загрузчики каких-то других ОС, поэтому «родной» ставится только на один диск. Не очень удобно, но разумно. К тому же, в Debian можно «размножить» GRUB по дискам через меню по команде dpkg-reconfigure grub-pc — главное, не забыть это сделать до поломки массива :)
> Поскольку mdraid может быть построен на разделах (как правило, так и есть), то логично
предположить, что на некоторых дисках могут оказаться загрузчики каких-то других ОС
Если дошло до RAID, стало быть, уже загрузилось то, что надо.

> По умолчанию они с деградированного массива не стартуют.
How to Recover Data and Rebuild Failed Software RAID’s – Part 8
In the previous articles of this RAID series you went from zero to RAID hero. We reviewed several software RAID configurations and explained the essentials of each one, along with the reasons why you would lean towards one or the other depending on your specific scenario.
In this guide we will discuss how to rebuild a software RAID array without data loss when in the event of a disk failure. For brevity, we will only consider a RAID 1 setup – but the concepts and commands apply to all cases alike.
RAID Testing Scenario
Before proceeding further, please make sure you have set up a RAID 1 array following the instructions provided in Part 3 of this series: How to set up RAID 1 (Mirror) in Linux.
The only variations in our present case will be:
1) a different version of CentOS (v7) than the one used in that article (v6.5), and
2) different disk sizes for /dev/sdb and /dev/sdc (8 GB each).
In addition, if SELinux is enabled in enforcing mode, you will need to add the corresponding labels to the directory where you’ll mount the RAID device. Otherwise, you’ll run into this warning message while attempting to mount it:
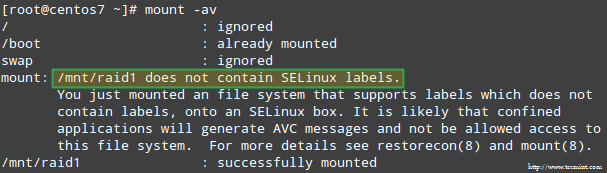
You can fix this by running:
Setting up RAID Monitoring
There is a variety of reasons why a storage device can fail (SSDs have greatly reduced the chances of this happening, though), but regardless of the cause you can be sure that issues can occur anytime and you need to be prepared to replace the failed part and to ensure the availability and integrity of your data.
A word of advice first. Even when you can inspect /proc/mdstat in order to check the status of your RAIDs, there’s a better and time-saving method that consists of running mdadm in monitor + scan mode, which will send alerts via email to a predefined recipient.
To set this up, add the following line in /etc/mdadm.conf:
![]()
To run mdadm in monitor + scan mode, add the following crontab entry as root:
@reboot /sbin/mdadm --monitor --scan --oneshot
By default, mdadm will check the RAID arrays every 60 seconds and send an alert if it finds an issue. You can modify this behavior by adding the --delay option to the crontab entry above along with the amount of seconds (for example, --delay 1800 means 30 minutes).
Finally, make sure you have a Mail User Agent (MUA) installed, such as mutt or mailx. Otherwise, you will not receive any alerts.
In a minute we will see what an alert sent by mdadm looks like.
Simulating and Replacing a failed RAID Storage Device
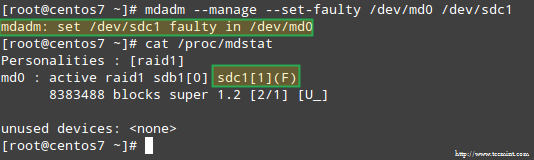
To simulate an issue with one of the storage devices in the RAID array, we will use the --manage and --set-faulty options as follows:
# mdadm --manage --set-faulty /dev/md0 /dev/sdc1
This will result in /dev/sdc1 being marked as faulty, as we can see in /proc/mdstat:
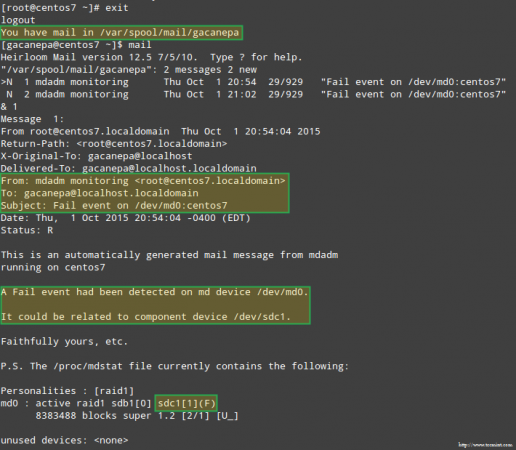
More importantly, let’s see if we received an email alert with the same warning:
In this case, you will need to remove the device from the software RAID array:
# mdadm /dev/md0 --remove /dev/sdc1
Then you can physically remove it from the machine and replace it with a spare part (/dev/sdd, where a partition of type fd has been previously created):
# mdadm --manage /dev/md0 --add /dev/sdd1
Luckily for us, the system will automatically start rebuilding the array with the part that we just added. We can test this by marking /dev/sdb1 as faulty, removing it from the array, and making sure that the file tecmint.txt is still accessible at /mnt/raid1:
# mdadm --detail /dev/md0 # mount | grep raid1 # ls -l /mnt/raid1 | grep tecmint # cat /mnt/raid1/tecmint.txt
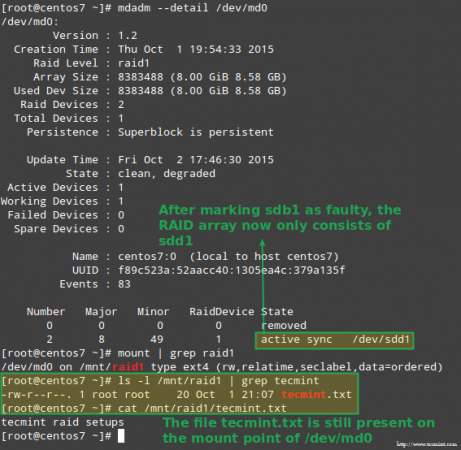
The image above clearly shows that after adding /dev/sdd1 to the array as a replacement for /dev/sdc1, the rebuilding of data was automatically performed by the system without intervention on our part.
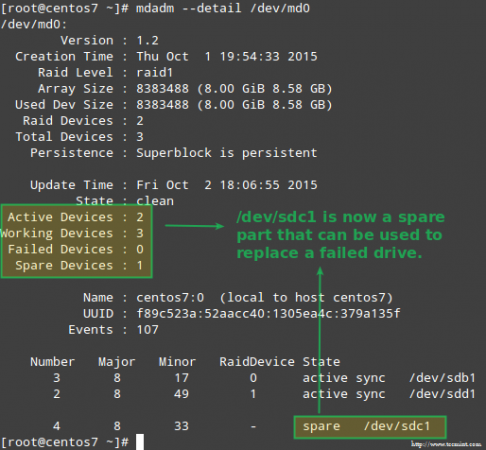
Though not strictly required, it’s a great idea to have a spare device in handy so that the process of replacing the faulty device with a good drive can be done in a snap. To do that, let’s re-add /dev/sdb1 and /dev/sdc1:
# mdadm --manage /dev/md0 --add /dev/sdb1 # mdadm --manage /dev/md0 --add /dev/sdc1
Recovering from a Redundancy Loss
As explained earlier, mdadm will automatically rebuild the data when one disk fails. But what happens if 2 disks in the array fail? Let’s simulate such scenario by marking /dev/sdb1 and /dev/sdd1 as faulty:
# umount /mnt/raid1 # mdadm --manage --set-faulty /dev/md0 /dev/sdb1 # mdadm --stop /dev/md0 # mdadm --manage --set-faulty /dev/md0 /dev/sdd1
Attempts to re-create the array the same way it was created at this time (or using the --assume-clean option) may result in data loss, so it should be left as a last resort.
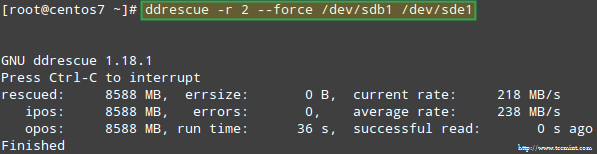
Let’s try to recover the data from /dev/sdb1, for example, into a similar disk partition (/dev/sde1 – note that this requires that you create a partition of type fd in /dev/sde before proceeding) using ddrescue:
# ddrescue -r 2 /dev/sdb1 /dev/sde1
Please note that up to this point, we haven’t touched /dev/sdb or /dev/sdd, the partitions that were part of the RAID array.
Now let’s rebuild the array using /dev/sde1 and /dev/sdf1:
# mdadm --create /dev/md0 --level=mirror --raid-devices=2 /dev/sd[e-f]1
Please note that in a real situation, you will typically use the same device names as with the original array, that is, /dev/sdb1 and /dev/sdc1 after the failed disks have been replaced with new ones.
In this article I have chosen to use extra devices to re-create the array with brand new disks and to avoid confusion with the original failed drives.
When asked whether to continue writing array, type Y and press Enter. The array should be started and you should be able to watch its progress with:
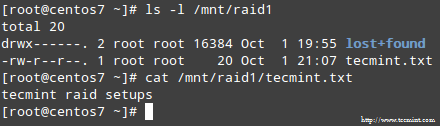
When the process completes, you should be able to access the content of your RAID:
Summary
In this article we have reviewed how to recover from RAID failures and redundancy losses. However, you need to remember that this technology is a storage solution and DOES NOT replace backups.
The principles explained in this guide apply to all RAID setups alike, as well as the concepts that we will cover in the next and final guide of this series (RAID management).
If you have any questions about this article, feel free to drop us a note using the comment form below. We look forward to hearing from you!