- How to set up a VPN on Linux — A guide to installing a VPN on Ubuntu, Kali, and Mint
- Learn more about staying secure online
- Which Linux distro is best for privacy?
- OpenVPN vs IKEv2 vs PPTP vs L2TP/IPSec vs SSTP — Ultimate Guide to VPN Encryption
- Install a VPN’s custom Linux software
- OpenVPN For Linux via NetworkManager
- Installing OpenVPN in Ubuntu GNOME
- Installing OpenVPN directly via the Linux Terminal
- Manually Configure VPN for Linux using PPTP via NetworkManager
- Manually Configure VPN for Linux using L2TP/IPsec
- How to install L2TP/IPsec for NetworkManager
- Manually Configure VPN for Linux using IKEv2
- How to Test a VPN for Linux
- Check your VPN for IP leaks
- VPN Client software implementations
- OpenVPN with GUI for Mac OS X
- OpenVPN with GUI for Win
- References
How to set up a VPN on Linux — A guide to installing a VPN on Ubuntu, Kali, and Mint
Want to set up your VPN with Ubuntu, Kali, or Mint? Then you’re in the right place! In this guide, we’ll walk you through the straightforward process of installing a VPN using its Linux GUI, NetworkManager, and other methods.
We’ll focus on installing a VPN on Ubuntu in this guide, seeing as it’s enduringly popular, but all of our instructions can be applied to Linux Mint, Debian, and Kali (which is based on Debian), and should also provide useful guidelines for folks running different distros.
Learn more about staying secure online
If you want to know more about how you can secure your data, check out the guides below:
Which Linux distro is best for privacy?
OpenVPN vs IKEv2 vs PPTP vs L2TP/IPSec vs SSTP — Ultimate Guide to VPN Encryption
Install a VPN’s custom Linux software
For most operating systems, the easiest way to set up a VPN client is by using the provider’s custom software – and the same is true for Linux! However, very few VPN providers actually offer a custom Linux GUI client, and instead prefer to develop apps for more popular platforms.
Custom Linux GUI clients are typically far easier to set up than their manual counterparts
The good news is that we’ve rounded up and reviewed those services that do include a custom Linux client. You can check them out in the table below or visit our Linux VPN guide for a more in-depth look at each provider.
Custom Linux GUI clients are typically far easier to set up than their manual counterparts, seeing as there’s less configuration required (and handy guides are always available), and are stuffed with more features, too. Our top Linux VPN picks come with benefits like a kill-switch, ad blocking functionality, WebRTC mitigation, and DNS leak protection. Essentially, you’ll be getting a fully-featured VPN experience – just like Windows and Mac users!
From $2.11/month
The best Linux VPN. With dedicated clients for a variety of distros and a full custom client, as well as a kill-switch and ad-blocker. Also offers a 30-day money-back guarantee.
ProPrivacy TrustScore: 10 out of 10 Server locations 84 Free trial No Simultaneous connections Unlimited
From $2.30/month
The best value Linux VPN, with a shiny new GUI app, unlimited simultaneous connections, and superb speeds.
ProPrivacy TrustScore: 9.9 out of 10 Server locations 100 Simultaneous connections Unlimited Free trial Yes
From $0.00/month
The best secure Linux VPN. Offers a sleek custom GUI client and comprehensive protection from leaks and third party snooping, as well as access to geo-blocked content. With a 30-day money-back guarantee.
ProPrivacy TrustScore: 9.8 out of 10 Simultaneous connections 10 Server locations 61 Free trial Yes
From $5.50/month
The best privacy-oriented Linux VPN. An open-source and zero-logs provider that offers Linux users a full GUI client and all the same features available to other platforms, and a 30-day money-back guarantee.
ProPrivacy TrustScore: 9.7 out of 10 Server locations 36 Simultaneous connections 5 Free trial No
From $3.23/month
The best advanced Linux VPN. Its Eddie client is fully-featured with a kill-switch and leak protection, and torrenting is permitted across its entire server network. Also includes a 30-day money-back guarantee.
ProPrivacy TrustScore: 9.6 out of 10 Server locations 21 Simultaneous connections 5
OpenVPN For Linux via NetworkManager
Outside of dedicated clients, probably the easiest way to install and use OpenVPN on most Linux systems is via the NetworkManager daemon.
It is worth noting that AirVPN recommends against using NetworkManager «due to multiple, critical problems». I have not, however, been able to establish any more details regarding this, and most VPNs seem happy to use it.
Installing OpenVPN in Ubuntu GNOME
- Register an account with your chosen VPN provider.
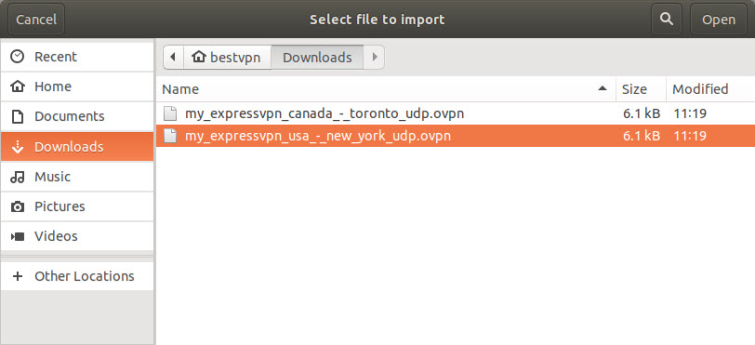
- Download your provider’s .ovpn config files for the servers you wish to connect to. These can often be batch-downloaded as a .zip file, in which case you will need to it unzip before use.
sudo apt-get install network-manager-openvpn-gnome
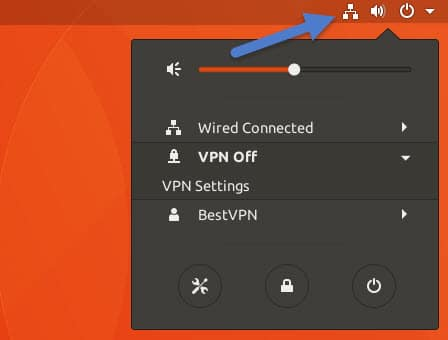 Then go to VPN Off -> VPN Settings -> VPN -> and click the + button.
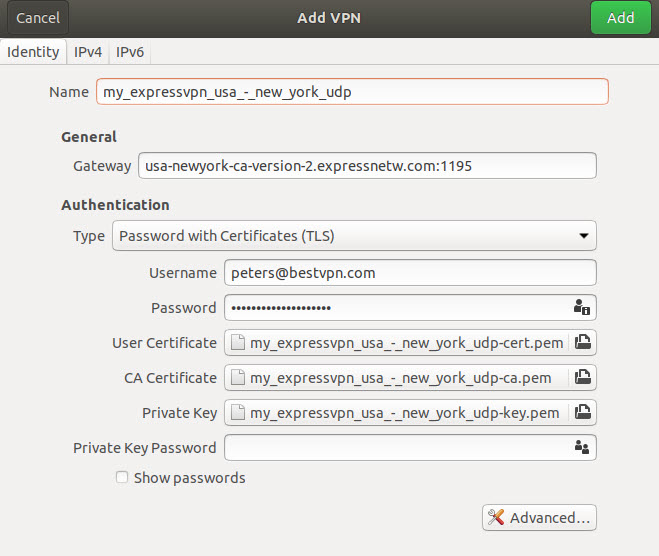
 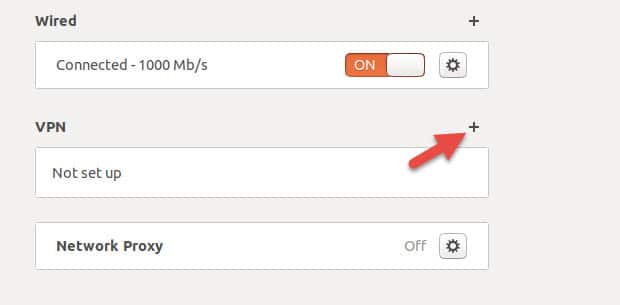 In the Add VPN box, you should see an OpenVPN option. If you don’t see OpenVPN, then restart your PC.
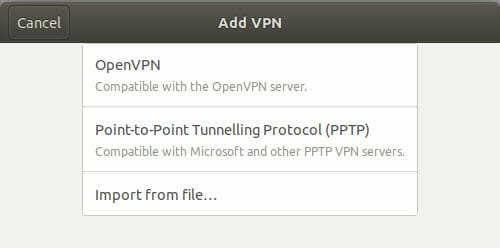
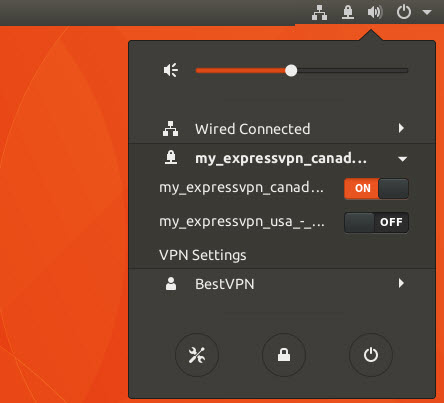
The VPN is now set up. To start it, go to NetworkManager -> VPN off -> and select the server you wish to connect to.
Installing OpenVPN directly via the Linux Terminal
According to AirVPN, using OpenVPN via Linux Terminal is also more secure than using NetworkManager, although I have not been able to confirm this independently or uncover the details.
The OpenVPN package is available in the Debian and many other repositories, but CentOS and RHEL users (for example) will first have to install the EPEL repository into your system.
- Register an account with your chosen VPN provider.
- Open Terminal and install OpenVPN using your usual package manager (such as APT, RPM, or YUM). For example, in Debian-based distros enter: sudo apt-get install openvpn or sudo rpm install openvpn In CentOS 7+ and Fedora 7+ you first have to install the EPEL repository: sudo yum install epel-release Before installing OpenVPN: yum install openvpn It is, of course, always possible to compile from source on any Linux system. Download the tarball here, extract, cd to the top-level of the extracted directory, and type: ./configure make make install
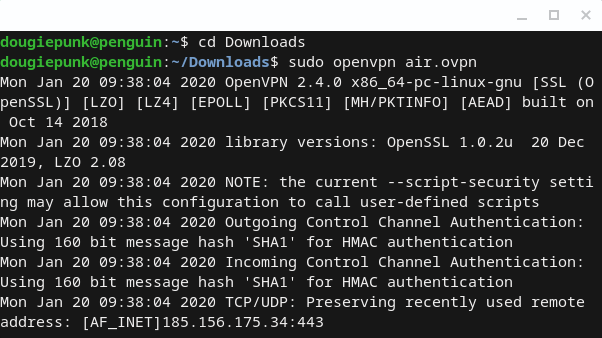
- Use a browser to download some OpenVPN configuration files from your VPN service’s website. Then open Terminal and cd into the directory you downloaded them into. It will make the next step easier if you rename the downloaded .ovpn files into something easy to type.
- In Terminal type: sudo openvpn [openvpn file] You can disconnect from the VPN by closing the Terminal window OpenVPN is running in.
Note that if using OpenVPN directly, DNS requests will not be pushed to the VPN provider’s DNS servers. IP leaks can be resolved by modifying resolvconf to push DNS to your VPN’s DNS servers.
Alternatively, you can manually configure the iptables firewall to ensure all traffic (including DNS requests) must go via the VPN server. This will, at least, ensure all DNS requests are proxied by your VPN. It will also act as a kill switch.
Manually Configure VPN for Linux using PPTP via NetworkManager
PPTP is not a secure VPN protocol, so we generally recommend that you avoid it. NetworkManager comes with PPTP support «out of the box,» however, which can make PPTP a useful «quick and dirty» solution when security is not a high priority.
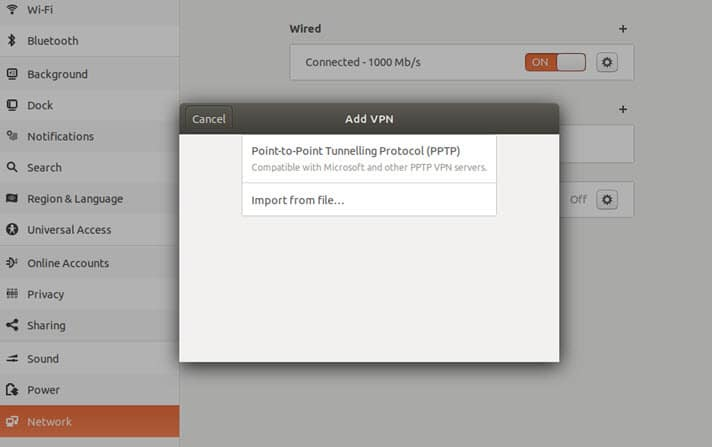
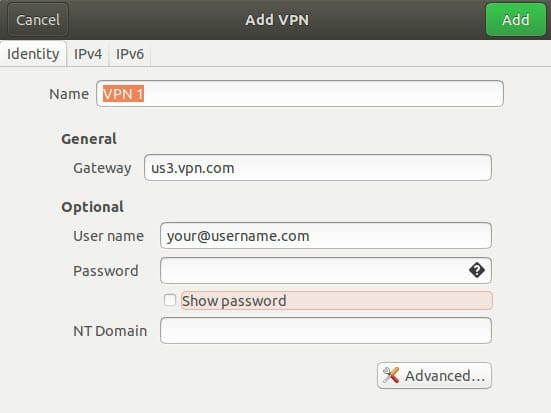
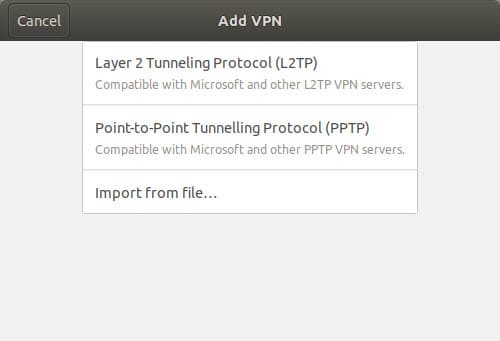
Go to Network Manager -> VPN Settings. Click the + icon next to the VPN box -> Point-to-Point Tunneling Protocol (PPTP):
Fill in the PPTP setting given to you by your VPN. Note that these settings are not specific to Linux, so you can use generic settings or settings given for another platform.
Manually Configure VPN for Linux using L2TP/IPsec
As disused in our Complete VPN Encryption Guide, L2TP is a tunneling protocol that does not provide any encryption or confidentiality to traffic that passes through it, so it is usually implemented with the IPsec authentication suite (L2TP/IPsec).
How to install L2TP/IPsec for NetworkManager
NetworkManager-l2tp is a VPN plugin for NetworkManager 1.2+ which includes support for L2TP/IPsec.
To install, fire up Terminal and enter the following commands:
sudo add-apt-repository ppa:nm-l2tp/network-manager-l2tp
sudo apt-get install network-manager-l2tp
You may be prompted to install additional binaries (e.g. for GNOME), in which case go ahead. Restart your PC and L2TP should now be enabled in NetworkManager.
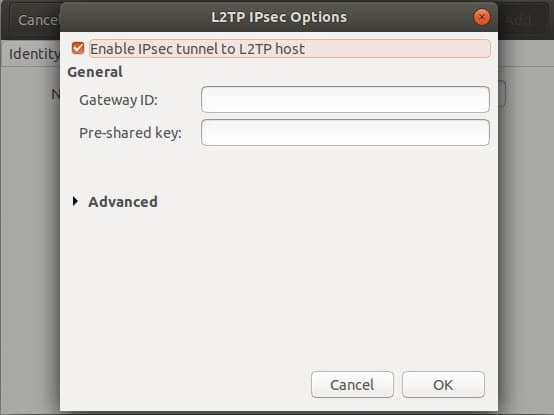
Setup is very similar to using PPTP (see above), except that you will need to enter some additional IPSec authentication details. Again, your VPN should be able to provide these, and generic settings are fine.
Update May 2018: There is currently a bug in xl2tpd which may compromise its use with the IPSec protocol. The issue has already been fixed in Fedora, so I would expect it to be patched in Ubuntu and Debian soon. Please see here for the details and latest updates.
Manually Configure VPN for Linux using IKEv2
IKEv2 is a secure and fast VPN protocol that is rapidly gaining popularity with VPN services. It is supported in Linux via strongSwan. strongSwan packages are available for most versions of Linux, or you can compile it yourself.
How to install IKEv2 for NetworkManager. You can build this from the source, or Debian/Ubuntu users can open Terminal and enter:
sudo apt-get install network-manager-strongswan
In use, the plugin works just like the L2PT NetworkManager plugin described above.
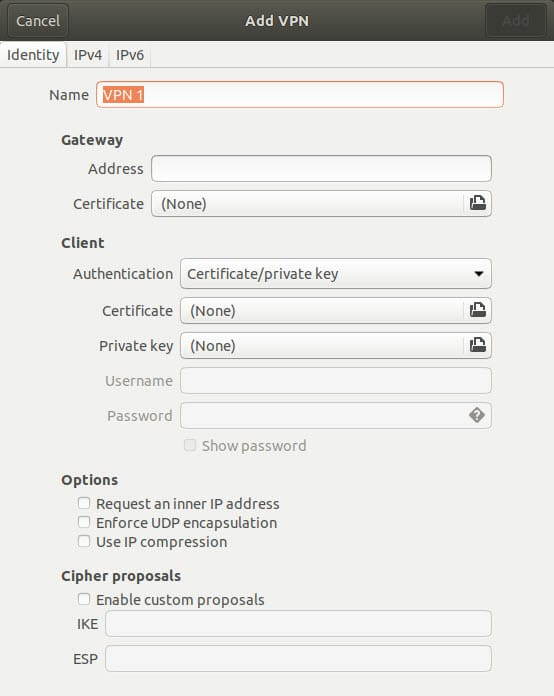
Simply enter the IKEv2 settings provided by your VPN (if it supports IKEv2).
How to Test a VPN for Linux
If using NetworkManager, a small network lock icon in the notification bar lets you know at-a-glance that you are connected.

For further confirmation the VPN is connected and working correctly, you can run an IP leak test…
Check your VPN for IP leaks
Once connected to the VPN (using whatever method), it is a good idea to check for IP leaks.
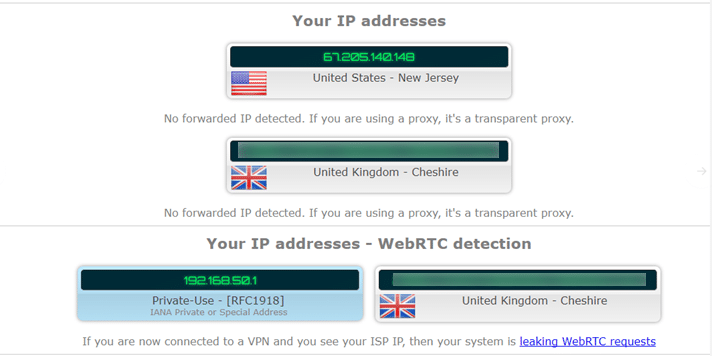
The example above shows a bad case of IPv6 leaks. The IPv4 DNS result correctly shows that I am connected to a VPN server in the US, but the website can see my real UK IPv6 address via both a regular DNS leak and WebRTC. Fail!
For more information about staying secure with a VPN in the UK or US check out the guides below:
VPN Client software implementations
Many Linux distributions including Ubuntu desktop variants come with Network Manager, a nice GUI to configure your network settings. It also can manage your VPN connections. It is the default, but if in doubt make sure you have package network-manager-openvpn installed.
Open the Network Manager GUI, select the VPN tab and then the ‘Add’ button. Select OpenVPN as the VPN type in the opening requester and press ‘Create’. In the next window add the OpenVPN’s server name as the ‘Gateway’, set ‘Type’ to ‘Certificates (TLS)’, point ‘User Certificate’ to your user certificate, ‘CA Certificate’ to your CA certificate and ‘Private Key’ to your private key file. Use the advanced button to enable compression (e.g. comp-lzo), dev tap, or other special settings you set on the server. Now try to establish your VPN.
OpenVPN with GUI for Mac OS X
- Tunnelblick is an excellent free, open source implementation of a GUI for OpenVPN for OS X. Download the latest OS X installer from there and install it. It also is recommended by upstream which would have a alternative on their own
Then put your client.ovpn config file together with the certificates and keys in /Users/username/Library/Application Support/Tunnelblick/Configurations/ and lauch Tunnelblick from your Application folder.
Instead of downloading manually, if you have brew set up on MacOS this is as easy as:
brew cask install tunnelblick
OpenVPN with GUI for Win
First download and install the latest OpenVPN Windows Installer. As of this writing, the management GUI is included with the Windows binary installer.
You need to start the OpenVPN service. Goto Start > Computer > Manage > Services and Applications > Services. Find the OpenVPN service and start it. Set it’s startup type to automatic.
When you start the OpenVPN MI GUI the first time you need to run it as an administrator. You have to right click on it and you will see that option.
There is an updated guide by the upstream project for the client on Windows.