[VPN] How to set up VPN Client in ASUS Router (Web GUI)?
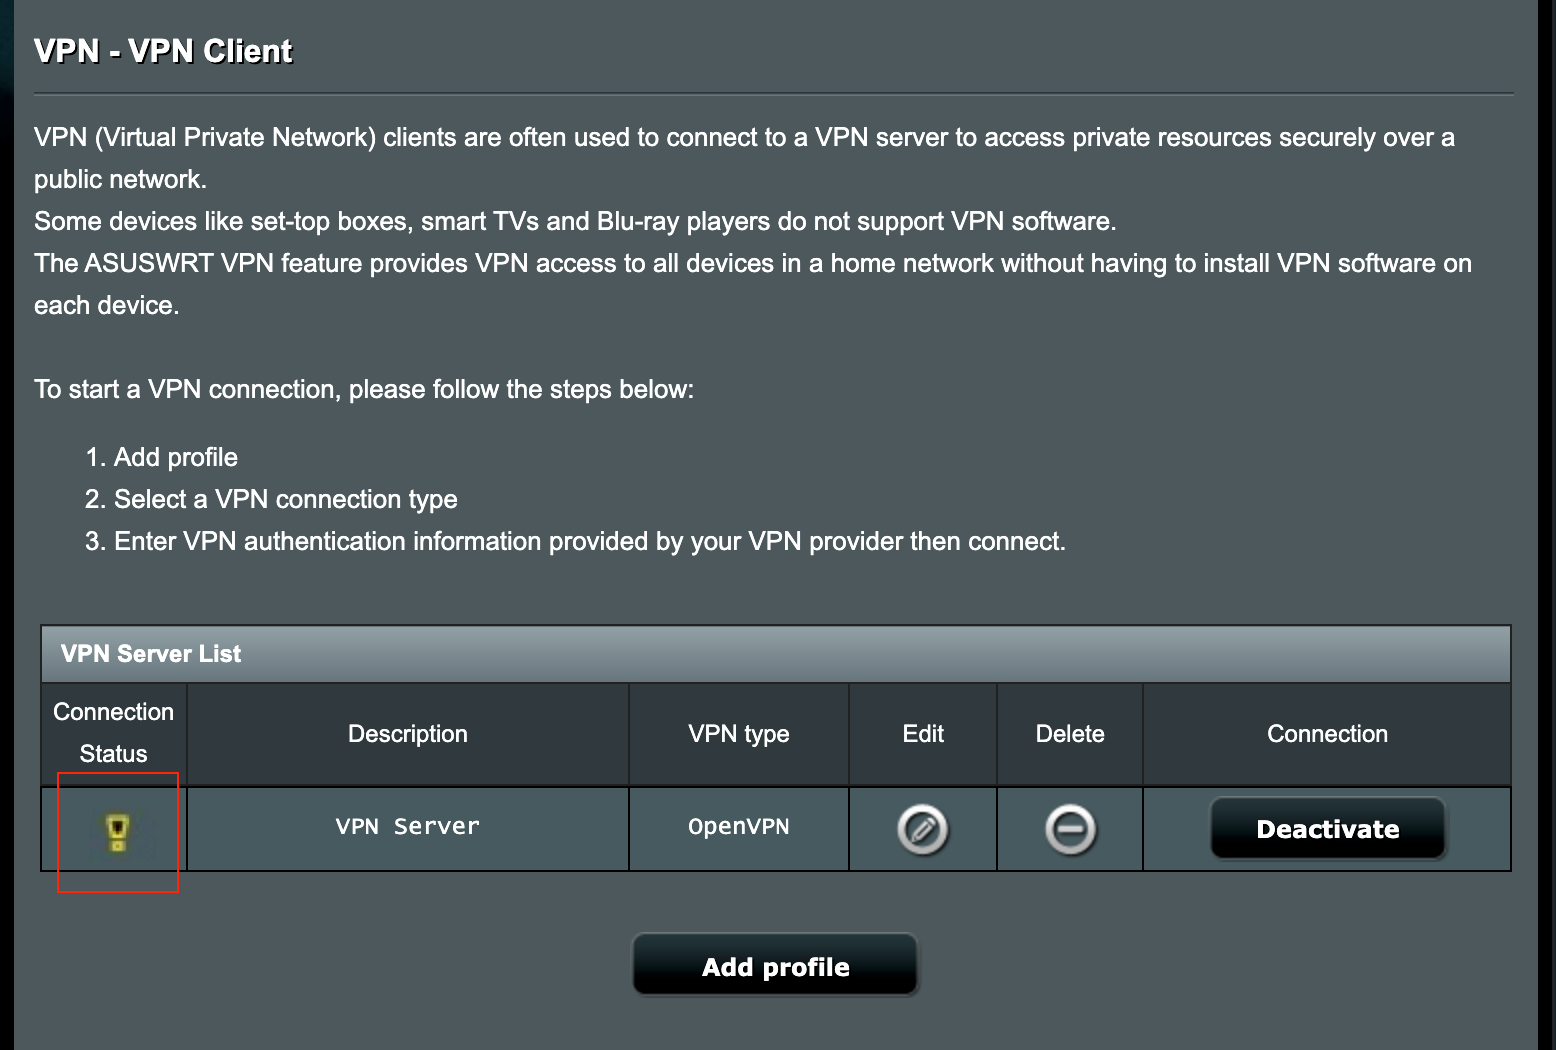
[VPN] How to set up VPN Client in ASUS Router (Web GUI)? What is VPN Client? VPN (Virtual Private Network) clients are often used to connect to a VPN server and allows to access private resources securely over a public network.
Some devices like set-top boxes, smart TVs and Blu-ray players do not support VPN software.
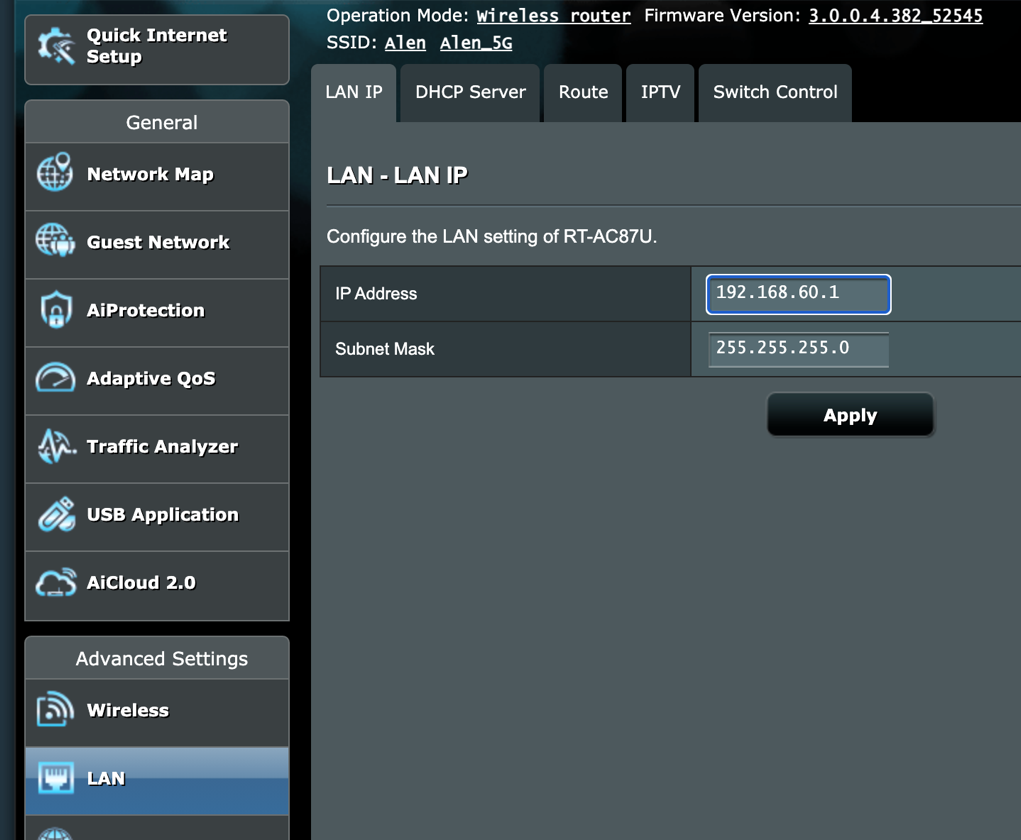
The ASUSWRT VPN feature provides VPN access to all devices in a home network without having to install VPN software on each device. To start a new VPN connection, please follow the steps below: Step 1: How to enter the router’s GUI (ASUSWRT)? Take RT-AX88U as an example. 1-1. Set up your wireless router via wired connection: a. Insert AC adapter of your wireless router to the DC-IN port and plug it to a power outlet. b. Connect your modem to the WAN port of your wireless router with another network cable. c. Insert your modem’s AC adapter to the DC-IN port and plug it to a power outlet. d. Connect your computer to the LAN port of your wireless router with the bundled network cable. 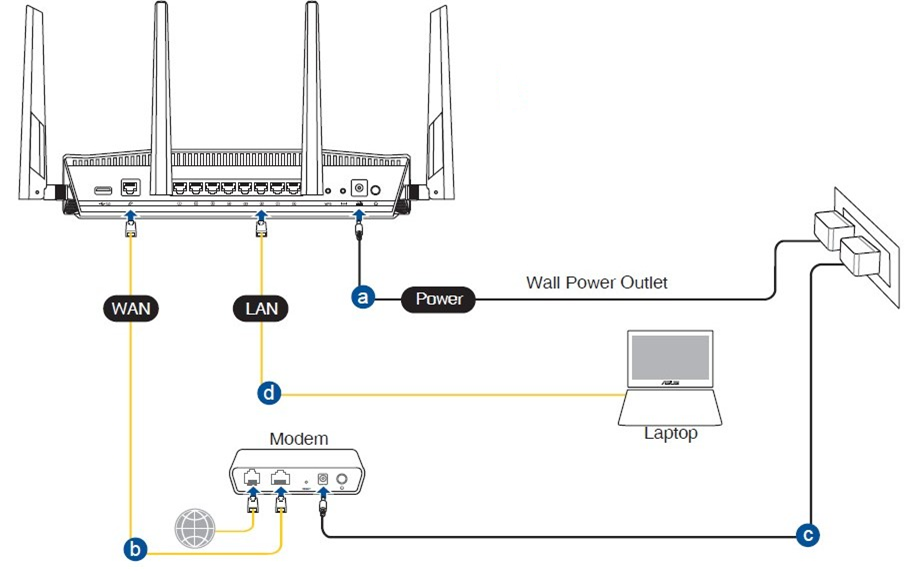

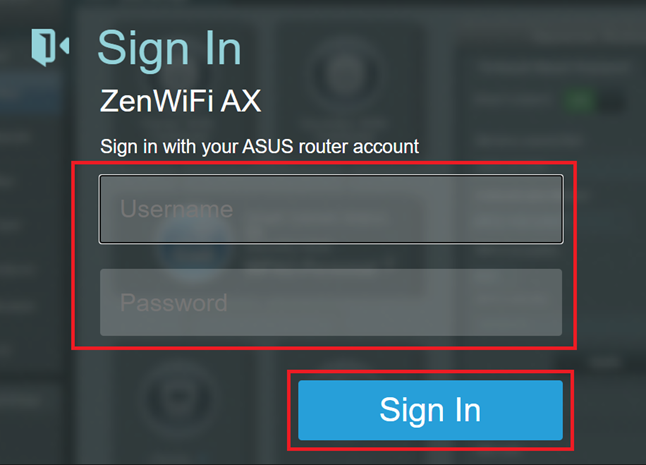
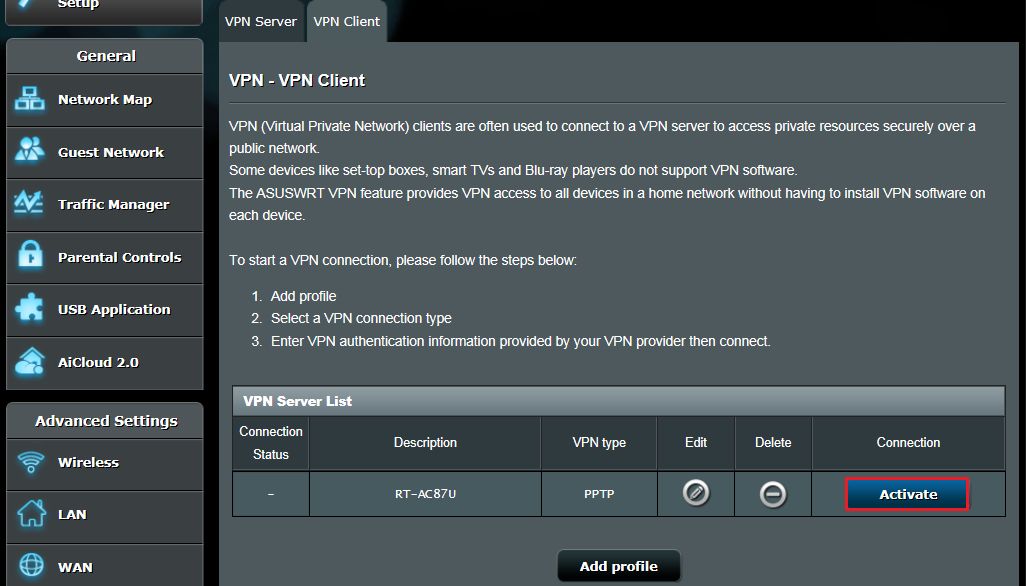
Please refer to [Wireless Router] How to reset the router to factory default setting? for how to restore the router to default status. Step 2: Click [VPN] from the left Advanced Settings > Find [VPN Client] tab and click [Add profile] 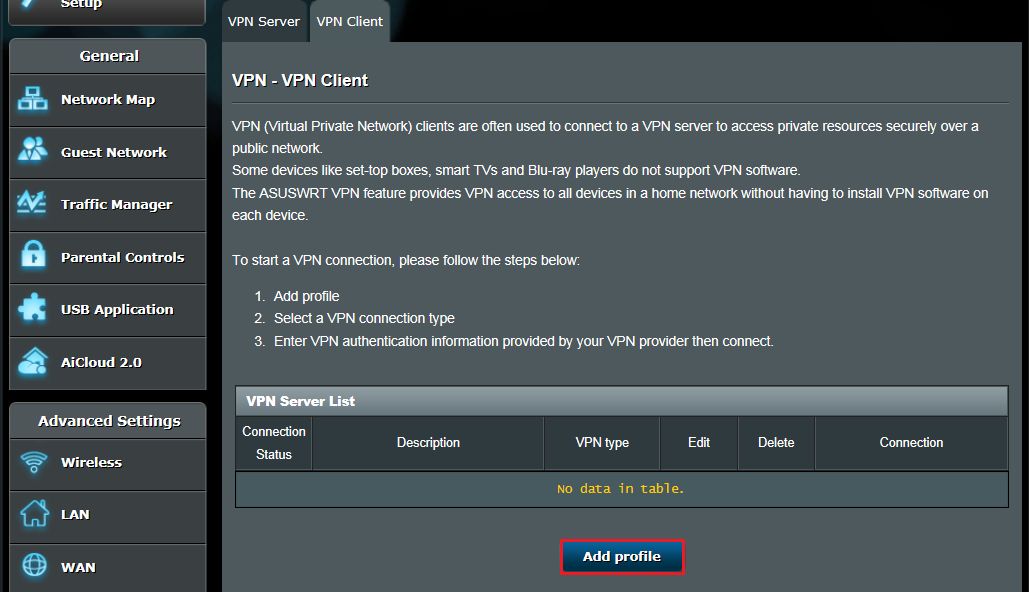
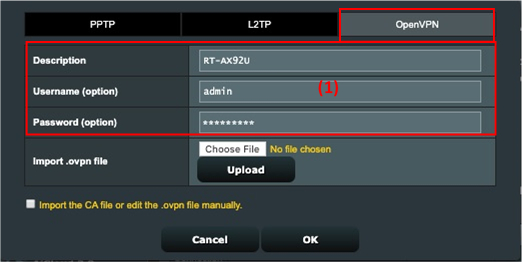
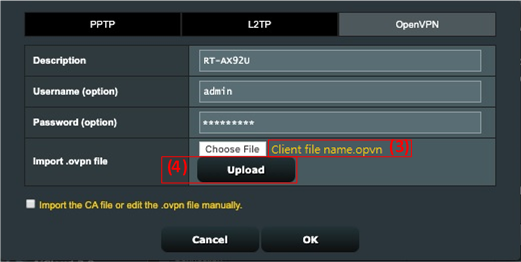
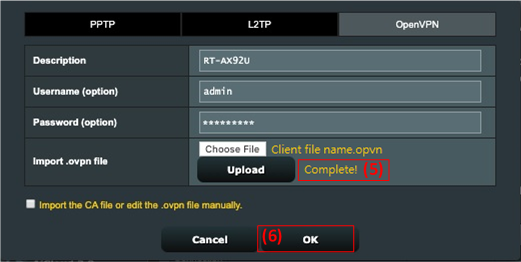
Step 3: Select a VPN connection type: PPTP, L2TP, or OpenVPN. 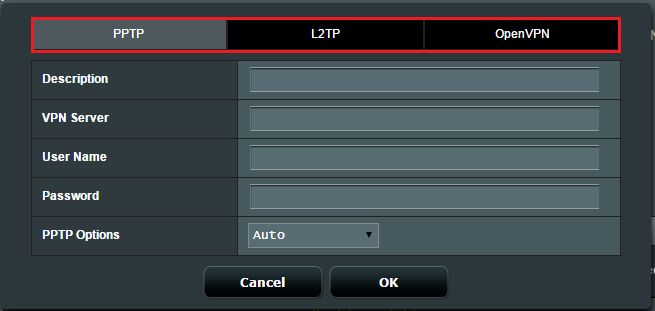
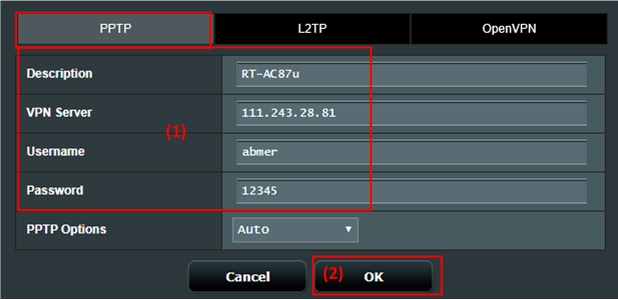
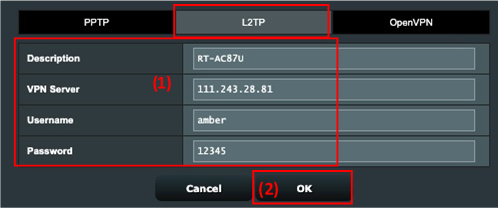



Was this information helpful?
- Above information might be partly or entirely quoted from exterior websites or sources. please refer to the information based on the source that we noted. Please directly contact or inquire the sources if there is any further question and note that ASUS is neither relevant nor responsible for its content/service
- This information may not suitable for all the products from the same category/series. Some of the screen shots and operations could be different from the software versions.
- ASUS provides the above information for reference only. If you have any questions about the content, please contact the above product vendor directly. Please note that ASUS is not responsible for the content or service provided by the above product vendor.
- Brand and product names mentioned are trademarks of their respective companies.
- Phones
- Laptops
- Tower PCs
- Graphics Cards
- Networking
- Motherboards
- Show All Products
- Item_other —>
- Tablets
- Gaming handhelds
- Gaming Networking
- AIOT & Industrial Solutions
- Chassis
- Cooling
- Health & Fitness
- All-in-One PCs
- Business Networking
- Chrome Devices
- Headphones & Headsets
- Mini PCs
- Monitors
- DVD & BluRay Optical Drives
- Projectors
- ROG — Republic Of Gamers
- Tinker Board
- Sound Cards
- Stick PCs
- Commercial
- Commercial_list.Item —>
- Tablets
- Networking
- Motherboard
- Mini PCs
- All-in-One PCs
- Desktops
- Laptops
- Monitors
- Projectors
- Servers & Workstations
- Signage
- Gaming Station
- Data Storage
[Беспроводное устройство] Как настроить мульти-VPN подключение на роутере ASUS?
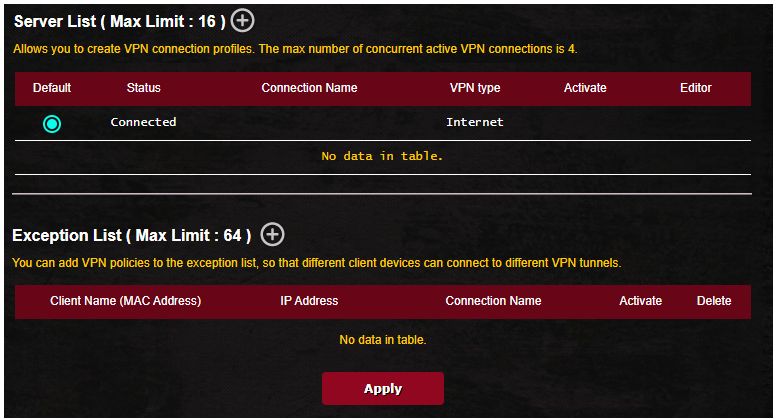
Одновременно в списке серверов допускается до 16 профилей VPN-подключений, максимальное количество одновременных активных VPN-подключений — 4.
В списке исключений можно указать до 64 устройств для установки правил VPN.
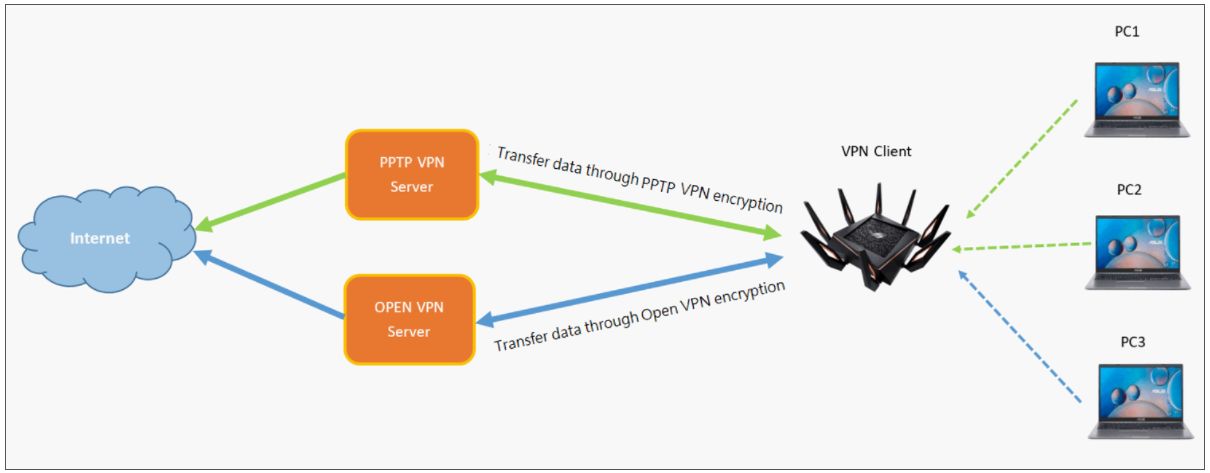
Например, если вы используете GT-AX11000 в качестве VPN-клиента, вы хотите установить VPN-соединение как с сервером PPTP VPN, так и с сервером Open VPN.
ПК 1, подключенный к GT-AX11000, подключен к Интернету через PPTVP VPN, а ПК 2 подключен к Интернету через OPEN VPN, что позволяет использовать VPN Fusion.
Когда GT-AX11000 используется в качестве VPN-клиента, устанавливается только одно зашифрованное VPN-соединение:
Когда GT-AX11000 используется в качестве VPN-клиента, одновременно устанавливаются два VPN-шифрования, что позволяет базовому устройству подключаться через разные VPN-серверы:
VPN-серверы, поддерживаемые беспроводными маршрутизаторами ASUS, различаются в зависимости от модели, поэтому рекомендуется обратиться к руководству пользователя продукта или странице технических характеристик продукта, чтобы убедиться, что ваш маршрутизатор поддерживается.
Например, следующий GT-AX11000 в качестве VPN-клиента подключается как к VPN-серверу PPTP, так и к OPEN VPN-серверу:
Настройте список серверов в VPN Fusion, чтобы установить и включить различные типы профилей VPN-серверов.
Шаг 1. Подключите компьютер к маршрутизатору ASUS через Wi-Fi или кабель Ethernet. Откройте веб-браузер и перейдите к веб-интерфейсу (http://router.asus.com).
Шаг 2. Введите имя пользователя и пароль для входа на странице входа, а затем нажмите [Войти].
Примечание. Если вы забыли имя пользователя и/или пароль, восстановите маршрутизатор до заводского состояния по умолчанию. Пожалуйста, обратитесь к Как сбросить маршрутизатор к заводским настройкам по умолчанию?
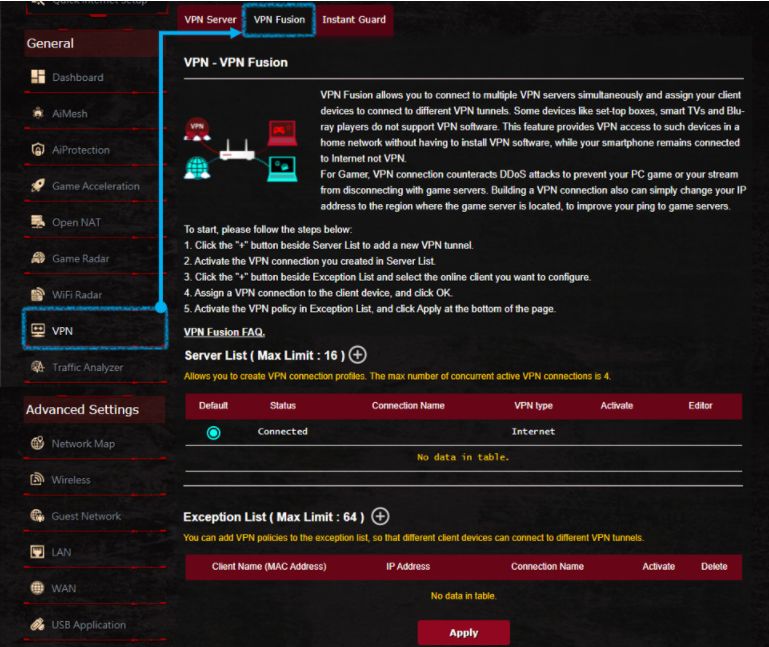
Шаг 3. Перейдите в [VPN > [VPN Fusion]
Шаг 4. Нажмите кнопку, создайте список VPN-серверов.
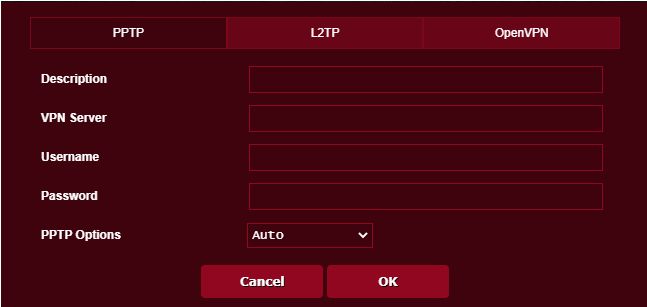
Шаг 5. Создайте профили сервера PPTP VPN/Open VPN
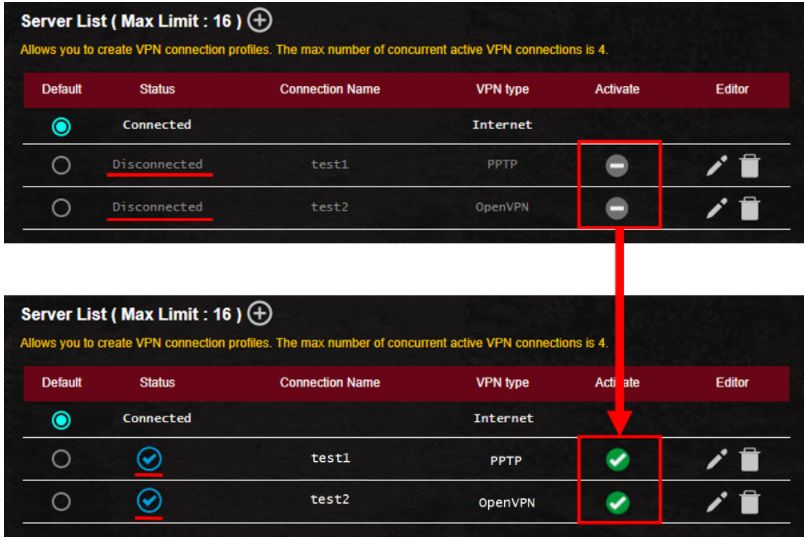
Шаг 6. PPTP VPN, откройте профиль VPN-сервера, как показано ниже.
Шаг 7. Оба профиля VPN-сервера были выбраны для включения, и соединение PPTP VPN и Open VPN прошло успешно.
По умолчанию используется Интернет, и вы можете изменить стандартное подключение маршрутизатора к другому профилю VPN-сервера.
Проверьте здесь для получения дополнительных инструкций.
Вы можете добавить политики VPN в список исключений, чтобы разные клиентские устройства могли подключаться к разным туннелям VPN.
Шаг 1. Нажмите кнопку, создайте список исключений.
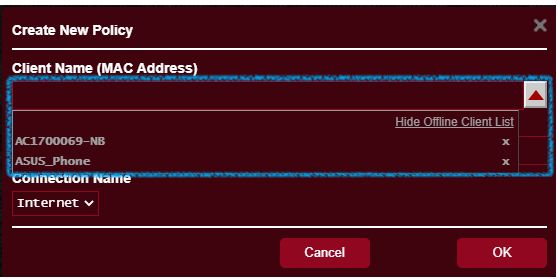
Шаг 2: Нажмите кнопку, выберите имя устройства, которое вы хотите назначить.
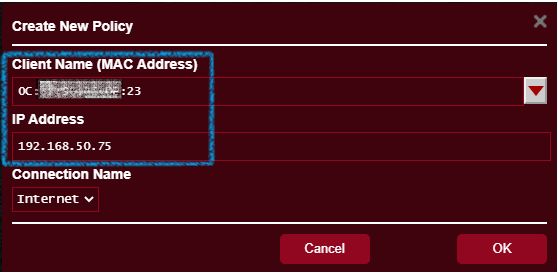
Шаг 3: Проверьте имя устройства (MAC-адрес) и IP-адрес устройства.
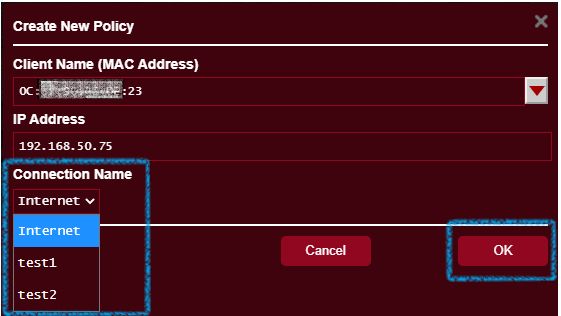
Шаг 4: Выберите Имя подключения и нажмите [OK].
Примечание. Это имя подключения было создано для вашего списка серверов.
Шаг 5. После настройки списка исключений нажмите [Активировать] > [Применить], чтобы сохранить настройки.
Включить имя соединения: (test1) (пример)
Проверьте здесь для получения дополнительных инструкций.
Вопросы-Ответы
1. Почему в последней прошивке отсутствует опция клиента OpenVPN?
Для серии GT VPN-клиент фактически называется VPN Fusion.
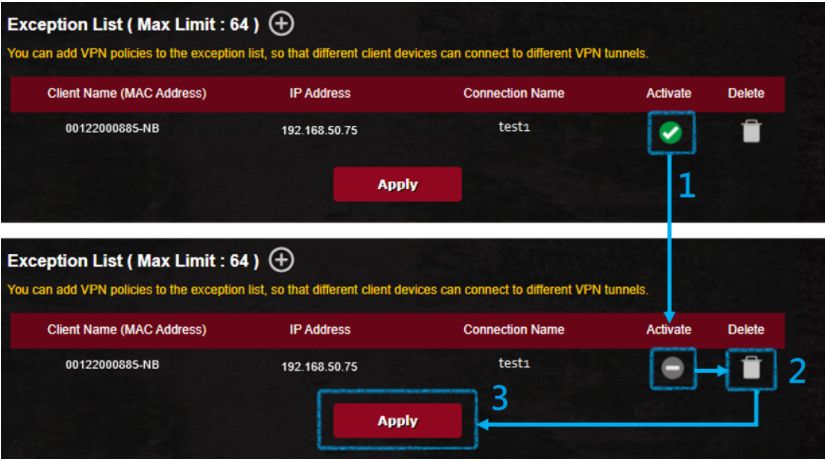
2. Могу ли я после создания списка исключений редактировать содержимое списка напрямую, не удаляя правило?
Нет, из списка исключений можно удалить только правила VPN для этого устройства. Деактивируйте правило, а затем нажмите [Удалить] > [Применить], чтобы сохранить настройки.
3. Введение в список серверов
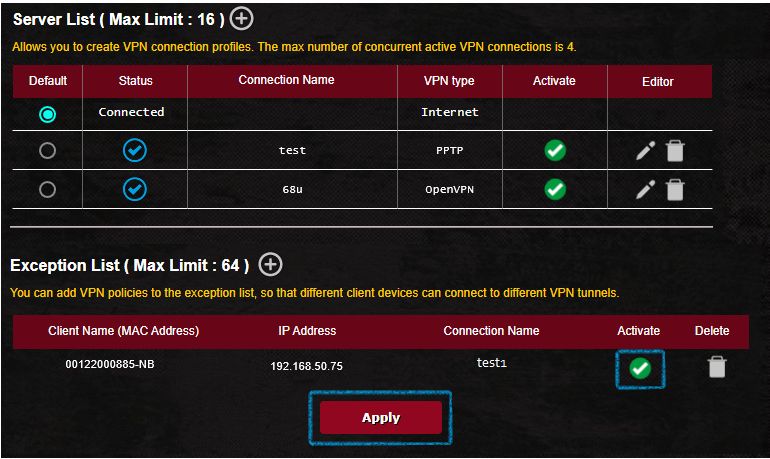
По умолчанию: клиентское устройство, не включенное в список исключений, будет подключаться к туннелю VPN по умолчанию. Вы можете установить VPN-туннель по умолчанию после создания профиля VPN. Когда туннель VPN по умолчанию отключен или деактивирован, клиентское устройство, не включенное в список исключений, будет подключаться к Интернету, а не к VPN.
Статус: Текущее состояние подключения к Интернету или VPN.
Имя подключения: имя вашего пользовательского подключения к VPN-серверу.
Тип VPN:Создайте тип VPN в списке серверов VPN.
Активировать: если вы создали профиль VPN-сервера, но не включили его, он будет отображаться как , при нажатии он будет отображаться как , это означает, что VPN включен.
Редактор: Нажмите значок, чтобы изменить профиль VPN-сервера, нажмите значок, чтобы удалить профиль VPN-сервера.
- Имя клиента (MAC-адрес): клиентское устройство, подключенное к маршрутизатору, например, телефон, компьютер, NB.
- IP-адрес: IP-адрес, назначенный маршрутизатором клиентскому устройству.
- Имя подключения: имя вашего пользовательского подключения к VPN-серверу.
- Активировать: Если вы создали список исключений, но не активировали его, он будет отображаться как , При нажатии он будет отображаться как , это означает, что правила маршрутизации для устройств включены.
- Удалить:Нажмите значок удаления правила.
Как скачать (Утилиты / ПО)?
Вы можете загрузить последние версии драйверов, программного обеспечения, микропрограмм и руководств пользователя из ASUS Центраз агрузок.
Узнать больше о Центре загрузок ASUS можно по ссылке.
