- How to set up a Linux VPN server (Beginner’s Guide)
- Requirements
- Install and Configure VPN
- Server computer
- Client computer
- Connect to a VPN
- Command line
- Graphical connection in Network Manager
- Troubleshooting
- Add more VPN users
- WireGuard VPN на VPS с Ubuntu 20.04: Своими ручками легко, быстро и весело
- Шаг 1: Обновляемся и готовимся
- Шаг 2: WireGuard, магия в одном скрипте
- Шаг 3: Превращаем VPS в VPN-сервер
- Шаг 4: Забираем конфигурацию клиента
- Шаг 5: Устанавливаем клиент WireGuard и подключаемся к VPN
- Шаг 6: Наслаждаемся своим VPN-сервером и радуемся
- Заключение
How to set up a Linux VPN server (Beginner’s Guide)
A VPN, or Virtual Private Network, creates an encrypted tunnel between your computer and a remote server. This has two major advantages. First, you mask your real location because you will have the IP address of the VPN server. Second, all the traffic between your computer and the server is encrypted. So, if you connect to a public WiFi, your data remains safe even if it is intercepted by someone. Similarly, your Internet Service provider cannot read your data.
There are three ways to get a VPN service.
- You can get a free VPN. This is obviously the worst option because there is nothing free and most likely such VPN providers sell your data to the third party. Free VPN is also usually very slow.
- You can sign up for a VPN service for a monthly fee. This is the most popular option. It is more reliable than a free VPN but you have to trust your VPN provider.
- You can get a personal VPN on your own server. This is the most secure option because you have maximum control over your traffic.
This post is about the third option.
Requirements
To get your own personal VPN, you need two computers:
- A client computer, most likely it is your home computer or a laptop. You use it to connect to a VPN.
- A private server, this where you install a VPN and use it as a VPN provider. This can be your own physical server or a virtual server.
There are several programs you can use to configure a personal VPN. I will use OpenVPN. It is open-source, it is available in all Linux distro and I believe it is one of the most popular VPN programs.
Install and Configure VPN
Server computer
You need to install OpenVPN and cURL programs:
sudo apt install openvpn curl cURL is needed to download the VPN installation script openvpn-install.sh. This script makes the installation very easy and error save. You can, of course, install everything manually, and there are good instructions on how to do that on Debian Wiki or Arch Linux Wiki. But I believe most of my readers prefer the simplest ways. This VPN installation script is a result of the work of 36 contributors, you can check what it does, and I personally trust it.
So, you need to download the script and make it executable:
curl -O https://raw.githubusercontent.com/Angristan/openvpn-install/master/openvpn-install.sh chmod +x openvpn-install.sh Then run this script as a superuser to install and configure OpenVPN on your server:
You need to follow the assistant and answer a few questions. You can keep everything by default, just press Enter for every question. Only give a name to your VPN configuration and I also recommend encrypting the configuration with a password:
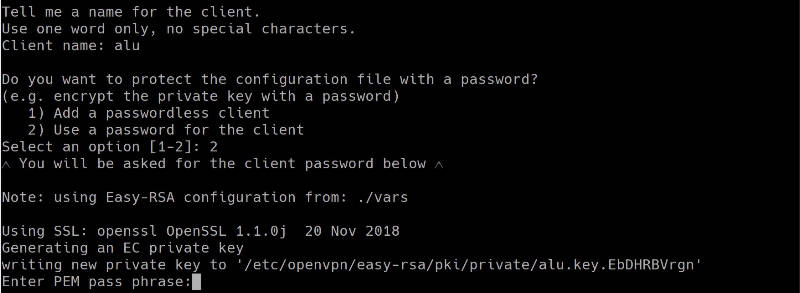
When everything is done. You should see a file that ends with .ovpn . This is a configuration file you will need to configure the client computer.

Client computer
On a client computer, also install OpenVPN and OpenVPN extension for your network manager:
sudo pacman -S openvpn networkmanager-openvpn I install networkmanager-openvpn for Plasma 5 on Arch Linux. Search for these two packages in your distro. Their names may differ slightly. If you use Ubuntu GNOME, for example, you need to install networkmanager-openvpn-gnome :
sudo apt install openvpn networkmanager-openvpn-gnome Next, download the VPN configuration file from your server:
scp remoteuser@remote-ip-address:/home/remoteuser/*.ovpn ~/Downloads/ The file will be downloaded to your local Downloads folder.
You can also use FileZilla if you prefer graphical programs. I explained how to use FileZilla and scp command in my previous post.
Connect to a VPN
First, I will show you the command line way to connect to a VPN. This way is more reliable and you make sure that your VPN works. Next, configure your graphical network manager.
Command line
So, copy the downloaded *.ovpn configuration file to the client folder of your OpenVPN:
sudo cp Downloads/*.ovpn /etc/openvpn/client/client.conf sudo openvpn /etc/openvpn/client/client.conf You may need to enter the password if you set one and then you will see something like this:

If you do not see any error, your VPN works fine. To test it, open your internet browser and visit any website. You can also check your public IP address and it should be your server address.

Graphical connection in Network Manager
Although I like the command line, it is much nice to be able to connect to the VPN with just one click from your system tray:
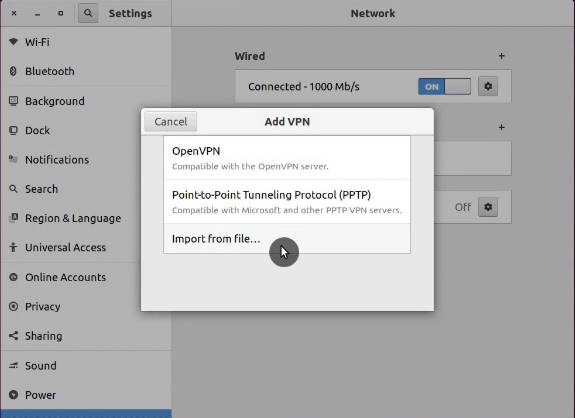
So, to add your VPN configuration to the Network Manager, open the Network Manager settings. Click on Add new connection, and import the configuration file you have downloaded from the server:
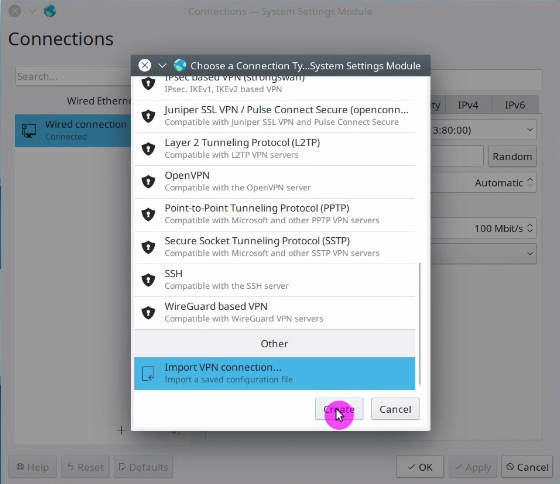
The above screenshots are from Plasma 5 Network Manager. It is almost the same in GNOME and other desktops. Just find an option to import the connection.
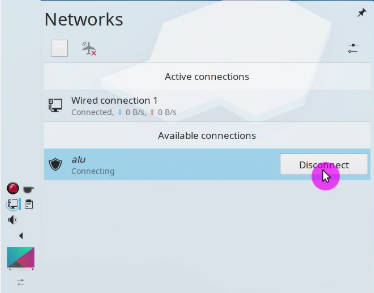
After that, you should see a new connection in your connection list. Try to enable it. If you see that your Network Manager icon changed, this means your VPN works. You can go to your web browser and test it.
Troubleshooting
When you start your OpenVPN connection from the command line, you will see errors right on the screen if something does not work. Try to understand what it says. If you do not how to fix it, google that error message.
However, when you configure the graphical interface of the Network Manager, you do not see detailed error information if it happens. You need to check the errors in your logs with this command:
journalctl -b -u NetworkManager For example, I did not succeed to connect to my VPN in Plasma 5 the first time. I imported the configuration and I saw that the system tried to connect, but failed after some time:

Checking the log files revealed that the TLS certificate was missing:

My Network Manager imported all certificated except the TLS one. From my experience, importing the connection configuration works flawlessly in the GNOME Network Manager. But other network managers may not recognize all settings during the importing. Probably, this is because the script is optimized for GNOME. So, you may need to correct some importing errors manually.
Open the configuration file *.ovpn with a text editor and make sure you have the corresponding settings in your Network Manager.
If some certificates are missing in your Network Manager, copy it from the configuration file and save as a *.crt file on your computer. Usually, all the Network Manager certificates are stored in ~/.local/share/networkmanagement/certificates/ .

You can see the screenshots of my configuration after I corrected all errors:
You may also need to change the permissions of all the certificates.
sudo chmod -R 700 ~/.local/share/networkmanagement/certificates/*/* This is how I was able to troubleshoot my Plasma 5 VPN connection. Obviously, I cannot guess all the possible problems that can arise during your installation and configuration of a personal VPN service.
Add more VPN users
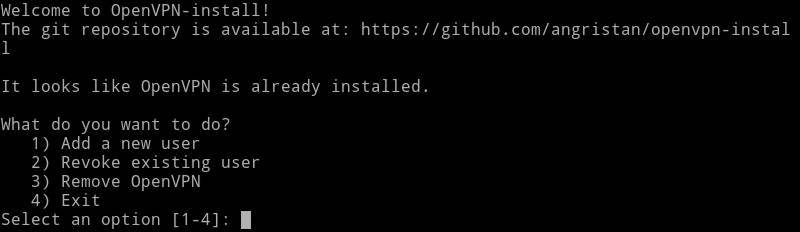
When you run the scrip openvpn-install.sh the first time, it creates a connection for one uses. However, if you run it again it, will offer you an option to add more users:
Select option 1. Add a new user and follow the instructions. The instructions are the same as above. Just provide a different Client name and you will see newuser.ovpn configuration file. Use it to connect a new user to this VPN server.
As you can see from the screenshot, running openvpn-install.sh again also gives you options to revoke a user, and remove OpenVPN from the server.
So, if you have ever thought about setting up a personal VPN, now you know how to do that. A personal VPN server is not only more secure in terms of privacy but it can also be cheaper. For example, if you connect your whole family to one VPN server, this option will be cheaper than subscribing your whole family to several VPN accounts by subscription.
Average Linux UserFollow I am the founder of the Average Linux User project, which is a hobby I work on at night. During the day I am a scientist who uses computers to analyze genetic data.
WireGuard VPN на VPS с Ubuntu 20.04: Своими ручками легко, быстро и весело
Привет, друзья Хабра! Сегодня я расскажу вам о том, как превратить свой VPS с Ubuntu 20.04 в супер-быстрый и современный VPN-сервер, используя WireGuard — популярный, молодой и дерзкий VPN-протокол! Пристегните ремни, включите режим веселья и давайте начнем!
Шаг 1: Обновляемся и готовимся
Для начала давайте убедимся, что наш VPS находится в самом актуальном и обновленном состоянии. Подключаетесь к VPS через SSH. Запустите следующие команды, чтобы обновить систему и установить необходимые пакеты:
sudo apt update sudo apt upgrade sudo apt install curlПосле этого у вас будет самая свежая версия Ubuntu, и вы будете готовы превратить свой VPS в мощный VPN-сервер.
Шаг 2: WireGuard, магия в одном скрипте
Зачем усложнять себе жизнь настройками, когда мы можем использовать готовый скрипт установки WireGuard? Давайте загрузим этот чудо-скрипт с GitHub и сделаем его исполняемым:
curl -O https://raw.githubusercontent.com/angristan/wireguard-install/master/wireguard-install.sh chmod +x wireguard-install.shШаг 3: Превращаем VPS в VPN-сервер
Теперь самое веселое! Запустите скрипт установки WireGuard и следуйте его забавным инструкциям на экране:
Скрипт попросит вас ввести некоторые параметры, но чаще всего можно использовать предлагаемые по умолчанию значения. Не бойтесь экспериментировать!
Шаг 4: Забираем конфигурацию клиента
После завершения установки скрипт создаст файл конфигурации клиента с расширением .conf . Этот файл — ваш VPN-билет на счастье! Загрузите его на своё устройство (например, компьютер или смартфон).
Шаг 5: Устанавливаем клиент WireGuard и подключаемся к VPN
Теперь установите клиент WireGuard на своем устройстве. Приложения для разных платформ можно найти на официальном сайте WireGuard.
После установки импортируйте файл конфигурации клиента в клиентское приложение WireGuard и подключитесь к своему VPN-серверу. Поздравляю, теперь вы находитесь в мире безопасности, анонимности и свободы!
Шаг 6: Наслаждаемся своим VPN-сервером и радуемся
Теперь у вас есть собственный VPN-сервер на базе WireGuard, который обеспечивает высокую скорость, отличную безопасность и простоту настройки. Можете гордиться собой, ведь вы только что настроили собственный VPN-сервер, который поможет вам сохранить конфиденциальность и обойти ограничения интернет-цензуры.
Заключение
Итак, мы разобрались, как настроить VPN-сервер на базе WireGuard на VPS с Ubuntu 20.04, и я надеюсь, что вам было так же весело, как и мне! Теперь вы можете использовать свой VPN-сервер для безопасного и анонимного серфинга в интернете, а также для доступа к заблокированным ресурсам.
В итоге, если Вы всё выполнили правильно, в терминале отобразится QR-Code, с приложением на мобилу можно установить конфигурацию просто его отсканировав. Если У Вас возникнут проблемы со скачиванием файла конфигурации, ничего страшного, Вы сможете в настройках конфигурации в мобильном продолжении WireGuard экспортировать его в виде файла куда угодно, даже другу по Телеге переслать. )
Спасибо, что читали этот веселый гайд, и удачи вам в настройке своего VPN-сервера! Если у вас возникнут вопросы или комментарии, пожалуйста, делитесь ими в комментариях ниже, и я с радостью помогу вам!