- How to Install Fira Code in Visual Studio Code
- Step 1: Download Fira Code
- Step 2: Install Fira Code
- Step 3: Using Fira Code in VS Code
- Vs code fira code linux
- # Table of Contents
- # How to enable Font Ligatures in Visual Studio Code
- # Installing a font with ligatures
- # Installing Fira Code on Windows
- # Installing Fira Code on macOS
- # Installing Fira Code on Linux
- # Enabling Font Ligatures in Visual Studio Code
- # Enabling font ligatures in a local .vscode/settings.json file
- # Additional Resources
- Saved searches
- Use saved searches to filter your results more quickly
- Installing
- How To Install Fira Code Font In VS Code And Sublime Text
- FiraCode Font Pack
- Final Step
- Available Commands
- How does it look with FiraCode font?
- Recommended Extension pack
- Relevant Links
How to Install Fira Code in Visual Studio Code
The default font for Visual Studio Code is Consolas. Many fonts are available on the web, but the most popular font among developers is Fira Code. The following guide shows how to install and use the Fira Code font in Visual Studio Code.
Step 1: Download Fira Code
Go to fonts.google.com/specimen/Fira+Code and click on the Download Family button. It will download a zip file into your system.
Step 2: Install Fira Code
To install Fira Code, do the following:
- Double-click on the downloaded zip file to unzip it.
Note: You can download and install WinRar from win-rar.com - Double-click on the file with .ttf extension.
- Click on the Install button. It will install the font in your system.
Step 3: Using Fira Code in VS Code
To make Fira Code your default font in VS Code, follow the below steps:
- From the top-level File menu, select the Preferences option. From the sub-menu, choose the Settings option. Alternatively, you can press Ctrl + ,
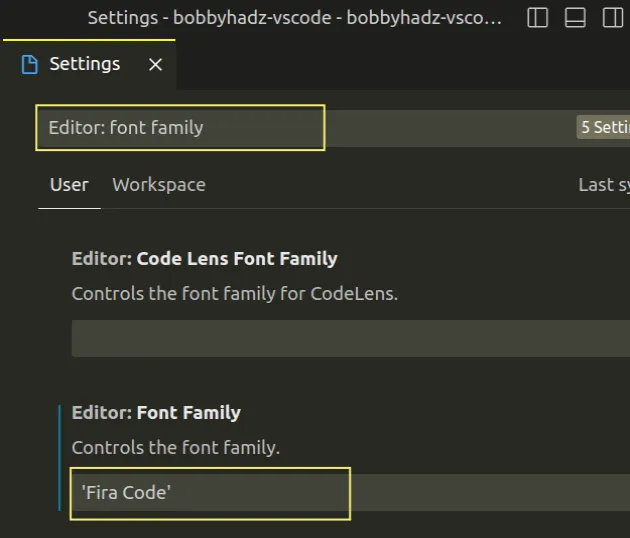
- In the search bar, type font.
- Type Fira Code inside the Editor: Font Family textbox.
- Restart VS Code. Now you can use Fira Code in VS Code.
Vs code fira code linux
Last updated: Mar 8, 2023
Reading time · 4 min

# Table of Contents
# How to enable Font Ligatures in Visual Studio Code
Ligatures are special characters in a font that combine two or more characters into one.
Here is a screenshot with some examples.
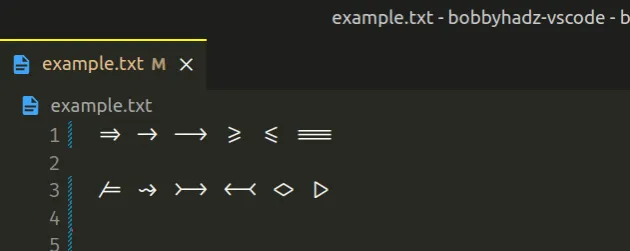
The file from the screenshot has the following contents.
The font in the example is called Fira Code.
If you have already installed a font with ligatures, click on the following subheading:
# Installing a font with ligatures
Make sure you have a font with ligatures installed.
The most commonly used font with programming ligatures is Fira Code.
Other free monospaced fonts with ligatures include:
# Installing Fira Code on Windows
Here are the instructions on how to install Fira Code.
Alternatively, you can follow the OS-specific instructions in the official repository.
Copied!choco install firacode
Make sure to start CMD as an administrator and issue the following command.
Copied!scoop bucket add nerd-fonts scoop install firacode
# Installing Fira Code on macOS
Copied!brew tap homebrew/cask-fonts brew install --cask font-fira-code
- Extract the file.
- Select all ttf font files.
- Right-click and select Open (or Open With Font Book).
- Select Install Font.
# Installing Fira Code on Linux
Follow the instructions in this section of the docs for your flavor of Linux.
For example, on Ubuntu, run the following command.
Copied!sudo apt install fonts-firacode
# Enabling Font Ligatures in Visual Studio Code
To enable font ligatures in Visual Studio Code:
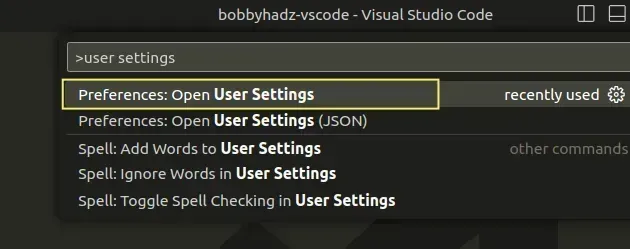
You can also open the settings screen by pressing Ctrl + , on Windows and Linux or Cmd + , on macOS.
- If you want to provide a fallback font in case Fira Code is not installed, use a comma, e.g. ‘Fira Code’, ‘Cascadia Code’, ‘Consolas’ .
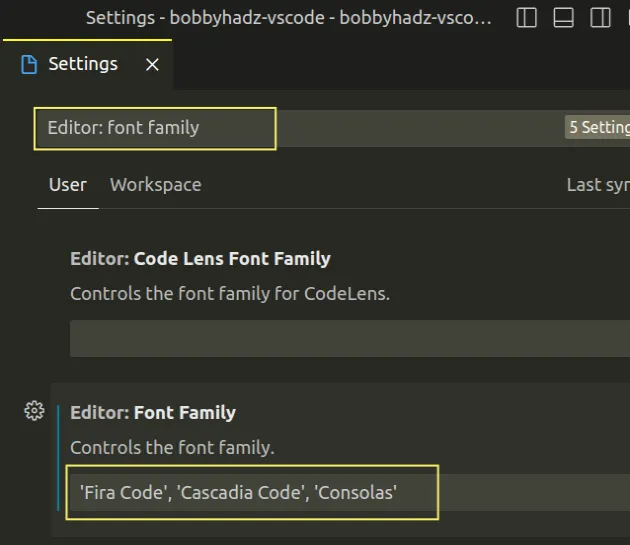
If Fira Code is not installed on the machine, VS Code falls back to the Cascadia Code font.
If Cascadia Code is not available as well, it falls back to the Consolas font.
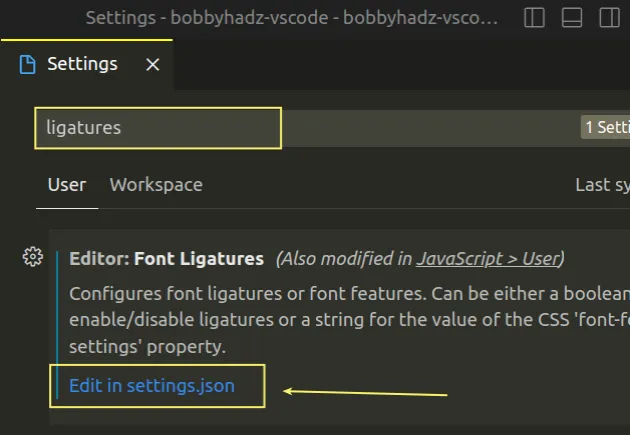
- Type ligatures in the search field and click on Edit in settings.json.
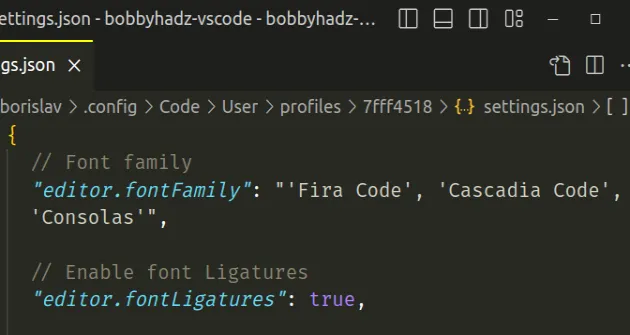
Copied!// Font family "editor.fontFamily": "'Fira Code', 'Cascadia Code', 'Consolas'", // Enable font Ligatures "editor.fontLigatures": true,
Make sure the properties are wrapped in an object in your settings.json file.
Copied!// Font family "editor.fontFamily": "'Fira Code', 'Cascadia Code', 'Consolas'", // Enable font Ligatures "editor.fontLigatures": true, // . Your other config here >
Setting editor.fontLigatures to true enables font ligatures in VS Code.
Open a file, e.g. one called example.txt and paste the following text in it.
If ligatures are enabled, you should be able to see the following output.
If you still don’t see font ligatures:
- Make sure the font you set the editor.fontFamily property to is installed on your machine.
- Try to restart Visual Studio Code.
# Enabling font ligatures in a local .vscode/settings.json file
An alternative approach to enable font ligatures is to use a local .vscode/settings.json file.
The local file applies the specified configuration only to the current project and overrides any global settings.
- In the root directory of your project, create a .vscode folder.
- Create a settings.json file in the .vscode folder.
- Add the following code to your settings.json file.
Copied!// Font family "editor.fontFamily": "'Fira Code', 'Cascadia Code', 'Consolas'", // Enable font Ligatures "editor.fontLigatures": true >
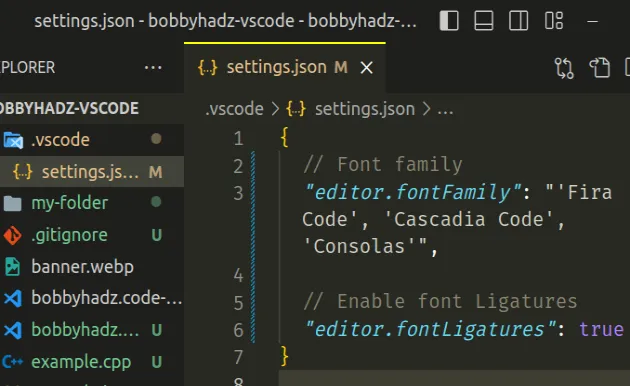
The configuration in your .vscode/settings.json file overrides any global configuration and is project-specific.
Open a file, e.g. one called example.txt and paste the following text in it.
If ligatures are enabled, you should be able to see the following output.
If you still don’t see font ligatures:
- Make sure the font you set the editor.fontFamily property to is installed on your machine.
- Try to restart Visual Studio Code.
# Additional Resources
You can learn more about the related topics by checking out the following tutorials:
I wrote a book in which I share everything I know about how to become a better, more efficient programmer.
Saved searches
Use saved searches to filter your results more quickly
You signed in with another tab or window. Reload to refresh your session. You signed out in another tab or window. Reload to refresh your session. You switched accounts on another tab or window. Reload to refresh your session.
Installing
Clone this wiki locally
- Select all font files
- Right click and select Open (alternatively Open With Font Book )
- Select «Install Font»
- Use brew and cask: Not officially supported, might install outdated version
brew tap homebrew/cask-fonts brew install --cask font-fira-code
- In the ttf folder double-click each font file and click “Install font”; see “Manual Installation” if double-clicking doesn’t work
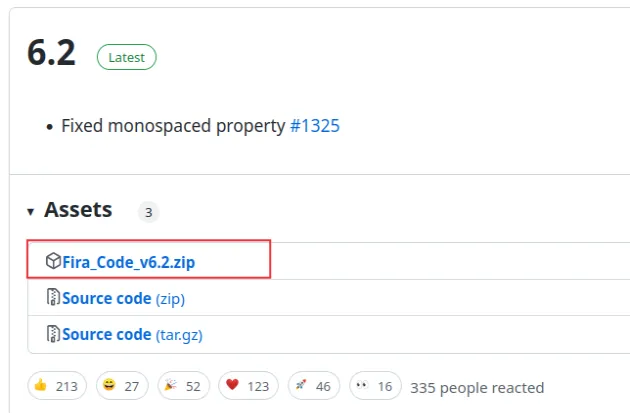
- Download the latest font zip file Fira_Code_v6.2.zip
- In the ttf folder, double-click each font file, click “Install font”; to install all at once, select all files, right-click, and choose “Install”
- On some systems (especially Windows 10), you may need to «Unblock» each font file before installing. To do so, right-click each font file, click Properties, then check Unblock next to Security at the bottom of the General tab. Click OK, and then install. Note: Skipping this step may cause the Fira Code fonts to intermittently stop working in VS Code, even though the fonts still appear in other programs.
On Windows 10 open the System Settings, go to Fonts and drag and drop the the font files from the ttf folder into the drop area indicated at the top of the dialog.
- Use chocolatey: choco install firacode
- Use scoop: Run as administrator
scoop bucket add nerd-fonts scoop install firacode How To Install Fira Code Font In VS Code And Sublime Text
In this example, I will show you how to install fira code font in your vs code editor. I will show you how to install fira code font in vs code on Linux, windows, and mac os. So if you are windows, mac, or Linux users, no problem. Just follow the below step two install and setup fira code in vs code editor.
You know that fira code font is developers friendly. It gives us an amazing look at code editor. You can set up it in you any code editor like vs code, php strom or sublime text. Just you need to tell your code editor that, hey I have installed fira code on my computer and I have told you in your settings.json file that use fira code as my font.
See the beautiful look of fira code in my vs code editor:

Install fira code in windows:
In this step, we need to see how to install fira code in the windows operating system. To install the fira code font in windows, we need to download it first. So visit this following url to fira code download which is a zip file.
You will see some .ttf extension file in ttf folder. Just double click on every .ttf extension file. Now fira code font is installed in your windows operating system.
Install fira code in mac os:
To install fira code font on mac os, run the below command.
brew tap homebrew/cask-fonts brew cask install font-fira-codeInstall fira code in ubuntu:
To install fira code font in your Linux distros, Just run the below command to install it.
sudo apt install fonts-firacodeNow everything is set to. In this step we need to setup fira code in our vscode editor. So open vs code settings.json file and paste this below code:
To install fira code font in your sublime text editor, just follow this step. Go to preferences then settings then paste this below code:
Hope this tutorial will help every developer who is looking for installing fira code font on their local pc.
FiraCode Font Pack


Free monospaced font with programming ligatures vscode extension
Final Step

When the Font Directory appears, install fonts if you haven’t already, and restart VSCODE once you have. Note: this is because of OS limitations, the fonts must be installed manually.
Available Commands
Note: to run commands, press ctrl+shift+p to open the command palette, and then type each one and click on it.
Here are the configurations this plugin will use
How does it look with FiraCode font?


Recommended Extension pack

ZPack is An Opinionated collection of the best and most used extensions for Web Developers in VSCode which has Better Developer Experience(DX) and load time in Mind.