- Install Multimedia Codecs on Ubuntu 22.04
- How to install multimedia codecs on Ubuntu 22.04
- How to remove Multimedia codecs Ubuntu 22.04
- Conclusion
- Install All Essential Media Codecs in Ubuntu With This Single Command [Beginner’s Tip]
- What is Ubuntu Restricted Extras?
- How to install Ubuntu Restricted Extras?
- Installing restricted extra package on Kubuntu, Lubuntu, Xubuntu
- Установить мультимедийные кодеки Ubuntu 20.04 LTS
- Включение репозиториев пакетов:
- Обновление кеша репозитория пакетов:
- Установка мультимедийных кодеков:
- Установка VLC Media Player:
- Установка музыкального проигрывателя Clementine:
- Включить видео и музыкальный проигрыватель по умолчанию Ubuntu 20.04 LTS:
Install Multimedia Codecs on Ubuntu 22.04
![]()
Multimedia codecs comprise a set of libraries/dependencies to play audio/video files of various formats. Ubuntu 22.04 comes up with default support for a few codecs. However, it is recommended to install multimedia codecs to get the uninterrupted stream of video and audio files.
Ubuntu 22.04 comes up with updated security features, improved usability, interactive interface and much more. Ubuntu 22.04 is the latest release of the LTS version of Ubuntu. This article provides a step-by-step installation guide of multimedia codecs on Ubuntu 22.04.
How to install multimedia codecs on Ubuntu 22.04
Multimedia codecs not only allow you to play audio video files, but they can also be used to compress/decompress media files for a smooth transmission. Let’s head over to the following steps that leads to installing the multimedia codecs on Ubuntu 22.04:
Step 1: It is recommended to update the system’s package before getting any program/application. Perform the update operation via the following command.

Step 2: Once the packages are updated successfully. You can install the multimedia codecs on your system by issuing the following command. The command will install the package ubuntu-restricted-extras which is equipped with essential media codecs.
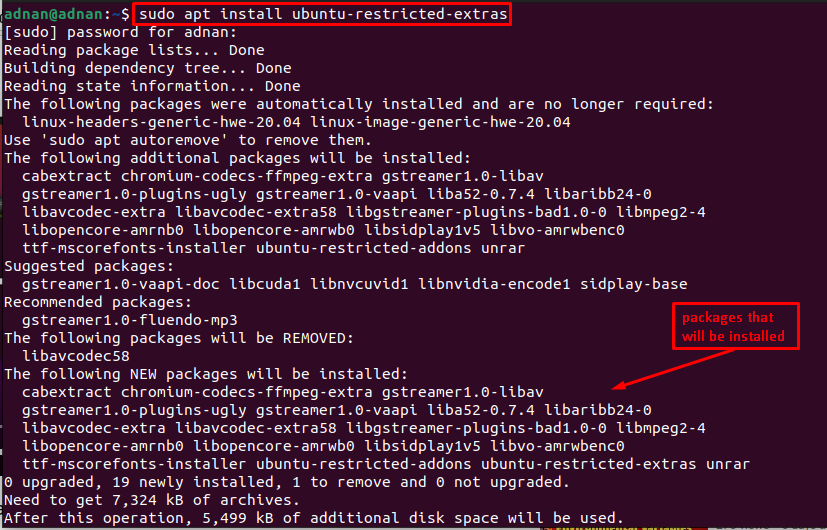
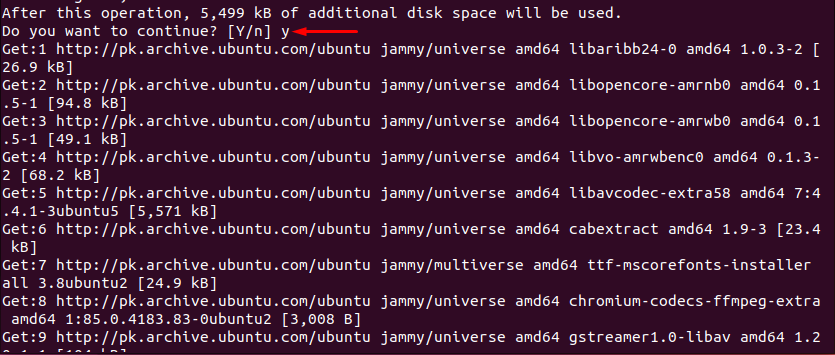
Before installation, Ubuntu will ask you to confirm by pressing “y“. Moreover, you would also observe that a few codecs are installed but not required. Whereas there are tens of codecs that will be installed with this command.
As the installation is started, the following interface will appear which states that license agreement is required for Microsoft-core-fonts (a package being installed with the multimedia codecs).
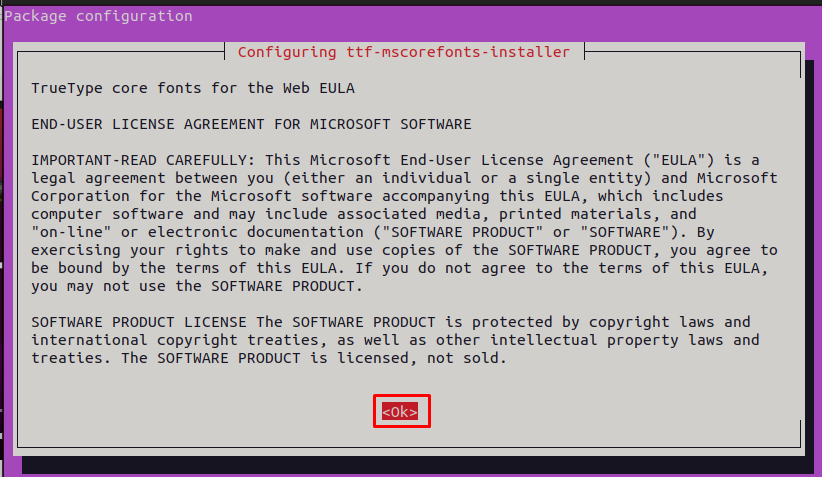
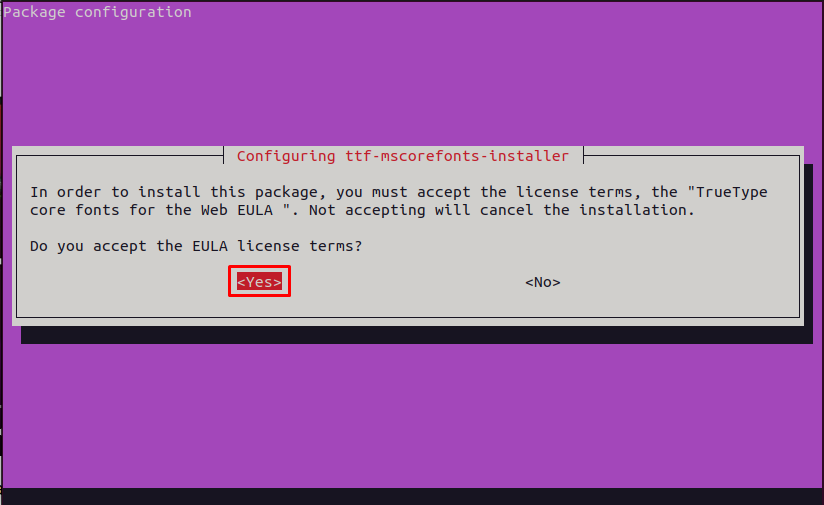
Now, you have to accept the license agreement of Microsoft-core-fonts. To do so, press the “tab” key to navigate to “OK” and hit enter:
The installation may take a while. Once the installation is finished; you can now play all kinds of audio/video files on your Ubuntu 22.04.
How to remove Multimedia codecs Ubuntu 22.04
Although the Multimedia codecs are recommended to be there on your Ubuntu 22.04. However, if you do not want to keep them on your Ubuntu 22.04. You can remove them via the following command.

Moreover, if you want to remove the configuration files as well. You can use the “–purge” option as written below:
Here you go with multimedia codecs!
Conclusion
Ubuntu 22.04 is the latest LTS release of Ubuntu. It is equipped with the updated security features, improved usability, and interface. Multimedia codecs are the essential packages that are recommended to play various audio/video files on Ubuntu. Although Ubuntu 22.04 is equipped with most of them, it is recommended to install multimedia codecs for an uninterrupted stream of media on Ubuntu 22.04.
Install All Essential Media Codecs in Ubuntu With This Single Command [Beginner’s Tip]
Ubuntu Restricted Extras is a single package that allows you to install all the essential media codecs to run files like MP3, h264 on Ubuntu-based distributions.
If you have just installed Ubuntu or some other Ubuntu flavors like Kubuntu, Lubuntu etc, you’ll notice that your system doesn’t play some audio or video file. For video files, you can install VLC on Ubuntu. VLC one of the best video players for Linux and can play almost any video file format. But you’ll still have troubles with audio media files and flash player. The good thing is that Ubuntu provides a single package to install all the essential media codecs: ubuntu-restricted-extras.
What is Ubuntu Restricted Extras?
The ubuntu-restricted-extras is a software package that consists various essential software like flash plugin, unrar, gstreamer, mp4, codecs for Chromium browser in Ubuntu etc. Since these software are not open source and some of them involve software patents, Ubuntu doesn’t install them by default. You’ll have to use multiverse repository, the software repository specifically created by Ubuntu to provide non-open source software to its users. Please read this article to learn more about various Ubuntu repositories.
How to install Ubuntu Restricted Extras?
I find it surprising that the software center doesn’t list Ubuntu Restricted Extras. In any case, you can install the package using command line and it’s very simple. Open a terminal in Ubuntu by searching for it in the menu or using the terminal keyboard shortcut Ctrl+Alt+T. Since ubuntu-restrcited-extras package is available in the multiverse repository, you should verify that the multiverse repository is enabled on your system:
sudo add-apt-repository multiverseYou may want to update the package cache if you are not running Ubuntu (Ubuntu does it automatically):
sudo apt install ubuntu-restricted-extrasWhen you enter the command, you’ll be asked to enter your password. When you type the password, nothing is displayed on the screen. That’s normal. Type your password and press enter. It will show a huge list of packages to be installed. Press enter to confirm your selection when it asks. You’ll also encounter an EULA (End User License Agreement) screen like this: 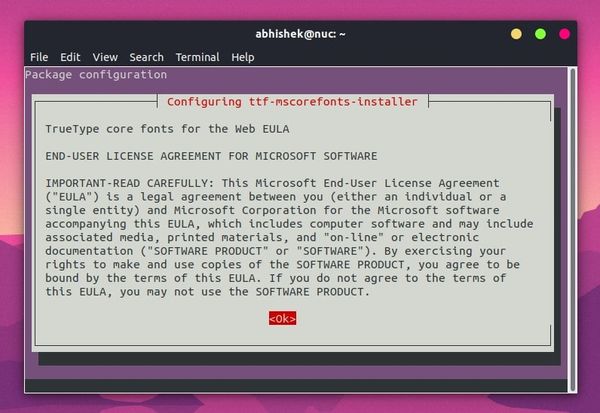 It could be overwhelming to navigate this screen but don’t worry. Just press tab and it will highlight the options. When the correct options are highlighted, press enter to confirm your selection.
 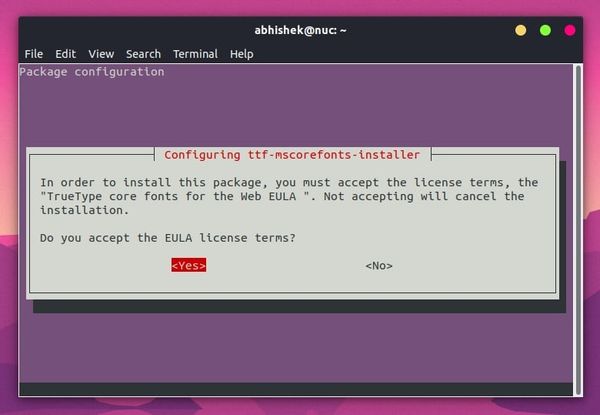 Once the process finishes, you should be able to play MP3 and other media formats thanks to newly installed media codecs.
Installing restricted extra package on Kubuntu, Lubuntu, Xubuntu
Do keep in mind that Kubuntu, Lubuntu and Xubuntu has this package available with their own respective names. They should have just used the same name but they don’t unfortunately. On Kubuntu, use this command:
sudo apt install kubuntu-restricted-extrassudo apt install lubuntu-restricted-extrassudo apt install xubuntu-restricted-extrasI always recommend getting ubuntu-restricted-extras as one of the essential things to do after installing Ubuntu. It’s good to have a single command to install multiple codecs in Ubuntu. I hope you like this quick tip in the Ubuntu beginner series. I’ll share more such tips in the future.
Установить мультимедийные кодеки Ubuntu 20.04 LTS
В этой статье я покажу вам, как установить мультимедийные кодеки в Ubuntu 20.04 LTS и подготовить его для просмотра видео, прослушивания музыки и т. д. Итак, приступим.
Включение репозиториев пакетов:
Во-первых, вы должны убедиться, что официальная main , limited , universe и репозитории multiverse включены.
Для этого откройте приложение Software & Updates из Меню приложений Ubuntu 20.04 LTS .

Теперь в Ubuntu На вкладке «Программное обеспечение убедитесь, что отмеченные флажки установлены.

Обновление кеша репозитория пакетов:
Теперь обновите кеш репозитория пакетов с помощью следующей команды:
Кэш репозитория пакетов APT должен быть обновлен.

Установка мультимедийных кодеков:
Мультимедийные кодеки необходимы для воспроизведения аудио и видео файлов. По умолчанию мультимедийные кодеки не установлены в Ubuntu 20.04 LTS.
Как видите, я не могу воспроизвести видеофайл Big Buck Bunny-720.mp4 с приложением Ubuntu 20.04 LTS Videos по умолчанию. После установки мультимедийных кодеков вы сможете воспроизводить любые видео/аудио с помощью любого видео/аудиоплеера в Ubuntu 20.04 LTS.

Вы можете установить все доступные мультимедийные кодеки сразу с помощью следующей команды:

Теперь, чтобы подтвердить установку, нажмите Y , а затем нажмите .

Ubuntu должен загрузить все необходимые пакеты из Интернета.

Ubuntu 20.04 LTS установит шрифты Microsoft вместе с мультимедийными кодеками.
Вы должны принять лицензионное соглашение ( Лицензионное соглашение с конечным пользователем) Microsoft, если вы хотите установить шрифты Microsoft в Ubuntu 20.04.

Теперь выберите и нажмите , чтобы принять лицензионное соглашение Microsoft.
ПРИМЕЧАНИЕ. Если вы не хотите устанавливать шрифты Microsoft, не принимайте лицензионное соглашение Microsoft EULA. Просто выберите и нажмите ..

Программа установки должна продолжить.

На этом этапе все мультимедийные кодеки должны быть установлены.

После установки мультимедийных кодеков вы сможете воспроизводить любое видео/ аудиофайл в Ubuntu 20.04 LTS, как показано на скриншоте ниже.

Установка VLC Media Player:
Вы можете установить медиаплеер VLC на Ubuntu 20.04 LTS. Медиаплеер VLC — один из лучших видео- и аудиоплееров. Он может воспроизводить практически любые типы мультимедийных файлов. Говорят, что если VLC не может воспроизвести медиафайл, то никакой другой проигрыватель не сможет. Мне лично очень нравится медиаплеер VLC.
Вы можете установить медиаплеер VLC с помощью следующей команды:

Теперь, чтобы подтвердить установку, нажмите Y , а затем нажмите .

Все необходимые пакеты загружаются из Интернета.

На этом этапе должен быть установлен VLC.

Теперь, чтобы воспроизвести медиафайл с помощью VLC, щелкните файл правой кнопкой мыши (мышью) и выберите Открыть с помощью другого приложения .

Выберите VLC media player из список и нажмите Выбрать .

Поскольку вы запускаете медиаплеер VLC для в первый раз вы увидите следующее окно.
Установите флажок Разрешить доступ к сети метаданных и нажмите Продолжить . Таким образом, VLC автоматически загрузит информацию о воспроизводимом медиафайле (например, обложки альбомов) из Интернета.

VLC воспроизводит Sintel — файл movie.mp4 , как вы можете видеть на скриншоте ниже.

Установка музыкального проигрывателя Clementine:
Если вам не нравится Rhythmbox , музыкальный проигрыватель по умолчанию в Ubuntu 20.04 LTS, вы можете попробовать Clementine . Он похож на Rhythmbox, но у него лучший пользовательский интерфейс и больше функций. Clementine также может автоматически загружать тексты песен, обложки альбомов, информацию об исполнителе и т. Д. Воспроизводимой вами музыки.
Вы можете установить Clementine с помощью следующей команды:

Чтобы подтвердить установку, нажмите Y , а затем нажмите .

Должна быть установлена Clementine.

После установки Clementine вы можете запустить Clementine из меню приложений Ubuntu 20.04 LTS.

Должен запуститься музыкальный проигрыватель Clementine.

Как видите, Клементина играет музыку. Справа тексты музыки отображается.

Включить видео и музыкальный проигрыватель по умолчанию Ubuntu 20.04 LTS:
Если вы хотите изменить видео и музыкальный проигрыватель по умолчанию в Ubuntu 20.04 LTS, этот раздел для вас.
Сначала откройте Настройки из меню приложений Ubuntu 20.04 LTS.

Теперь перейдите на вкладку Приложения по умолчанию в Настройки . приложение. Как видите, Rhythmbox установлен в качестве Music проигрывателя по умолчанию, а Videos — по умолчанию Video player в Ubuntu 20.04 LTS.

Чтобы изменить видеопроигрыватель по умолчанию на медиаплеер VLC, щелкните раскрывающееся меню Видео и выберите в списке медиаплеер VLC .

Таким же образом нажмите Музыка раскрывающееся меню и выберите из списка музыкальный проигрыватель по умолчанию.

Как видите, медиаплеер VLC установлен как видео проигрыватель по умолчанию, а музыкальный проигрыватель Clementine — установить по умолчанию Music player.

Итак, вот как вы устанавливаете мультимедийные кодеки на Ubuntu 20.04 LTS. Спасибо, что прочитали эту статью.