- Как принудительно закрыть гостевую виртуальную машину с помощью команды virsh на Linux KVM
- Как бережно прекратить работу гостевой виртуальной машины с помощью команды virsh на Linux KVM
- Как немедленно завершить работу виртуальной машины гостя (принудительное завершение работы)
- Оставьте ответ Отменить ответ
- Manage your virtual machines
- From the shell
- Define your new VM
- List your VMs
- Define, undefine, start, shutdown, destroy VMs
- Suspend and resume a Virtual Machine
- Editing the attributes of a Virtual Machine
- Adding CPUs
- Adding Memory
- Changing the Network Card Model
- Adding USB Device Pass-through
- Limitations
- Apparmor Modification
- Adding USB devices
- Hot Add
- Static Add
- Get new IDs
- Как запустить/ Выключить/ Перезагрузить гостевые операционные системы с virsh на KVM
- Как запустить/ Выключить/ Перезагрузить гостевые операционные системы с virsh на KVM
- Список работаетающих гостевых виртуальных машин
- Запуск гостевой VM
- Выключение гостевой VM
- Перезагрузка гостевой VM
- Добавить комментарий Отменить ответ
- Рубрики
- соц сети
- Архив новостей
- Свежие записи
- Свежие комментарии
Как принудительно закрыть гостевую виртуальную машину с помощью команды virsh на Linux KVM
Я использовал команду «virsh shutdown vm1», чтобы закрыть гостевой файл с именем vm1, используя команду virsh. Тем не менее, он все еще работает, и мой vm1 не отвечает на сеанс ssh. Есть ли способ принудительно остановить или убить гостевую виртуальную машину с помощью команды virsh с хост-сервера?
Вы всегда можете заставить гостевой домен/виртуальную машину завершить работу с помощью команды virsh. Эта команда выполняет немедленное и безоговорочное завершение работы виртуальной машины. Давайте посмотрим, как заставить гостя прекратить работу на Linux KVM.
Как бережно прекратить работу гостевой виртуальной машины с помощью команды virsh на Linux KVM
Синтаксис будет выглядеть следующим образом:
# virsh shutdown domain # virsh shutdown vm # virsh shutdown freebsd # virsh shutdown ubuntu1
Как немедленно завершить работу виртуальной машины гостя (принудительное завершение работы)
Синтаксис будет выглядеть следующим образом:
# virsh destroy domain # virsh destroy vm # virsh destroy freebsd # virsh destroy ubuntu1
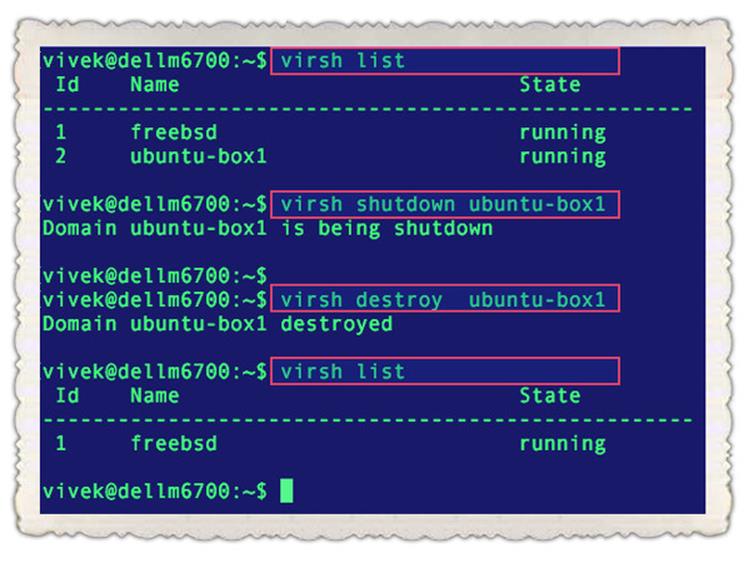
Вышеупомянутая команда работает, однако она также может привести к повреждению гостевой файловой системы, тем не менее, оставив ее ресурсы в целости. Поэтому я рекомендую делать резервную копию вашей виртуальной машины каждый день или, по крайней мере, делать резервные копии важных файлов, включая базу данных.
Это интересно:
Оставьте ответ Отменить ответ
📅 С 20 по 22 апреля пройдут незабываемые битвы среди кибер-гладиаторов в мире информационной безопасности!
Открыта регистрация команд по ссылке .
Manage your virtual machines
There are several methods from the GUI, but the easiest to set up is probably VirtManager. See the setup guide at the above link. Alternative management options include convirt (GUI) or convirt2 (WWW).
From the shell
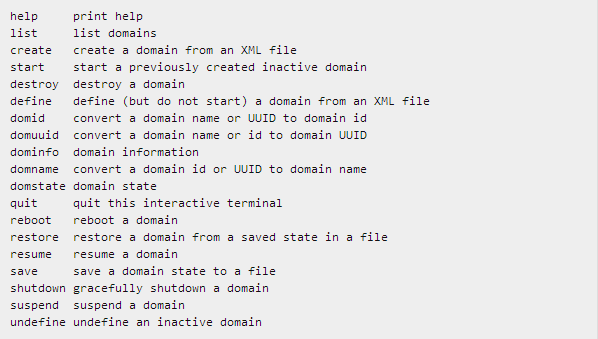
You can manage your VMs from the shell using virsh. You can get a list of the available commands if you type «help». Type «help command» to get additional infos for a particular command.
Define your new VM
Before you can manage your new VM with virsh, you must define it:
$ virsh --connect qemu:///system Connecting to uri: qemu:///system Welcome to virsh, the virtualization interactive terminal. Type: 'help' for help with commands 'quit' to quit virsh # define /etc/libvirt/qemu/newvm.xml Domain newvm defined from /etc/libvirt/qemu/newvm.xml
Note that to list newvm, you must use ‘list —inactive’ or ‘list —all’, since list without any options will only list currently running machines.
List your VMs
Virsh allows you to list the virtual machines available on the current host:
yhamon@paris:/etc/libvirt/qemu$ virsh --connect qemu:///system Connecting to uri: qemu:///system Welcome to virsh, the virtualization interactive terminal. Type: 'help' for help with commands 'quit' to quit virsh # help list NAME list - list domains SYNOPSIS list [--inactive | --all] DESCRIPTION Returns list of domains. OPTIONS --inactive list inactive domains --all list inactive & active domains virsh # list Id Name State ---------------------------------- 15 mirror running 16 vm2 running virsh # list --all Id Name State ---------------------------------- 15 mirror running 16 vm2 running - test5 shut off
Define, undefine, start, shutdown, destroy VMs
The VMs you see with list —all are VMs that have been «defined» from an XML file. Every VM is configured via a XML file in /etc/libvirt/qemu. If you want to remove a VM from the list of VMs, you need to undefine it:
virsh # undefine test5 # WARNING: undefine will delete your XML file! Domain test5 has been undefined virsh # list --all Id Name State ---------------------------------- 15 mirror running 16 vm2 running
To be able to undefine a virtual machine, it needs to be shutdown first:
virsh # shutdown mirror Domain mirror is being shutdown
This command asks for a nice shutdown (like running shutdown in command line).
Notice: Ubuntu 10.04 server doesn’t have acpid installed by default. This package needs to be installed on the guest OS before it will listen to any requests from the host.
You can also use «destroy», the more brutal way of shutting down a VM, equivalent of taking the power cable off:
virsh # destroy mirror Domain mirror destroyed
If you have made a change to the XML configuration file, you need to tell KVM to reload it before restarting the VM:
virsh # define /etc/libvirt/qemu/mirror.xml Domain mirror defined from /etc/libvirt/qemu/mirror.xml
virsh # start mirror Domain mirror started
Suspend and resume a Virtual Machine
Virsh allows you to easily suspend and resume a virtual machine.
virsh # suspend mirror Domain mirror suspended virsh # resume mirror Domain mirror resumed
Editing the attributes of a Virtual Machine
- export (aka ‘dump’) the xml of the virtual machine you want to edit
- edit the xml
- import (aka ‘define’) the xml
For example, to edit the machine named ‘foo’ (you can get a list of your machines with ‘virsh list —all’), do:
$ virsh dumpxml foo > /tmp/foo.xml (edit /tmp/foo.xml as needed) $ virsh define /tmp/foo.xml
Adding CPUs
KVM allows you to create SMP guests. To allocate two CPUs to a VM, dump the xml as above, then edit your xml to have:
Now define the VM as above.
Adding Memory
To change the memory allocation in a VM, dump the xml as above, then edit your xml to have:
Now define the VM as above. Keep in mind that the memory allocation is in kilobytes, so to allocate 512MB of memory, use 512 * 1024, or 524288.
Changing the Network Card Model
kvm and qemu currently default to using the rtl8139 NIC. Supported NICs in Ubuntu 8.04 LTS are i82551, i82557b, i82559er, ne2k_pci, pcnet, rtl8139, e1000, and virtio. To use an alternate NIC, dump the xml as above, then edit your xml to have:
Now define the VM as above.
Adding USB Device Pass-through
Limitations
Apparmor Modification
In order for a software program to access the usb device correctly the apparmor abstraction for qemu must be changed. Edit /etc/apparmor.d/abstractions/libvirt-qemu add a line:
# this lets qemu read all USB device information and might be considered a security risk /run/udev/data/* r,
After making the changes the guest must be restarted to get its profile regenerated.
Adding USB devices
This can also be done via virt-manager.
First find the usb Vendor ID and Product ID.:
$ lsusb Bus 001 Device 001: ID 1d6b:0002 Linux Foundation 2.0 root hub Bus 005 Device 012: ID 0a5c:2110 Broadcom Corp. Bluetooth Controller Bus 005 Device 003: ID 0483:2016 SGS Thomson Microelectronics Fingerprint Reader Bus 005 Device 001: ID 1d6b:0001 Linux Foundation 1.1 root hub Bus 004 Device 001: ID 1d6b:0001 Linux Foundation 1.1 root hub Bus 003 Device 001: ID 1d6b:0001 Linux Foundation 1.1 root hub Bus 002 Device 001: ID 1d6b:0001 Linux Foundation 1.1 root hub
In the event that the Broadcom Corp. Bluetooth Controller wants to be selected the vendor and product ids are 0a5c and 2110 respectively.
Hot Add
Create an xml snippet just representing the device like
You can then attach/detach that via:
$ virsh attach-device # work with it in the guest $ virsh detach-device
Static Add
The IDs can be entered into the xml profile. This can be done through virsh through the edit command.:
Get new IDs
To get a new mac address to paste into your xml file, use this command:
MACADDR=»52:54:$(dd if=/dev/urandom count=1 2>/dev/null | md5sum | sed ‘s/^\(..\)\(..\)\(..\)\(..\).*$/\1:\2:\3:\4/’)»; echo $MACADDR
To get a new uuid for your xml file, use: uuidgen
KVM/Managing (последним исправлял пользователь paelzer 2017-04-26 07:45:02)
The material on this wiki is available under a free license, see Copyright / License for details
You can contribute to this wiki, see Wiki Guide for details
Как запустить/ Выключить/ Перезагрузить гостевые операционные системы с virsh на KVM

Как запустить/ Выключить/ Перезагрузить гостевые операционные системы с virsh на KVM
Команда Virsh является альтернативой командой для управления Red Hat Enterprise Linux 5 KVM среды с помощью интерфейса командной строки (CLI). В Virsh команде предусмотрена часть Libvirt API, которая обеспечивает общий API для применений, требующих стандартизированного доступа для взаимодействия с KVM с использованием стабильного интерфейса.
Ниже приведены основные и часто используемые virsh команды:
Список работаетающих гостевых виртуальных машин
Введите следующую команду:
Id Name State ---------------------------------- 1 VM01 running 2 VM02 running
Запуск гостевой VM
Введите следующую команду:
Выключение гостевой VM
Введите следующую команду:
Или, вы можете принудительно остановить гостевую VM то сделать это можно с помощью следующей команды:
Перезагрузка гостевой VM
Введите следующую команду:
Добавить комментарий Отменить ответ
Этот сайт использует Akismet для борьбы со спамом. Узнайте, как обрабатываются ваши данные комментариев.
Рубрики
- Arch Linux (167)
- Commands (36)
- Debian’s (635)
- Administration tools Ubuntu (37)
- Backups Debian’s (7)
- Database в Ubuntu (58)
- Games (игры) (1)
- Monitoring в Debian и Ubuntu (49)
- Virtualization в Ubuntu / Debian/ Linux Mint (41)
- Docker (22)
- Kubernetes (6)
- KVM (4)
- OpenVZ (3)
- Vagrant (5)
- VirtualBox (6)
- ArgoCD (1)
- Concourse (1)
- Gitlab (1)
- Jenkinks (4)
- Spinnaker (1)
- Apache (32)
- Cherokee (1)
- FTP-services (5)
- Lighttpd (1)
- Nginx (26)
- PHP (27)
- Proxy для Debian’s (2)
- Tomcat (4)
- Панели управления в Ubuntu/Debian/Mint (24)
- Установка и настройка почты на Ubuntu/Debian (12)
- Хранилища (clouds) (2)
- Administration tools freeBSD (19)
- Database во FreeBSD (52)
- Monitoring во freeBSD (37)
- Virtualization во FreeBSD (22)
- VoIP (1)
- Установка Web сервисов (91)
- Установка и настройка почты (6)
- Установка из ports (пакетов) (19)
- Установка из sorce code (исходников) (23)
- Непрерывная интеграция (CI) (27)
- Database в MacOS (36)
- Monitoring в Mac OS (31)
- Security (безопасность) (12)
- Virtualization в Mac OS (30)
- Docker (19)
- Kubernetes (6)
- Vagrant (5)
- VirtualBox (5)
- ArgoCD (1)
- CircleCI (1)
- Concourse (1)
- Gitlab (1)
- Jenkinks (4)
- Spinnaker (1)
- Administration tools CentOS (49)
- Backups RPM’s (4)
- Database в CentOS (68)
- Monitoring в CentOS (67)
- Virtualization в CentOS/ Red Hat/ Fedora (42)
- Docker (23)
- Kubernetes (6)
- KVM (5)
- OpenVZ (2)
- Vagrant (5)
- VirtualBox (6)
- VMWare (3)
- ArgoCD (1)
- Concourse (1)
- Gitlab (1)
- Jenkinks (4)
- Spinnaker (1)
- Apache (35)
- Cherokee (1)
- DNS (3)
- FTP (10)
- Nginx (33)
- PHP (34)
- Proxy для RedHat’s (2)
- Tomcat (2)
- Voice (2)
- Панели управления в CentOS/Red Hat/Fedora (27)
- Прокси сервер на CentOS/RHEL/Fedora (4)
- Установка и настройка почты на CentOS/RHEL/Fedora (14)
- Хранилища (clouds) (1)
соц сети

Архив новостей
Свежие записи
Свежие комментарии
- Глеб к записи Установка Adobe Flash Player в Debian/Ubuntu/Mint
- Максим к записи Заблокировать User Agents используя Nginx
- Денис к записи Как включить EPEL репозиторий на CentOS
- Гость к записи Закомментировать/Раскомментировать строки vi/vim в Unix/Linux
- Sergey к записи Установка и настройка OpenVPN сервера на Debian/Ubuntu/Linux Mint