- Мониторинг температуры Linux
- Что мы будем использовать?
- Установка компонентов
- Настройка мониторинга температуры Linux
- 1. Настройка lm_sensors
- Настройка hddtemp
- Измерение и мониторинг температуры
- Выводы
- Find Out CPU Temperature From the Command-Line
- 1. Overview
- 2. Finding CPU Temperature Without Third-Party Tools
- 2.1. The /sys/class Directory
- 2.2. The temp File
- 2.3. The type File
- 2.4. Putting It All Together
- 3. Alternative: lm_sensors
- 3.1. Installation
- 3.2. Usage
- 4. Alternative: acpi
- 4.1. Installation
- 4.2. Usage
- 5. Conclusion
Мониторинг температуры Linux
В большинстве случаев нам не нужно беспокоиться о температуре компьютера. Все устроено так что температура не будет превышать максимальную если у вашего оборудования нет никаких производственных дефектов. Но перегрев могут вызвать не только аппаратные ошибки, это также может произойти из-за багов в драйвере графической карты или неправильно настроенной программы управления вентилятором. Частой причиной перегрева также может быть пыль, грязь, мусор попавшие в систему охлаждения (вентилятор, радиатор). Такое часто происходит со старым оборудованием.
Перегрев может вызвать очень серьезные повреждения вашего компьютера, так что следите за температурой вашей системы. Еще лучше если есть служба контроля температуры, которая предупредит вас если температура начнет сильно расти. В этой инструкции я расскажу как настроить мониторинг температуры Linux. В операционной системе Linux есть специальный набор утилит, которые предназначены для того, чтобы выполнять контроль температуры linux.
Что мы будем использовать?
Давайте рассмотрим утилиты, которые мы сегодня будем использовать:
- lm-sensors — программный инструмент, извлекающий данные из аппаратных датчиков на материнской плате для мониторинга температуры, напряжения, влажности и т д;
- hddtemp — инструмент для измерения температуры жестких дисков;
- psensor — графическая утилита для мониторинга температуры, которая позволяет посмотреть температуру Linux, для процессора, видеокарты, жестких дисков и других компонентов, которые поддерживают эту функцию.
Установка компонентов
Программа psensor отображает температуру на основе информации, полученной от lm-sensors и hddtemp. Поэтому сначала необходимо установить эти инструменты. Для установки в Debian или Ubuntu выполните:
sudo apt install lm-sensors hddtemp psensor
Если вы хотите установить самую новую версию этих компонентов, нужно добавить сначала PPA от разработчиков в систему:
sudo add-apt-repository ppa:jfi/ppa
sudo apt update
sudo apt install lm-sensors hddtemp psensor
Установка psensor в Fedora и других дистрибутивах, основанных на Red Hat будет выглядеть аналогично:
sudo yum install lm_sensors hddtemp psensor
Настройка мониторинга температуры Linux
Сначала нужно настроить низкоуровневые инструменты для считывания данных о температуре компонентов lm_sensors и hddtemp. Начнем с lm_sensors. После этого вы уже сможете посмотреть температуру linux.
1. Настройка lm_sensors
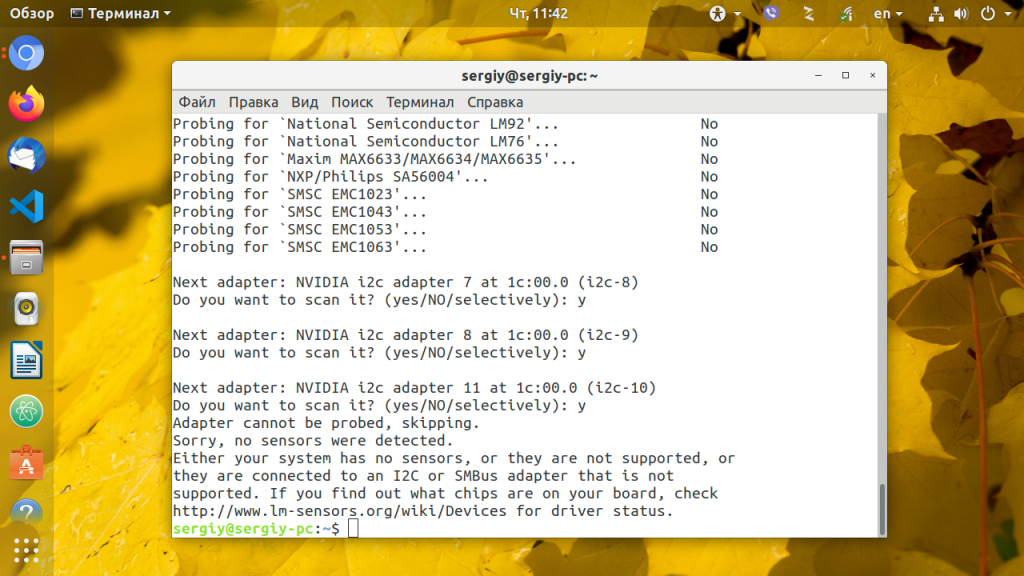
Для запуска мастера настройки ls_sensors выполните команду:
Отвечайте Y на все вопросы. Утилита попытается обнаружить все доступные в системе встроенные аппаратные датчики (для процессора, видеокарты, памяти и других микросхем), а также автоматически определить подходящие драйвера для них.
Когда сканирование датчиков завершится вам будет предложено добавить обнаруженные модули ядра в автозагрузку:
В Ubuntu или Debian модули будут добавлены в /etc/modeuls. А в Fedora будет создан файл /etc/sysconfig/lm_sensors. Для автоматической загрузки нужных модулей достаточно добавить lm_sensors в автозагрузку:
sudo systemctl enable lm-sensors
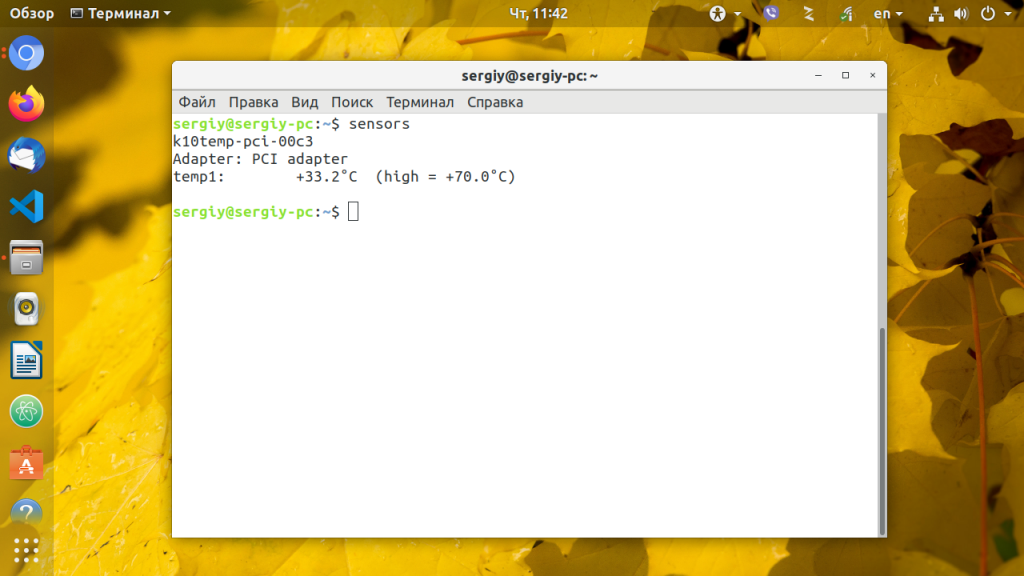
Теперь вы можете посмотреть температуру процессора Linux и других аппаратных компонентов с помощью команды sensors:
Настройка hddtemp
Еще вам нужно запустить hddtemp для контроля температуры жестких дисков. Выполните эту команду для запуска hddtemp в качестве демона, /dev/sda замените на адрес своего диска.
Это нужно сделать для каждого диска. Также необходимо добавить эту программу в автозагрузку.
Измерение и мониторинг температуры
Теперь можно начать мониторинг температуры linux с помощью psensor. Для этого просто запустите программу. Вы можете сделать это с помощью главного меню или же выполнив команду:

Вызовите контекстное меню в главном окне программы и выберите Параметры. Здесь вы увидите список доступных датчиков. Вы можете выбрать за какими датчиками нужно наблюдать.
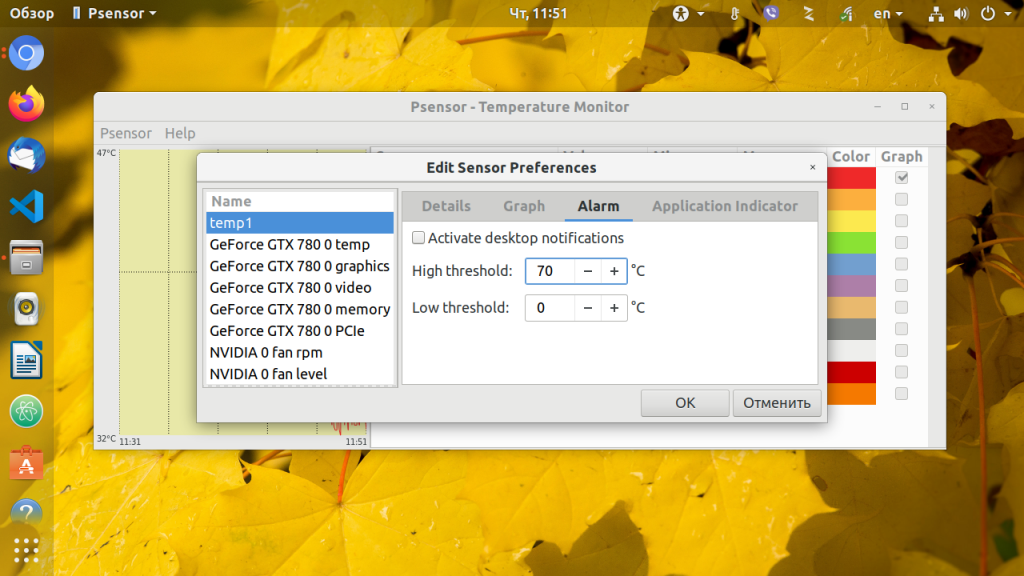
Еще можно установить уровень тревоги для каждого датчика на вкладке Alarm. Когда температура Linux превысит заданную вы получите уведомление.
По умолчанию температура в psensor измеряется в градусах Цельсия. В последних версиях также есть поддержка конвертации в градусы по Фаренгейту.
Выводы
Дальше, чтобы программа работала постоянно осталось добавить ее в автозагрузку. Теперь температура процессора linux всегда будет под контролем и ваш компьютер точно не перегреется. Если у вас остались вопросы, спрашивайте в комментариях!
Обнаружили ошибку в тексте? Сообщите мне об этом. Выделите текст с ошибкой и нажмите Ctrl+Enter.
Find Out CPU Temperature From the Command-Line
![]()
The Kubernetes ecosystem is huge and quite complex, so it’s easy to forget about costs when trying out all of the exciting tools.
To avoid overspending on your Kubernetes cluster, definitely have a look at the free K8s cost monitoring tool from the automation platform CAST AI. You can view your costs in real time, allocate them, calculate burn rates for projects, spot anomalies or spikes, and get insightful reports you can share with your team.
Connect your cluster and start monitoring your K8s costs right away:
1. Overview
In this tutorial, we’ll take a look at how we can check for the CPU temperature on the Linux terminal. First, we’ll see how we can figure out the temperature of our CPUs without the help of third-party tools. Afterward, we’ll cover a couple of small useful utilities for the same purpose.
2. Finding CPU Temperature Without Third-Party Tools
On Linux, we can read almost every accessible detail related to hardware resources. These details include the count of the CPU cycles, CPU temperature, I/O usage, network usage, and more. This is all possible because Linux gives us more control over the hardware and software.
2.1. The /sys/class Directory
The /sys directory is a virtual file system that contains a plethora of information regarding the Linux kernel and the hardware. The files inside this directory don’t actually reside on the disk. Instead, they’re only created and updated on-the-fly as we read them.
The /sys/class directory is the hierarchy of the hardware. This directory mostly contains information about the devices that are registered with the kernel.
One of the directories is called thermal, which contains temperature information of the hardware resources:
$ ls -lL /sys/class/thermal total 0 . drwxr-xr-x 3 root root 0 Apr 7 00:05 cooling_device7 drwxr-xr-x 3 root root 0 Apr 7 00:05 cooling_device8 drwxr-xr-x 4 root root 0 Apr 7 00:05 thermal_zone0 drwxr-xr-x 3 root root 0 Apr 7 00:05 thermal_zone1 drwxr-xr-x 3 root root 0 Apr 7 00:05 thermal_zone2In this directory, we’re concerned with the thermal_zone directories. The thermal_zone directories correspond to the thermometers placed on our motherboard.
Let’s cd into the thermal_zone0 directory and check what it contains:
$ cd thermal_zone0 && ls -lL total 0 . drwxr-xr-x 2 root root 0 Apr 7 00:05 subsystem -rw-r--r-- 1 root root 4096 Apr 7 00:55 sustainable_power -r--r--r-- 1 root root 4096 Apr 7 00:29 temp -r--r--r-- 1 root root 4096 Apr 7 00:29 type -r--r--r-- 1 root root 4096 Apr 7 00:29 trip_point_0_temp . As we can see, it includes lots of files and directories. However, we’re only interested in the temp and the type files.
2.2. The temp File
The temp file contains the actual temperature of the zone. It should contain just a single integer value:
We can divide this value by 100 to get the actual temperature in Celsius. In this case, it would be 27.8 °C.
2.3. The type File
The type file contains a value that signifies the zone to which the temperature corresponds:
The acpitz thermometer is located beside the CPU socket. However, we are interested in the CPU temperature. Similarly, for the CPUs, we can check the other thermal_zone directories that might contain this thermal information.
2.4. Putting It All Together
It can be tedious to check for CPU temperature this way because these directories might be different on different machines. Interestingly, the zone information is defined in the driver for the hardware resources.
For that reason, we might want to use a command that prints out this information in a readable way:
- We read the type and file files from each thermal_zone directory and feed the result to paste
- The paste command will align the lines from the corresponding files, separated by tabs
- We pipe the output of the paste command to column, which further aligns the output into columns
- The contents of column are then piped to sed, which replaces the values with readable temperature values
Additionally, we can create a simple shell script out of this rather long command and execute it either directly or from another script.
3. Alternative: lm_sensors
lm_sensors is a handy utility for monitoring temperatures, voltage, fan speed, and other hardware sensor information.
3.1. Installation
On major Linux distributions, lm_sensors should already be installed. However, if it’s not, we can use a package manager to install it from our distro’s official package repository:
# Ubuntu-like $ apt install lm-sensors# Fedora, RHEL, openSUSE $ yum install lm_sensors# Arch-like $ pacman -S lm_sensorsOnce installed, let’s verify it:
$ sensors -v sensors version 3.6.0+git with libsensors version 3.6.0+git3.2. Usage
We can use lm_sensors by simply typing in the sensors command:
$ sensors acpitz-acpi-0 Adapter: ACPI interface temp1: +27.8 C temp2: +29.8 C coretemp-isa-0000 Adapter: ISA adapter Package id 0: +40.0 C Core 0: +39.0 C Core 1: +40.0 CAs we can see, the CPU temperature for each core is given in the Core 0 and Core 1 fields, respectively.
Moreover, if it doesn’t display the CPU temperature, we can run the sensors-detect command beforehand. The sensors-detect command will detect all the available sensors attached to the machine.
4. Alternative: acpi
acpi is another lightweight alternative that we can use to display the temperature and battery information.
4.1. Installation
The acpi utility doesn’t ship with most distributions, so we’ll have to install it from our official package repository using the package name acpi:
# Ubuntu-like $ apt install acpi# Fedora, RHEL, openSUSE $ yum install acpiAfter the installation, let’s verify it:
4.2. Usage
We can print out the temperature information with acpi by simply running it with the -t or –thermal option:
$ acpi -t Thermal 0: ok, 29.8 degrees C Thermal 1: ok, 27.8 degrees CWe can print a detailed report with the -i or –details option as well.
5. Conclusion
In this article, we covered how we can check the thermal status of our CPUs. First, we experimented with the raw thermal details provided by the Kernel in the /sys/class directory. Afterward, we used a couple of alternative tools that automate this process for us.