- Ubuntu server installation with root only?
- 2 Answers 2
- How to Enable Root Account in Ubuntu? [Ubuntu Root Login]
- 1: How to enable Ubuntu root Login Temporarily?
- 2: How to enable root user in ubuntu via Graphical User Interface?
- 3: How to enable ubuntu root in Command-line?
- Conclusion
- Как зайти под root в Ubuntu
- Как зайти под root в Ubuntu
- Похожие записи
- Оцените статью
- Об авторе
- 4 комментария к “Как зайти под root в Ubuntu”
Ubuntu server installation with root only?
You could simply unlock the root account (by setting a password for it) and delete your standard sudo user account after the installation. I don’t know how complex it would be to modify an installer image that way, but the manual method is definitely much simpler and also shouldn’t take long.
2 Answers 2
This is a step-by-step example of how to do it by enabling root and deleting the user, as mentioned by user Byte Commander
- ssh into the installation as the user USERNAME created during installation
- sudo su to become root
- passwd and then password to give the root user a password
- nano /etc/ssh/sshd_config with the following edit to allow root user ssh login
- Find the (commented out) line #PermitRootLogin prohibit-password and without modifying it, add the following new line below it
- PermitRootLogin yes
- Ctrl-X , y , Enter to save the changes and exit nano
- cut -d: -f1 /etc/passwd should list USERNAME as the last entry.
- cut -d: -f1 /etc/group should list USERNAME as the last entry.
- id (when executed as USERNAME ) should return uid=1000(username) gid=1000(username) groups=1000(username),4(adm),24(cdrom),27(sudo),30(dip),46(plugdev),108(lxd)
Now delete the user USERNAME :
- deluser —remove-home USERNAME to delete the user created during installation. You will get a warning Warning: group ‘USERNAME’ has no more members. , but this group will also be deleted automatically before the command finishes.
- No user named USERNAME should be listed in cut -d: -f1 /etc/passwd .
- No group named USERNAME should be listed in cut -d: -f1 /etc/group .
- It is possible to log in via ssh as the user root with the root password.
While it may be the case that some stuff still refers to USERNAME , the way the system is at this point comes relatively close to what a VPS would offer, hopefully close enough to do some testing with Ansible or similar.
While that Kickstart-solution should be the correct one, this one may be easier to archive and offer nearly the same functionality.
How to Enable Root Account in Ubuntu? [Ubuntu Root Login]
In Ubuntu, By default, the root user account is disabled for security reasons. Now, how to enable Root Login in Ubuntu or Ubuntu Root Login? This article will guide you through various methods to do this.
![How to Enable Root Account in Ubuntu? [Ubuntu Root Login]](data:image/svg+xml,%3Csvg%20xmlns='http://www.w3.org/2000/svg'%20viewBox='0%200%20922%20491'%3E%3C/svg%3E)
List of content you will read in this article:
If you are a newbie, you may be scratching your head about how to enable your root account in Ubuntu! Well, for several security purposes, the ubuntu root login account is kept disabled. Before we begin, here is some preface.
When you install Ubuntu, a root account is created. The issue here is that you do not have the provision to set the password for the account.
Let us guide you to enable the root user account in the Ubuntu server! This tutorial will also help you understand several other factors, including how to disable the account and set up a password for your root account. Let’s dive into understanding further.
Follow the below listed commands to find out the root user account password details:

The x in the output signifies that the account’s password is empty.
Here, ! signifies that the password is locked. What does this mean? Well, this means that the user cannot set a password for the account.
This is an issue. Here is a solution. Following are a few methods that you must follow to enable the account and subsequently set a password:
- Temporary Method
- Command-Line and Graphical User Interface Method
- Command-Line Method
1: How to enable Ubuntu root Login Temporarily?
You can use this method when you want to enable ubuntu root account temporarily. Follow the command mentioned below:
Now, if you want to disable an account, log out of the session and type the following command:
2: How to enable root user in ubuntu via Graphical User Interface?
Here is how you can access the root account through the graphical user interface.
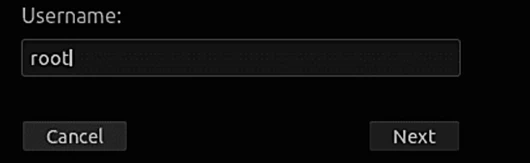
Type root in the first textbox.
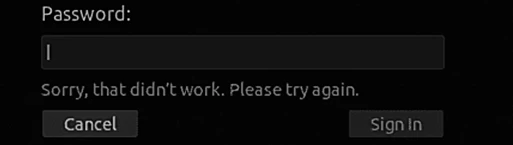
Type your root account password.
As soon as you type the password, you encounter an error message. The reason is that a security layer in the graphical interface stops any login until and unless several other configuration files are configured.
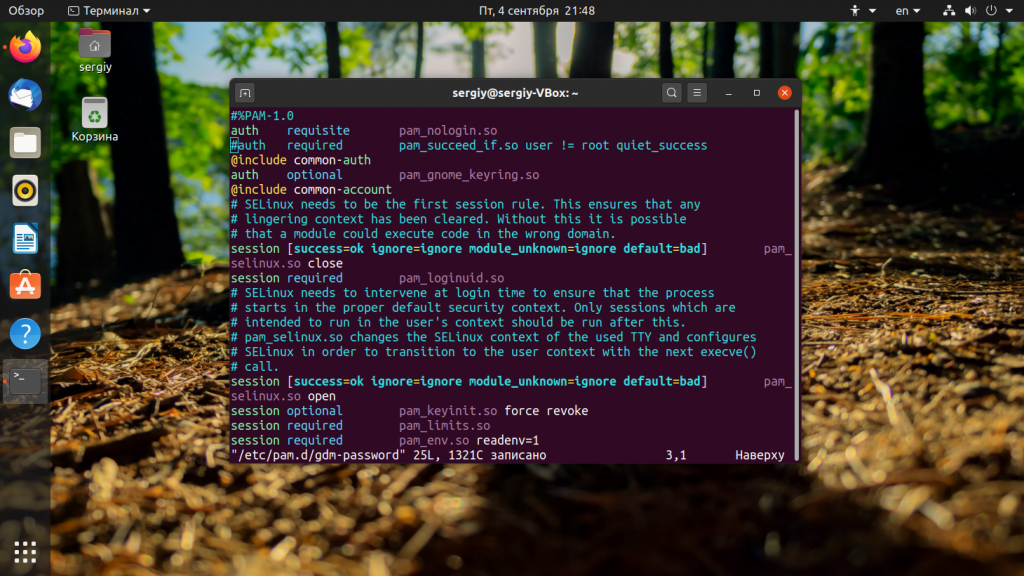
This basically provides extra security. To log in through the graphical user interface, follow these steps and edit the following files:
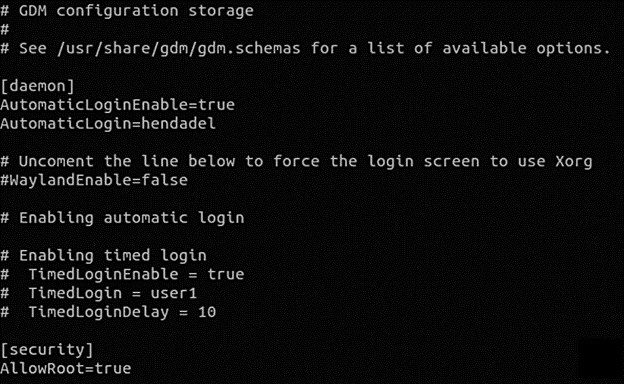
Before editing these files, back up the following configuration files:
sudo cp /etc/gdm3/custom.conf /etc/gdm3/custom.conf_backup
sudo cp /etc/pam.d/gdm-password /etc/pam.d/gdm-password_backup
Now, simply, open the “/etc/gdm3/custom.conf” configuration file
sudo vi /etc/gdm3/custom.conf
Moving on, write the following mentioned line under the ‘security’ textbox.
Now, open “/etc/pam.d/gdm-password” which is a configuration file.
As soon as you hunt down the following line, add ‘#’ at the beginning of that line, just as shown below.
#auth required pam_succeed_if.so user != root quiet_success
Just save and hit exit on the ‘gdm’ configuration file.
To see the changes that you just made, simply reboot the system. To do so, type the following command:
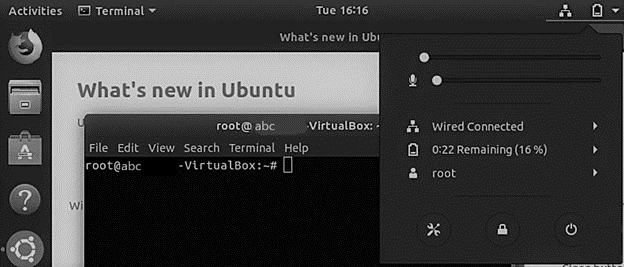
As you have rebooted your system, login into the root account now.
You can log in to the root account easily.
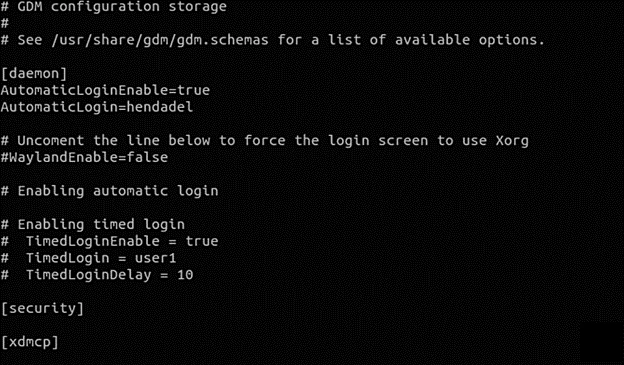
Additionally, if you want to disable the root account, simply use the following command:
Reverse whatever changes you made in the two configuration files earlier.
Delete “AllowRoot=true” from the “/etc/gdm3/custom.conf” configuration file as shown below.
Next, delete the ‘#’ from “/etc/pam.d/gdm-password”.
3: How to enable ubuntu root in Command-line?
Using the command-line method, you can easily enable or disable the root account through the command line. Here, you cannot log in through a graphical interface.
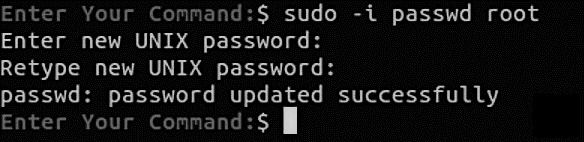
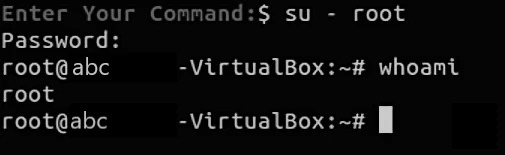
Use the following command to enable the root account:
The screenshot shows that you can access the root account. Along with that, you can set the password for the root account as well. Now, you can go to your root account by typing the following command:
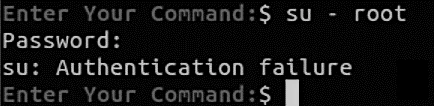
Moreover, to disable the root account, enter the following:
To be sure, switch to the root account and see if the process is successful.
If you see the same message as the above image, then yes, you have successfully disabled the account, as now you can see that the authentication has failed.
Conclusion
These were a few methods to help you enable or disable the root account in Ubuntu. Also, a few root user login commands help you to enable it.
We hope that the article solved your queries and provided you with a better understanding of the topic. If you have any questions or suggestions, please leave them in the comment section below.
People are also reading:
Как зайти под root в Ubuntu
Политика дистрибутива Ubuntu нацелена на то, что все действия, требующих административных привилегий надо выполнять с помощью команды sudo. Использовать root пользователя как основного для новичков опасно, поскольку они ещё плохо ориентируются в системе и могут забыть, что они вошли как root и удалить что-то важное.
А поскольку восстановить файлы, удалённые с помощью команды rm почти нельзя, то лучше новичков туда не пускать. Но иногда возникает необходимость войти под пользователем root. В этой небольшой статье мы рассмотрим как это сделать.
Как зайти под root в Ubuntu
По причинам, описанным выше для пользователя root пароль в Ubuntu не задан по умолчанию, поэтому вы не можете просто так войти от его имени с помощью в виртуальных консолях доступных по Ctrl+Alt+FN или с помощью утилиты su. Поскольку пароля нет, ввести его верно вы не сможете.
Но это всё очень просто обходится. Для того чтобы войти под пользователем root в терминале достаточно дописать sudo перед командой su:
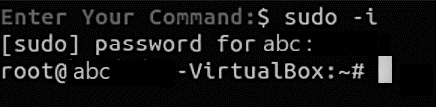
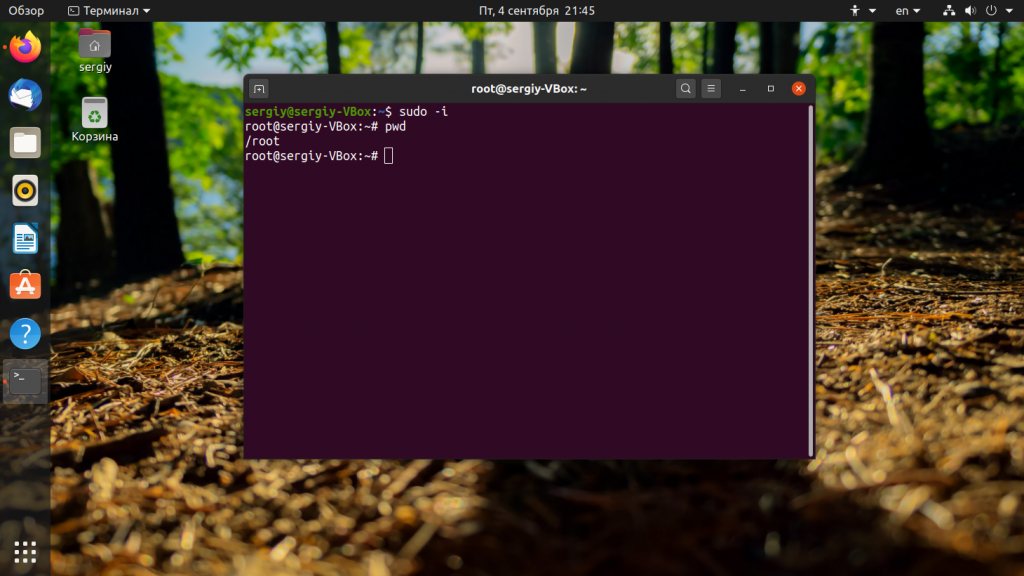
Также можно использовать опцию -i команды sudo чтобы открыть консоль от имени суперпользователя:
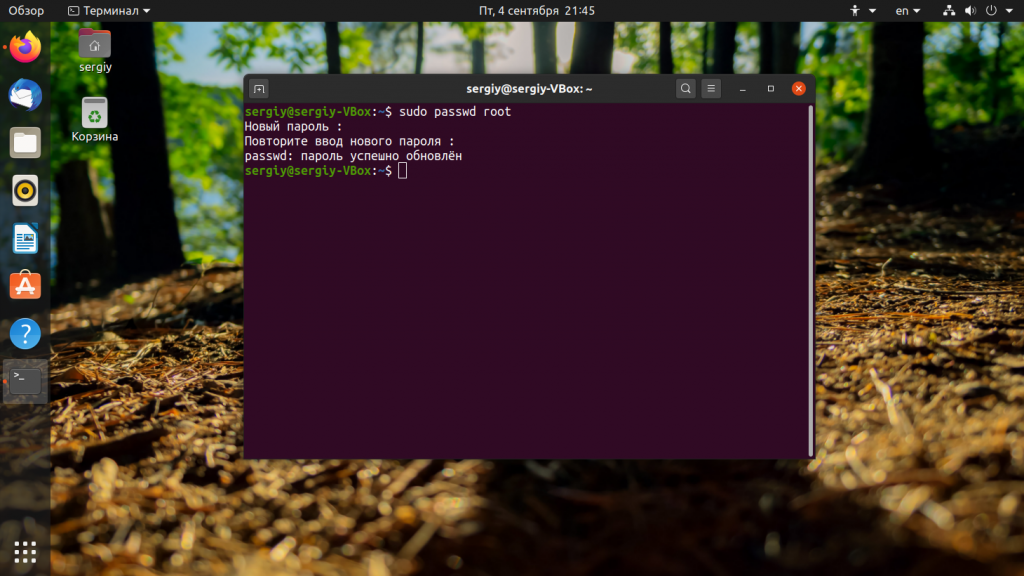
Однако, если вы хотите авторизоваться от имени этого пользователя в виртуальной консоли или по SSH, то вам надо сначала задать для него пароль. Для этого выполните:
Затем введите два раза пароль. После этого пользователь root становится почти полноценным пользователем системы. Вы не сможете только войти под ним в графический интерфейс потому что на это действует ограничение самой оболочки Gnome, это очень плохая практика — запускать целую оболочку от имени root.
Но если вам всё же очень хочется, надо немного настроить правила PAM для GDM. Для этого откройте файл /etc/pam.d/gdm-password и закомментируйте там строчку:
sudo vi /etc/pam.d/gdm-password
# auth required pam_succeed_if.so user != root quiet_success
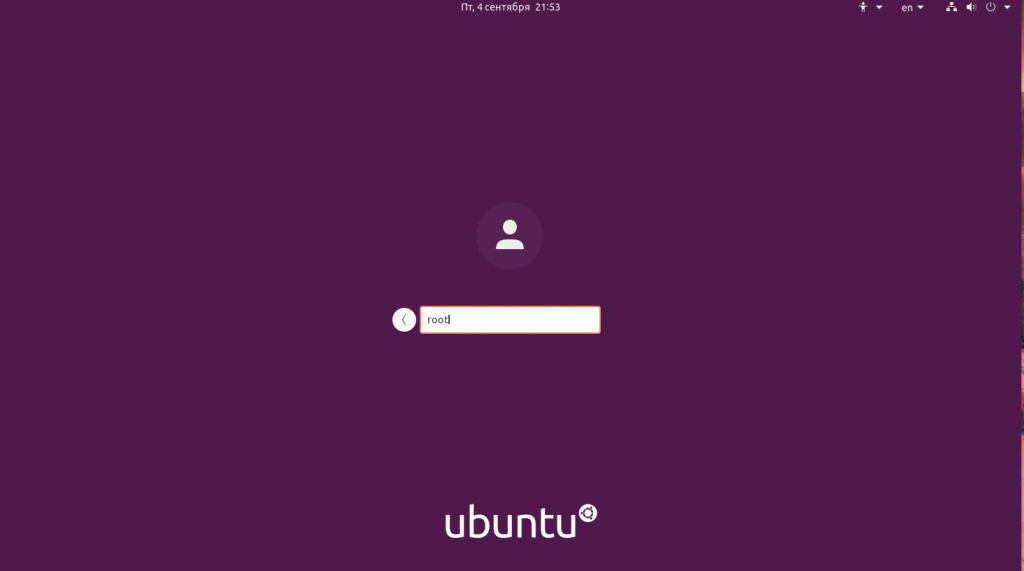
После этого вы сможете авторизоваться от имени root в менеджере входа. Просто кликните по пункту Нет в списке, а затем введите логин root:
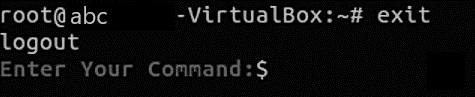
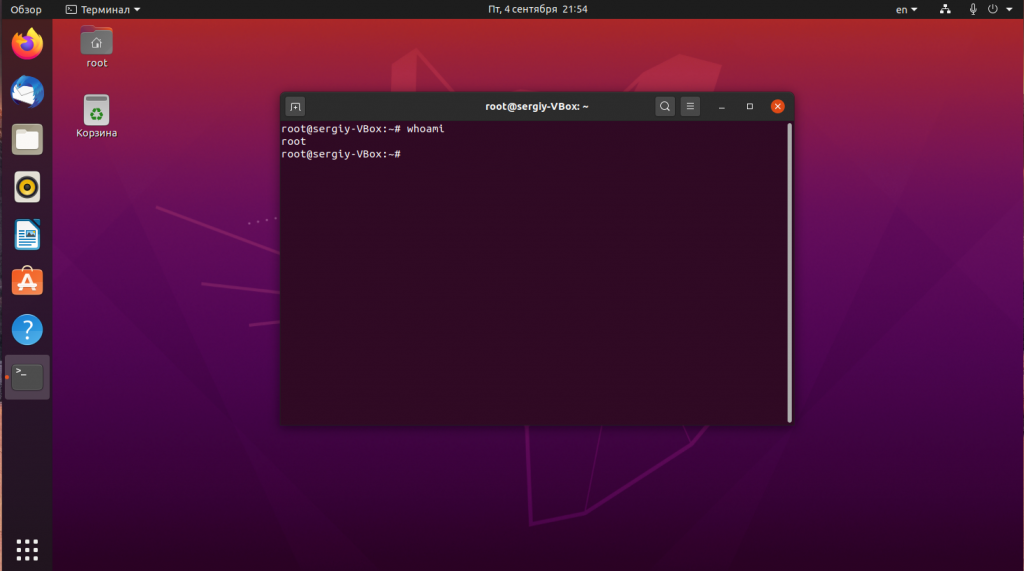
Перед вами откроется оболочка, запущенная от имени суперпользователя:
Это очень небезопасно, потому что любая программа может делать с вашим компьютером всё, что захочет и никто её не остановит. Фактически, первые версии Windows тоже работали в таком режиме и поэтому они были очень уязвимы к вирусам.
Обнаружили ошибку в тексте? Сообщите мне об этом. Выделите текст с ошибкой и нажмите Ctrl+Enter.
Похожие записи
Оцените статью
Статья распространяется под лицензией Creative Commons ShareAlike 4.0 при копировании материала ссылка на источник обязательна .
Об авторе
Основатель и администратор сайта losst.ru, увлекаюсь открытым программным обеспечением и операционной системой Linux. В качестве основной ОС сейчас использую Ubuntu. Кроме Linux, интересуюсь всем, что связано с информационными технологиями и современной наукой.
4 комментария к “Как зайти под root в Ubuntu”
Ну а что там с другими DE? Решение я знаю, но почему их нет в статье? Огласите весь список, пожалуйста! Ответить
Поставил два дня назад Ubuntu, просто посмотреть что за зверь такой Linux. Посмотрел. Теперь понял почему Windows рулит в мире, а Linux в глубокой попе ) Если после установки в Windows сразу можно работать (копировать, вставлять файлы, создавать папки редактировать и тд), то в Linux НИЧЕГО нельзя делать. То есть вообще ничего. Разве что браузер работает и можно что то посмотреть. А для того чтобы получить разрешение на работу в Linux, надо сначала выучить команды терминала ) Окститесь линуксоиды! Какой идиот сейчас будет заморачиваться с командами? Современная молодежь даже не знает что такое терминал. Почитал заклинания линуксоидов: какие страшные картинки рисуют, если юзер зашел под root. Чуть ли не конец света ) Как будто в Windows нет важных файлов, а все важнейшие для юзера файлы только в Linux ) Вы вообще про переустановку системы слышали? Если нет, сообщаю: Linux гораздо проще переустановить, чем Windows, не надо активировать систему. Так что заходим под root, спокойно что то ломаем и спокойно переустанавливаем. Никакой трагедии. По крайней мере такая дикая защита от ЮЗЕРА не нужна. Ответить
![How to Enable Root Account in Ubuntu? [Ubuntu Root Login]](https://monovm.com/wp-content/uploads/2021/05/cover849-main.webp)