- How to Setup Wavlink Wifi Extender [Detailed Guide]
- What is Wavlink Range Extender?
- 4 Methods to Setup Wifi Extenders
- Setup through WPS Button
- Setup through Manual Steps
- Setup through Aerial Access Point
- Setup with an Ethernet Cable
- Why Choose Wavlink Range Extenders?
- Strong and Wider Wi-fi Coverage
- Reuse of Existing Router
- Connection for Multiple Devices
- Conclusion
- FAQs
- Как Открыть Вход в Репитер WavLink (WiFi.WAVLINK.COM) — Инструкция по Настройке на Русском
- Как зайти в настройки ретранслятора WavLink?
- Не получается зайти в ретранслятор по адресу wifi.wavlink.com
- Если адрес личного кабинета WavLink изменен
- Инструкция, как настроить китайский репитер
- Подключение репитера WavLink к маршрутизатору
- Настройка репитера WavLink
How to Setup Wavlink Wifi Extender [Detailed Guide]
Wavlink has a range of networking items, including a wireless router, repeater, range extender, switchers, and more. The wavlink extenders are ideal for expanding and strengthening your wireless network signal. It is compatible with the majority of routers and modems.
This article explains different methods to set up wavlink wifi range routers, repeaters, or extenders. In addition, we have also highlighted why choosing wavlink extenders is a great choice.
What is Wavlink Range Extender?
The wavlink range extenders are an excellent choice for eliminating dead zones of your internet connection. In addition, you can expand the wi-fi coverage of your router by connecting a wavlink range extender to it.
It is a dual-band device that allows you to connect 20 devices simultaneously, giving wi-fi signals at the speed of 1200mps.
4 Methods to Setup Wifi Extenders
If you’ve recently bought a wavlink range extender or repeater, you certainly have made a great choice. The process of setup wifi extenders is easy. Read on to discover different methods to set up the Wavlink router, repeater, and range extender.
Setup through WPS Button
Make sure the place where you set up the range extender doesn’t have any electronic devices around its surroundings like a TV, coffee maker, microwave, refrigerator, printer, etc.
- Press the WPS button for 5 seconds
- Hold and press the WPS button on your wifi router too
- If a green LED turns on the extender, it is connected to the router.
Depending on the model of wavlink routers and extenders, some indicate a blue LED instead of green.
Setup through Manual Steps
- Plug the extender into a power socket
- Once a power LED turns on the range extender
- Open any smart device (i.e., mobile phone, tablet, computer, etc.)
- Navigate to the settings in your smart device and go to the wifi settings
- Tap on the connection named “Wavlink-Extender Setup_Ext.”
- Once connected, launch a web browser on your mobile
- Enter the address ap. set up on the link bar
- A new setup page for range extender will open
- Refer to the step-by-step instructions to set up the extender.
Setup through Aerial Access Point
Connect your range extender to a power source. Make sure it’s closer to your home modem. Then, open settings from your device and connect to the network “Wavlink-AC” or “Wavlink-N.”
Now, go to a web browser and type 192.168.10.1. Or wifi.wavlink.com at the address bar and enter the admin username into the setup page.
The setup system will prompt you to select your time zone and make a system password. Next, select the Access Point or LAN Bridge to create a new network and password and press “Apply.”
Lastly, connect your router to the range extender through an Ethernet Cable.
Setup with an Ethernet Cable
To set up your extenders or repeaters through an ethernet cable, you must have a wireless network with a different name (SSID). In addition, you will need a desktop device (laptop or computer), an extender, and a 3-Meter ethernet cable.
Step # 01 Connect the extender to a power source
Step # 02 Plug the ethernet cable into the extender’s LAN port
Step # 03 Plug the other end of the ethernet cable into the desktop device
Step # 04 Disable the wireless capability in your computer
Step # 05 Open a web browser and enter the link “192.168.10.1. or wifi.wavlink.com” in the address bar.
Step # 06 Follow the on-page instructions in the community section.
Why Choose Wavlink Range Extenders?
The extenders are high-quality devices that augment the wi-fi coverage between a specific area and an internet router. Users often experience limited and weak wi-fi signals through the standard network. The wavlink range extender reduces the dead zones and barriers, providing a strong wi-fi signal.
Here are some reasons to choose wavlink range extenders.
Strong and Wider Wi-fi Coverage
The wi-fi range extender is a powerful device if you want to extend the signal of your existing wireless network. It broadens the range of your wi-fi network.
Reuse of Existing Router
Another great reason to use a wi-fi range extender or repeater is that it allows you to make the most out of your existing network router. If you have a tight budget or want to avoid the laborious work of installing a new router, installing an extender or repeater is an ideal choice.
Connection for Multiple Devices
The standard downside of using a shared network is the poor bandwidth of the internet signal whenever a new device connects to it. For example, if one user is streaming a 3D movie online, the other user connected to the same network would face a weak network even to load a single webpage. You can have 20 devices connected to the same network with a range extender.
Conclusion
Wavlink is among the most high-quality manufacturer of powerful networking products. The routers, extenders, and repeaters designed by Wavlink can easily extend your internet connection.
This article has explained helpful methods for installing wavlink extenders to your wifi network.
FAQs
Q1; Why is Wavlink not associated with Ivanti?
Wavlink is an IT-centered tech brand registered under the trademark of Winstars technology Ltd. Wavlink is not associated with Ivanti. It is often confused with Wavelink, a networking device manufacturer. Wavelink is associated with Ivanti.
Q2; What if the WPS Button setup process fails?
In rare cases, the extenders fail to set up with the internet home router. It mostly happens due to networking problems or weak signals. You can resolve this issue by:
- Press and hold the WPS button to restart your extending device
- If there is no WPS button on your device, unplug the primary power source and wait for a few seconds.
Hedayat S
Hedayat is the new Editor-in-Chief of Rottenwifi and has been writing about computer networking since 2012. Hedayat’s strong background in computer science helped him cement his position in the ever-expanding tech blogging world. As a network engineer, systems administrator, and systems analyst during his decade-long career in Information Technology, he has a passion for the internet & technology in his DNA.
Blog.rottenwifi.com is a participant in the Amazon Services LLC Associates Program which means we may get paid commissions on editorially chosen products purchased through our links to retailer sites. All names, logos, brands, and images are trademarks or copyrighted materials of their respective owners. Amazon and the Amazon logo are trademarks of Amazon.com, Inc., or its affiliates.
Как Открыть Вход в Репитер WavLink (WiFi.WAVLINK.COM) — Инструкция по Настройке на Русском
Вход в wifi ретранслятор WavLink обычно располагается по адресу 192.168.10.1 или wifi.wavlink.com. Уверен на 99%, что вы попали на эту страницу из результатов поиска, поскольку не смогли зайти в настройки данного репитера. Без лишний предисловий, сейчас я вам покажу, как открыть личный кабинет и войти в панель управления данного усилителя беспроводного сигнала через его веб-интерфейс. А в конце статьи будет подробная инструкция по настройке китайского репитера на русском языке.
Как зайти в настройки ретранслятора WavLink?
Итак, для того, чтобы войти в личный кабинет WavLink, необходимо подключиться к wifi сети, которую он ретранслирует. Удивительно, но ее название почему-то не указано на наклейке на корпусе, где отображена вся остальная информация для коннекта. А именно, здесь указан адрес http://wifi.wavlink.com, а также пароль для входа — admin.

- Включить wifi модуль на ноутбуке или смартфоне
- Вставить ретранслятор WavLink в розетку
- Подключиться к его сигналу, который имеет имя «WAVLINK-N»
Изначально сеть никак не защищена, поэтому подключение происходит без использования какого-либо пароля.

После этого запускаем любой браузер и набираем в адресной строке адрес wifi.wavlink.com. Также для входа можно прописать и его IP — 192.168.10.1. Эти адреса равнозначны, можно использовать любой.

Откроется страница входа в репитер WavLink. Изначально здесь все будет на английском языке, но я рекомендую сразу поменять его на русский. Автоматически в дальнейшем весь веб-интерфейс личного кабинета также будет русифицирован.
На странице входа нас попросят ввести пароль. В это поле нужно ввести привычное нам значение — «admin«.

После чего попадаем в личный кабинет WavLink

Не получается зайти в ретранслятор по адресу wifi.wavlink.com
Бывают ситуации, когда вроде бы вы все делаете правильно, однако в панель администратора ретранслятора WavLink войти на получается. В этом случае рекомендую проверить параметры подключения, указанные в конфигурациях сетевого адаптера компьютера или ноутбука.
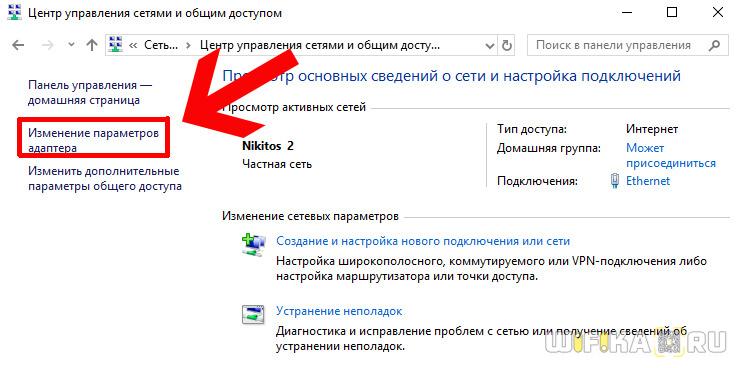
На Windows 10 для этого нужно открыть «Центр управления сетями и общим доступом». Можно воспользоваться обычным поиском, чтобы сразу попасть в эту настройку.

И далее ищем ссылку «Изменение параметров адаптера»
Здесь будут два значка — нам нужен «Беспроводная сеть». Во-первых, нужно ее включить, если она не активна. Для этого кликаем по иконке правой кнопкой мыши и выбираем соответствующий пункт меню.

Далее заходим в это же меню и открываем «Свойства»

Находим «Протокол Интернета версии 4» и активируем все галочки на «Получить IP адрес автоматически» и «Получить адрес DNS сервера автоматически».
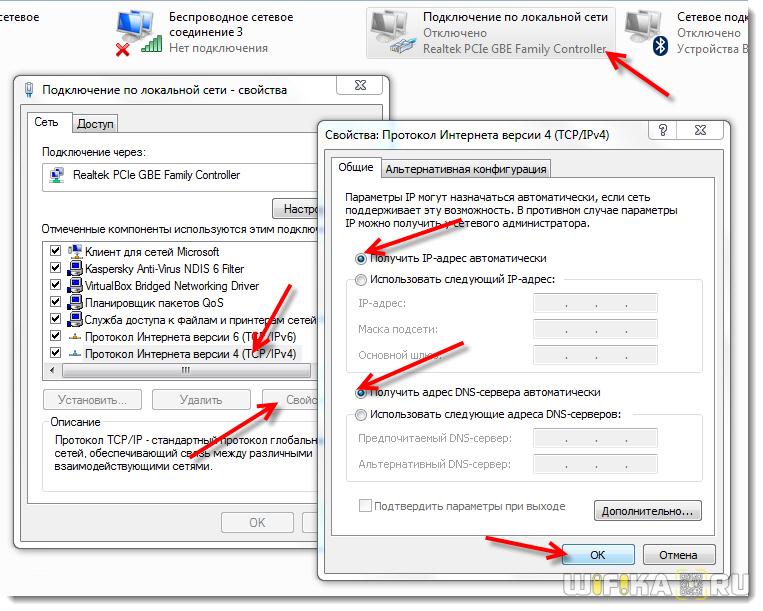
В том случае, если в некоторых полях были указаны некие данные, то необходимо их куда-то переписать. Это информация для подключения к интернету. И она вам еще потребуется при настройке роутера.
Если адрес личного кабинета WavLink изменен
Наконец, ещё одна причина, по которой страница входа в интерфейс конфигурации ВавЛинк может быть не доступна. Это банальное изменение адреса 192.168.10.1 на какой-либо иной предыдущим владельцем. В таком случае его можно посмотреть в меню «Состояние» подключения во все тех же параметрах сетевого адаптера.
Или же выполнить полный сброс повторителя к заводским настройкам. Это делается кнопкой «Reset». Ее нужно задать на 10-15 секунд, пока не замигают светодиоды и ретранслятор не начнет перезагружаться.
Инструкция, как настроить китайский репитер
Ну а теперь пришло время обещанной подробной инструкцию по настройке ретранслятора. Мне не нашлось найти в интернете отдельной сколь-либо ценной публикации на русском. А ведь подобное руководство для китайского оборудования всегда очень кстати. Поэтому восполняем данный пробел.
Подключение репитера WavLink к маршрутизатору
К нашему счастью панель управления здесь хоть и криво, но уже из коробки была переведена на русский язык. Так что мучиться с переводом китайских паучков не придется. Воспользуемся пошаговым быстрым подключением. Для этого переходим в меню «Мастер» и выбираем режим «Репитер». Отметим, что наш WavLink также может работать в роли точки доступа (AP), то есть брать интернет по кабелю от роутера и ретранслировать его по беспроводному сигналу.

Далее выбираем сеть от своего роутера. Если она скрытая, то ставим флажок на «Ввести вручную»

Вводим от нее пароль и придумываем название беспроводной сети, которую будет ретранслировать наш повторитель. И жмем на «Коннект»

Ждем, пока настройки применятся и репитер перезагрузится

После чего нужно будет переподключить компьютер к только что созданному wifi сигналу

Настройка репитера WavLink
После этого возвращаемся в панель управления репитера WavLink и смотрим, что тут еще можно настроить. Сначала зайдем в раздел «WiFi».

- Бесплатный Wi-Fi Настройки — управление беспроводной сетью репитера. Тут можно поменять ее имя, пароль, а также скрыть SSID

- Сила сигнала — регулировка уровня можности беспроводного передатчика. Чтобы сигнал был только у вас, а не у соседей
- Дополнительные параметры — настройка таких данных, как канал wifi и его ширина


Последний раздел — «Настройка», где расположены системные конфигурации репитера.