- Using MySQL Relational Databases on Arch Linux
- System Configuration
- Install MySQL
- Configure MySQL
- Use MySQL
- How to Reset MySQL’s Root Password
- Tuning MySQL
- More Information
- How to Install LAMP Stack with PhpMyAdmin in Arch Linux
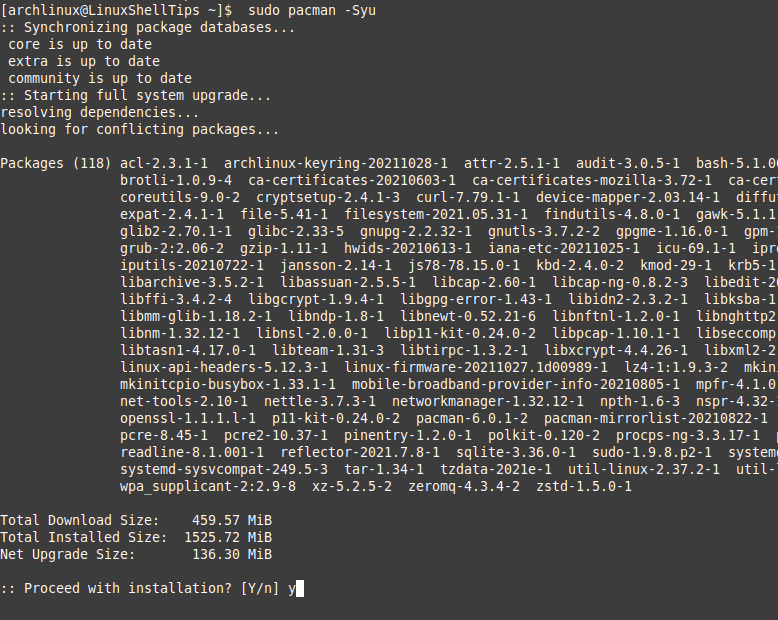
- Step 1: Update Arch Linux System
- Step 2: Install Apache in Arch Linux
- Step 3: Install PHP in Arch Linux
- Step 4: Install MySQL in Arch Linux
- Step 5: Secure MySQL in Arch Linux
- Step 6: Configure Apache in Arch Linux
- Step 7: Testing Apache in Arch Linux
- Welcome to LinuxShellTips
- Step 8: Install PhpMyAdmin in Arch Linux
Using MySQL Relational Databases on Arch Linux
Estamos traduciendo nuestros guías y tutoriales al Español. Es posible que usted esté viendo una traducción generada automáticamente. Estamos trabajando con traductores profesionales para verificar las traducciones de nuestro sitio web. Este proyecto es un trabajo en curso.
This guide has been deprecated and is no longer being maintained.
MySQL is a popular database management system, used as the data storage provider for thousands of web and server applications. This guide will help beginners get started with MySQL on Arch Linux. If you would like to deploy MySQL as part of an application stack, consider our LEMP and LAMP guides.
System Configuration
Make sure your /etc/hosts file has proper entries, similar to the ones shown below. Replace “12.34.56.78” with your Linode’s public address, “servername” with your short hostname, and “mydomain.com” with your system’s domain name.
127.0.0.1 localhost.localdomain localhost 12.34.56.78 servername.mydomain.com servernameSet your system’s hostname by setting the HOSTNAME= value in the /etc/rc.conf file.
Install MySQL
Issue the following commands to update your system and install MySQL:
pacman -Syu pacman -S mysql You will want to add the mysqld daemon to the DAEMONS-() array at the end of the /etc/rc.conf file to ensure that the mysql process starts following then next reboot cycle.
The MySQL server package will be installed on your server, along with dependencies and client libraries. Start MySQL by running the following command:
Configure MySQL
After installing MySQL, it’s recommended that you run mysql_secure_installation , a program that helps secure MySQL. While running mysql_secure_installation , you will be presented with the opportunity to change the MySQL root password, remove anonymous user accounts, disable root logins outside of localhost, and remove test databases. It is recommended that you answer yes to these options. If you are prompted to reload the privilege tables, select yes. Run the following command to execute the program:
mysql_secure_installation By default, MySQL listens only for internal connections. If you plan to connect to your database via TCP/IP, you will need to remove or comment (e.g. prefix the line with a # ) add the bind-address line in the my.cnf file. as follows:
Allowing unrestricted access to MySQL on a public IP not advised, but you may change the address it listens on by modifying the bind-address parameter. If you decide to bind MySQL to your public IP, you should implement firewall rules that only allow connections from specific IP addresses.
Consult the “More Information” section at the end of this tutorial for additional resources that address the configuration of MySQL. Issue the following command to restart the daemon:
Please reference our secure MySQL remote access guide for information on connecting to your databases with local clients.
Use MySQL
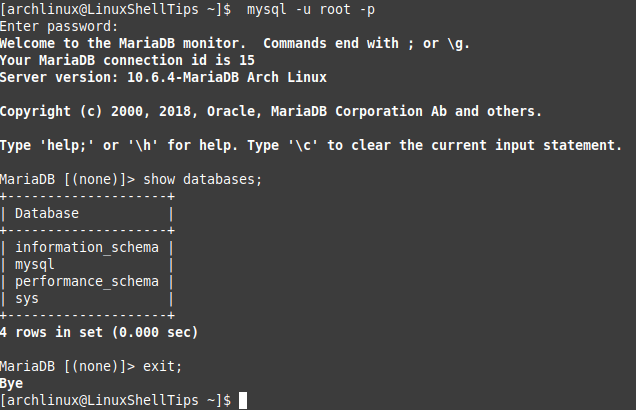
The standard tool for interacting with MySQL is the mysql client program. To get started, issue the following command at your prompt:
You will be prompted to enter the root MySQL user’s password. Enter the password you assigned when you installed MySQL, and you’ll be presented with the MySQL monitor display:
Welcome to the MySQL monitor. Commands end with ; or \g. Your MySQL connection id is 2 Server version: 5.5.9-log Source distribution Copyright (c) 2000, 2010, Oracle and/or its affiliates. All rights reserved. Oracle is a registered trademark of Oracle Corporation and/or its affiliates. Other names may be trademarks of their respective owners. Type 'help;' or '\h' for help. Type '\c' to clear the current input statement. mysql> To generate a list of commands for the MySQL prompt, type \h :
List of all MySQL commands: Note that all text commands must be first on line and end with ';' ? (\?) Synonym for `help'. clear (\c) Clear the current input statement. connect (\r) Reconnect to the server. Optional arguments are db and host. delimiter (\d) Set statement delimiter. edit (\e) Edit command with $EDITOR. ego (\G) Send command to mysql server, display result vertically. exit (\q) Exit mysql. Same as quit. go (\g) Send command to mysql server. help (\h) Display this help. nopager (\n) Disable pager, print to stdout. notee (\t) Don't write into outfile. pager (\P) Set PAGER [to_pager]. Print the query results via PAGER. print (\p) Print current command. prompt (\R) Change your mysql prompt. quit (\q) Quit mysql. rehash (\#) Rebuild completion hash. source (\.) Execute an SQL script file. Takes a file name as an argument. status (\s) Get status information from the server. system (\!) Execute a system shell command. tee (\T) Set outfile [to_outfile]. Append everything into given outfile. use (\u) Use another database. Takes database name as argument. charset (\C) Switch to another charset. Might be needed for processing binlog with multi-byte charsets. warnings (\W) Show warnings after every statement. nowarning (\w) Don't show warnings after every statement. For server side help, type 'help contents' mysql> Let’s create a database and assign a user to it. Issue the following commands at the MySQL prompt:
CREATE DATABASE testdb; CREATE USER 'testuser'@localhost IDENTIFIED BY 'CHANGEME'; GRANT ALL PRIVILEGES ON testdb.* TO 'testuser'@localhost; exit Now let’s log back into the MySQL client as testuser and create a sample table called “customers.” Issue the following commands:
mysql -u testuser -p USE testdb; CREATE TABLE customers (customer_id INT NOT NULL AUTO_INCREMENT PRIMARY KEY, first_name TEXT, last_name TEXT); exit This creates a table with a customer ID field of the type INT for integer (auto-incremented for new records, used as the primary key), as well as two fields for storing the customer’s name. Of course, you’d probably want to store much more information than this for a customer, but it’s a good example of a common case nonetheless.
How to Reset MySQL’s Root Password
If you’ve forgotten your root MySQL password, you may reset it by issuing the following commands:
/etc/rc.d/mysqld stop mysqld_safe --skip-grant-tables & mysql -u root The following part of the password reset will now be done within the MySQL client program:
USE mysql; UPDATE user SET PASSWORD-PASSWORD("CHANGEME") WHERE User-'root'; FLUSH PRIVILEGES; exit Last, restart MySQL by issuing the following command:
Tuning MySQL
MySQL Tuner is a useful tool that connects to a running instance of MySQL and provides configuration recommendations based on workload. Ideally, the MySQL instance should have been operating for at least 24 hours before running the tuner. The longer the instance has been running, the better advice MySQL Tuner will provide.
To install MySQL Tuner issue the following commands:
pacman -S wget wget http://mysqltuner.pl/mysqltuner.pl chmod 755 mysqltuner.pl To run MySQL Tuner simply enter:
Please note that this tool is designed to provide configuration suggestions and is an excellent starting point. It would be prudent to perform additional research for tuning configurations based on the application(s) utilizing MySQL*.*
More Information
You may wish to consult the following resources for additional information on this topic. While these are provided in the hope that they will be useful, please note that we cannot vouch for the accuracy or timeliness of externally hosted materials.
This page was originally published on Tuesday, April 5, 2011.
How to Install LAMP Stack with PhpMyAdmin in Arch Linux
Technically, the LAMP stack consists of Linux, Apache, MySQL, and PHP modules. A LAMP stack environment is ideal for web software developers that want to experience how their web application(s) is likely to behave in a server-hosted/production environment.
It is the perfect testing/debugging platform for your web app until you are confident enough to decouple it and host it on a dedicated server.
In this article, you will learn how to install and configure the LAMP environment along with the PhpMyAdmin database management tool in Arch Linux.
Afterward, you should be able to comfortably develop and test your first web application before making it production-ready and taking it online.
Step 1: Update Arch Linux System
An up-to-date Linux system is a performant system and will not break down easily.
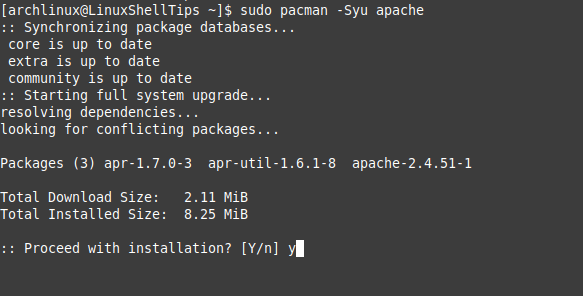
Step 2: Install Apache in Arch Linux
The following command installs the latest version of the Apache webserver.
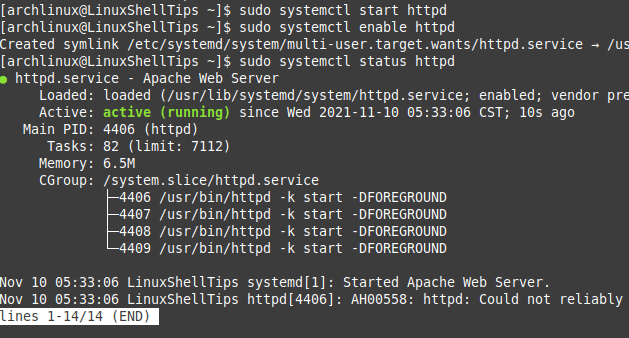
Once Apache is installed, next, you need to start, enable and check the status of the Apache server daemon.
$ sudo systemctl start httpd $ sudo systemctl enable httpd $ sudo systemctl status httpd
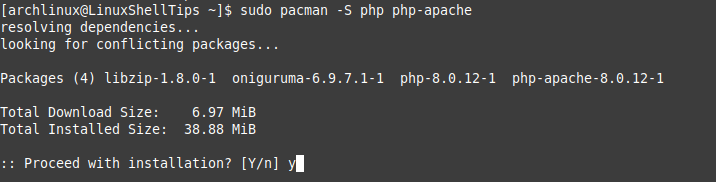
Step 3: Install PHP in Arch Linux
The following command installs PHP and its Apache module.
$ sudo pacman -S php php-apache
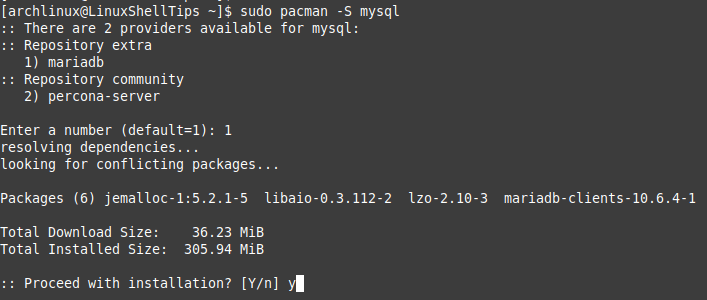
Step 4: Install MySQL in Arch Linux
MariaDB is a community-supported MySQL fork and therefore a good idea to go with it.
Choose the option 1) to install MariaDB.
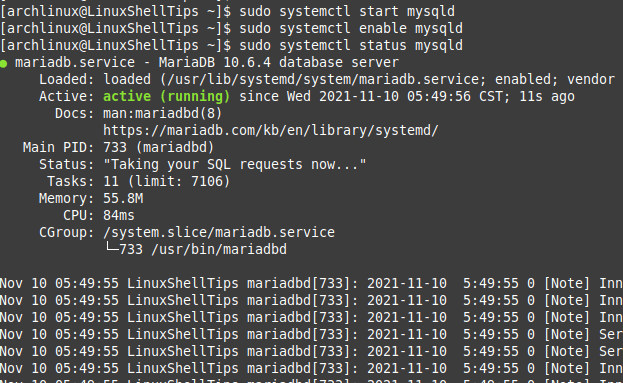
We also need to start, enable and check the MySQL daemon to make sure it is running.
$ sudo systemctl start mysqld $ sudo systemctl enable mysqld $ sudo systemctl status mysqld
If you run into unnecessary errors while trying to execute the above command, for example.
[ERROR] Fatal error: Can't open and lock privilege tables: Table 'mysql.host' doesn't exist
Switch to the root user of the Arch Linux system:
Navigate to the directory path /var/lib/mysql and delete everything inside it.
# mysql_install_db --user=mysql --basedir=/usr --datadir=/var/lib/mysql
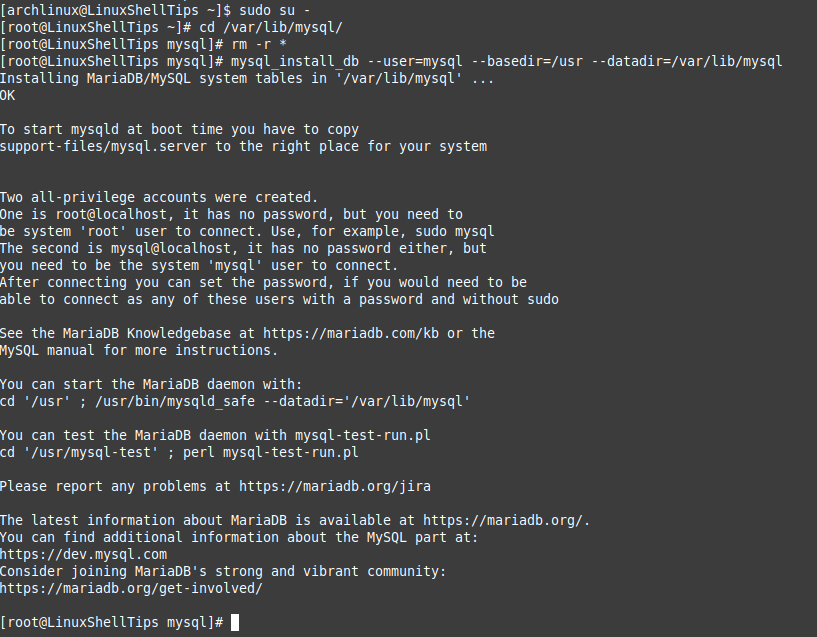
Switch back to your sudoer user and finally, rerun the following command to make sure the mysqld daemon is active:
$ sudo systemctl start mysqld $ sudo systemctl enable mysqld $ sudo systemctl status mysqld
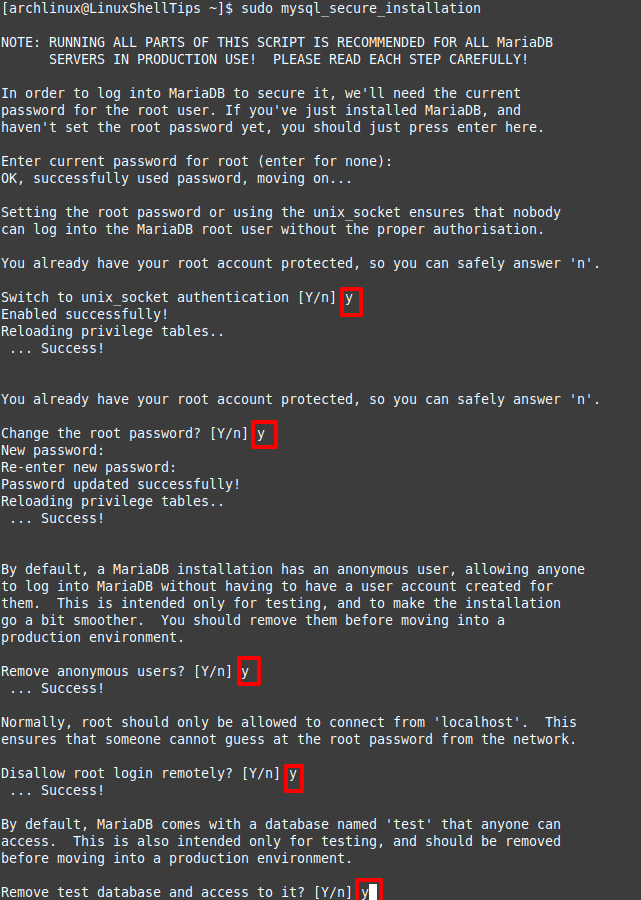
Step 5: Secure MySQL in Arch Linux
Next, you need to secure your MySQL installation by running the following security script.
$ sudo mysql_secure_installation
You will be asked some questions which you can answer as per your preference.
Finally, connect to your MySQL database as the root user.
Step 6: Configure Apache in Arch Linux
Open the apache configuration file.
$ sudo nano /etc/httpd/conf/httpd.conf
Search for the lines starting with LoadModule mpm_prefork_ and uncomment it.
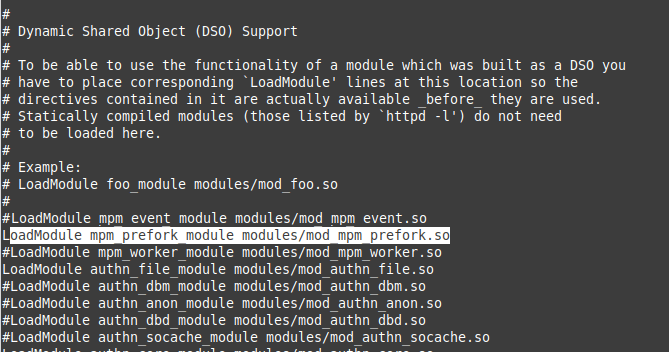
Also, at the bottom of this file, add the following lines:
LoadModule php_module modules/libphp.so AddHandler php-script php Include conf/extra/php_module.conf

Restart Apache webserver to apply configuration changes.
$ sudo systemctl restart httpd
Step 7: Testing Apache in Arch Linux
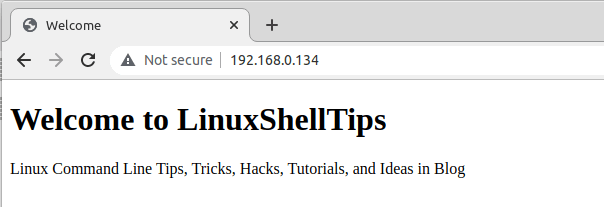
To test Apache, we will create a custom home page (index.html) file.
$ sudo nano /srv/http/index.html
Add the following HTML code.
Welcome to LinuxShellTips
Linux Command Line Tips, Tricks, Hacks, Tutorials, and Ideas in Blog
Save the file and go to the following URL on your browser to access the page.
http://localhost Or http://IP-Address
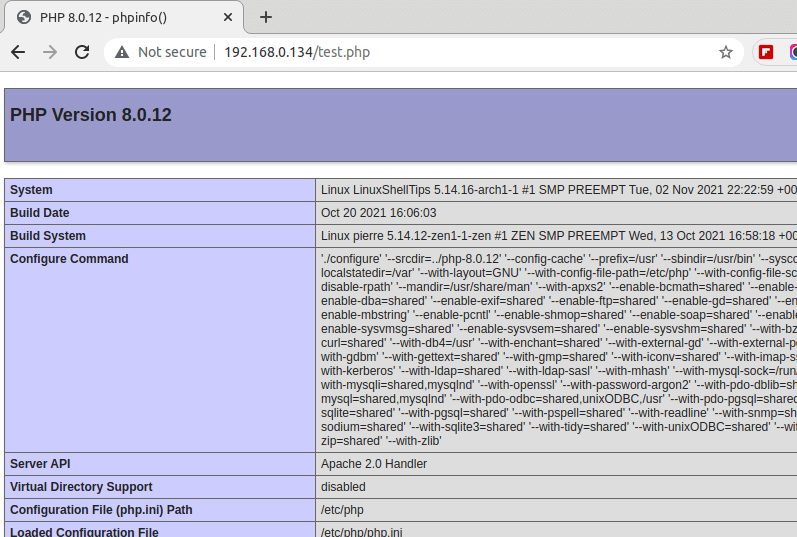
To test if Apache serves PHP scripts, create and edit the following file:
Add the following PHP code.
Save the file and go to the following URL on your browser to access the page.
http://localhost/test.php Or http://IP-Address/test.php
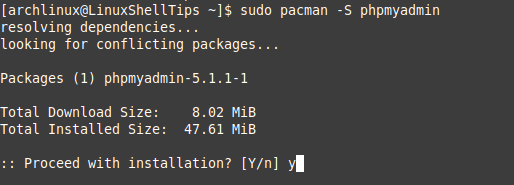
Step 8: Install PhpMyAdmin in Arch Linux
PhpMyAdmin is an open-source web-based database management tool for MySQL/MariaDB.
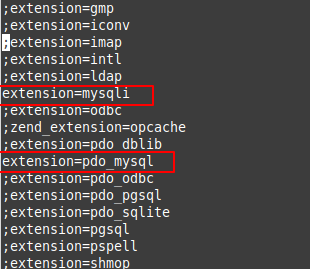
Open the file /etc/php/php.ini and uncomment the lines extension=mysqli, extension=pdo_mysql and extension=iconv by removing the semicolon (;) preceding them.
Now set up Apache to work with phpmyadmin by creating phpmyadmin’s main configuration file.
$ sudo nano /etc/httpd/conf/extra/phpmyadmin.conf
Populate this file with content similar to the following screen capture:
Alias /phpmyadmin "/usr/share/webapps/phpMyAdmin"DirectoryIndex index.php AllowOverride All Options FollowSymlinks Require all granted
Next, include the path to this configuration file on Apache’s main configuration file.
$ sudo nano /etc/httpd/conf/httpd.conf
Add the following line at the bottom.
Include conf/extra/phpmyadmin.conf
Finally, restart the Apache web service.
$ sudo systemctl restart httpd
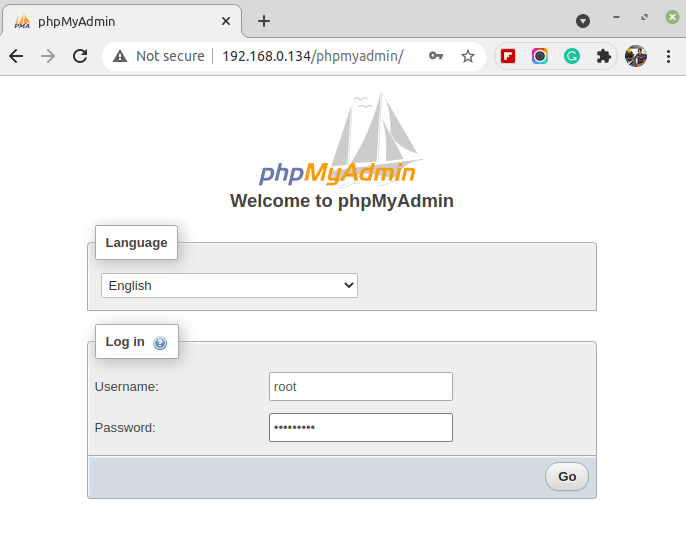
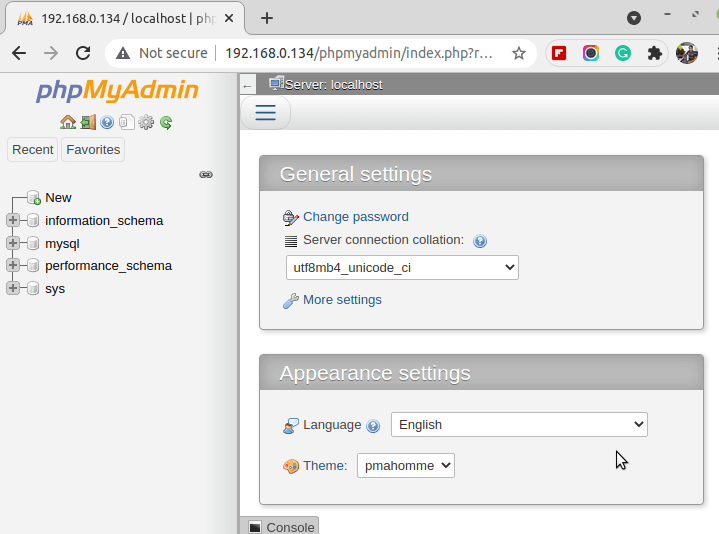
Now access the PhpMyAdmin from the browser.
http://localhost/phpmyadmin Or http://IP-Address/phpmyadmin
With this article guide, you can comfortably start testing the behavior of your web app in a production-like environment. You are now familiar with the needed extensions and configurations required to keep your server environment running.