- Настройка Apache + SSL для работы сайта по HTTPS
- Шаг 1. Создание сертификата
- Шаг 2. Установка модуля SSL для Apache
- Шаг 3. Настройка Apache
- Шаг 4. Проверка работоспособности
- Шаг 5. Настройка редиректа
- В конфигурационном файле
- В файле .htaccess
- Установка модуля rewrite
- Apache + NGINX
- How to Host a Website Using Apache with SSL in Rocky Linux
- Install Apache in AlmaLinux
- Enable Apache on Firewall in Rocky Linux
- Hosting a Website with Apache in Rocky Linux
- LinuxShellTips Introduces linuxshelltips.in
- Creating Apache Virtual Host in Rocky Linux
- Secure Apache with HTTPS in Rocky Linux
Настройка Apache + SSL для работы сайта по HTTPS

Обновлено: 17.02.2022 Опубликовано: 31.01.2017
Используемые термины: Apache, CentOS, Ubuntu, FreeBSD. Инструкция написана для операционных систем на базе UNIX.
Шаг 1. Создание сертификата
Для боевого сервера, сертификат должен быть получен от доверенного центра сертификации — либо локального для компании, либо коммерческого. Или получен бесплатно от Let’s Ecnrypt. Для тестовой среды можно сгенерировать самоподписанный сертификат. Для этого сперва переходим в рабочую папку. а) на Red Hat / CentOS:
openssl req -new -x509 -days 1461 -nodes -out cert.pem -keyout cert.key -subj «/C=RU/ST=SPb/L=SPb/O=Global Security/OU=IT Department/CN=test.dmosk.local/CN=test»
* в данном примере созданы открытый и закрытый ключи на 4 года (1461 день); значения параметра subj могут быть любыми в рамках тестирования.
Шаг 2. Установка модуля SSL для Apache
Шаг 3. Настройка Apache
ServerName site.ru
DocumentRoot /var/www/apache/data
SSLEngine on
SSLCertificateFile ssl/cert.pem
SSLCertificateKeyFile ssl/cert.key
#SSLCertificateChainFile ssl/cert.ca-bundle
- ServerName — домен сайта;
- DocumentRoot — расположение файлов сайта в системе;
- SSLCertificateFile и SSLCertificateKeyFile — пути до файлов ключей, которые были сгенерированы на шаге 1;
- SSLCertificateChainFile — при необходимости, путь до цепочки сертификатов (если используем не самоподписанный сертификат).
Проверяем корректность настроек в Apache:
Перечитываем конфигурацию apache:
Шаг 4. Проверка работоспособности
Открываем браузер и переходим на наш сайт, добавив https://. При использовании самоподписного сертификата (как в нашем случае), обозреватель выдаст предупреждение, что передача данных не безопасна. Подтверждаем наше намерение открыть сайт. Если все работает, переходим к шагу 5.
Если сайт не заработал, пробуем найти причину по log-файлу. Как правило, он находится в каталоге /var/log/apache или /var/log/httpd.
Шаг 5. Настройка редиректа
Чтобы все запросы по http автоматически перенаправлялись на https, необходимо настроить перенаправление (redirect). Есть несколько способов это сделать.
В конфигурационном файле
Открываем файл с настройкой виртуальных доменов (как в шаге 3) и дописываем следующее:
* в конкретном примере, мы перенаправили все запросы для сайта site.ru.
** обратите особое внимание, что если у Вас уже есть VirtualHost *:80 для настраиваемого сайта, необходимо его закомментировать или отредактировать.
В файле .htaccess
Установка модуля rewrite
Чтобы перенаправление работало в Apache, необходимо установить модуль rewrite.
а) в CentOS открываем конфигурационный файл и проверяем наличие строки:
LoadModule rewrite_module modules/mod_rewrite.so
* если ее нет, добавляем; если она закомментирована, снимаем комментарий.
systemctl restart apache2
Apache + NGINX
При использовании веб-сервера на базе и Apache и NGINX, как правило, наружу смотрит последний. В таком случае, именно он будет отвечать на http-запросы, и в таком случае нужно настраивать SSL на NGINX.

Как настроить Apache для работы по HTTPS (SSL)
How to Host a Website Using Apache with SSL in Rocky Linux
The crusade on how awesome, ideal, and convenient the Apache web server is can never get old. It continues to be a lifesaver for most individuals working on web application projects.
Its popularity as a web server application is due to its open-source attribute. Moreover, the module-rich nature of Apache makes it flexibly configurable to its users. Also, when you decide to expand the footprints of your web application projects, Apache makes it possible to accommodate such growing projects.
Rocky Linux, on the other hand, is a community-based enterprise Linux operating system distribution. Since it is somewhat a fork of RHEL’s (Red Hat Enterprise Linux) source code, it is also attributed as a complete binary-compatible and downstream release of its maker (RHEL).
In short, the Rocky Linux project has two critical objectives in mind and the release of an enterprise Linux operating system that is: production-grade and community-supported.
Install Apache in AlmaLinux
To get Apache up and running on your Rocky Linux, consider the following installation steps. Make sure you are a root user or have Sudoer privileges on the system you are using.
Always ensure your Rocky Linux system is up-to-date for its performance to remain top-notch.
Depending on how often you use it, the system update might or might not take a while to complete.
Next, install Apache and its associated dependencies from the AppStream and BaseOS repo.
$ sudo dnf install httpd httpd-tools
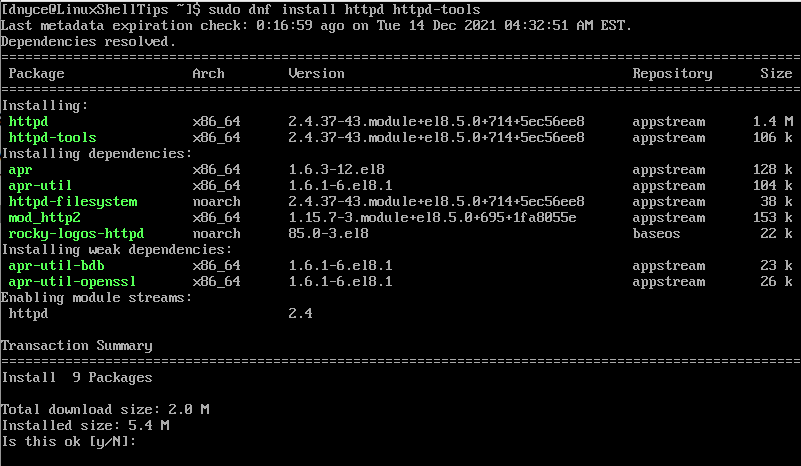
Due to the light nature of the Apache package, the installation should take less than a minute to complete.
In Rocky Linux, Apache operates via the httpd service hence the reason why we reference httpd during its installation.
By default, once the Apache installation successfully completed, the httpd service should be up and running. To be certain, we need to start it again.
$ sudo systemctl start httpd
The next step is to ensure that Apache is continuously running even after restarting the system. We will achieve this objective by enabling Apache’s httpd service.
$ sudo systemctl enable httpd
The next step is to check the status of Apache to ensure that it is up and running.
$ sudo systemctl status httpd

We have verified that Apache is up and running on our Rocky Linux system. Other useful Apache commands to consider include the following:
$ sudo systemctl stop httpd $ sudo systemctl restart httpd $ sudo systemctl reload httpd
Enable Apache on Firewall in Rocky Linux
This step gives the outside world access to Apache through HTTP (port 80) and HTTPS (port 443) protocols.
It is only through this step that you will be able to access your Apache-powered web applications from other machines/computers with varying operating system interfaces.
$ sudo firewall-cmd --zone=public --add-port=80/tcp $ sudo firewall-cmd --zone=public--add-port=443/tcp
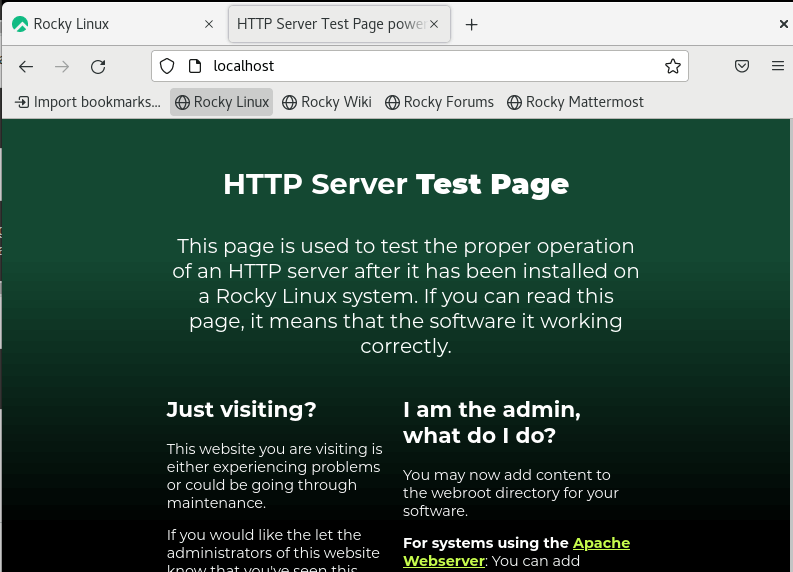
Now you can use any other client machine to access your Rocky Linux server through its IP address on a web browser. You should be able to land on Apache’s default page. The page tells you that Apache is ready to serve your web apps.
Apaches stores your website in /var/www/html/. It is from this location that you can configure how your web application should be represented from a web browser’s viewpoint.
Hosting a Website with Apache in Rocky Linux
The default Apache configuration is suitable to run a single website, but if you want to run multiple website domains, you should use the Apache Virtual Hosts directive feature.
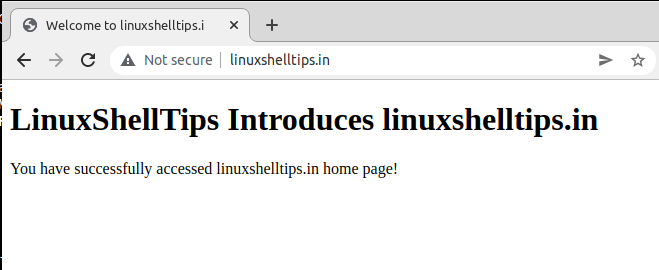
For example, to run another website domain called ‘linuxshelltips.in‘, you need to create a separate virtual host directory and a log directory to hold the log files with the right permissions.
$ sudo mkdir -p /var/www/linuxshelltips.in/html $ sudo mkdir -p /var/www/linuxshelltips.in/log $ sudo chown -R $USER:$USER /var/www/linuxshelltips.in/html $ sudo chmod -R 755 /var/www
Next, create a sample index.html file to test the site.
$ sudo vi /var/www/linuxshelltips.in/html/index.html
Populate it with the following HTML code.
LinuxShellTips Introduces linuxshelltips.in
You have successfully accessed linuxshelltips.in home page!
Creating Apache Virtual Host in Rocky Linux
Now create directories called sites-available and sites-enabled for holding the virtual host files.
$ sudo mkdir /etc/httpd/sites-available $ sudo mkdir /etc/httpd/sites-enabled
Next, mention the sites-enabled directory path in the Apache configuration file that needs access to the virtual host files.
$ sudo vi /etc/httpd/conf/httpd.conf
In the end, add the following line and close the file.
IncludeOptional sites-enabled/*.conf
Finally, create a new virtual host file for our domain linuxshelltips.in.
$ sudo vi /etc/httpd/sites-available/linuxshelltips.in
Next, add the following virtual host configuration with the domain name you are using.
ServerAdmin www.linuxshelltips.in ServerAlias linuxshelltips.in DocumentRoot /var/www/linuxshelltips.in/html ErrorLog /var/www/linuxshelltips.in/log/error.log CustomLog /var/www/linuxshelltips.in/log/access.log combined
Save the file and close the terminal editor.
To active our virtual host file, you need to create a symbolic link between the sites-available and the sites-enabled directories.
$ sudo ln -s /etc/httpd/sites-available/linuxshelltips.in /etc/httpd/sites-enabled/linuxshelltips.in.conf
Finally, restart the Apache and make sure it is running.
$ sudo systemctl restart httpd $ sudo systemctl status httpd
Now you should be able to see the hosted index.html page through your domain name.
Secure Apache with HTTPS in Rocky Linux
To secure Apache with HTTPS, you need to install and use Free Let’s Encrypt SSL certificate by installing Certbot and mod_ssl packages from the EPEL repo.
$ sudo dnf install epel-release $ sudo dnf install certbot python3-certbot-apache mod_ssl
Once Certbot is installed, you can obtain a free SSL certificate for our domain.
$ sudo certbot --apache -d linuxshelltips.in
The above command downloads SSL certificates under a subdirectory named after your domain in the /etc/letsencrypt/live directory.
Once you obtain a certificate for your domain, you can verify the SSL certificate at the following URL.
https://www.ssllabs.com/ssltest/analyze.html?d=linuxshelltips.in
Apache is a dynamic and most popular web server which when fused with a server OS like Rocky Linux creates a very performant and efficient environment.