- How to Host a Website on an Apache Web Server
- Install Apache Web Server in Linux
- Host a Simple HTML Website on Apache
- Linux Shell Tips
- Manage Apache Web Server in Linux
- Установка Apache в Linux
- Установка веб-сервера Apache на Linux
- Установка Apache на CentOS и RHEL
- Установка Apache на Ubuntu и Debian
- Запуск и управление веб-сервером Apache
- Проверить веб-сервер Apache
- Проверьте тестовую страницу Apache
- Создать HTML-файл для тестирования
- Настройка фаервола для Apache
- Файлы и каталоги Apache
- Install and Configure Apache
- What you’ll learn
- What you’ll need
- 2. Installing Apache
- 3. Creating Your Own Website
- 4. Setting up the VirtualHost Configuration File
- 5. Activating VirtualHost file
- End result
How to Host a Website on an Apache Web Server
The Apache HTTP Server (commonly referred to simply as Apache), is a free and open-source web server software brought to you by the Apache Software Foundation. Apache has been around for more than 2 decades and is considered beginner-friendly.
In this tutorial, you will learn how to install an Apache webserver to host a simple HTML website running on a Linux platform.
Install Apache Web Server in Linux
On Ubuntu Linux and other Debian-based distributions such as Linux Mint, Apache can be installed with the following command.
$ sudo apt install apache2 -y
On Red Hat Enterprise Linux and related distributions such as CentOS, Fedora, and Oracle Linux, Apache can be installed with the following command.
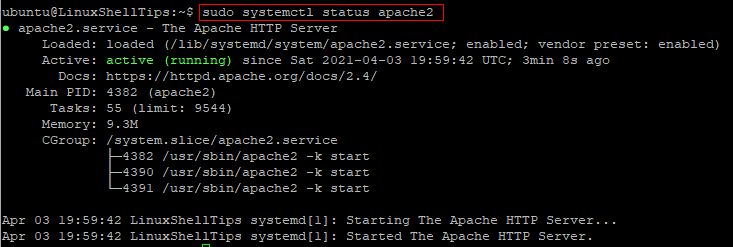
On Ubuntu Linux and other Debian-based distributions, you can start and check the status of the Apache webserver by running the commands below.
$ sudo systemctl start apache2 $ sudo systemctl status apache2
On Red Hat Enterprise Linux and related distributions, run the following commands to start and check the status of Apache.
$ sudo systemctl start httpd $ sudo systemctl status httpd
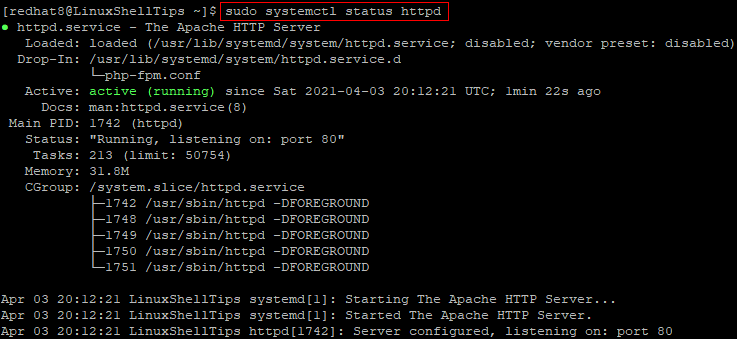
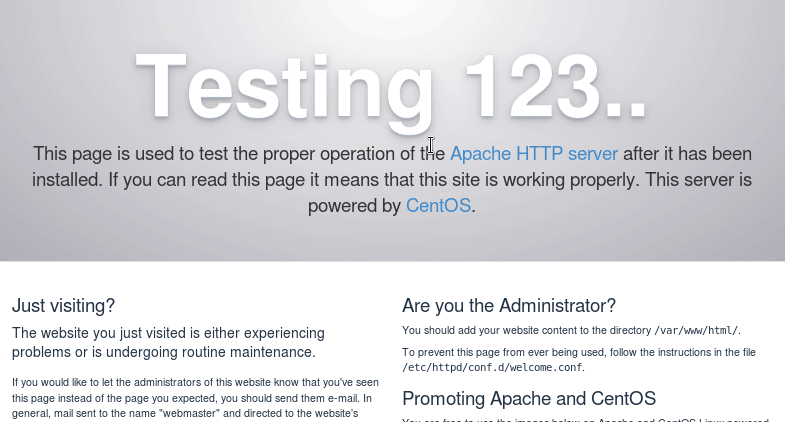
Once you have confirmed that Apache is active, open a web browser and enter the IP address of your Linux server. You may also enter localhost in place of your server IP.
You should see a test page that confirms that Apache is up and running properly.
http://IP-Addresss OR http://localhost
Host a Simple HTML Website on Apache
After you have confirmed that Apache is working properly, you are now ready to add your website content. On Apache, the default location where publicly accessible web content is stored in /var/www/html. This is commonly referred to as the website root.
The first page that is loaded when users visit your website is called the index page. Let us create one as follows.
Firstly, change into the website root with the command below.
On Ubuntu Linux, run the command below to rename the default index page file.
$ sudo mv index.html index.html.bk
On Red Hat, there is nothing to rename here as the default index page file is not stored in this location.
Next, create a new index file with:
Copy and paste the sample HTML code below into the open text editor.
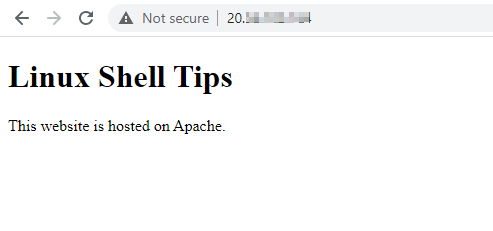
Linux Shell Tips
This website is hosted on Apache.
Save and close the index.html file.
Now, go back to your web browser and refresh the page. You should see your new website as shown in the image below.
Manage Apache Web Server in Linux
As we wrap up this tutorial, let us highlight some basic commands for managing Apache in addition to the ones that we have already used. As you may have noticed, the Apache web service is referred to as apache2 on Ubuntu while it is called httpd on Red Hat Linux.
To configure Apache to automatically start when the Linux server is rebooted, run:
$ sudo systemctl enable apache2 $ sudo systemctl enable httpd
To disable automatic starting of Apache when the Linux server is rebooted, run:
$ sudo systemctl disable apache2 $ sudo systemctl disable httpd
$ sudo systemctl restart apache2 $ sudo systemctl restart httpd
$ sudo systemctl stop apache2 $ sudo systemctl stop httpd
Conclusion
In this tutorial, we have described how to install Apache on Ubuntu Linux as well as Red Hat Linux. We also showed you how to replace the default Apache web page with your own content.
Установка Apache в Linux
![]()
Apache — популярный бесплатный opensource веб-сервер. Он является частью стека LAMP (Linux, Apache, MySQL, PHP), который обеспечивает большую часть Интернета. Мы уже рассказывали про его установку на Windows и сравнивали его с nginx, а сегодня расскажем про то как установить Apache на Linux.

А про то как установить nginx на Linux, можно прочитать в нашей статье.
Установка веб-сервера Apache на Linux
Установка Apache на CentOS и RHEL
Откройте окно терминала и обновите списки пакетов репозитория, введя следующее:
Теперь вы можете установить Apache с помощью команды:
httpd — это имя службы Apache в CentOS. Опция –y автоматически отвечает да на запрос подтверждения.
Установка Apache на Ubuntu и Debian
В Ubuntu и Debian пакет и служба Apache называются apache2 . Сначала также обновите инструмент управления пакетами apt .
Теперь устанавливаем Apache:
Запуск и управление веб-сервером Apache
Apache — это сервис, работающий в фоновом режиме. В Debian и Ubuntu он автоматически запустится после установки, а в CentOS его нужно запустить вручную.
Запустите службу Apache, введя следующее:
sudo systemctl start httpd
Система не возвращает вывод, если команда выполняется правильно.
Чтобы настроить автозагрузку Apache при запуске используйте команду:
sudo systemctl enable httpd
Чтобы проверить состояние службы Apache:
sudo systemctl status httpd

Чтобы перезагрузить Apache (перезагрузит файлы конфигурации, чтобы применить изменения):
sudo systemctl reload httpd
Чтобы перезапустить весь сервис Apache:
sudo systemctl restart httpd
sudo systemctl stop httpd
Чтобы отключить Apache при запуске системы:
sudo systemctl disable httpd
Проверить веб-сервер Apache
Задача вашего программного обеспечения Apache — обслуживать веб-страницы по сети. Ваша новая установка Apache имеет тестовую страницу по умолчанию, но вы также можете создать собственную тестовую страницу.
Проверьте тестовую страницу Apache
В окне терминала найдите IP-адрес вашей системы:
Если вы знакомы с командами ip addr show или ifconfig , вы можете использовать их вместо этого. Подробно про команду ip можно прочитать тут.
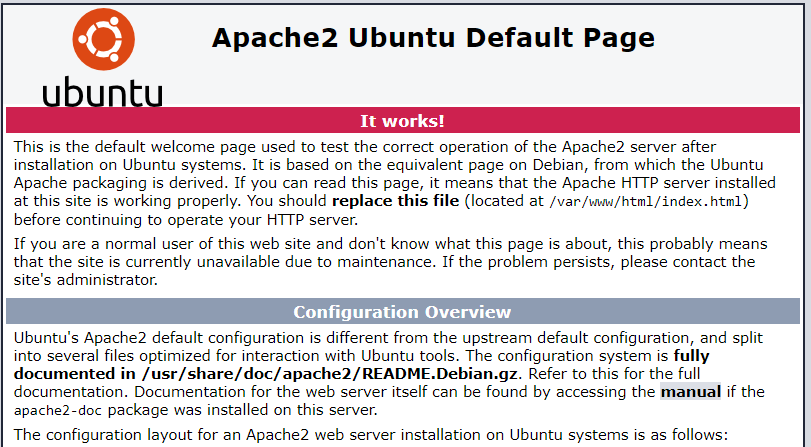
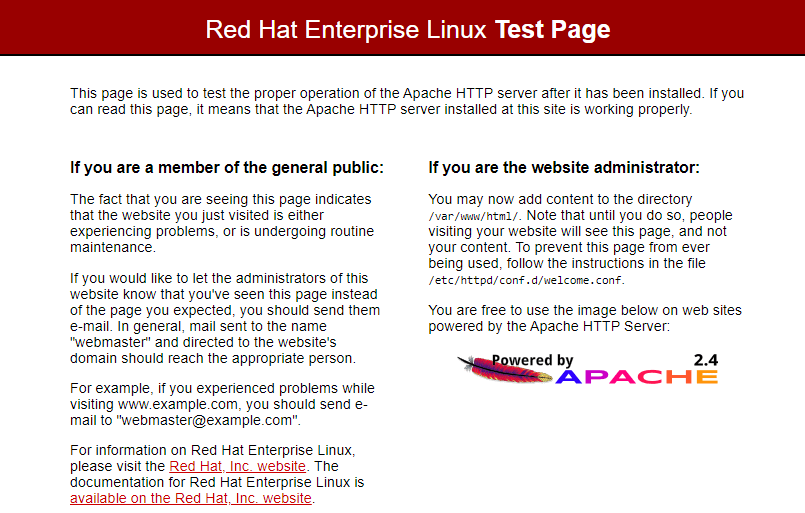
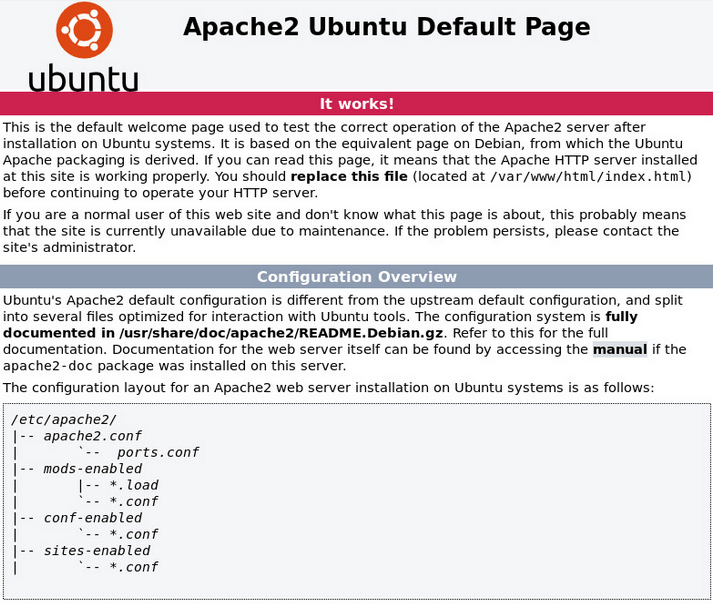
Откройте веб-браузер и введите IP-адрес, отображаемый в выводе. Система должна показать тестовую страницу HTTP-сервера Apache, как показано на скриншоте ниже:
Или так, если у вас Ubuntu:
Если ваша система не имеет графического интерфейса, используйте команду curl:
curl [your_system's_IP_address]:80
Примечание. В конце: 80 обозначает порт 80, стандартный порт для интернет-трафика. Обязательно напишите соответствующий IP-адрес вместо [your_system’s_IP_address].
Создать HTML-файл для тестирования
Если по какой-либо причине вам нужна или у вас уже есть пользовательская HTML-страница, которую вы хотите использовать в качестве тестовой страницы, выполните следующие действия:
В окне терминала создайте новый индекс файл HTML:
echo My Apache Web Server > /var/www/html/index.html
Отредактируйте файл по своему вкусу и сохраните его.
Теперь вы можете выполнить действия, описанные в предыдущем разделе, и если ваш сервер Apache работает правильно, если он отобразит указанную пользовательскую страницу.
Настройка фаервола для Apache
Фаервол в вашей системе блокирует трафик через разные порты. Каждый порт имеет свой номер, и разные виды трафика используют разные порты. Для вашего веб-сервера вам нужно разрешить HTTP и HTTPS трафик через порты 80 и 443 .
В терминале введите следующее:
sudo firewall-cmd --permanent --zone=public --add-service=http sudo firewall-cmd --permanent --zone=public --add-service=https sudo firewall-cmd --reload
Еще раз проверьте, правильно ли настроен ваш фаервол:
sudo firewall-cmd --list-all | grep services
Вы должны увидеть http и https в списке разрешенных сервисов.
Если вы пользуйтесь UFW, то можно открыть порты HTTP ( 80 ) и HTTPS ( 443 ), включив профиль Apache Full :
sudo ufw allow 'Apache Full'
Если вы используете nftables для фильтрации подключений к вашей системе, откройте необходимые порты, введя следующую команду:
nft add rule inet filter input tcp dport ct state new,established counter accept
Файлы и каталоги Apache
Apache управляется путем применения директив в файлах конфигурации:
- /etc/httpd/conf/httpd.conf — основной файл конфигурации Apache
- /etc/httpd/ — Расположение всех файлов конфигурации
- /etc/httpd/conf.d/ — Все конфигурационные файлы в этом каталоге включены в основной файл настроек
- /etc/httpd/conf.modules.d/ — Расположение конфигурационных файлов модуля Apache
Примечание. При внесении изменений в файлы конфигурации не забывайте всегда перезапускать службу Apache, чтобы применить новую конфигурацию.
Логи Apache расположены тут:
- /var/log/httpd/ — расположение файлов логов Apache
- /var/log/httpd/access_log — показывает журнал систем, которые обращались к серверу
- var/log/httpd/error_log — показывает список любых ошибок, с которыми сталкивается Apache
Назначьте каталог для хранения файлов для вашего сайта. Используйте файлы конфигурации, чтобы указать каталог, который вы выбрали. Некоторые типичные места включают в себя:
- /home/username/my_website
- /var/www/my_website
- /var/www/html/my_website
- /opt/my_website
Install and Configure Apache
Apache is an open source web server that’s available for Linux servers free of charge.
In this tutorial we’ll be going through the steps of setting up an Apache server.
What you’ll learn
What you’ll need
- Ubuntu Server 16.04 LTS
- Secure Shell (SSH) access to your server
- Basic Linux command line knowledge
Got everything ready? Let’s move on to the next step!
Originally authored by Aden Padilla
2. Installing Apache
To install Apache, install the latest meta-package apache2 by running:
sudo apt update sudo apt install apache2 After letting the command run, all required packages are installed and we can test it out by typing in our IP address for the web server.

If you see the page above, it means that Apache has been successfully installed on your server! Let’s move on.
3. Creating Your Own Website
By default, Apache comes with a basic site (the one that we saw in the previous step) enabled. We can modify its content in /var/www/html or settings by editing its Virtual Host file found in /etc/apache2/sites-enabled/000-default.conf .
We can modify how Apache handles incoming requests and have multiple sites running on the same server by editing its Virtual Hosts file.
Today, we’re going to leave the default Apache virtual host configuration pointing to www.example.com and set up our own at gci.example.com .
So let’s start by creating a folder for our new website in /var/www/ by running
We have it named gci here but any name will work, as long as we point to it in the virtual hosts configuration file later.
Now that we have a directory created for our site, lets have an HTML file in it. Let’s go into our newly created directory and create one by typing:
cd /var/www/gci/ nano index.html Paste the following code in the index.html file:
I'm running this website on an Ubuntu Server server!
Now let’s create a VirtualHost file so it’ll show up when we type in gci.example.com .
4. Setting up the VirtualHost Configuration File
We start this step by going into the configuration files directory:
cd /etc/apache2/sites-available/ Since Apache came with a default VirtualHost file, let’s use that as a base. ( gci.conf is used here to match our subdomain name):
sudo cp 000-default.conf gci.conf Now edit the configuration file:
We should have our email in ServerAdmin so users can reach you in case Apache experiences any error:
ServerAdmin yourname@example.com We also want the DocumentRoot directive to point to the directory our site files are hosted on:
The default file doesn’t come with a ServerName directive so we’ll have to add and define it by adding this line below the last directive:
This ensures people reach the right site instead of the default one when they type in gci.example.com .
Now that we’re done configuring our site, let’s save and activate it in the next step!
5. Activating VirtualHost file
After setting up our website, we need to activate the virtual hosts configuration file to enable it. We do that by running the following command in the configuration file directory:
You should see the following output
Enabling site gci. To activate the new configuration, you need to run: service apache2 reload root@ubuntu-server:/etc/apache2/sites-available# To load the new site, we restart Apache by typing:
End result

Now is the moment of truth, let’s type our host name in a browser. Hooray!
Further reading: