- How to set the domain name on GNU/Linux?
- 3 Answers 3
- Set FQDN
- activate hostname
- add domain name and address to the server
- VERIFY
- LibreBay
- суббота, 21 января 2017 г.
- Как доменное имя связать с сайтом на личном сервере с Ubuntu Linux
- Настройка домена и DNS-хостинга от RU-CENTER
- Настройка локального хостинга LAMP
- How to setup domain name in Linux server
- Step 1.
- Step 2.
- Step 3.
- Step 4.
- Related stuff:
How to set the domain name on GNU/Linux?
I want to change my domain name. I can use the domainname command, but is there a way to make it permanent across reboots? I think it can be configured in /etc/resolv.conf but this file is generally generated and I don’t know exactly the difference between search and domain directives. And at what time exactly the information there is passed to the domainname program to set the domain name?
Do you have any ideas on that?
I’d like to be mostly compatible across distributions. So if if anyone has pointers on the different distributions flavours, I’d gladly accept them.
Every distribution does this differently. Which ones are you interested in? And did you read their documentation?
Mostly RedHat and Debian flavours. And I couldn’t find relevant information in the documentation. But perhaps I haven’t looked hard enough, I admit I don’t know exactly where in the documentation it could be (or even if it is in the docs).
That’s fair. In Red Hat’s documentation, it’s buried in an appendix. While in Debian’s it’s not buried in an appendix, but it is confusing.
@Michael This link on the debian mailing list is mostly useful, especially So to finally answer your question, you configure your FQDN wherever you want names resovled. If you want it in files on the box itself, then it goes in /etc/hosts. If you run your own name server like I do (I run dnsmasq for simplicity) then you only have to record the information in
On red hat 7 and derived systems you should use hostnamectl to set up the hostname. cyberciti.biz/faq/rhel-redhat-centos-7-change-hostname-command/…
3 Answers 3
Set FQDN
I’m using Debian 7 and this is what worked for me; thanks to Fernando Ribeiro.
server # here's where you put the server's host name activate hostname
add domain name and address to the server
192.168.1.2 server.domain server VERIFY
> hostname --short server > hostname --domain domain > hostname --fqdn server.domain > hostname --ip-address 192.168.1.2 after changing server name in /etc/hostname you might not be able to edit /etc/hosts . In this case you have to use xauth add as stated in this answer stackoverflow.com/questions/20611783/…
When you use redhat-base systems, linux uses /etc/sysconfig/network file and you should set variable HOSTNAME to FQDN , when you use FQDN , linux itself determines domain name.
But when you use debian-base systems, you should fill /etc/hostname file with FQDN :
NOTE: if you want to set domain name be sure set FQDN (Fully Qualyfied Domain Name)
When you set, hostname -d shows you the domain name .
Thank you, but I was under the impression that these files should only contain the hostname without the domain part. If I do what you suggest, hostname will return the fqdn directly (no difference between hostname and hostname -f ).
oh by the way, i forget to say you should set hostname by hand hostname web.mydomain.com after configure your files. because when you configure your file memory can’t apply changes.(if it was useful, don’t forget useful flag)
man hostname , being cited from its end to beginning
FILES /etc/hostname Historically this file was supposed to only contain the hostname and not the full canonical FQDN. Nowadays most software is able to cope with a full FQDN here. This file is read at boot time by the system initialization scripts to set the hostname. /etc/hosts Usually, this is where one sets the domain name by aliasing the host name to the FQDN. THE FQDN The FQDN (Fully Qualified Domain Name) of the system is the name that the resolver(3) returns for the host name, such as, ursula.example.com. It is usually the hostname followed by the DNS domain name (the part after the first dot). You can check the FQDN using hostname --fqdn or the domain name using dnsdomainname. You cannot change the FQDN with hostname or dnsdomainname. The recommended method of setting the FQDN is to make the hostname be an alias for the fully qualified name using /etc/hosts, DNS, or NIS. For example, if the hostname was "ursula", one might have a line in /etc/hosts which reads 127.0.1.1 ursula.example.com ursula Technically: The FQDN is the name getaddrinfo(3) returns for the host name returned by gethostname(2). The DNS domain name is the part after the first dot. Therefore it depends on the configuration of the resolver (usually in /etc/host.conf) how you can change it. Usually the hosts file is parsed before DNS or NIS, so it is most common to change the FQDN in /etc/hosts. If a machine has multiple network interfaces/addresses or is used in a mobile environment, then it may either have multiple FQDNs/domain names or none at all. Therefore avoid using hostname --fqdn, hostname --domain and dnsdomainname. hostname --ip-address is subject to the same limitations so it should be avoided as well. I’d say it does describe the whole thing thoroughly.
LibreBay
Статьи про ОС Ubuntu. Языки программирования Си и C++.
Инструменты разработки и многое другое.
суббота, 21 января 2017 г.
Как доменное имя связать с сайтом на личном сервере с Ubuntu Linux
Допустим имеется сервер со статическим белым IP адресом (в качестве сервера может быть и VPS/VDS). На сервере установлен серверный дистрибутив Ubuntu с web-сервером LAMP (Linux-Apache-MySQL-PHP). Также приобретено доменное имя для сайта. Возникает задача, как сделать, чтобы сайт работающий на этом сервере был связан с доменным именем и был доступен в интернете.
По историческим причинам я пользуюсь услугами интернет компании RU-CENTER. Сейчас в моем распоряжении имеются VDS сервер, несколько доменных имен и дополнительная услуга DNS-хостинг. И на примере услуг от RU-CENTER, в статье я расскажу, как связать доменное имя со сайтом на личном сервере.
Настройка домена и DNS-хостинга от RU-CENTER
Открываем в браузере главную страницу RU-CENTER’а: https://www.nic.ru/ и в правом верхнем углу выполняем вход на страницу управления услугами.

На странице управления переходим в раздел услуги -> Мои домены, где выбираем имя домена для сайта на личном сервере. В моем случае это будет neon1ks.ru. Далее вам необходимо во всех командах neon1ks.ru заменить на своё имя домена.
В столбце DNS-серверы у выбранного домена, нажимаем Изменить

Откроется страница управления DNS-сервера. В области Использовать DNS-серверы услуг RU-CENTER выбираем «DNS-master», и применяем изменения с помощью кнопки Сохранить изменения.
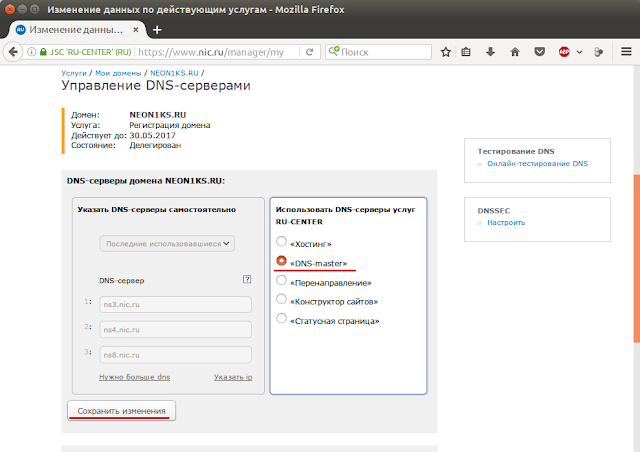
Получаем сообщение, что Заказ на изменение данных принят. И в течении несколько часов заказ будет выполнен. По своему опыту могу сказать, что большинство изменений вступаю в силу быстрее.

- ns3-l2.nic.ru
- ns4-l2.nic.ru
- ns8-l2.nic.ru
- ns4-cloud.nic.ru
- ns8-cloud.nic.ru

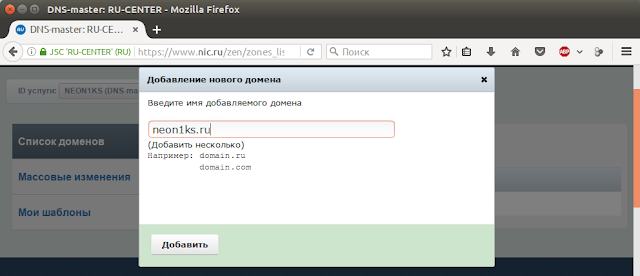
Далее переходим в раздел услуги -> DNS-хостинг и нажимаем на кнопку Управление DNS-зонами.

Откроется страница управления DNS-Master, где добавляем наше доменное имя кнопкой Добавить домен.

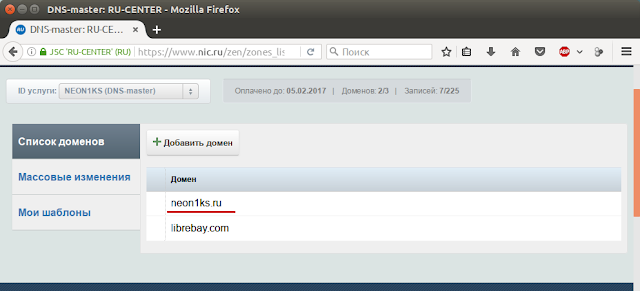
Затем получаем предупреждение, на которое можно не обращать внимание, нажимаем Продолжить:

Домен добавлен, заходим в его настройки, щелкая по имени домена:
- NS (Authoritative name server) — адрес узла, отвечающего за доменную зону. Проще говоря, запись NS указывает, какие DNS сервера хранят информацию о домене. Критически важна для работы службы DNS.
- Запись A (address) — адресная запись, необходима для связи домена и IP-адреса сервера. Проще говоря, для работы вашего сайта и всех поддоменов.
Когда вы вводите название сайта в адресную строку браузера, именно по записи A служба доменных имён определяет, с какого сервера нужно открывать ваш сайт.
- Name (Имя) — указываем символ собаки @ ;
- Type (Тип) — A;
- IP address (IP адрес) — ваш IP адрес сервера;
- TTL — поле оставляем пустым.
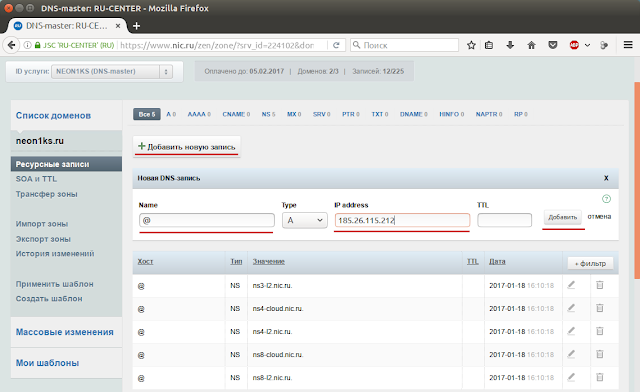
Затем еще раз добавляем запись типа A, только в поле Name вместо @ указываем www .
После добавлении записей сверху появится предупреждение: “Зона содержит изменения, не выгруженные на сервер.” Здесь в правой части нажимаем на кнопку Выгрузить зону.

Остальные настройки уже выполняются на стороне личного сервера.
Настройка локального хостинга LAMP
На сервере необходимо создать виртуальный хостинг и правильно его настроить. Об этом уже была подробная статья, поэтому здесь я кратко расскажу об основных действиях.
В начале создает директорию хостинга (document root) /var/www/neon1ks.ru/public_html , не забывайте, что вместо neon1ks.ru вам нужно указывать свое имя домена.
sudo mkdir -p /var/www/neon1ks.ru/public_html Где размещаем тестовый файл index.html (вместо mcedit можете использовать любой другой консольный редактор)
sudo mcedit /var/www/neon1ks.ru/public_html/index.html содержащий, допустим, следующее
Success! The neon1ks.ru virtual host is working!
Горячие клавиши у mcedit для сохранения F2, для выхода из редактора F10.
Для правильной работы сайта требуется, чтобы пользователь www-data (пользователь созданный для работы сервера apache2) имел доступ на чтение файлов сайта. Простой способ это обеспечить, сделать пользователя www-data владельцем всех файлов сайта:
sudo chown -R www-data:www-data /var/www/neon1ks.ru/public_html Далее создаем файл конфигурации виртуального хостинга, за основу можно взять файл 000-default.conf :
sudo cp /etc/apache2/sites-available/000-default.conf /etc/apache2/sites-available/neon1ks.ru.conf И редактируем. Я использую следующий конфиг. файл для виртуального хостинга:
ServerName neon1ks.ru ServerAlias www.neon1ks.ru ServerAdmin postmaster@neon1ks.ru DocumentRoot /var/www/neon1ks.ru/public_html Options Indexes FollowSymLinks AllowOverride All Require all granted ErrorLog $/neon1ks_ru_error.log CustomLog $/neon1ks_ru_access.log combined В заключение запускаем созданный виртуальный хостинг:
sudo a2ensite neon1ks.ru.conf sudo service apache2 reload На этом настройка завершена.
Тестируем. Правда возможно потребуется подождать некоторое время, пока обновятся DNS-серверы. Открываем браузер и переходим по имени домена. В случае успешно проведенной настройки откроется тестовая страница:
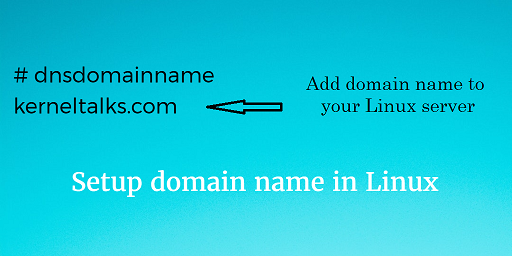
How to setup domain name in Linux server
Many companies have an internal domain for their IT infrastructure. This needs its servers to be configured with a domain name. This will ensure all servers will have FQDN (Fully Qualified Domain Name). For example, server12 is hostname and server12.kerneltalks.com is its FQDN. In such setup, many tools, monitoring requires servers to be identified by FQDN only.
For such a scenario you have to configure the domain name for your Linux server. We will walk you through steps that need to be taken to the setup domain name on your Linux server.
First of all, check if your server is having domain name already set up or not using below command :
root@server12 # dnsdomainname kerneltalks.com
If you get output like above then your server is configured with the domain name. If your output is blank then you have to the setup domain name for your server.
Without further delay lets jump into steps to configure domain name.
Step 1.
How to setup FQDN in Linux?
First thing to be done is add FQDN to your hostname in /etc/hosts file.
root@server12 # cat /etc/hosts 10.10.2.32 server12.kerneltalks.com server12
To confirm your FQDN, run below command :
root@server12 # hostname -f server12.kerneltalks.com
Output should be hostname.domain name
Step 2.
Configure domain name in Red Hat RHEL, Fedora and CentOS
Add below line in /etc/sysconfig/network
Add below parameter in /etc/sysctl.conf
Configure domain name in Ubuntu
Edit your hostname (not FQDN) in /etc/hostname file. and restart hostname service. If you see below error :
# service hostname restart Failed to restart hostname.service: Unit hostname.service is masked.
you can set hostname using :
# hostnamectl set-hostname server12
Once done, confirm normal hostname (using hostname ) and FQDN (using hostname -f )
Step 3.
Add domain in /etc/resolv.conf . This file used for setting nameservers as well.
root@server12 # cat /etc/resolv.conf search kerneltalks.com
This addition makes sure that you can resolves hostnames within your domain.
Step 4.
Confirm that changes are working perfectly. Question is how to check the domain name of the Linux server?
Below are the commands to check hostname, FQDN, and domain name of your server.
root@server12 # hostname server12 root@server12 # hostname -f server12.kerneltalks.com root@server12 #dnsdomainname kerneltalks.com
hostname command shows your server’s hostname. hostname -f shows your FQDN. dnsdomainname command shows your domain name of the server!
Related stuff:
- How to enter single user mode in SUSE 12 Linux?
- How to save top command output in file
- How to find AWS resources that need to be tagged
- 5 ways to check swap on Linux
- How to convert JKS file to KEY file for Apache
- How to remove password expiry in linux
- Howto get Disk serial number in HPUX
- How to disable IPv6 on Linux
- How to open the file in the read-only mode under vi or vim
- How to enable repository using subscription-manager in RHEL
- How to resolve the MFA entity already exists error
- How to safely remove disk from LVM