- Аннотация
- Общесистемные глобальные настройки
- Автоматизация настройки пользовательских proxy
- Пользовательские настройки
- Графический инструмент fly-kcmshell5
- Отдельные настройки приложений
- Web-браузер Яндекс.Браузер
- Web-браузер Firefox
- Web-браузер Chromium
- Сохранение учетных данных для Firefox/Chromium
- Менеджер пакетов APT
- Интерпретатор командной строки Bash
- wget
- Проверка действующих настроек proxy
- How to Download File Using Wget via Proxy in Linux
- Wget and Proxy
- Download File with Wget Using Proxies IP Addresses and Port
- Download File with Wget Using User Authentication
- How To Set Proxy For wget Command?
- Set Proxy via Command
- Set Proxy via User wgetrc Configuration File
- Set Proxy via Global wgetrc Configuration File
- Set Proxy For Operating System
Аннотация
В настоящей статье содержится описание настроек proxy-соединений для различных программ. Рассматриваются глобальные (применяемые ко всем приложениям) и специальные (применяемые к отдельным приложениям) настройки. Как правило, глобальных настроек достаточно для того, что бы все приложения всех пользователей работали через proxy без необходимости настраивать proxy внутри приложения. Однако, некоторые приложения не умеют работать с глобальными настройками или им нужны особенные настройки (например, Firefox, Chromium, а также основанные на них приложения, а также любые другие приложения, основанные на QtWebEngine, в том числе Konqueror, использующий модуль WebEnginePart, Akregator и Falkon).
Общесистемные глобальные настройки
Для настройки конфигурации proxy на системном уровне требуются права администратора (при работе в Astra Linux с включенным МКЦ — администратора с высоким уровнем целостности). Параметры настройки задаются в конфигурационном файле /etc/environment (например sudo nano /etc/environment). Для задания правил используются предопределенные переменные окружения:
- для точек proxy-доступа с использованием различных протоколов:
- https_proxy;
- http_proxy;
- ftp_proxy
- socks_proxy.
- no_proxy.
Значения точек proxy-доступа задаются в виде:
https_proxy="https://:@:/" http_proxy="http://:@:/" ftp_proxy="ftp://:@:" socks_proxy="socks://:@:/"
https_proxy="https://:/" http_proxy="http://:/" ftp_proxy="ftp://:/" socks_proxy="socks://:/"
Значение переменной no_proxy (список исключений) задается в виде списка адресов-исключений:
no_proxy="127.0.0.1, localhost, 192.168.0.0/24, domain.local"
Для активизации изменений настроек перезагрузить ОС.
Для применения общесистемных настроек для пользователя:
- В пользовательской сессии открыть терминал (горячая клавиша Alt+T);
- Выполнить команду:

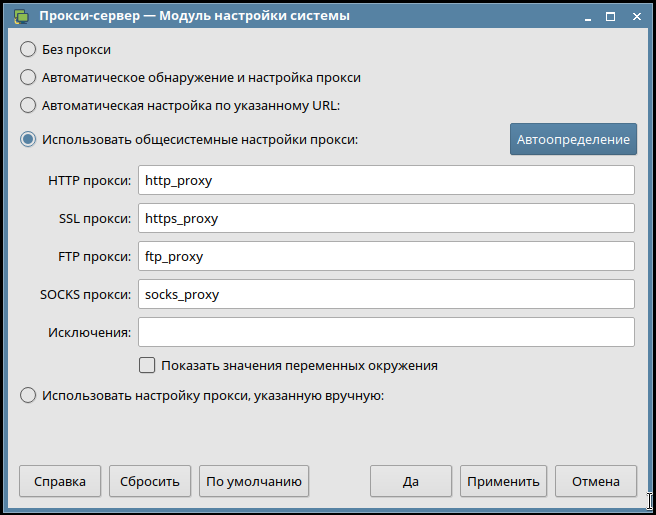
В открывшемся окне выбрать пункт «Использовать общесистемные настройки proxy» (или, в зависимости от установленного обновления, «Использовать общесистемные параметры прокси» ) и указать имена переменных окружения, заданных в файле /etc/environment:
Автоматизация настройки пользовательских proxy
Пользовательские настройки fly-kcmshell5 хранятся домашнем каталоге пользователя в файле .config/kioslaverc. Это файл может быть скопирован разным пользователям, при этом следует каждой копии присвоить права доступа, позволяющие пользовательским приложениям читать этот файл (но не обязательно разрешать изменять).
Пользовательские настройки
Графический инструмент fly-kcmshell5
Графический инструмент fly-kcmshell5 доступен в составе Astra Linux начиная с обновлений:
- Astra Linux Special Edition x.7;
- Astra Linux Special Edition РУСБ-10015-01 (очередное обновление 1.6) начиная с обновления БЮЛЛЕТЕНЬ № 20210611SE16 (оперативное обновление 1.6.7);
- Astra Linux Special Edition РУСБ.10265-01 (очередное обновление 8.1) начиная с обновления БЮЛЛЕТЕНЬ № 20211019SE81 (оперативное обновление 8.1.3);
- Astra Linux Common Edition 2.12.42;
В более ранних обновлениях Astra Linux Special Edition доступен аналогичный инструмент kcmshell5. Далее в примерах команд используется инструмент fly-kcmshell5, применение инструмента kcmshell такое же.
Для выполнения пользовательской настройки proxy:
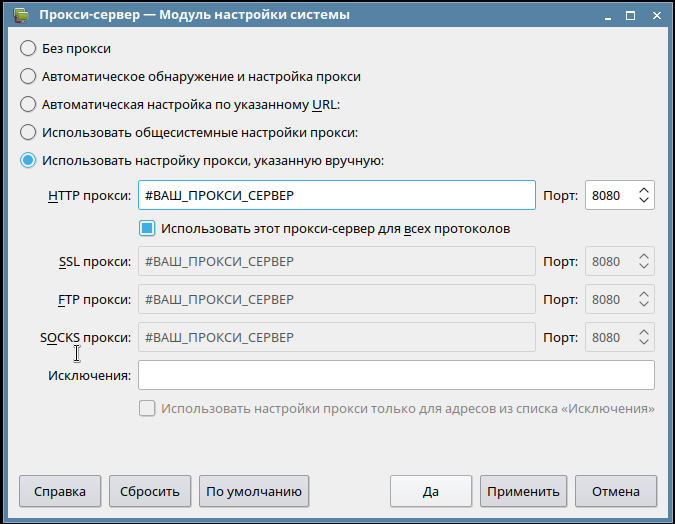
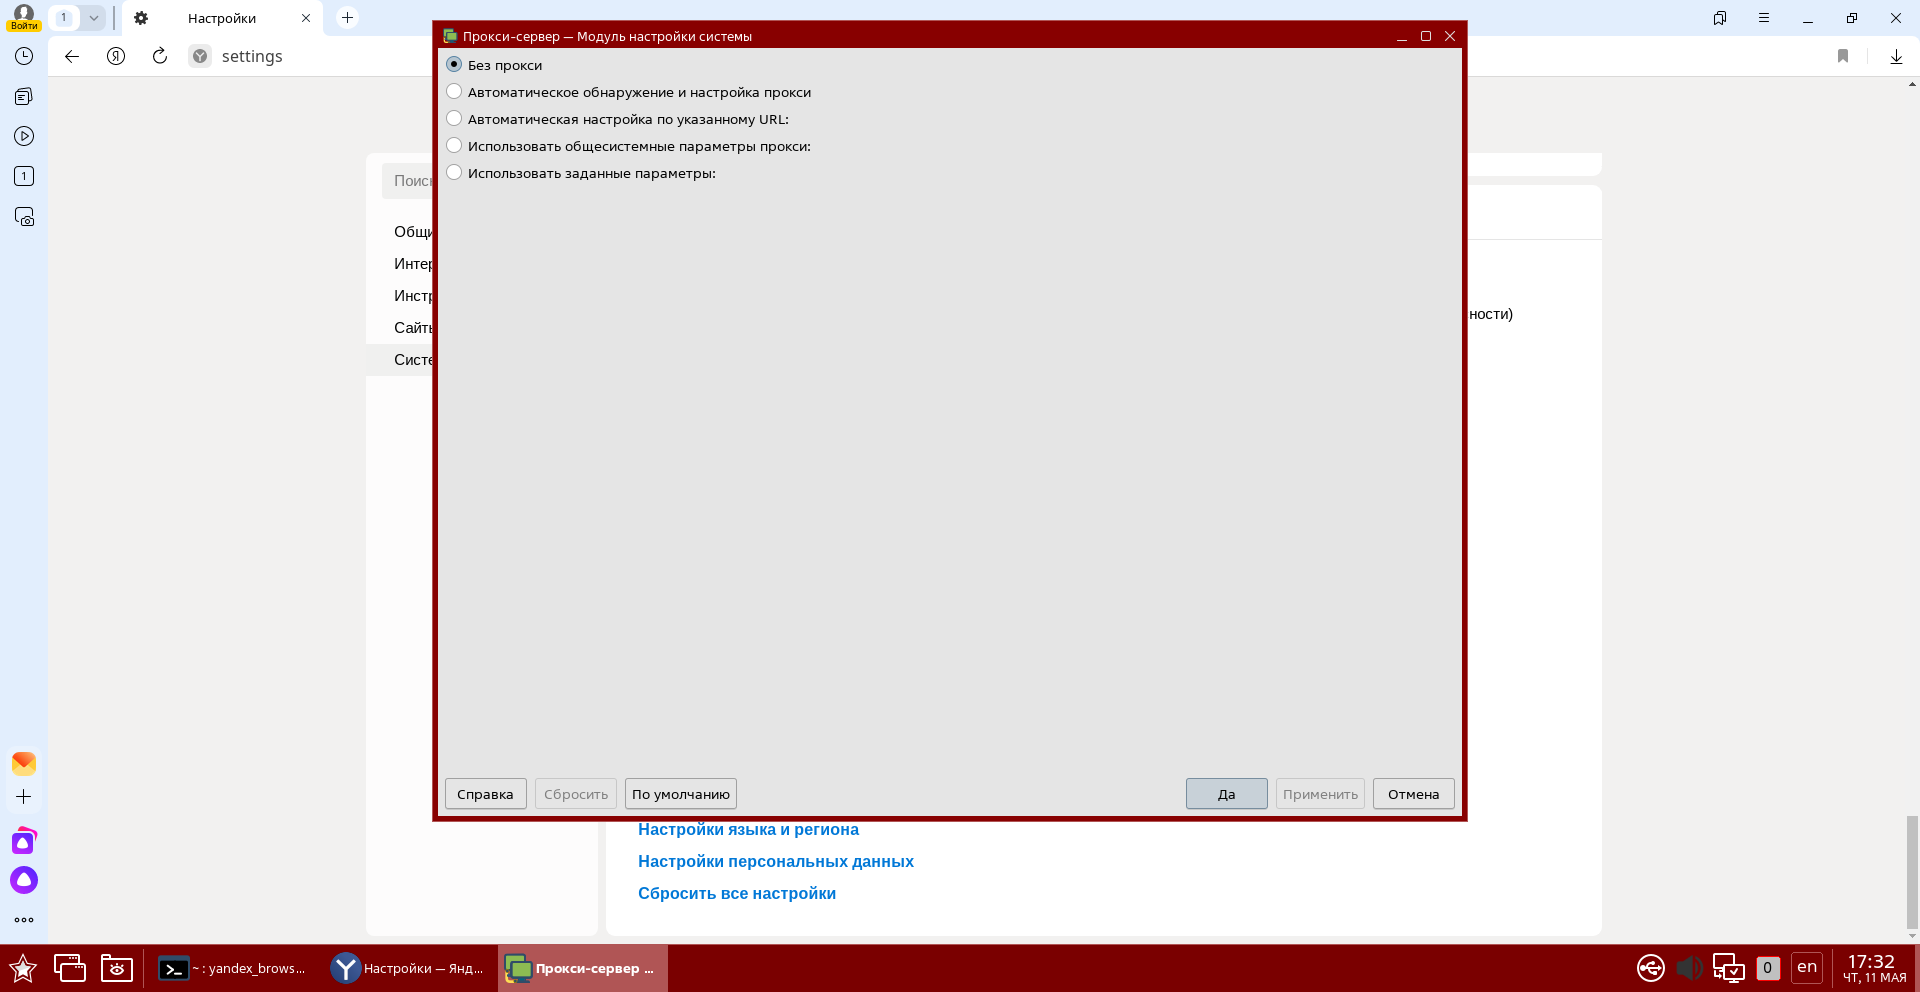
Таком способ настройки не поддерживает передачу логина и пароля для proxy с аутентификацией, и такой proxy не будет работать.
В открывшемся окне:
- Выбрать режим работы proxy «»Использовать настройку прокси, указанную вручную» (или, в зависимости от установленных обновлений «Использовать заданные параметры»):
Адреса (имена) proxy следует указывать без префиксов типа протокола ( https://, http:// и т.д.);
Отдельные настройки приложений
Web-браузер Яндекс.Браузер
Применимо начиная с версии расширенного репозитория 1.7.4.ext1.
См. также материалы технической поддержки Яндекс: Настройки прокси.
Для настройки прокси непосредственно в браузере:
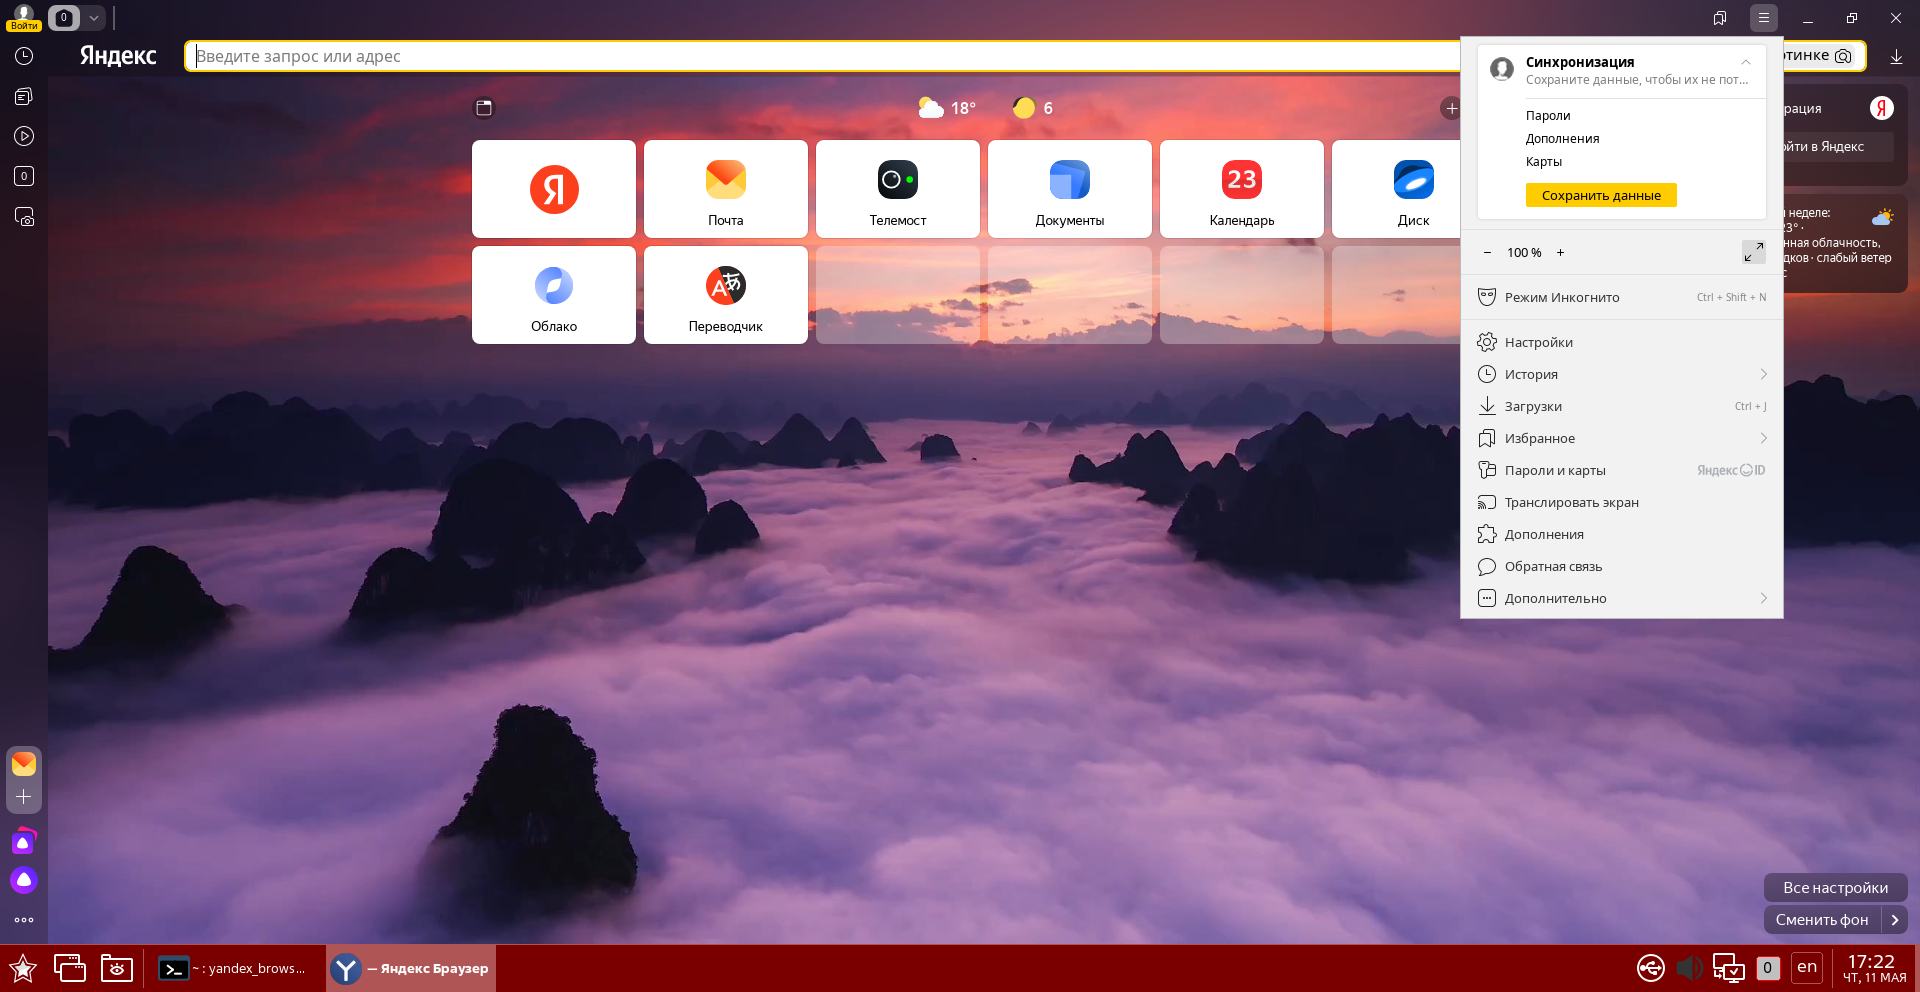
- Нажать кнопку перехода к настройкам браузера (кнопка с тремя горизонтальными полосками, расположенная в верхнем правом углу окна браузера).
- В открывшемся меню выбрать пункт «Настройки»:
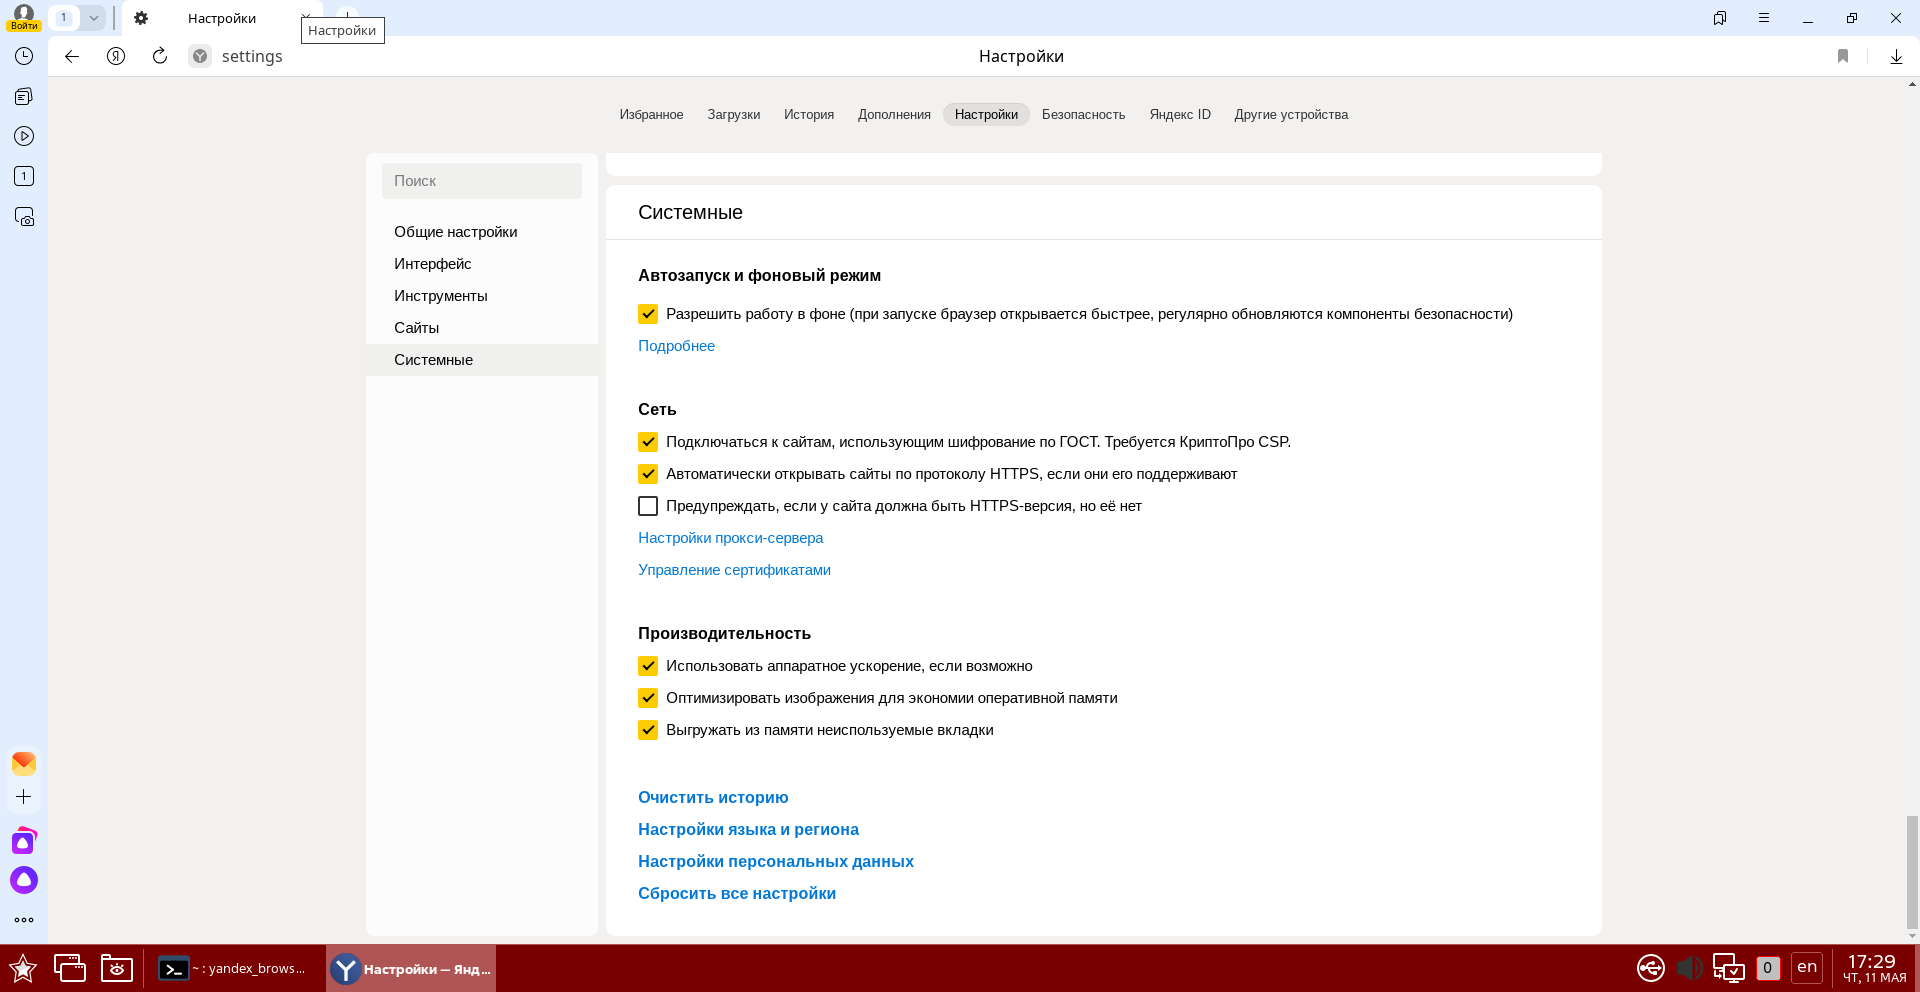
- В открывшемся окне в левом меню выбрать пункт «Системные»:
- В правом меню в разделе «Сеть» выбрать пункт «Настройка прокси-сервера».
- В открывшемся окне задать необходимые настройки:
- Открыть окно настроек Firefox:
- Перейти на вкладку «Дополнительно»;
- Перейти на вкладку «Сеть»;
- Нажать на кнопку «Настроить» напротив надписи «Настройка параметров соединения Firefox с Интернетом».
Web-браузер Firefox
Firefox игнорирует глобальные настройки, передаваемые через переменные окружения, но может использовать пользовательские настройки, заданные с помощью fly-kcmshell5 или свои собственные. Пользовательская настройка proxy с помощью fly-kcmshell5 описана выше .
Для того, чтобы назначить proxy с помощью собственных настроек Firefox:
Важное отличие Firefox от других программ — он умеет использовать NTLM аутентификацию (используется на Microsoft Internet Security and Acceleration Server).
Web-браузер Chromium
CHROMIUM_FLAGS="--proxy-server=:"
Сохранение учетных данных для Firefox/Chromium
WEB-браузеры Firefox и Chromium игнорируют глобальные настройки proxy в части логина и пароля и при запуске регулярно запрашивают логин и пароль. Для запоминания учетных данных proxy с паролем в браузере можно воспользоваться расширением (плагином) FoxyProxy.
Менеджер пакетов APT
APT может работать отдельно с персональными настройками. Такие настройки указываются в файле /etc/apt/apt.conf :
Acquire::http::proxy "http://:@:/"; Acquire::https::proxy "http://:@:/"; Acquire::ftp::proxy "http://:@:/"; Acquire::socks::proxy "http://:@:/"; Acquire. Proxy "true";
Если сервер работает без аутентификаци, то :@ нужно убрать.
Для задания исключений использовать опцию DIRECT:
Интерпретатор командной строки Bash
Если используются одинаковые настройки для протоколов http , https и ftp , то можно использовать следующую команду для включения всех proxy:
и для отключения всех proxy:
Можно также создать функции Bash для автонастройки proxy. Для этого добавить в файл ~/.bashrc следующий код:
# Включить Proxy function setproxy() < export _proxy="http://:@:" > # Отключить Proxy function unsetproxy() < unset _proxy >
И применить сделанные настройки:
Теперь для быстрого включения и отключения прокси можно использовать командыsetproxyиunsetproxy.
wget
proxy-user = username proxy-password = password http_proxy = http://:@:/ ftp_proxy = http://:@:/ use_proxy = on
Если прокси без аутентификации, то часть :@ не указывается.
Проверка действующих настроек proxy
How to Download File Using Wget via Proxy in Linux
Most Linux users prefer to carry out their periodic file download requirements from a command-line interface. It is a convenient approach as they do not have to switch between web browsers’ GUI tabs or go through several redirecting download buttons before initiating the actual download of the files they need. This objective is achieved by using a terminal-based file download program.
Wget is one such program. To use it, you only need to prefix the URL containing the file you wish to download with the command wget.
Consider the following wget syntax:
$ wget [options] [URL_to_targeted_file]
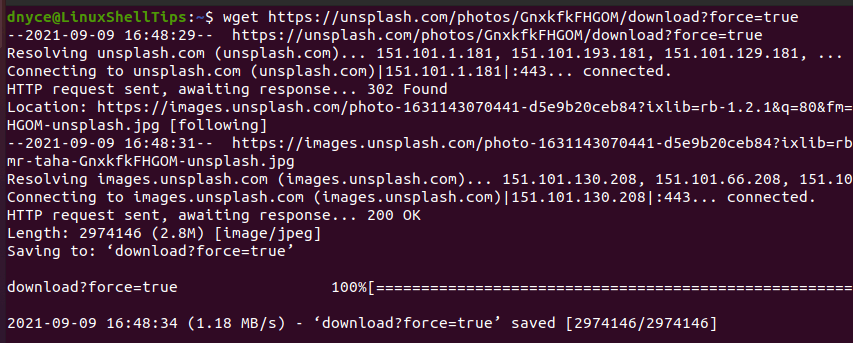
A simple example would be the download of a free photo from the Unsplash website.
$ wget https://unsplash.com/photos/GnxkfkFHGOM/download?force=true
Wget and Proxy
When a proxy server is in the picture, using wget to download a file is no longer as straightforward as demonstrated above. It is because a proxy server acts as a bridge between the remote computer or server (holding the file you wish to download) and your client or local machine (anticipating the file download to start and end successfully).
Since a proxy server offers a firewall-and-filter functionality, some authentication is required before we can be able to successfully download any file.
Download File with Wget Using Proxies IP Addresses and Port
Since wget supports the use of common protocols like HTTP, HTTPS, and FTP, we can set proxies related to these protocols as per the following syntax:
export ftp_proxy=FTP_PROXY:PORT export http_proxy=HTTP_PROXY:PORT export https_proxy=HTTPS_PROXY:PORT
- FTP_PROXY points to the associated FTP proxy server address.
- HTTP_PROXY points to the associated HTTP proxy server address.
- HTTPS_PROXY points to the associated HTTPS proxy server address.
- PORT points to the address port associated with each proxy server address.
Based on the above syntax, a wget via proxy file download scenario under HTTP and HTTPS protocols will follow the following command sequence.
$ export http_proxy="PROXY_IP:PROXY_PORT" $ export https_proxy ="PROXY_IP:PROXY_PORT" $ wget URL_to_Downloadable_File
Download File with Wget Using User Authentication
In this case, instead of setting your proxies with the needed user authentication credentials, you can pass them through the succeeding wget command.
Consider the following full implementation of wget proxy file download via HTTPS protocol.
$ export https_proxy="https://PROXY_SERVER_ADDRESS:SERVER_PORT" $ wget --http-user= "YOUR_USERNAME" --http-password= "YOUR_PASSWORD" https:// PATH_TO_DOWNLOADABLE_FILE
The wget terminal-based file download tool is an interestingly flexible application to master for your Linux file download needs whether you are retrieving remote files via proxies or not. Its command usage has more to offer than what this article guide has covered.
To know more about the depth of wget usage, key in the following commands on your Linux terminal environment.
How To Set Proxy For wget Command?

The wget command is a popular command used to download files via the command-line interface. Proxy is used as an intermediate host which redirects HTTP and HTTPS requests to the destination server. In some cases, we may require to set a proxy for the wget command. In this tutorial, we examine how to set a proxy for the wget command.
Set Proxy via Command
The proxy configuration for the wget command can be set via the command line interface during usage of the wget command. The -e use_proxy=yes http_proxy=»proxy.linuxtect.com» option can be used to set a temporary proxy for the current command execution time. In the following example, we use the “proxy.linuxtect.com” host as a proxy in order to download “www.windowstect.com”.
$ wget -e use_proxy=yes -e http_proxy="proxy.linuxtect.com" www.windowstect.comEvery protocol has its own usage and requires different proxy and proxy configurations. The HTTPS proxy can be configured like below for the command line interface usage.
$ wget -e use_proxy=yes -e https_proxy="proxy.linuxtect.com" https://windowstect.comAlternatively, an FTP proxy configuration can be set for the FTP protocol usage.
$ wget -e use_proxy=yes -e ftp_proxy="proxy.linuxtect.com" ftp://windowstect.comSet Proxy via User wgetrc Configuration File
As an advanced command, the wget provides configuration files. Every user has their own configuration file located in their home directories with the name of .wgetrc . If it doesn’t exist it can be created easily as a text file. This configuration file can be used to set proxy configuration for the wget command. Put the following lines for the related proxy configuration for the current user. The exact location of this configuration file is “~/.wgetrc“. This configuration is permanent and used every time the wget command is executed.
http_proxy="proxy.linuxtect.com" https_proxy="proxy.linuxtect.com" ftp_proxy="proxy.linuxtect.com"Set Proxy via Global wgetrc Configuration File
Alternatively, the wget proxy configuration can be set for the whole system. The systemwide wget configuration file can be used which is located at “/etc/wgetrc“. The same configuration is put like a user proxy configuration file. This configuration is permanent and used every time the wget command is executed.
http_proxy="proxy.linuxtect.com" https_proxy="proxy.linuxtect.com" ftp_proxy="proxy.linuxtect.com"Set Proxy For Operating System
Every Linux distribution provides the proxy configuration for the current user or system-wide the “~/.bash_profile” file is used to set proxy configuration for the current user. The “/etc/profile” file is used to set proxy configuration for all users in a system-wide scope.
export http_proxy=http://proxy.linuxtect.com export https_proxy=https://proxy.linuxtect.com export ftp_proxy=ftp://proxy.linuxtect.com