- Getting Started with the Arduino WiFi Shield
- Connecting the Shield
- Using the Shield With Older Boards
- Ports on the WiFi Shield
- Network Settings
- Scan for available networks
- Open network example
- WPA network example
- WEP Network example
- SD Card and SPI
- Updating firmware on the shield
- Next steps
- Arduino WiFi Shield 101
- Getting Started
- Need Help?
- Documentation
- OSH: Schematics
- On-board Indicators
Getting Started with the Arduino WiFi Shield
The Arduino WiFi shield allows an Arduino board to connect to the internet using the WiFi library and to read and write an SD card using the SD library.
The WiFi Library is included with the most recent version of the Arduino IDE. The firmware for the WiFi shield has changed in Arduino IDE 1.0.4. It is strongly recommended to install this update per these instructions
The WiFI library is similar to the Ethernet library and many of the function calls are the same.
Connecting the Shield
To use the shield, mount it on top of an Arduino board (e.g. the Uno). To upload sketches to the board, connect it to your computer with a USB cable as you normally would. Once the sketch has been uploaded, you can disconnect the board from your computer and power it with an external power supply.
Digital pin 7 is used as a handshake pin between the WiFi shield and the Arduino, and should not be used.
Using the Shield With Older Boards
If you are using the WiFi shield with an Arduino earlier than the Uno rev3, you need to make the connection below for the board to work. The WiFi board uses the IOREF pin on newer Arduino pin layouts (Uno rev3, Mega2560 rev3, and later) to sense the reference voltage for the I/O pins of the board to which it is attached. If you are using the shield with an older board, you need to connect the shield’s IOREF pin to 3.3V. You can do this either with a jumper wire connecting IOREF to 3.3V as shown in the photo below, or by soldering the IOREF jumper on the bottom of the shield, shown below. WARNING: If you use the solder jumper, do not connect the shield to a rev3 or later board. To be safe, remove the IOREF pin on the shield. Otherwise, you will be shorting 3.3V to 5V through the IOREF pin.
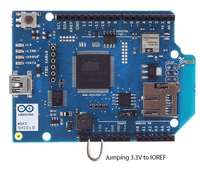
Jumping 3.3V to IOREF (recommended)
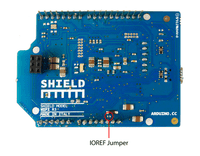
Soldering 3.3V to IOREF
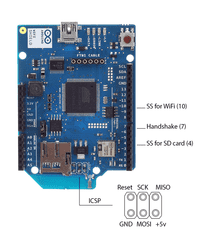
Ports on the WiFi Shield
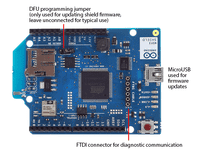
There is an onboard micro-USB connector. This is not for programming an attached Arduino, it is for updating the Atmega 32UC3 using the Atmel DFU protocol. The programming jumper adjacent to the power bus and analog inputs should be left unconnected for typical use. It is only used for DFU programming mode.
A FTDI connection enables serial communication with the 32UC3 for debugging purposes. A list of available commands can be found here.
Network Settings
The shield will connect to open networks, as well as those using WEP and WPA2 Personal encryption. The shield will not connect to networks using WPA2 Enterprise encryption.
The SSID (network name) must be broadcast for the shield to connect.
Depending on your wireless router configuration, you need different information.
- For an open (unencrypted) network, you need the SSID.
- For networks using WPA/WPA2 Personal encryption, you need the SSID and password.
- WEP network passwords are hexadecimal strings known as keys. A WEP network can have 4 different keys; each key is assigned a «Key Index» value. For WEP encrypted networks, you need the SSID, the key, and key number.
Scan for available networks
The sketch below is a good one to run the first time you use the board in a new area. This sketch will not connect to a network, but it will show you what networks the shield can view. Your WiFi shield will probably not see as many networks as a computer with a larger WiFi antenna. Once you have downloaded the sketch to your Arduino, open the serial port to see available networks.
#include #include void setup() // initialize serial and wait for the port to open: Serial.begin(9600); while(!Serial) ; // attempt to connect using WEP encryption: Serial.println("Initializing Wifi. "); printMacAddress(); // scan for existing networks: Serial.println("Scanning available networks. "); listNetworks(); > void loop() delay(10000); // scan for existing networks: Serial.println("Scanning available networks. "); listNetworks(); > void printMacAddress() // the MAC address of your Wifi shield byte mac[6]; // print your MAC address: WiFi.macAddress(mac); Serial.print("MAC: "); Serial.print(mac[5],HEX); Serial.print(":"); Serial.print(mac[4],HEX); Serial.print(":"); Serial.print(mac[3],HEX); Serial.print(":"); Serial.print(mac[2],HEX); Serial.print(":"); Serial.print(mac[1],HEX); Serial.print(":"); Serial.println(mac[0],HEX); > void listNetworks() // scan for nearby networks: Serial.println("** Scan Networks **"); byte numSsid = WiFi.scanNetworks(); // print the list of networks seen: Serial.print("number of available networks:"); Serial.println(numSsid); // print the network number and name for each network found: for (int thisNet = 0; thisNetnumSsid; thisNet++) Serial.print(thisNet); Serial.print(") "); Serial.print(WiFi.SSID(thisNet)); Serial.print("\tSignal: "); Serial.print(WiFi.RSSI(thisNet)); Serial.print(" dBm"); Serial.print("\tEncryption: "); Serial.println(WiFi.encryptionType(thisNet)); > > Open network example
The sketch below shows you how to initiate a connection with an open network named «yourNetwork».
#include char ssid[] = "yourNetwork"; // the name of your network int status = WL_IDLE_STATUS; // the Wifi radio's status void setup() // initialize serial: Serial.begin(9600); // attempt to connect to an open network: Serial.println("Attempting to connect to open network. "); status = WiFi.begin(ssid); // if you're not connected, stop here: if ( status != WL_CONNECTED) Serial.println("Couldn't get a wifi connection"); while(true); > // if you are connected : else Serial.print("Connected to the network"); > > void loop() // do nothing >WPA network example
The example below shows how to connect to a WPA/WPA2 Personal encrypted network named «yourNetwork» with a password «12345678».
#include char ssid[] = "yourNetwork"; // your network SSID (name) char pass[] = "12345678"; // your network password int status = WL_IDLE_STATUS; // the Wifi radio's status void setup() // initialize serial: Serial.begin(9600); // attempt to connect using WPA2 encryption: Serial.println("Attempting to connect to WPA network. "); status = WiFi.begin(ssid, pass); // if you're not connected, stop here: if ( status != WL_CONNECTED) Serial.println("Couldn't get a wifi connection"); while(true); > // if you are connected, print out info about the connection: else Serial.println("Connected to network"); > > void loop() // do nothing > WEP Network example
Your router will most likely have a settings dialog similar to the one below for generating the WEP key based on an ASCII passphrase:
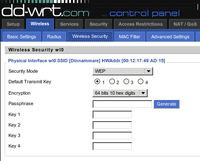
If you do not have access to your router’s administrative tools, consult your network administrator.
Each key is 10 or 26 hexadecimal digits long (40 or 128 bits) and paired with a key number. For example, a 40-bit key, ABBADEAF01 will work, but ABBADEAF won’t work (too short) and ABBAISDEAF won’t work (I and S are not hexadecimal characters).vFor 128-bit, you need a string that is 26 characters long. D0D0DEADF00DABBADEAFBEADED will work because it’s 26 characters, all in the 0-9, A-F range.
NB : WEP provides a basic encryption mechanism, but it can be cracked. If you require strong encryption for your network, it is recommended you use WPA
The example below shows how to connect to a WEP encrypted network named «yourNetwork» with a hex key of «ABBADEAF01», and a key index of 0.
#include char ssid[] = "yourNetwork"; // your network SSID (name) char key[] = "ABBADEAF01"; // your network key int keyIndex = 0; //your network key Index number int status = WL_IDLE_STATUS; // the Wifi radio's status void setup() // initialize serial: Serial.begin(9600); // attempt to connect using WEP encryption: Serial.println("Attempting to connect to WEP network. "); status = WiFi.begin(ssid, keyIndex, key); // if you're not connected, stop here: if ( status != WL_CONNECTED) Serial.println("Couldn't get a wifi connection"); while(true); > // if you are connected, print out info about the connection: else Serial.println("Connected to network"); > > void loop() // do nothing >SD Card and SPI
The WiFI Shield includes a micro-SD card slot, which can be interfaced with using the SD library. The SS for the SD card is pin 4.
Arduino communicates with the shield using the SPI bus. This is on digital pins 11, 12, and 13 on the Uno and pins 50, 51, and 52 on the Mega. On both boards, pin 10 is used as SS. On the Mega, the hardware SS pin, 53, is not used, but it must be kept as an output or the SPI interface won’t work.
Updating firmware on the shield
Please follow this guide to update the firmware on your shield.
Next steps
Refer to the WiFi library page for more information on the functionality of the shield, as well as further examples.
The text of the Arduino getting started guide is licensed under a Creative Commons Attribution-ShareAlike 3.0 License. Code samples in the guide are released into the public domain.
Arduino WiFi Shield 101
The Arduino WiFi Shield 101 is a powerful IoT shield with crypto-authentication which allows you to wirelessly connect your Arduino or Genuino with ease. This shield is perfect for your IoT projects!
LAST REVISION: 07/13/2023, 08:02 AM
Note: This page refers to a product that is retired.
Arduino WiFi Shield 101 is a powerful IoT shield with crypto-authentication, developed with ATMEL, that connects your Arduino or Genuino board to the internet wirelessly. Connecting it to a WiFi network is simple, no further configuration in addition to the SSID and the password are required. The WiFi 101 Shield comes with an easy-to-use library that allows to connect your Arduino or Genuino board to the internet with few instructions. As always, every element of the platform – hardware, software and documentation – are freely available and open-source. This means that you can learn exactly how it’s made and use its design as the starting point for your own projects.
- Operating voltage both 3.3V and 5V (supplied from the host board)
- Connection via: IEEE 802.11 b/g/n for up to 72 Mbps networks
- Encryption types: WEP and WPA2 Personal
- Support TLS 1.1 (SHA256)
- Connection with Arduino or Genuino on SPI port
- Onboard CryptoAuthentication by ATMEL
You can find here your board warranty information.
The WiFi Shield 101 needs certificates to ensure SSL connection. To upload new certificates and update the firmware, please refer to the Utilities section in the WiFi101 Library reference.
Getting Started
You can find in the Getting Started section all the information you need to configure your board, use the Arduino Software (IDE), and start tinker with coding and electronics.
Need Help?
Documentation
OSH: Schematics
The Arduino WiFi Shield 101 is open-source hardware! You can build your own board using the following files:
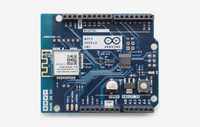
The Arduino WiFi Shield 101 allows an Arduino or Genuino board to connect to the internet using the IEEE 802.11 wireless specifications (WiFi). It is based on the Atmel SmartConnect-WINC1500 module, compliant with the IEEE 802.11 b/g/n standard. The WINC1500 module provided is a network controller capable of both TCP and UDP protocols. Use the WiFI library to write sketches which connect to the internet using the shield. The WiFI shield connects to an Arduino or Genuino board using long wire-wrap headers which extend through the shield. This keeps the pin layout intact and allows another shield to be stacked on top.
The WiFi Shield 101 also features an hardware encryption/decryption security protocol provided by the ATECC508A CryptoAuthentication chip that is an ultra secure method to provide key agreement for encryption/decryption, specifically designed for the IoT market.
Digital pin 7 is used as a handshake pin between the WiFi 101 Shield and the board, and should not be used.
Digital pin 5 is used as RESET pin between the WiFi 101 Shield and the board, and should not be used.
Usage with Arduino/Genuino UNO board
Please note that Uno + WiFi Shield 101 is not compatible with the Software Serial library.
The WiFi Shield 101 carries a library that is very complex and occupies more than 60% of the available memory, leaving little room for sketches.
Please keep in mind even if that basic usage is supported for the Uno, for complex projects we strongly recommend to use the WiFi Shield 101 with a Arduino/Genuino Zero, 101 or Mega 2560.
| Example MQTT (complex) | Example WiFi Web Server (easy) | |
|---|---|---|
| UNO | 87% | 76% |
| 101 | 48% | 27% |
| MEGA 2560 | 11% | 10% |
| ZERO | 9% | 8% |
For a better understanding, the table above shows the memory usage (in %) of two different sketches (Example MQTT and WiFi Web Server) on a Uno, Mega 2560, Zero and 101 board.
On-board Indicators
The shield contains a number of signalling LEDs:
- ON (green): indicates that the shield is properly powered
- WIFI (green): indicates a connection to a network
- ERROR (red): indicates when there is a communication error
- NETWORK (yellow): indicates that data is received/transmitted