Команда chmod Linux
Система полномочий в Linux имеет очень важное значение, поскольку благодаря ей можно разделять привилегии между пользователями, ограничить доступ к нежелательным файлам или возможностям, контролировать доступные действия для сервисов и многое другое. В Linux существует всего три вида прав — право на чтение, запись и выполнение, а также три категории пользователей, к которым они могут применяться — владелец файла, группа файла и все остальные.
Эти права применяются для каждого файла, а поскольку все в системе Linux, даже устройства, считаются файлами, то, получается что эти права применимы ко всему. Мы более подробно рассматривали как работают права доступа к файлам Linux в отдельной статье, а этой, я хочу остановиться на команде chmod, которая используется для установки прав.
Команда chmod Linux
Эта команда имеет типичный для команд linux синтаксис, сначала команда, затем опции, а в конце файл или папка, к которой ее нужно применить:
$ chmod опции права /путь/к/файлу
Сначала рассмотрим какими бывают права доступа linux и как они устанавливаются. Пред этим рекомендую прочитать статью про права, ссылка на которую есть выше. Есть три основных вида прав:
Также есть три категории пользователей, для которых вы можете установить эти права на файл linux:
Синтаксис настройки прав такой:
группа_пользователей действие в ид_прав
В качестве действий могут использоваться знаки «+» — включить или «-« — отключить. Рассмотрим несколько примеров:
- u+x — разрешить выполнение для владельца;
- ugo+x — разрешить выполнение для всех;
- ug+w — разрешить запись для владельца и группы;
- o-x — запретить выполнение для остальных пользователей;
- ugo+rwx — разрешить все для всех;
Но права можно записывать не только таким способом. Есть еще восьмеричный формат записи, он более сложен для понимания, но пишется короче и проще. Я не буду рассказывать как считать эти цифры, просто запомните какая цифра за что отвечает, так проще:
Права на папку linux такие же, как и для файла. Во время установки прав сначала укажите цифру прав для владельца, затем для группы, а потом для остальных. Например, :
- 744 — разрешить все для владельца, а остальным только чтение;
- 755 — все для владельца, остальным только чтение и выполнение;
- 764 — все для владельца, чтение и запись для группы, и только чтение для остальных;
- 777 — всем разрешено все.
Каждая из цифр не зависит от предыдущих, вы вбираете именно то, что вам нужно. Теперь давайте рассмотрим несколько опций команды, которые нам понадобятся во время работы:
- -c — выводить информацию обо всех изменениях;
- -f — не выводить сообщения об ошибках;
- -v — выводить максимум информации;
- —preserve-root — не выполнять рекурсивные операции для корня «/»;
- —reference — взять маску прав из указанного файла;
- -R — включить поддержку рекурсии;
- —version — вывести версию утилиты;
Теперь, когда вы знаете опции и как настраиваются права доступа chmod, давайте рассмотрим несколько примеров как работает команда chmod linux.
Примеры использования chmod
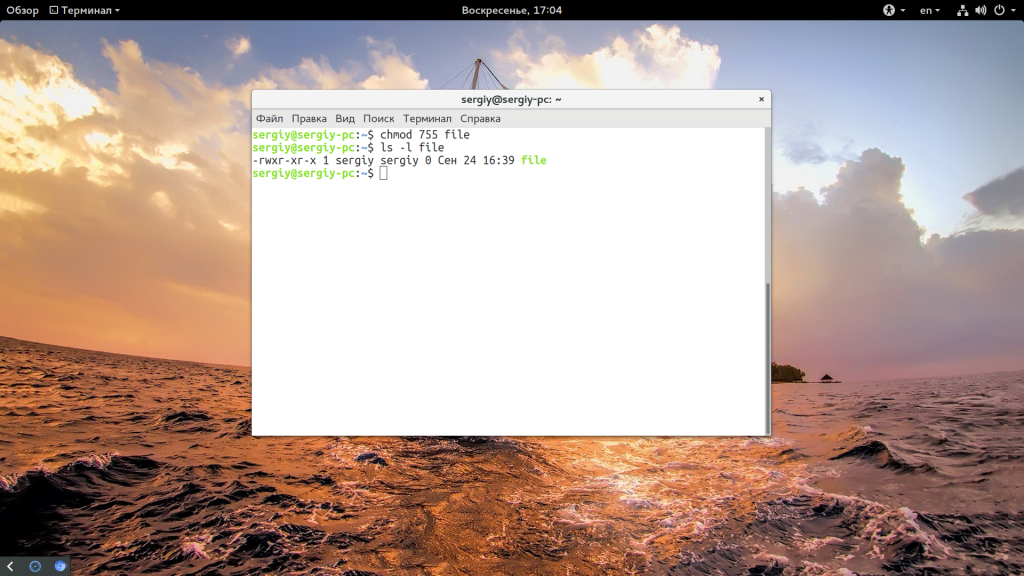
Я не буду приводить много примеров, так как там и так все более-менее понятно после пояснения правил создания выражений установки прав. Сначала самый частый случай — разрешить выполнения скрипта владельцу:

Или можно воспользоваться цифровой записью:
chmod 766 file
ls — l file

Недостаток цифровой записи в том, что вы не можете модифицировать уже существующие права доступа linux. Например, в первом варианте вы просто добавили флаг выполнения для владельца файла, а все остальные права оставили неизменными. В восьмеричном варианте мы полностью заменили текущие права новыми — все для владельца и чтение/запись для группы и остальных. Как видите, права установлены как и ожидалось. Теперь отключим выполнение владельцем:

Дальше разрешим только чтение всем, кроме владельца:


Файлы с правами 000 недоступны никаким пользователям, кроме суперпользователя и владельца. Вернем права обратно:
Такая же ситуация с файлами, владельцем которых вы не являетесь, если вы хотите изменить их права — используйте sudo. Из модификаторов прав вы можете конструировать любые последовательности, я думаю тут нет смысла разбирать их все. Для того чтобы поменять права на все файлы в папке используйте опцию -R:
chmod -R ug+rw dir
ls -l dir/
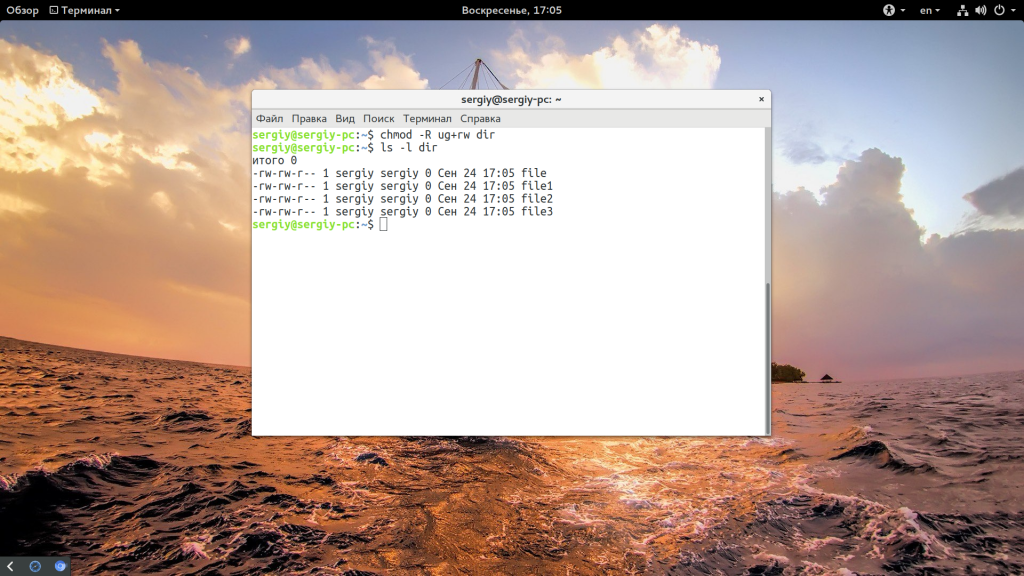
Также вы можете смотреть подробную информацию про вносимые изменения, например:

Выводы
В этой небольшой статье была рассмотрена команда chmod linux. Она очень часто используется наряду с такими командами, как chown и umask для управления правами. Надеюсь, эта информация была полезной для вас. Если у вас остались вопросы, спрашивайте в комментариях!

Обнаружили ошибку в тексте? Сообщите мне об этом. Выделите текст с ошибкой и нажмите Ctrl+Enter.
Chmod Command – How to Change File Permissions in Linux

Daniel Rosa

One of the first commands I learned on Linux was the touch command that creates a file using the command line.
If you ever try to create, for instance, a text file, all you have to do is type touch filename.txt , press Enter, and the file is created for you in the directory you are in. You can then write whatever you want in it using the file editor of your choice.
However, when it comes to creating scripts, things can get a little more complicated. Why is that?
Let me try to show you this with another example. Suppose you want to create a script using touch. Type touch example.sh , press Enter, and there you have it. Once more, you can write in it using a file editor.
With everything ready, all that’s left to do is to test it. You type ./sample.sh and press Enter to see your script in action and…but what is this message telling me?
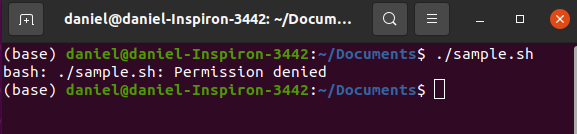
Why do we need permissions?
I am the admin! How come I don’t have permission to run a script I wrote myself seconds ago?
There is actually a reason for that – and, to be honest, most users should be thankful for it, since not being able to execute scripts without knowing what you’re doing often prevents you from putting your system at risk.
Let’s have a quick chat about permissions first. Then we’ll move on to discovering how to change them.
In order to get some more information about your file, we will use the command that lists the files in a directory: ls .
After typing ls and pressing Enter, this is what we get in the command line:
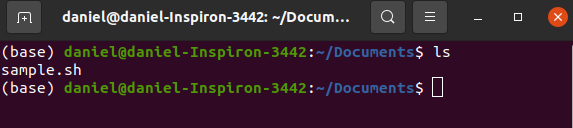
What it does is list all the visible files in the directory you are at the moment. By adding the flag -l to it, it provides you with more information on the files in the directory. This is the result when we type ls -l and press Enter:
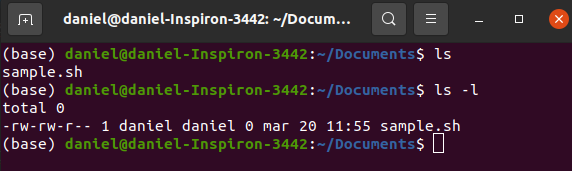
We see the same file(s), but with plenty of information before it/them. To begin with, we have a sequence of ten dashes and letters that may seem meaningless at first. This is actually the mapping of permissions your file has.
The first character can be a dash ( — , for a common file), a d (for a directory), or an l (for a soft link). For the sake of simplicity, I will focus on the simple files, although permissions are valid for all these kinds of files/folders.
After the first character, the other 9 can be divided in groups of three. The first trio show the permissions for the current user. The next shows the permissions for this group. The last three are the permissions for all users that don’t fit this category.
For our explanation, let’s focus on the first three permissions, since we are not going to change groups or anything of the sort.
Time to understand what these are. There are three things you can normally do with a file: read it, write in it, and execute it. That is, basically, what those letters mean.
The first r stands for the reading permission. Then we have w for the writing permission. Finally, a dash, meaning whatever should be there is not. What should be there is an x , standing for eXecutable.
So, talking about the current user (me), the permissions I have for this file are the reading and the writing permissions. I can’t, however, execute the sample.sh file. That’s why, when trying to execute the file, I got that ‘permission denied’ message.
How can I, then, execute this file? That’s where the chmod command comes into play.
What does chmod do?
Well, I’ve been mentioning ‘permissions’ since the beginning of the article. Let’s extend this explanation a little bit to say that they are ‘permissions to access a file in a certain mode. This means that r denotes the permission to access the file in reading mode, w denotes the permission to access the file in writing mode, and x denotes the permission to access the file in executable mode.
Why am I telling you that? Because of the command this article is all about. chmod stands for ‘change mode’. In other words, when you use this command, you are changing a file’s mode to whatever mode you want to use.
How to Use Operators with cmod
It is necessary to use an operator with the chmod command. It serves to specify the kind of change you want to do on the permissions.
For instance, + is the operator you use to add a permission to the ones the file already has. — removes a permission from the list. There is also the = operator, which resets the permissions so you can define them again.
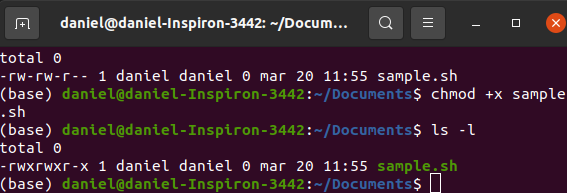
In our case, by typing chmod -w sample.sh , what I am asking the command to do is to remove the writing permission. So what I would have to do to add the executable permission is to type chmod +x sample.sh .
If I now try to execute the file, whatever I put in the script is now going to be executed.
Using ls -l , this is what I would have now.
Who gets the permission?
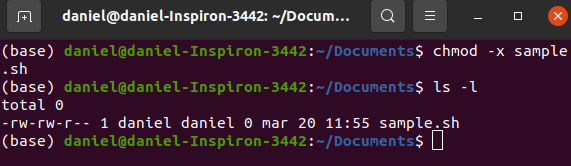
Something else worth pointing out is who is getting this permission. You will see that the ‘x’ is given to all users, file owner, group, and others. If this is not what you are going for, maybe it is a good thing to remove the executable permission again with chmod -x sample.sh .
In order to enable the permission only for the owner of the file (me, in this case), we should add a ‘u’ before the ‘+x’, like this:
Typing ls -l , that’s what you have:

If you wanted to give the permission for both the owner and its group, then the command would be chmod ug+x sample.sh .

Great! I think this covers what I would like to show you. There are other things that could be of interest to you, like how to use chmod with octal or binary values to represent the permissions. But these are modes we use to have the same results and I believe the letters are an easier way to achieve these results.
In case you want more information on the command, one thing you can do is type chmod —help , which will give you a briefing on what the command can do. An even more detailed description can be achieved by typing man chmod .
I hope this article was helpful to you. For more articles on Linux commands, check freecodecamp.org/news.