- How to Use Udev for Device Detection and Management in Linux
- Learn Basics of Udev in Linux
- How to Work with Udev Rules in Linux
- How to Install and Understand Device Manager in Ubuntu
- Device Manager and HAL
- Installing Device Manager in Ubuntu
- Using Device Manager in Ubuntu
- How to detect and manage devices on Linux
- What is Udev?
- How to detect a disk?
- Why rename a device?
- Conclusion
How to Use Udev for Device Detection and Management in Linux
Udev (userspace /dev) is a Linux sub-system for dynamic device detection and management, since kernel version 2.6. It’s a replacement of devfs and hotplug.
It dynamically creates or removes device nodes (an interface to a device driver that appears in a file system as if it were an ordinary file, stored under the /dev directory) at boot time or if you add a device to or remove a device from the system. It then propagates information about a device or changes to its state to user space.
It’s function is to 1) supply the system applications with device events, 2) manage permissions of device nodes, and 3) may create useful symlinks in the /dev directory for accessing devices, or even renames network interfaces.
One of the pros of udev is that it can use persistent device names to guarantee consistent naming of devices across reboots, despite their order of discovery. This feature is useful because the kernel simply assigns unpredictable device names based on the order of discovery.
In this article, we will learn how to use Udev for device detection and management on Linux systems. Note that most if not all mainstream modern Linux distributions come with Udev as part of the default installation.
Learn Basics of Udev in Linux
The udev daemon, systemd-udevd (or systemd-udevd.service) communicates with the kernel and receives device uevents directly from it each time you add or remove a device from the system, or a device changes its state.
Udev is based on rules – it’s rules are flexible and very powerful. Every received device event is matched against the set of rules read from files located in /lib/udev/rules.d and /run/udev/rules.d.
You can write custom rules files in the /etc/udev/rules.d/ directory (files should end with the .rules extension) to process a device. Note that rules files in this directory have the highest priority.
To create a device node file, udev needs to identify a device using certain attributes such as the label, serial number, its major and minor number used, bus device number and so much more. This information is exported by the sysfs file system.
Whenever you connect a device to the system, the kernel detects and initializes it, and a directory with the device name is created under /sys/ directory which stores the device attributes.
The main configuration file for udev is /etc/udev/udev.conf, and to control the runtime behavior the udev daemon, you can use the udevadm utility.
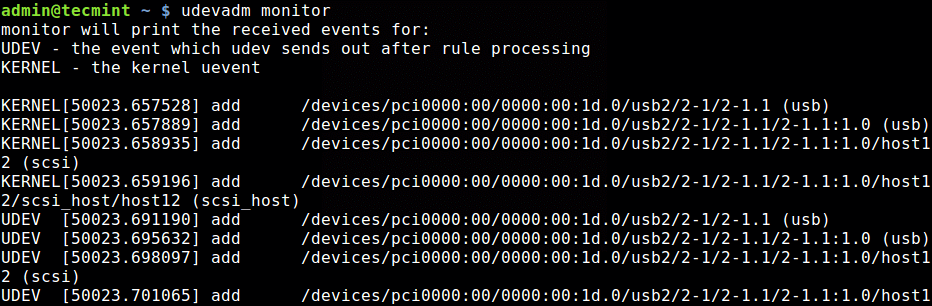
To display received kernel events (uevents) and udev events (which udev sends out after rule processing), run udevadm with the monitor command. Then connect a device to your system and watch, from the terminal, how the device event is handled.
The following screenshot shows an excerpt of an ADD event after connecting a USB flash disk to the test system:
To find the name assigned to your USB disk, use the lsblk utility which reads the sysfs filesystem and udev db to gather information about processed devices.
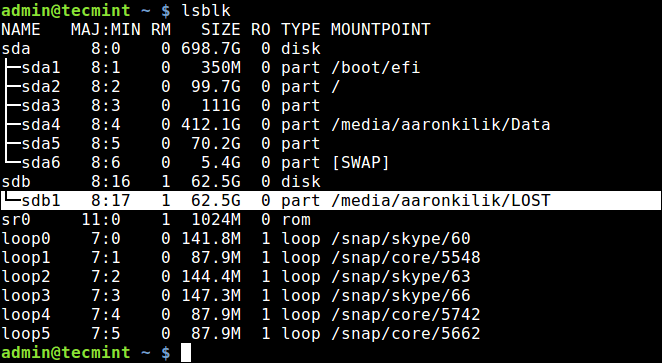
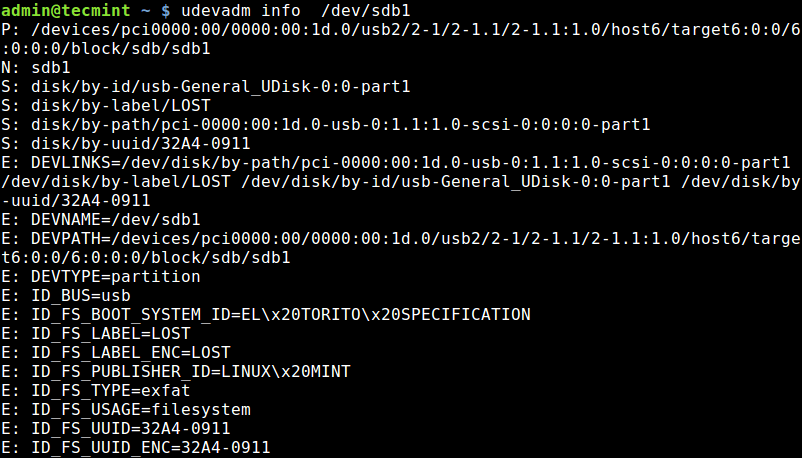
From the output of the previous command, the USB disk is named sdb1 (absolute path should be /dev/sdb1 ). To query the device attributes from the udev database, use the info command.
How to Work with Udev Rules in Linux
In this section, we will briefly discuss how to write udev rules. A rule comprises of a comma-separated list of one or more key-value pairs. Rules allow you to rename a device node from the default name, modify permissions and ownership of a device node, trigger execution of a program or script when a device node is created or deleted, among others.
We will write a simple rule to launch a script when a USB device is added and when it is removed from the running system.
Let’s start by creating the two scripts:
$ sudo vim /bin/device_added.sh
Add the following lines in the device_added.sh script.
#!/bin/bash echo "USB device added at $(date)" >>/tmp/scripts.log
$ sudo vim /bin/device_removed.sh
Then add the following lines to device_removed.sh script.
#!/bin/bash echo "USB device removed at $(date)" >>/tmp/scripts.log
Save the files, close and make both scripts executable.
$ sudo chmod +x /bin/device_added.sh $ sudo chmod +x /bin/device_removed.sh
Next, let’s create a rule to trigger execution of the above scripts, called /etc/udev/rules.d/80-test.rules.
$ vim /etc/udev/rules.d/80-test.rules
Add these two following rules in it.
SUBSYSTEM=="usb", ACTION=="add", ENV=="usb_device", RUN+="/bin/device_added.sh" SUBSYSTEM=="usb", ACTION=="remove", ENV=="usb_device", RUN+="/bin/device_removed.sh"

- «= + attachment_31087″ aria-describedby=»caption-attachment-31087″ style=»width: -10px» > Check Scripts Log After Adding USB Then the file should have an entry such as “USB device removed at date_time”, as shown in the screenshot.

For more information on how to write udev rules and manage udev, consult the udev and udevadm manual entries respectively, by running:
Summary
Udev is a remarkable device manager that provides a dynamic way of setting up device nodes in the /dev directory. It ensures that devices are configured as soon as they are plugged in and discovered. It propagates information about a processed device or changes to its state, to user space. If you have any questions or thoughts to share on this topic, use the feedback form.
How to Install and Understand Device Manager in Ubuntu

Device Manager shows a list of the hardware installed on the PC, along with the names and dates of the particular device drivers associated with each hardware item. Device drivers are software applications that allow an operating system to communicate with hardware devices. Many device drivers are provided by accessory manufacturers, while others are built-in to Windows and are updated through Windows Update.
Some devices have options, such as power settings or sensitivity, that are user-selectable, and changing these settings is also done inside Device Manager.
Device Manager also indicates a problem with a component visually with an icon to the left of the component name.
Device Manager and HAL
Gnome Device Manager is a front-end, or GUI, to the HAL daemon service. HAL, which stands for “hardware abstraction layer,” continuously polls the system message flow or “desktop bus,” which is also known as “D-Bus.” Developed by RedHat for Linux, but now widely implemented in Microsoft Windows, Mac OS X, and other flavors of Linux, D-Bus is a way for applications or processes to communicate with one another. It’s through D-Bus that processes find out which other processes are available and query their capabilities or readiness. It’s also the method through which programs register to listen for messages about hardware events from the Linux kernel. In other words D-Bus is there to deliver messages from HAL to applications that are interested in them. This is also how the system learns, for example, that a thumbdrive has been inserted.
Device Manager is not a complete application. In fact, it’s in flux. Another project called HardwareKit by RedHat is expected to eventually replace parts of HAL and have its own GUI interface. However, we can install and run Gnome Device Manager now and at least get an idea about how Linux understands (or fails to understand) our PC’s hardware.
Installing Device Manager in Ubuntu
An application like Windows Device Manager is not provided by default in Ubuntu 9.04. If you open a terminal and type gnome-device-manager, it will tell you that the program is not currently installed and helpfully add that you can install it by typing
sudo apt-get install gnome-device-manager
Or, alternatively, you can install it using the Synaptic Package Manager. Start it under System → Administration → Synaptic Package Manager. Enter
in the package search field, and you’ll see gnome-device-manager appear in the first column. Click the box beside it, and then select “Mark for Installation” in the pop-up dialog.
Either way, you’ll find that a related package (libgnome-device-manager0) is also needed, which apt-get in the terminal or syn-apt-ic on the desktop will handle for you.
Using Device Manager in Ubuntu
Gnome Device Manager is started by selecting Applications → System Tools → Device Manager. One of the first things you’ll want to do is to click View → Device Properties. This will make the “Properties” tab appear in the view. The images below show Device Manager at first startup, after clicking Device Properties, and the Properties tab for the notebook’s battery.


A major difference between Windows Device Manager and Gnome’s Device Manager is that the Gnome version concerns itself with properties, which are in a way messages, rather than drivers. Windows allows you to view a device, determine which driver is installed, and find out if the operating system thinks the device is working correctly.
Gnome Device Manager does not relate to a device driver, and the presence of a listing in the hardware list does not indicate that the recognized hardware is working, or can even work at all under Ubuntu, or even if its recognized. However, Device Manager does do an extensive scan of the hardware in order to determine the hardware’s capabilities.
If a device on the PC or a peripheral is not working or not working correctly, it’s useful to find the hardware in Device Manager just to find out what Ubuntu actually knows about it. Then taking the hardware’s name and searching for it in Google or on popular Linux forums may provide a fix, or at least somebody who can commiserate with you.
Will Gnome Device Manger evolve into a robust hardware manager? It’s too early to tell, but right now it’s a powerful and handy utility for viewing and identifying the hardware devices on a PC.
How to detect and manage devices on Linux

Many of the Linux beginners coming from Windows know how to manage devices on their Windows systems. But they do not know how to do the same on Linux unfortunately. This is not because Linux is different, rather they are new and unaware of where to find the right help. Here I am going to help you how to detect and manage devices in your Linux system. I will be using Ubuntu 20.04 distribution. All commands are valid for related distribution which uses the apt package manager.
What is Udev?
We use Udev as our device manager for the Linux kernel. It helps with creating and removing device nodes in the /dev directory. It is Udev that enables the plugging of USB devices and network disks. It helps a system admin to manage devices connected to a Linux system.
We apply rules in /etc/udev/rules.d/ directory, and Udev processes the changes once a device is connected.
I will use the udevadm tool to interact with the Udev device manager. Let’s do it.
How to detect a disk?
Using the following command you will be able to see a lot of data regarding a particular device. Usually, disks start with /dev/sda or /dev/sdb so we will also use the same format to detect our disk too.
You’ll see an output like below:

This gives us a lot of information. You can see that it shows us each and every bit of the information available related to our disk. In the last lines of the terminal, if you take notice then you will find that it shows a disk running under VBOX. It also shows the related UUID of the disk.
Using Udev, you can also change the name of your disk, USB devices, and network cards.
For instance: If you go to the rules list, you will find out that there are a number of devices available to update their names.
Here is a demo of the rules list file. Type the following command and check your rules file.

I am using a nano text editor on my Ubuntu server, therefore I will use the following command to open up the rules file.

It is important to remember that Udevadm info starts with the device specified by the devpath and then takes us to the chain of parent devices.
The file shows each and every device available. It can be disabled, removed, and renamed.
Why rename a device?
When it comes to team management, it is better to rename a device. This helps your team members to figure out which devices are connected to which system in an array of connected Linux machines.
Conclusion
This was all for now. In this tutorial, we discussed different aspects of the Udev program to see how we can manipulate our hardware in the best way possible. In future guides, We will help you with how to make complex changes to your hardware. We also ran operations using simple commands to find out all connected hardware with your system.