- Encrypting Files on Linux
- What is Encryption?
- 1. Archive Manager
- 2. GnuPG
- 3. Nautilus
- Best Method to Encrypt Files in Linux
- Шифрование информации в Linux
- Шифрование файла с помощью пароля
- 1. Создание текстового файла для шифрования
- 2. Шифрование файла
- 3. Дешифрование
- Шифрование файла с помощью ключей
- 1. Создание ключей
- 3. Шифрование
- 3. Дешифрование
- Использование цифровой подписи для файла
- 1. Создание цифровой подписи
- 2. Проверка подлинности файла
- Вывод:
Encrypting Files on Linux
![]()
With the world of technology undergoing a large-scale transformation and radical change, this has led to everything around us becoming digitized. Businesses, education, companies – all industry platforms have started shaping their way of work to meet the requirements of the ever-changing society.
However, as efficient and exciting this change has been, it has brought along with it some huge adverse effects as well, one of which includes the increasing cyber security threat. The access to the Internet has led to our data being increasingly vulnerable, heavy breaches in security becoming more and more common and numerous companies falling victims to cyberattacks.
Hence with such a huge threat looming behind our shadows, it has become even more important to implement strong safety protocols that help in securing our data such as encryption of data. Therefore, today we’ll be looking at different ways on how one can encrypt their files on Linux.
What is Encryption?
Encryption is the process of encoding your data in such a way that only those that are authorized will be able to read it. It does this by scrambling the readable data into a code like form that can only be decoded by a decryption key. This thus allows a user to protect their information and secure their data even in the case if their device gets lost or stolen.
Let us look at some of the most popular encryption techniques that are currently available in Linux.
1. Archive Manager
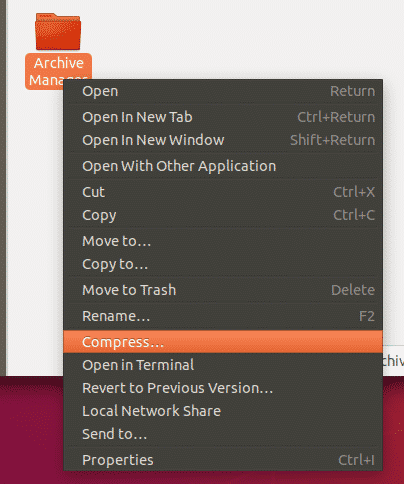
The most basic way to encrypt your files in Linux is using the general Archive Manager already preinstalled in your Linux systems. First of all, go to the folder or to the files which you want to encrypt. Next right-click on the folder or file and then click on compress.
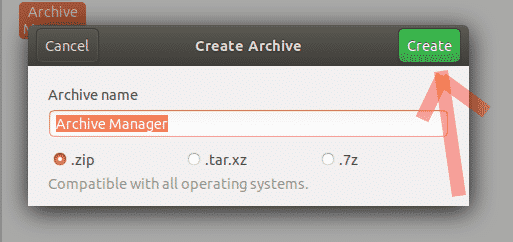
Next simply select the .zip extension and click on Create.
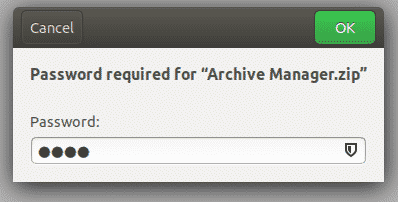
After that, open your zip file & click on the hamburger icon on the top right of the zip file.

From there, select the password option from the drop-down menu and set up your password.
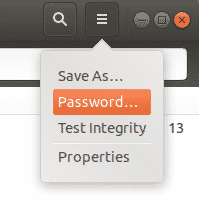
Simply click on Save and your files will be encrypted with a password (See the Image below).
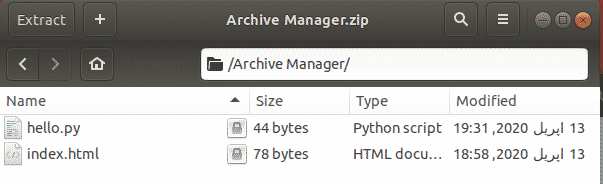
Now whenever you try to extract the file, it will ask for the password that you setup before.
2. GnuPG
Another way of encrypting files in Ubuntu is by using GnuPG or GPG for short, which is a software that allows users to easily encrypt their data and even sign them using the Command Line.
a) Installation of GPG
GPG comes pre-installed with most of the Linux Distributions. However, if a user is in possession of a system without GPG being installed, then the user needs to open the command line through either Ubuntu Dash or Ctrl+Alt+T shortcut and enter the following command:
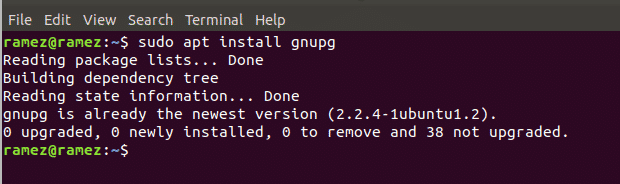
It is to be noted that the command given above is for only Debian based Linux systems such as Ubuntu. If a user has a Red Hat Linux system such as Fedora, then the user needs to enter the following command into the command line:
b) Using GPG to Encrypt Files
Now to encrypt your files using GPG, first go to the folder which you want to encrypt and open the terminal. In the terminal, enter the following command to start the process:
Here filename refers to the name of the file that you’re trying to encrypt.
Upon entering this command on the terminal, you’d be presented with a prompt asking you to enter your encryption password. The prompt will again ask you to reenter your password for verification. Now if you check in your folder, you’ll see a filename.gpg file present inside of it. You can view this in the command line by running the following command:

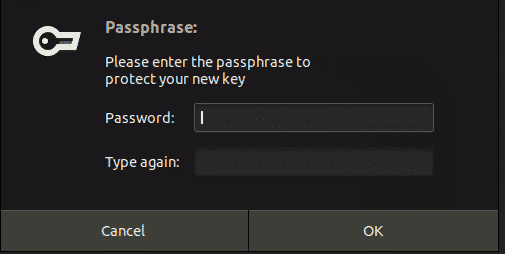
A better way of encrypting files in GPG is by using a private key. For this, first of all we have to create a private key. This can be done by running the following command:
This will then ask you for your Name and email address and then would ask whether you want to Okay everything or Quit. Press O if you want to continue. Now a prompt asking to enter a password for the key will appear.
Then once it has created the key, you can use this to encrypt your files by using the following command:
The keyword must either be your name or the email address that you used. For decryption of files, you simply have to enter the following command:
You will be asked to enter the password you set up before and once that is done, you will have the decrypted file in your folder.
Example shown below for the decryption process.

3. Nautilus

For users who are more comfortable using the GUI rather than the command line, Nautilus would be a better alternative than GPG. It is also a software that can be used for the encryption and decryption of data.
a) Installing Nautilus
Firstly, we have to install Nautilus which can be done by running the following command:
After installing Nautilus, run the following command to restart Nautilus:
b) Using Nautilus to Encrypt Files
Now go to the folder where the files that you want to encrypt are present. Next right-click on the folder or file and then click on Encrypt.
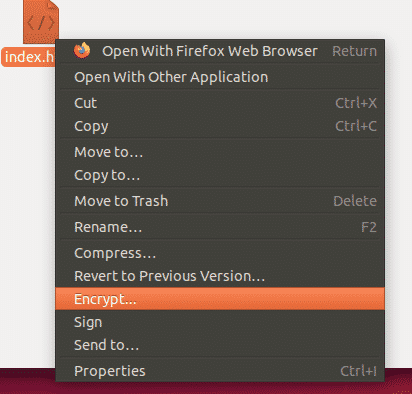
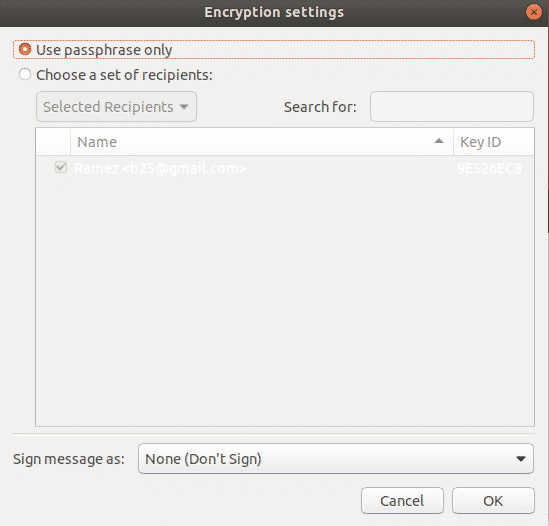
Now we will have two options to choose from – either select a paraphrase that will opt you to enter a password and then using that will encrypt your files or choose a key that you have already created beforehand to encrypt your file (Choose a set of recipients option).
Finally, you can decrypt your file by right-clicking on the pgp encrypted file and then clicking on Open with Decrypt File.
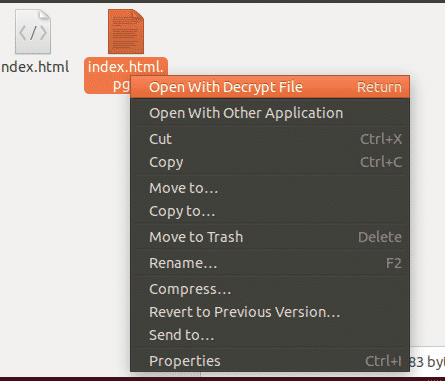
It will then ask you to enter your passphrase which upon entering and clicking OK will give you your decrypted file.
Best Method to Encrypt Files in Linux
With privacy issues and cyberattacks becoming increasingly large, it has become important to also start securing your data and protecting your desktops using safety protocols. Encryption is one way of having your data secure and protected. From the numerous options available out there for the encryption of data, GPG serves as one of the most popular Command Line based software and Nautilus along with the Archive Manager already present in Ubuntu, are considered good alternatives as well. If users are in need of adding an extra blanket of security to their computers, then encryption would be an efficient and easy choice to implement.
Шифрование информации в Linux
С зарождением цивилизации появилась необходимость передачи информации между людьми. При чём таким способом, чтобы эта информация не стала доступной третьим лицам.

С течением времени технологии развивались, количество информации увеличивалось, а методы её перехвата усложнялись.
В настоящее время происходит активное внедрение цифровых технологий в различные сферы человеческой жизни, поэтому вопрос защиты информации при её хранении и передаче является особенно актуальным.
Я расскажу о том, как сохранить конфиденциальность своей информации с помощью инструмента GPG.
GnuPG (Gnu Privacy Guard) — свободная программа для шифрования информации и создания электронных цифровых подписей. Разработана как альтернатива коммерческой программе PGP. GnuPG полностью совместима со стандартом IETF OpenPGP.
Инструмент командной строки для GnuPG называется GPG. Им я и буду пользоваться. В данной публикации все манипуляции будут выполняться в операционной системе Linux. В ней уже установлено программное обеспечение GnuPG.
Если вы используете macOS, то вам нужно установить GPG-Suite, или воспользоваться командой brew install gnupg2. Если вы пользователь Windows, то советую вам установить GPG4Win.
Шифрование файла с помощью пароля
Далее речь пойдёт о симметричном шифровании. Методе шифрования, при котором для шифрования и дешифрования применяется один и тот криптографический ключ.
1. Создание текстового файла для шифрования
Создать пустой файл через терминал можно с помощью команды: cat > имя_файла .
Файл будет создан в вашей домашней папке.

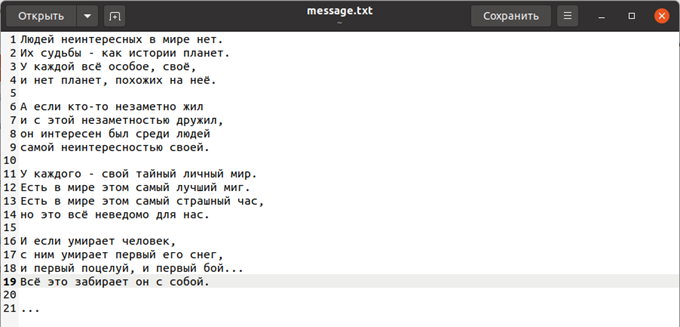
Запишем в файл стихотворение Евгения Евтушенко.
2. Шифрование файла
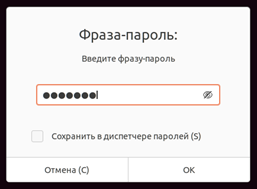
Вводим следующую команду: gpg -c message.txt .

Опция -с (или —symmetric ) означает шифрование только симметричным шифром. Далее нужно будет ввести фразу-пароль, которая станет ключом.
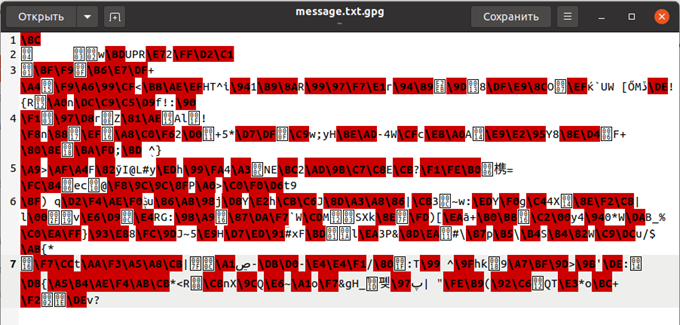
В итоге в директории с исходным файлом появится файл с расширением gpg. Это зашифрованный файл.

Если попытаетесь его открыть как обычный файл, то увидите примерно следующее:
3. Дешифрование
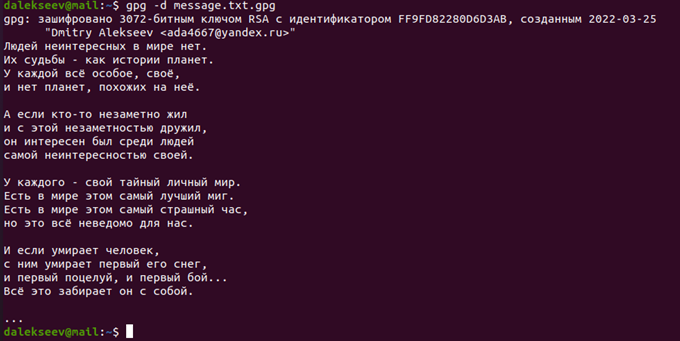
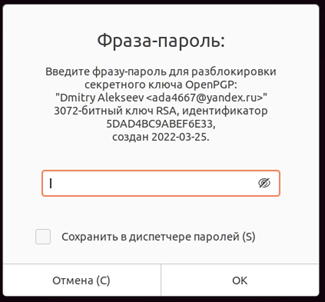
Для расшифровки этого файла следует ввести в терминале следующую команду: gpg —decrypt message.txt.gpg . Утилита запросит фразу-пароль. Если был введён верный пароль, то на экране отобразится исходный текст.

Для записи дешифрованной информации в отдельный файл добавьте опцию —output и после укажите название файла.
Шифрование файла с помощью ключей
Шифрование с помощью пары ключей – это уже ассиметричное шифрование. Данный метод является более надёжным. Шифрование осуществляется с помощью публичного ключа, а дешифровка — с использованием приватного ключа. Без приватного ключа вы не сможете выяснить что содержалось в исходном файле.
1. Создание ключей
Для создания пары ключей наберите следующую команду в терминале: gpg —full-generate-key .
Необходимо будет ввести тип ключа, размер ключа (по умолчанию 3072 бит), срок действия ключа, идентификатор пользователя (полное имя, адрес электронной почты) и примечание ключа (если нужно).
Идентификатор пользователя будет использован в качестве идентификатора ключа.
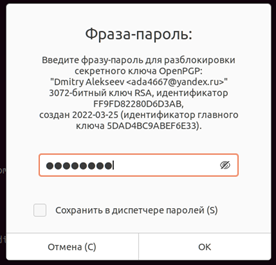
В конце нужно будет подтвердить корректность введённой информации и придумать фразу-пароль для защиты нового ключа.

В документации также указана команда gpg –gen-key , но при её использовании ряд параметров такие, как тип, размер ключа будут взяты по умолчанию. Срок действия ключа будет 2 года.
В скрытой директории ~./gnupg появятся файлы с ключами. В файле pubring.gpg публичный ключ, а в secring.gpg — приватный.
Также все свои доступные ключи можно увидеть с помощью команды: gpg –list-keys .

На скриншоте два ключа: первый был создан с помощью команды gpg –gen-key , второй – с помощью gpg –full-generate-key с параметрами, указанными ранее.
3. Шифрование
Для шифрования введите следующую команду: gpg -e -r идентификатор_пользователя имя_файла .

В качестве идентификатора пользователя я указал просто Dmitry, поэтому утилита выбрала первый по порядку ключ. Чтобы зашифровать информацию с помощью второго ключа, нужно было ввести идентификатор однозначно определяющий второй ключ. Например, ‘Dmitry Alekseev (best key)’.
Опять же в директории с исходным файлом будет создан файл с расширением gpg.

3. Дешифрование
Команда для дешифровки: gpg -d имя_файла.gpg .
Необходимо ввести фразу-пароль.
После в терминале отобразится дешифрованная информация.
Использование цифровой подписи для файла
Цифровая подпись позволяет подтвердить авторство электронного документа. На основе файла и ключа создаётся отпечаток, который записывается в файл. Если файл будет изменён, то отпечаток уже не совпадёт.
1. Создание цифровой подписи
Вы можете подписать файл с помощью команды: gpg -sign имя_файла .

Для создания подписи будет использован ранее созданный секретный ключ, поэтому нужно будет снова ввести фразу-пароль.
Опять же в директории с исходным файлом появится файл с расширением gpg.

Также вы можете создать подпись в отдельном файле: gpg -b имя_файла .

В директории появится файл с расширением sig.

2. Проверка подлинности файла
Введите следующую команду: gpg —verify имя_файла.sig имя_файла .
Если файл не был изменён, то вы увидите следующее.

Если файл был изменён, то при проверке на экране появится следующее сообщение.

Вывод:
Мы с вами познакомились с таким популярным инструментом шифрования как GPG. Эта утилита обладает большими возможностями по защите информации, мы с вами рассмотрели только часть. Посмотреть документацию по ней можно с помощью команды gpg — h .