How to Verify PGP Signature of Downloaded Software on Linux
When installing software on a Linux system is usually a smooth ride. In most cases, you would use a package manager such as apt, dnf, or Pacman to install it securely from your distribution’s repositories.
In some instances, however, a software package may not be included in the distribution’s official repository. In such scenarios, one is compelled to download it from the vendor’s website. But how sure are you that the software package wasn’t tampered with? This is the question we will seek to answer. In this guide, we focus on how to verify the PGP signature of a downloaded software package in Linux.
PGP (Pretty Good Privacy) is a cryptographic application used for encrypting and signing files. Most software authors sign their applications using the PGP program for instance GPG (GNU Privacy Guard).
GPG is a cryptography implementation of OpenPGP and it enables secure transmission of data and can also be used to verify the integrity of the source. In a similar fashion, you can leverage GPG to verify the authenticity of downloaded software.
The verification of the integrity of downloaded software is a 5-step procedure that takes the following order.
- Downloading the public key of the software’s author.
- Checking the key’s fingerprint.
- Importing the public key.
- Downloading the Signature file of the software.
- Verify the signature file.
In this guide, we will use Tixati – a peer-to-peer file sharing program – as an example to demonstrate this. Already, we have downloaded the Debian package from the Offical download page.
Verify the PGP Signature of Tixati
Right off the bat, we are going to download the Author’s Public key that is used for verifying any releases. The link to the key is provided at the bottom of the Tixati downloads page.
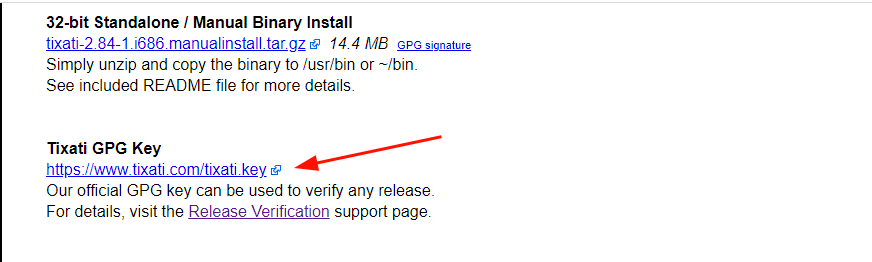
On the command line, grab the Public key using the wget command as shown.
$ wget https://www.tixati.com/tixati.key
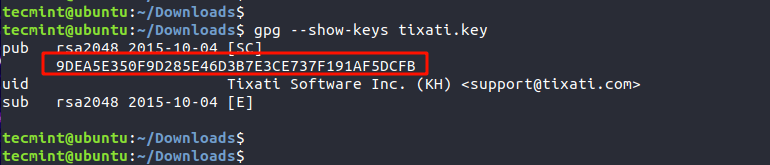
Check the Public key’s Fingerprint
Once the key is downloaded, the next step is to check the Public key’s fingerprint using the gpg command as shown.
The highlighted output is the fingerprint of the public key.
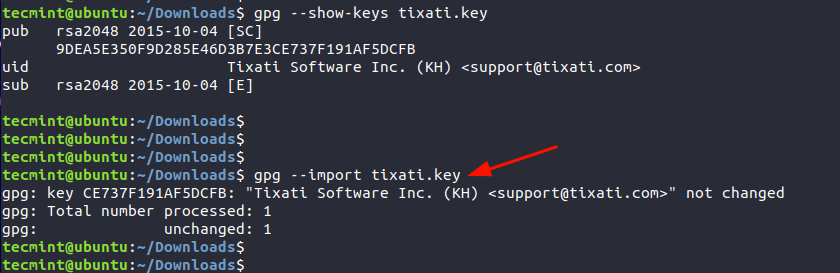
Import the GPG Key
Once we have checked the key’s public fingerprint, we will import the GPG key. This only needs to be done once.
Download Signature File of the Software
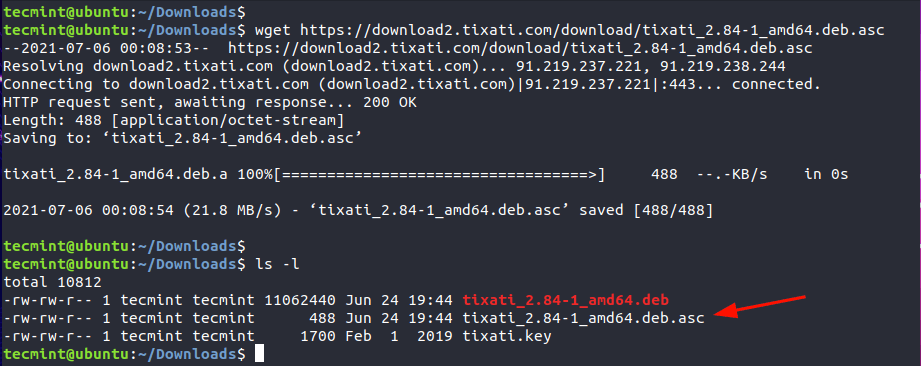
Next, we will download the PGP signature file which is just adjacent to the Debian package as indicated. The signature file bears the .asc file extension.
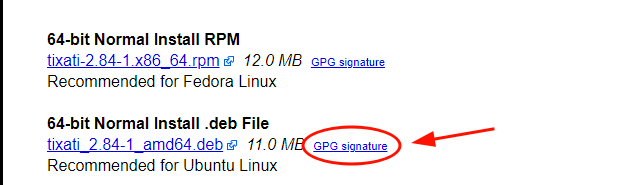
$ wget https://download2.tixati.com/download/tixati_2.84-1_amd64.deb.asc
Verify the Signature File
Lastly, verify the integrity of the software using the signature file and against the Debian package as shown.
$ gpg --verify tixati_2.84-1_amd64.deb.asc tixati_2.84-1_amd64.deb
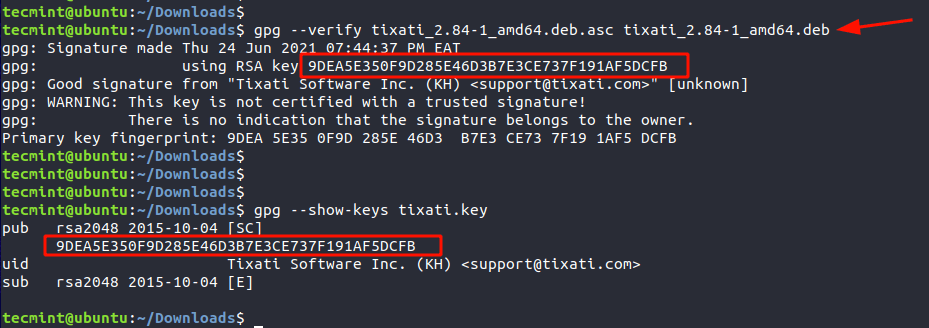
The third line’s output confirms that the Signature is from the software’s author, in this case, Tixati Software Inc. The line above provides the fingerprint which matches the fingerprint of the Public key. This is confirmation of the PGP signature of the software.
We hope that this guide provided insights into how you can go about verifying the PGP of a downloaded software package in Linux.
RPM and GPG: How to verify Linux packages before installing them
Are you sure that your package is safe from corruption or malicious activity? Here’s how signature verification can help.

Great Linux resources
Large and popular RPM repositories are typically replicated around the world. The projects and companies providing the packages utilize content distribution networks (CDNs) and mirror sites to make their packages available to consumers. For many open-source projects, that includes hosting by volunteers. To detect and avoid malicious replacement packages, package owners can sign the package files, and consumers can verify those signatures.
While GPG can sign any file, manually checking package signatures is not scalable for system administrators. The RPM format has an area specifically reserved to hold a signature of the header and payload. The rpm utility uses GPG keys to sign packages and its own collection of imported public keys to verify the packages. YUM and DNF use repository configuration files to provide pointers to the GPG public key locations and assist in importing the keys so that RPM can verify the packages.
For this article, I will use keys and packages from EPEL. The public key is included in an RPM package, which also configures the yum repo . For some projects, the key may also be available directly from a source web site.
The rpm utility has its own key management
Since the rpm utility has its own key management, there is no need to import the GPG public keys to your personal GPG keyring. In fact, you cannot just verify the file with gpg commands because the signature is not of the entire .rpm file. Instead, the signature is only associated with the critical portions of the package.
Run the following command to use rpm to verify a package:
$ rpm -K epel-release-latest-8.noarch.rpm epel-release-latest-8.noarch.rpm: digests SIGNATURES NOT OKIn this case, the «SIGNATURES NOT OK» message appears because the key has not yet been imported for RPM. The default behavior of rpm commands is to verify the signature of packages during any install or verify interactions. If that is not possible, because the package is not signed or the public key is not available, you may need to specify the —nogpgcheck option to skip this step.
If you have access to the GPG public key, you can use the following command to manually import a key:
$ rpm --import RPM-GPG-KEY-EPEL-8 Since the metadata for the key is stored in the RPM database, you can query and delete keys the same as any package.
Use the following command to list the keys:
$ rpm -qa gpg-pubkey* gpg-pubkey-7fac5991-4615767f gpg-pubkey-2f86d6a1-5cf7cefbUse this command to get the information on a key:
$ rpm -qi gpg-pubkey-2f86d6a1-5cf7cefb Name : gpg-pubkey Version : 2f86d6a1 Release : 5cf7cefb Architecture: (none) Install Date: Mon 01 Jun 2020 12:14:38 PM EDT Group : Public Keys Size : 0 License : pubkey Signature : (none) Source RPM : (none) Build Date : Wed 05 Jun 2019 10:17:31 AM EDT Build Host : localhost Relocations : (not relocatable) Packager : Fedora EPEL (8) Summary : gpg(Fedora EPEL (8) ) Description : -----BEGIN PGP PUBLIC KEY BLOCK----- Version: rpm-4.14.2 (NSS-3) . omitted. The following command is used to remove a key:
$ sudo rpm -e gpg-pubkey-2f86d6a1-5cf7cefbMore options for key management are described in the man page included with the rpmkey package.
YUM and DNF can add keys to the RPM database
Other package managers make key management even easier. YUM and DNF use configuration files in /etc/yum.repos.d to specify a URL for the GPG key used to verify packages in that repository. The utilities can then import the key if it is not already available for verification.

In the yum repo configuration file, the line gpgcheck=1 indicates that GPG checking should be done for all packages in this repository. It is a Boolean value that can be changed in the configuration or overridden temporarily on the command line with the —nogpgcheck option.
If the GPG public key has not yet been imported to RPM when a package installation begins, then the yum (or dnf ) utility can initiate an import of the key. The gpgkey=URI line specifies the source of the key to be imported. This source can be any URI, including a local file or a remote web link. The yum or dnf utility will pause and ask for confirmation to import the key after showing the key ID and fingerprint.
warning: /var/cache/dnf/epel-fafd94c310c51e1e/packages/zsh-syntax-highlighting-0.7.1-1.el8.noarch.rpm: Header V3 RSA/SHA256 Signature, key ID 2f86d6a1: NOKEY Extra Packages for Enterprise Linux 8 - x86_64 1.6 MB/s | 1.6 kB 00:00 Importing GPG key 0x2F86D6A1: Userid : "Fedora EPEL (8) " Fingerprint: 94E2 79EB 8D8F 25B2 1810 ADF1 21EA 45AB 2F86 D6A1 From : /etc/pki/rpm-gpg/RPM-GPG-KEY-EPEL-8 Is this ok [y/N]: yThe key is added to RPM, and then the verification and installation of the package continues.
Prepare to sign a package
If you are creating and distributing your own RPM package files, you can sign those packages with the rpmsign utility.
The first step is to create a GPG keypair for signing. Be sure to also export and share the public key. For packages that will be distributed publicly, it is a good idea to use a new keypair and a keyring in a shared location. Additionally, use the —full-gen-key option and then choose to create a signing-only key instead of the default, which creates both a signing and encryption key.
$ gpg --keyring /shared/rpm/.gpg --no-default-keyring --full-gen-key Even if only one person is using the key to sign packages, make a separate keypair to use for signing. Do not use the same key for other daily tasks such as personal email encryption.
Next, we need to install the rpm-sign package and set up an rpmmacros file specifying the key to use. The rpm-sign package includes a man page for rpmsign which describes the process. Note that the package name has a dash that is not a part of the command name.
$ sudo yum install rpm-sign $ man rpmsignRPM commands get their configuration from several rpmmacros files. There is a default file with lots of samples located at /usr/lib/rpm/macros . If multiple people are responsible for signing packages using the same key, place a central configuration file in the /etc/rpm/macros location. Finally, for a specific person signing the packages, the user’s ~/.rpmmacros file can be configured to point to the correct GPG key.
The minimum entry for the rpmmacros file is to specify the name of the key. You can use a name or the key ID. Obtain the key ID with the gpg —list-keys command.
Tip: Run the rpmsign command before setting the gpg_name variable and the message will show the format.
$ rpmsign --addsign my-custom-package.rpm You must set "%_gpg_name" in your macro fileIn addition to the key name, if the keyring is anywhere other than the default user ~/.gnupg directory, use the gpg_path variable to set the location. This value will be the same as used with the —keyring option when the key was created.
There are additional options available if the GPG binary or command syntax requires something beyond the expected defaults.

Sign and publish packages
You are now ready to sign the package or packages. According to the rpmsign man page, the —addsign and —resign commands are interchangeable. Both will replace the signature portion of an RPM package file with current information.
The following command is an example of using the —addsign flag:
$ rpmsign --addsign myprod-2.x86_64.rpm myprod-libs-2.x86_64.rpmOlder versions of rpmbuild included a —sign option that could sign the package during the build process if the GPG keys and rpmmacro files were configured correctly. The —sign option is now deprecated in favor of the separate step of using rpmsign . This approach encourages a build, test, sign, publish workflow.
Finally, make the packages and GPG public key available to clients. One option is to mimic the EPEL project and create an RPM file that includes the GPG public key and one or more yum repo files pointing to the location of the signed packages. For organizations hosting packages on a Red Hat Satellite Server, start by uploading the GPG public key, and then assigning that key to the product or repository that holds the signed packages. All packages in a repository must be signed with the same key. This is a common reason for Satellite administrators to resign packages before uploading.
Now that you know more about managing RPM packages with GPG, you can better understand how to work with rpm , yum , and dnf .
For further reading, check out Securing RPM signing keys and the Administration and Content Management guides in the Red Hat Satellite documentation.
[ Want to learn more about security? Check out the IT security and compliance checklist. ]