- Introduction to History Command in Linux [For Beginners]
- Where are the settings for history command stored in Linux?
- How to use the history command in Linux?
- 1) Use arrow keys to scroll through history of commands
- 2) Default history settings
- 2) Running a command from the history using index
- 3) Delete a command from history
- 4) Delete entire command history
- 5) Searching for commands in the history
- Method 1. Use Grep
- Method 2: Use reverse-i-search
- How to Use the Linux history Command
- How to Use Linux history Command
- Use Date and Timestamps
- View the Size of the History Buffer
- Repeat a Command
- Search a Command by String
- List the Matching Commands
- Change the Executed Command
- Prevent Recording Commands in History
- Delete History
- Update the History File
Introduction to History Command in Linux [For Beginners]
Everything you type in the terminal is stored in the shell history. Learn how to use command history in Linux in this introduction to history command.
Let’s face it, us humans are not great at remembering things. Sometimes being forgetful can be very frustrating and lead to painful consequences.
Unlike us, computers are capable of near-perfect memory. One example is the history command in Linux. This program keeps track of everything that we type into the command line.
It sounds pretty simple, and it is. You’d be surprised how often this tool can come in handy, though!
Let’s walk through some examples that will improve our command-line skills and make us more productive.
Where are the settings for history command stored in Linux?
To understand the history command better, we will look at what settings can be configured by the user.
The typical default for the number of commands logged is 1000 on Ubuntu, but it can vary from system to system. The settings for history are set by your bash profile (Normally ~/.bashrc). There are several history file settings that are editable from this file including the location of the log file.
By default, command history is usually logged to ~/.bash_history.
[email protected]:~$ cat ~/.bash_history sudo apt-get clean #sudo e4defrag / df -h sudo e4defrag / sudo fstrim / sudo -s poweroff lsHow to use the history command in Linux?

Let’s see some examples of using history command in Linux.
1) Use arrow keys to scroll through history of commands
Many of us don’t think of what the command line was like before we knew this trick. If you don’t already know, using your up/down arrow keys lets you quickly scroll through your command history.
This is great for when you make a mistake while entering some long complex command. Just hit the up arrow, and correct it. Done.
2) Default history settings
Let’s start with something simple. We’re just going to enter the command and see what is returned.
This will return a numbered list of your recently entered commands.
[email protected]:~$ history 1 sudo apt-get clean 2 #sudo e4defrag / 3 df -h 4 sudo e4defrag / 5 sudo fstrim / 6 sudo -s 7 poweroff 8 ls 9 historyLooks familiar, right? This is the content from our .bash_history file, plus a new entry for ‘history’.
In fact, new entries will not be reflected in the file until you close the shell.
2) Running a command from the history using index
Did you notice that the commands were numbered when you ran the history command? To re-run a specific command quickly, type ! and then the number.
[email protected]:~$ !8 ls Desktop Downloads fontconfig Pictures Templates Documents examples.desktop Music Public Videos3) Delete a command from history
If you made a mistake, you can erase a specific item with the -d option followed by the line number. Let’s erase line number nine.
[email protected]:~$ history -d 9 [email protected]:~$ history 1 sudo apt-get clean 2 #sudo e4defrag / 3 df -h 4 sudo e4defrag / 5 sudo fstrim / 6 sudo -s 7 poweroff 8 ls4) Delete entire command history
Maybe you want to get rid of more than one line. We can erase the entire history using the -c option.
[email protected]:~$ history -c [email protected]:~$ history 1 history5) Searching for commands in the history
Obviously, my history file is now fairly short since I’ve just cleared it. However, with the potential to have up to 1000 commands, things can get messy quickly. Fortunately, you can use tools to search history to help find that complex command you used earlier.
Method 1. Use Grep
Here’s an updated list of our history.
[email protected]:~$ history 1 history 2 ls 3 ll 4 cd 5 cd .. 6 cd 7 ls 8 ll 9 historyNow, I am going to use the history command piped with the grep command to find entries containing the character l .
[email protected]:~$ history | grep l 2 ls 3 ll 7 ls 8 ll 10 history | grep lMethod 2: Use reverse-i-search
You can also search your commands using the reverse-i-search tool. If you hit Ctrl+r, you will see a new prompt that you can use to search your command history.
You can start typing and it will return results as you add letters. This is one of the must-know terminal shortcuts in Linux.
Both grep and the reverse-i-search can be used to make your life easier.
This was just the very basic history command examples. There are no ends to customizing it as per your preference and requirement. Perhaps we’ll cover some advanced history commands later in the future.
I hope you find this introduction to history command useful. Please provide your feedback in the comment section.
How to Use the Linux history Command
The history command in Linux is a built-in shell tool that displays a list of commands used in the terminal session. history allows users to reuse any listed command without retyping it.
In this tutorial, we will show you how the history command works and different ways to use it.

How to Use Linux history Command
Using the history command without options displays the list of commands used since the start of the terminal session:
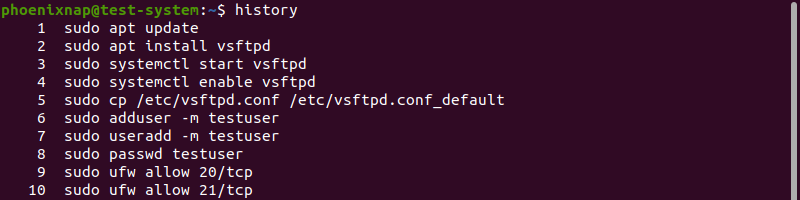
To display the command history list with a limited number of entries, append that number to the history command. For instance, to show only the latest five entries, use:

Once you close the terminal, the Bash shell saves new command history entries in the .bash_history file.
Use Date and Timestamps
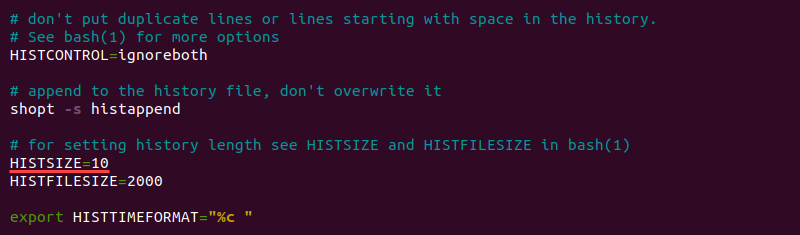
The .bashrc file stores the Bash shell settings. Modifying this file allows you to change the output format of the history command.
Open the .bashrc file using a text editor such as Nano:
To change the output format to include date and timestamps, add the following line to the .bashrc file:
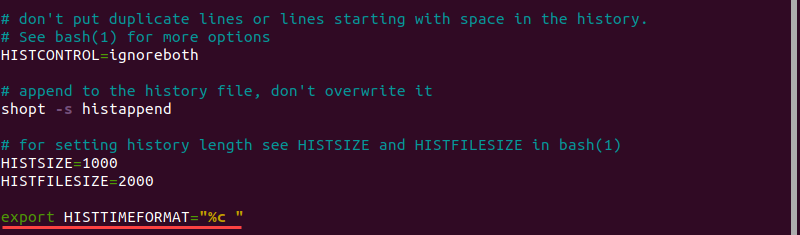
Note: The blank space before the closed quotation marks prevents the timestamp from connecting to the command name, making the history list easier to read.
Using different arguments after HISTTIMEFORMAT allows you to customize the level of detail in the timestamp:
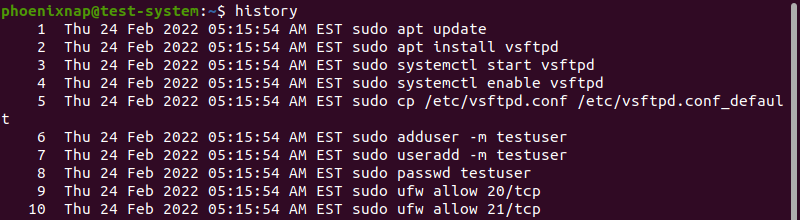
Save the changes to the .bashrc file, relaunch the terminal, and run the history command to confirm the new output format:
View the Size of the History Buffer
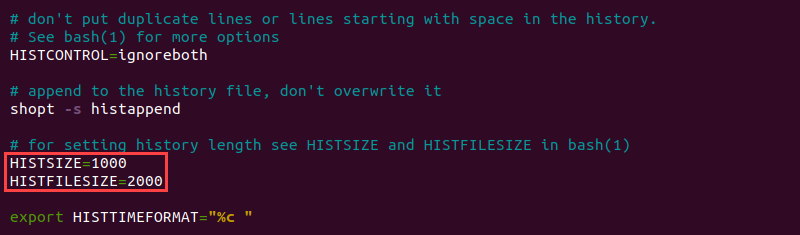
The .bashrc file contains two entries that control the size of the history buffer:
- HISTSIZE : The maximum number of entries for the history list.
- HISTFILESIZE : The maximum number of entries in the .bash_history file.
Editing the HISTSIZE and HISTFILESIZE values changes how the Bash shell displays and saves the command history.
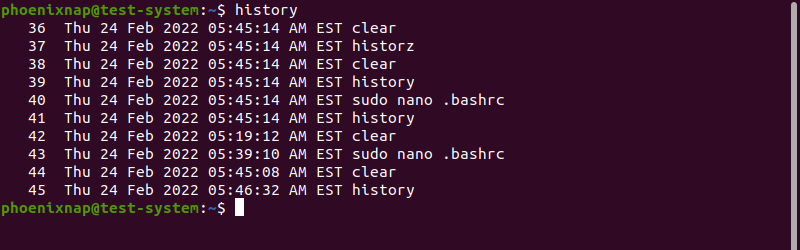
For instance, changing the HISTSIZE value to 10 makes the history command list show a maximum of 10 latest entries.
Saving the changes to the .bashrc file, relaunching the terminal, and running the history command confirms the new output format:
Repeat a Command
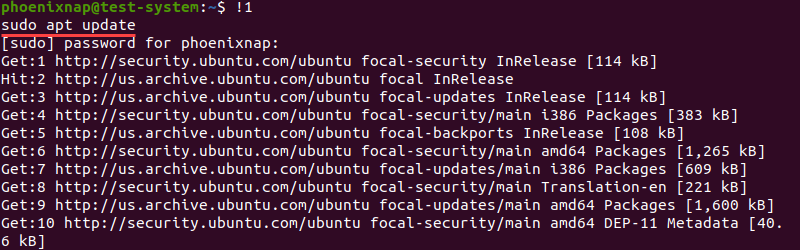
Running the history command allows you to reuse any of the commands on the list. For instance, to run the first command ( sudo apt update ) again, use:
Adding a dash (—) before the command number starts the count from the end of the list. For instance, to reuse the tenth last command ( history 5 ), use:

Use double exclamation points to repeat the last command:

Search a Command by String
Adding a string after the exclamation point runs the latest command that starts with that string. For example, to reuse the latest command that begins with sudo , use:

Using this method can cause problems if the shell runs an unexpected command, especially when searching for a command that starts with sudo . As a precaution, adding the :p argument displays the command without running it, allowing you to review the command and decide if you want to execute it.

To search for a command that contains a string, but may not start with it, add a question mark next to the exclamation point. For instance, to reuse the last command that contains echo :

In the example above, the shell reuses the last command that contains the echo string even though the command starts with sudo .
Check out our article on sudo command to learn how to use the sudo command with examples.
List the Matching Commands
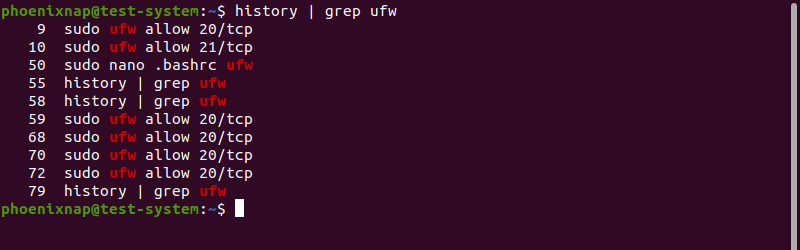
Combining history and grep allows you to display a list of commands that contain a string. For example, to list all commands that contain ufw , use:
Note: Learn more about using the grep command in Linux.
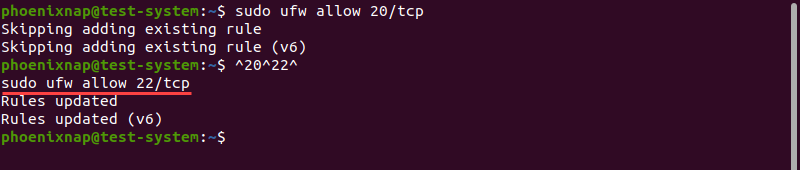
Change the Executed Command
Use the following syntax to change the last executed command:
For instance, the ufw command to enable port 20 shows that the port is already enabled:

Use the syntax above to change the port number from 20 to 22:
Prevent Recording Commands in History
To prevent recording commands in the history list, temporarily disable recording by using:
To re-enable recording, use:
Delete History
Use the -d option with the history command to delete a command from the history list. For instance, delete command number 87 with:
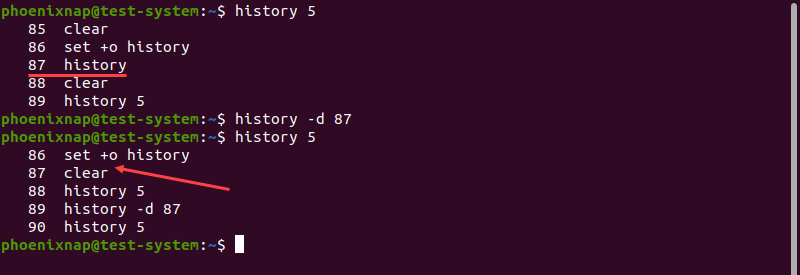
Use the -c option to clear the whole history list:
Update the History File
The Bash shell saves any updates to the command history list when you exit the terminal session. The history command also allows you to save changes while in the terminal session.
Using the -a option lets you append the command history entries from this session to the .bash_history file:
Another method is to use the -w option to save the entire history list to the .bash_history file:
After reading this tutorial, you should be able to use the history command in Linux to view, edit, and delete the command history list and reuse commands from it.
If you are interested in learning more about Linux commands, have a look at our Linux commands cheat sheet.