- What is IPSEC and how it works
- Security Association:
- Authentication:
- Encryption :
- Asymmetric and Symmetric encryptions
- About the author
- David Adams
- How to Implement IPsec in Linux
- IPsec basics:
- ESP protocol (Encapsulating Security Payload):
- IKE protocol (Internet Key Exchange):
- Implementing IPsec in Linux with StrongSwan and ProtonVPN:
- Conclusion:
- About the author
- David Adams
What is IPSEC and how it works
![]()
IPSEC (Internet Protocol Security) are 3 cryptographic protocols useful to encrypt communications through a network, usually used for VPN, but applicable to protect the IP (Internet Protocol) in different cases. IPSEC is part of IPV6 while optional for IPV4. The 3 protocols composing IPSEC are AH (Authentication Header), ESP (Encapsulating Security Payload) and IKE (Internet Key Exchange). While AH and ESP work in different ways, both of them can be combined to provide different functions.
While the protocol AH is an authentication protocol, the ESP protocol provides authentication and encryption too.
Security Association:
The association consists in the keys administration and establishing a secure connection between the devices, this is the first step in a connection and is carried out by the protocol IKE (Internet Key Exchange).
Authentication:
In this case the authentication does not provide encryption because the information is not ciphered, the function of the AH protocol and it’s authentication is to confirm the delivered packet wasn’t intercepted and modified or “broken” during the transference. The AH protocol helps to verify the transferred data integrity and the implicated IP addresses. Using IPSEC with AH won’t protect our information from a Man In the Middle attack but it will let us know about it by detecting differences between the received IP packet’s header and the original one. To do it the AH protocols identifies packets adding a layer with a sequence of numbers.
AH, Authentication Header as its name specifies also verifies the IP header layer, while the ESP doesn’t include the IP header.
Note: IP Header is an IP’s packet layer containing information on the established connection (or going to get connected), such as the source and destination address among more.
Encryption :
In contrast to the protocol AH which only authenticates the integrity of the packets, senders in IP headers, ESP (Encapsulating Security Payload) packet additionally offers encryption which means if an attacker intercepts the packet he won’t be able to see the content because it is ciphered.
Asymmetric and Symmetric encryptions
IPSEC combines both asymmetric and symmetric encryptions to provide security while keeping speed.
Symmetric encryptions have a single key shared between users, while asymmetric encryption is the one we use when authenticating with public and private keys. The asymmetric encryption is safer because it allows us to share a public key with many users while the security relies on the private key, symmetric encryption is less safe because we are forced to share the only key.
Symmetric encryption advantage is the speed, a permanent interaction between two devices permanently authenticating with asymmetric encryption would be slow. IPSEC integrates both of them, first the asymmetric encryption authenticates and establishes a safe connection between the devices using protocols IKE and AH and then it changes to symmetric encryption to keep the connection speed, the SSL protocol also integrates both asymmetric and symmetric encryptions but SSL or TLS belong to higher layer of the IP protocol, that’s why IPSEC can be used for TCP or UDP (you can also use SSL or TLS but is not the norm).
Using IPSEC is an example of the need to add additional support to our kernel; you can implement IPSEC on Linux with strongSwan, on Debian and Ubuntu systems you can type:

An article was also published on VPN services including IPSEC easy to setup on Ubuntu.
I hope you found this article useful to understand IPSEC protocols and how they work. Keep following LinuxHint for more tips and updates on Linux.
About the author
David Adams
David Adams is a System Admin and writer that is focused on open source technologies, security software, and computer systems.
How to Implement IPsec in Linux
![]()
This tutorial explains how to implement the IPsec protocol to shield the internet connection using StongSwan and ProtonVPN.
IPsec basics:
IPsec is a level 3 secure protocol. It provides security for the transportation layer and superior both with IPv4 and IPv6.
The IPSEC works with 2 security protocols and a key management protocol: ESP (Encapsulating Security Payload), AH (Authentication Header), and IKE (Internet Key Exchange).
Protocols ESP and AH grant different security levels and can operate in transport mode and tunnel modes. Tunnel and Transport modes can be applied both with ESP or AH implementation.
While AH and ESP work in different ways, they can be mixed to provide different security features.
Transport mode: The original IP header contains information on sender and destination.
Tunnel mode: A new IP header containing source and destination addresses is implemented. Original IP may differ from the new one.
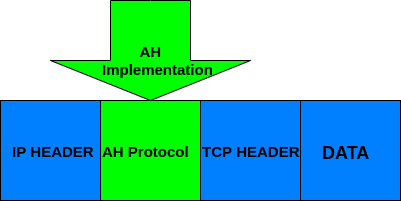
AH, protocol (Authentication Header): The AH protocol guarantees packets point-to-point integrity and authentication for transportation and application layers except for variable data: TOS, TTL, flags, checksum, and offset.
Users of this protocol ensure packets were sent by a genuine sender and were not modified (as would happen in a Man in the Middle attack).
The following figure describes the implementation of the AH protocol in transport mode.
ESP protocol (Encapsulating Security Payload):
The protocol ESP combines different security methods to secure packets integrity, authentication, confidentiality, and connection safety for transportation and application layers. To achieve this, ESP implements authentication and encryption headers.
The following image shows the implementation of the ESP protocol operating in tunnel mode:
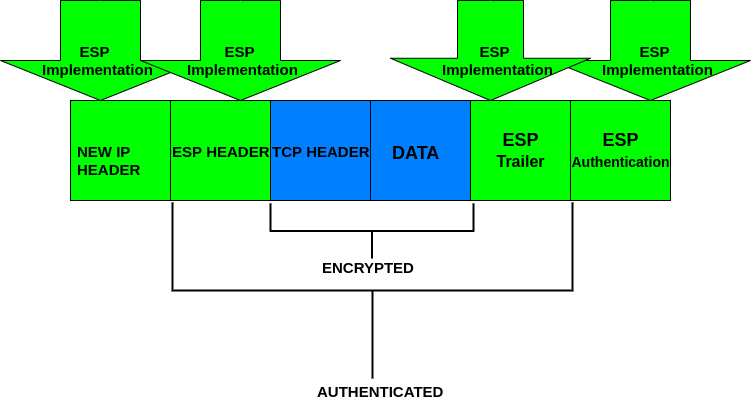
By comparing the previous graphics, you can realize the ESP process covers original headers encrypting them. At the same time, AH adds an authentication header.
IKE protocol (Internet Key Exchange):
The IKE manages the security association with information such as the IPsec endpoint addresses, keys, and certificates, as required.
You can read more on IPsec at What is IPSEC and how it works.
Implementing IPsec in Linux with StrongSwan and ProtonVPN:
This tutorial shows how to implement the IPsec protocol in Tunnel Mode using StrongSwan, an open-source IPsec implementation, and ProtonVPN on Debian. The steps described below are the same for Debian-based distributions like Ubuntu.
To start to install StrongSwan by running the following command (Debian and based distributions)

After Strongswan is installed, add necessary libraries by executing:

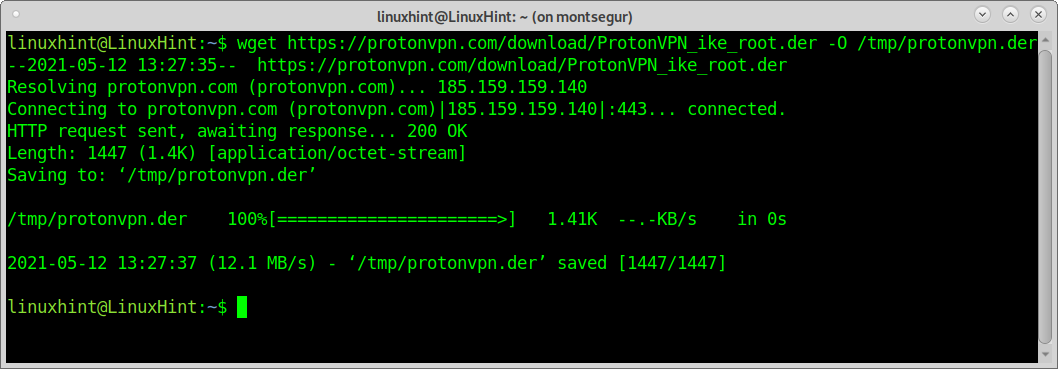
To download ProtonVPN using wget run:
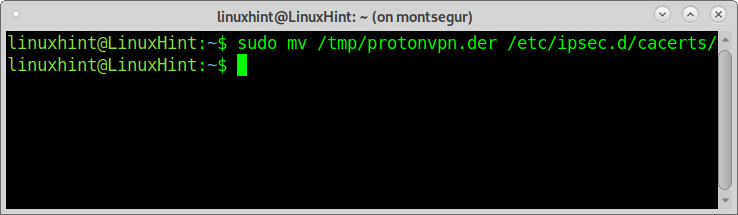
Move certificates to the IPsec directory by running:
Now go to https://protonvpn.com/ and press the GET PROTONVPN NOW green button.

Press the button GET FREE.
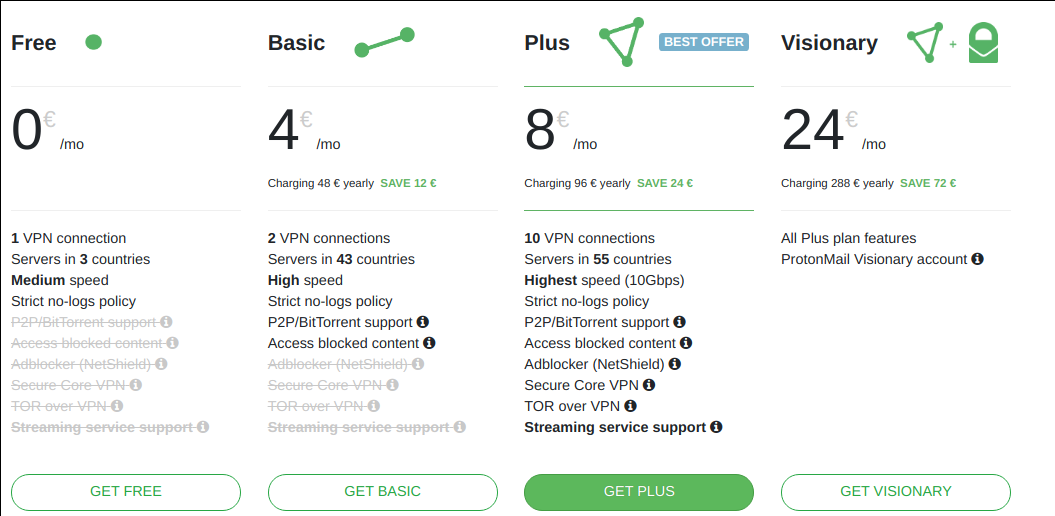
Fill in the registration form and press the green button Create an account.

Verify your email address using the verification code sent by ProtonVPN.
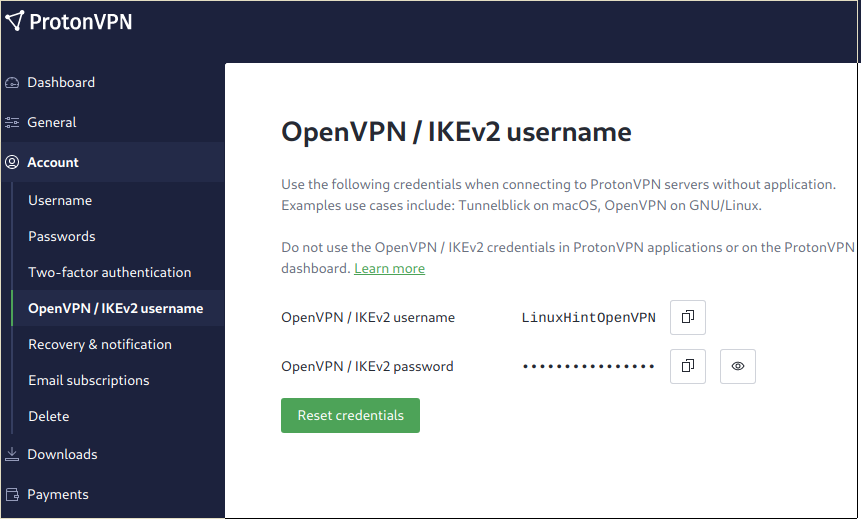
Once in the Dashboard, click on Account>OpenVPN/IKEv2 username. These are the credentials you need to edit the IPsec configuration files.
Edit the file /etc/ipsec.conf by running:

Below Sample VPN connections, add the following:
NOTE: Where LinuxHint is the connection name, an arbitrary field. must be replaced by your username found at the ProtonVPN Dashboard under Account>OpenVPN/IKEv2 username.
The value nl-free-01.protonvpn.com is the chosen server; you can find more servers in the Dashboard under Downloads>ProtonVPN clients.
rightca = / etc / ipsec.d / cacerts / protonvpn.der

Press CTRL+X to save and close.
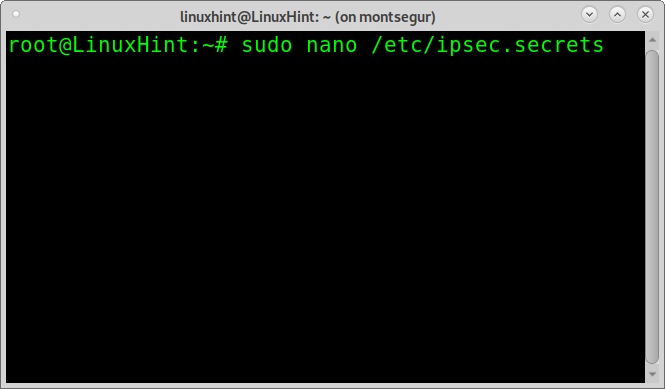
After editing /etc/ipsec.conf you need to edit the file /etc/ipsec.secrets which stores credentials. To edit this file run:
You need to add the username and key using the syntax “USER: EAP KEY” as shown in the following screenshot, in which VgGxpjVrTS1822Q0 is the username and b9hM1U0OvpEoz6yczk0MNXIObC3Jjach the key; you need to replace both of them for your actual credentials found in the Dashboard under Account>OpenVPN/IKEv2 username.
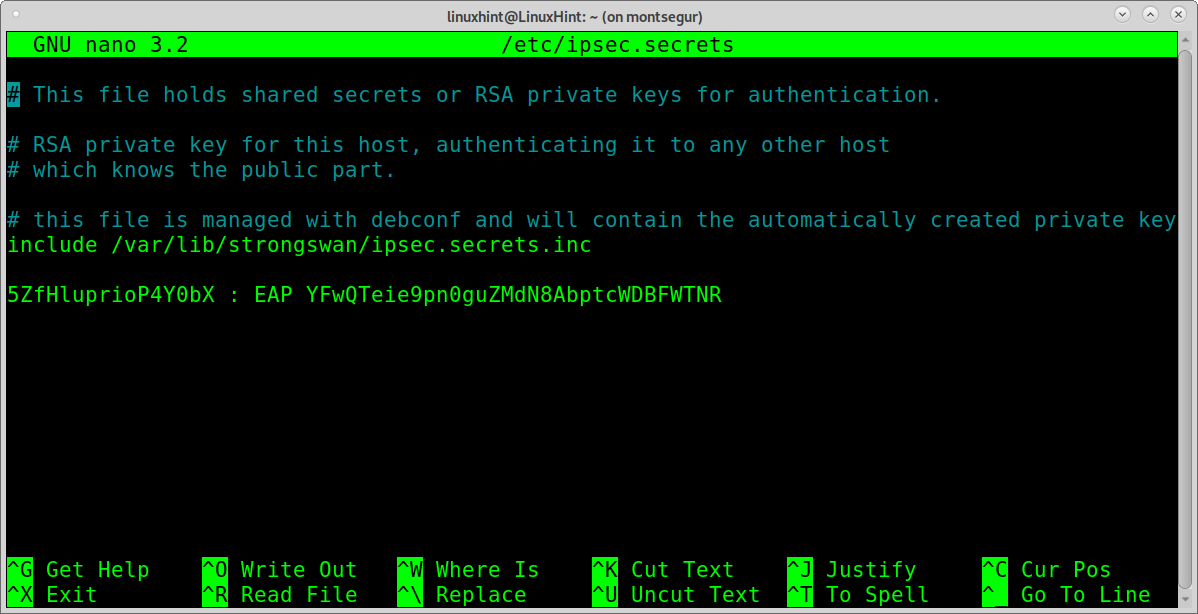
Press CTRL+X to save and close.
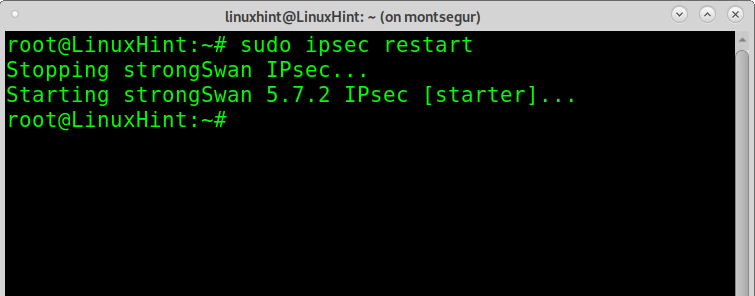
Now it’s time to connect, but before running ProtonVPN, restart the IPsec service by running:
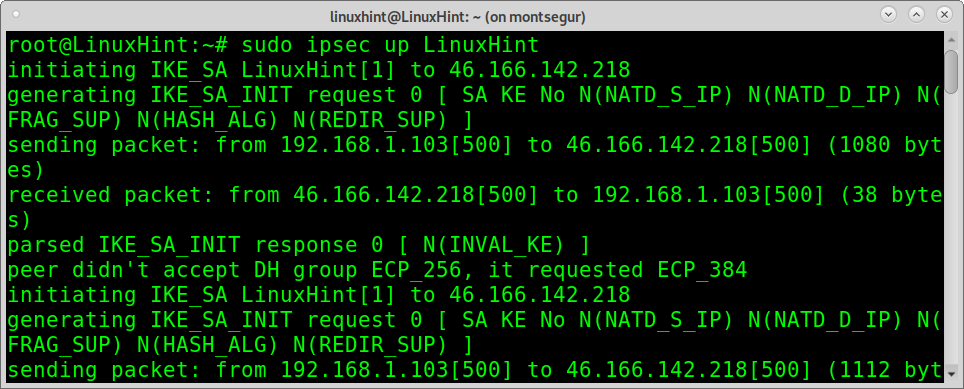
Now you can connect running:
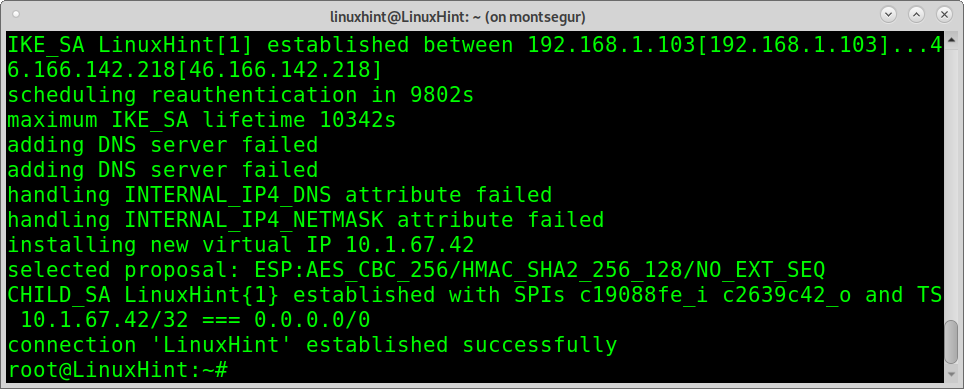
As you can see, the connection was established successfully.
If you want to turn off ProtonVPN, you can run:
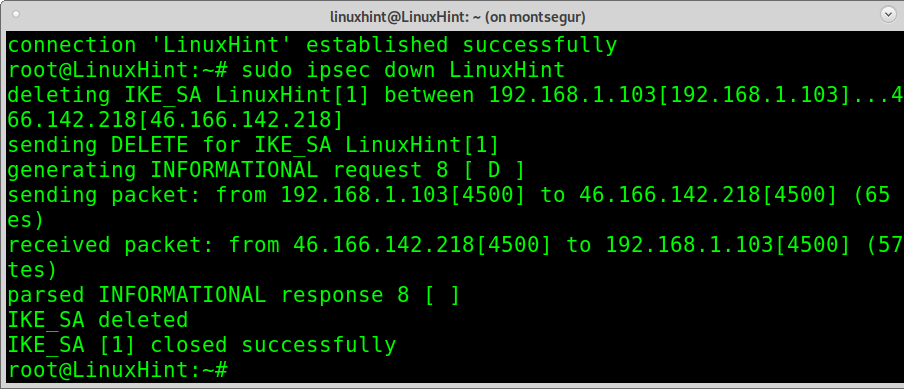
As you can see, IPsec was disabled properly.
Conclusion:
By implementing IPsec, users drastically evolve in security concerns. The example above shows how to deploy IPsec with ESP protocol and IKEv2 in Tunnel Mode. As shown in this tutorial, the implementation is very easy and accessible to all Linux user levels. This tutorial is explained using a free VPN account. Still, the IPsec implementation described above can be improved with premium plans offered by VPN service providers, getting more speed and additional proxy locations. Alternatives to ProtonVPN are NordVPN and ExpressVPN.
Regarding StrongSwan as an open-source IPsec implementation, it was chosen for being a multi-platform alternative; other options available for Linux are LibreSwan and OpenSwan.
I hope you found this tutorial to implement IPsec in Linux useful. Keep following LinuxHint for more Linux tips and tutorials.
About the author
David Adams
David Adams is a System Admin and writer that is focused on open source technologies, security software, and computer systems.